
Introduction
In this article, I will discuss the Cocoa MVC pattern, which is probably the most commonly used pattern in iOS app implementation.
Although there are various software architectures such as clean architecture, I think Cocoa MVC pattern is the best for building applications in Swift iOS Storyboard based app, unless you want to use it on a large scale.
When you read about software architecture in books, you feel understand, but it's often difficult to implement in real applications.
So, this time, I will try to explain it by implementing a very simple application.
Please take a little time to read it as you move through it with your hands.
Get an idea of the Cococa MVC pattern
It's not very efficient to learn Cocoa MVC without knowing anything about it, so you should get a feel for it first.
We'll review it after implementations, so it's fine if you only have a basic understanding of what it is at this point.
The MVC pattern stands for Model-View-Controller Pattern, and as the name implies, it divides the code in your application into three roles: Model, View, and Controller.
Model
The Model is responsible for maintaining and processing data. For example, connecting with network, calculating something, save data to a local storage...etc.
Everything other than View and Controller is included in Model.
You should be careful about that Model is different from Model, which represents a table in the SQL database in the framework, in web frame work like Ruby on Rails.
Also, if the Model changes the data it holds, it will notify the Controller that subscribes to the Model of the change.
View
The View is responsible for drawing the screen.
In order to increase reusability, it is important to design View so that it receives input and draws it as it is, without logic as much as possible.
Controller
The Controller has references to the Model and View and monitors changes to the Model.
The Controller receives the user's input, requests the Model to process it, and updates the drawing of the View when it detects changes to the Model.
These can be summarized as follows
| Name | Role |
|---|---|
| Model | Processing and holding data |
| View | Drawing View |
| Controller | Accept User input and connect View and Model |

A very important point here is that the Controller acts as a bridge between the View and the Model, so that the View and the Model are completely independent of anything else.
By doing so, the View and the Model can be reused in a variety of ways.
On the contrary, Controllers are highly dependent on specific Views and Models, and Cocoa MVC is
design takes reusability of the View and Model to the extreme, at the expense of reusability of the Controller.
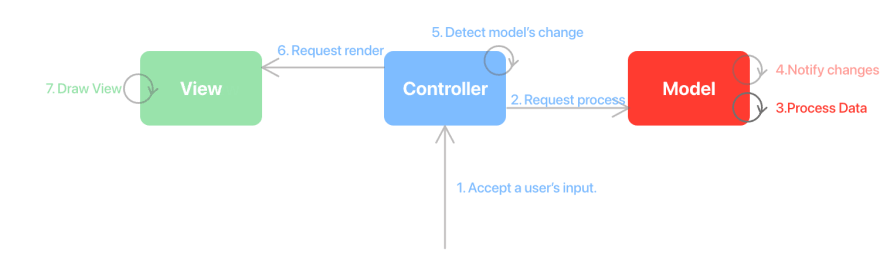
The entire process, from user input to screen drawing, looks like the following

- [Controller] Accept a user's input.
- [Controller] Request Model to process data.
- [Model] Process data.
- [Model] Notify changes to a subscribing Controller.
- [Controller] Detect changes in the Model.
- [Controller] Request View to draw.
- [View] Draw on the screen.
Now that we've gotten the general idea up to this point, let's move on to the next section, where we'll actually start implementing the code!
Write Cocoa MVC by yourself
This app is a simple counter application that allows you to increase or decrease numbers with the + and - buttons.

Let's implement this project using the Cocoa MVC pattern.
You can create a project from scratch, or you can clone it and start with EN/Starter, as I've prepared the initial and final state of the project.
https://github.com/kazuooooo/CocoaMVCFromScratch
Implementing the CounterModel.
First, let's start by implementing the MVC M, the Model, the CounterModel.
As mentioned earlier, the role of the Model is to hold and process data.
So required them
- Keeps how much the number is now (data retention)
- Increase/decrease the number (data processing)
- Notify the controller monitoring the Model of the change
import Foundation
class CounterModel {
    static let notificationName = " CounterModelChanged"

    let notificationCenter = NotificationCenter()
    // Retain how much the number is now (data retention)
    internal var count: Int = 0 {
        didSet {
            // Notify the controller monitoring the Model of the change
            notificationCenter.post(
                name: .init(rawValue: CounterModel. notificationName),
                object: count
            )
        }
    }
    // Retain how much the number is now (data retention)
    func countUp(){ count += 1 }
    func countDown(){ count -= 1 }
}
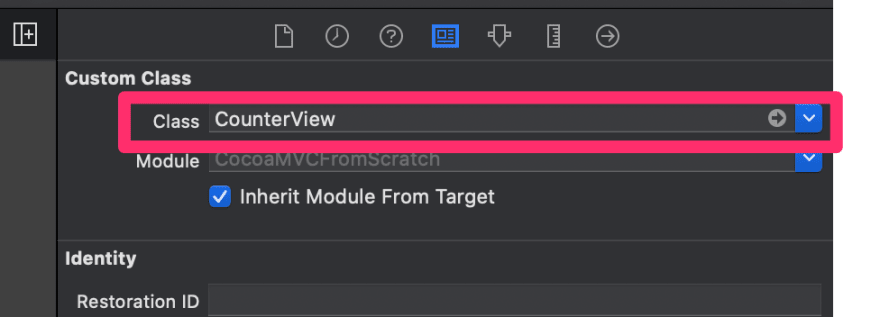
Implementing CounterView.
The next step is to implement CounterView, the V in MVC.
The role of the View is to render.
CountView is responsible for rendering the countLabel through the method render.
import Foundation
import UIKit

class CounterView: UIView {

    @IBOutlet weak var countLabel: UILabel!
    public func render(count: Int){
        countLabel.text = String(count)
    }
}
Then create the actual screen in StoryBoard. (If you're using a starter, it will be created in advance.)

Don't forget the Count Label is connected with an IBOutlet and the CounterView is set to the Custom View.

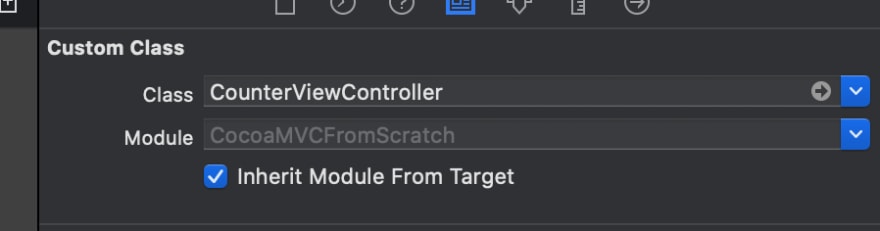
Implementing CounterViewController.
Finally, we implement the MVC C, CounterViewController.
In order to bridge the gap between the View and the Model,
Controller needs
- Monitor Model changes
- Accepts user input and asks the Model to process it
- Request the View to draw when the Model is changed.
The source is below
import UIKit
class CounterViewController: UIViewController {
// Keep the View and Model references.
@IBOutlet var counterView: CounterView!
private(set) lazy var counterModel = CounterModel()
override func viewDidLoad() {
super.viewDidLoad()
// Monitor changes to the Model
counterModel.notificationCenter.addObserver (
self,
selector: #selector(self.handleCountChange (_:))),
name: .init(NSNotification.Name(rawValue: CounterModel.notificationName))), object: nil
)
}
// Detects changes.
@objc func handleCountChange(_ notification: Notification) {
if let count = notification.object as? Int {
// requesting the drawing process to the View
counterView.render(count: count)
}
}
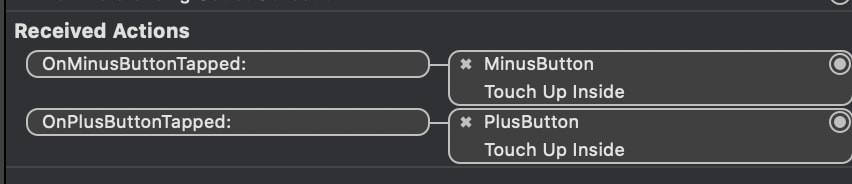
// Accepting input.
@IBAction func OnPlusButtonTapped(_ sender: Any ) {
// Ask the Model to do something.
counterModel.countUp()
}
@IBAction func OnMinusButtonTapped(_ sender: Any) {
counterModel.countDown()
}
}
Here, too, don't forget to connect button to an IBAction and set up the ViewController class.
Now, the implementation is complete.
Try a Run and see if the +/- buttons work properly!
Review the pattern again
The implementation is complete, but it still doesn't feel like it's just a sutra, and it doesn't feel right somehow, does it?
Finally, let's go over the big picture again, looking at the code.
This will give you a better understanding.
Look at dependencies.
First, let's go over the code again, looking at this diagram we saw earlier about dependencies !
If you look at the code in the Controller, you can see that the CounterViewController has CounterView and CounterModel references and monitor changes of CounterModel.
class CounterViewController: UIViewController {
    // Has CounterView and CounterModel references
    @IBOutlet var counterView: CounterView!
    private(set) lazy var counterModel = CounterModel()

    override func viewDidLoad() {
        super.viewDidLoad()
        // Monitor model's change
        counterModel.notificationCenter.addObserver(
            self,
            selector: #selector(self.handleCountChange(_:)),
            name: .init(NSNotification.Name(rawValue: CounterModel.notificationName)), object: nil
        )
    }
...
}
Also, be sure to check the code to see that the View and Model are completely independent of the Controller, which only accepts processing and can be reused.
Check process flow
Finally, we will check the whole process flow by looking at the diagram and code, using the + button as an example.
1. Accept a user’s input.

At first, Counter View Controller accepts input via OnPlusButtonTapped method.
// Accept input
@IBAction func OnPlusButtonTapped(_ sender: Any) {
    ...
}
2. Request Model to process data
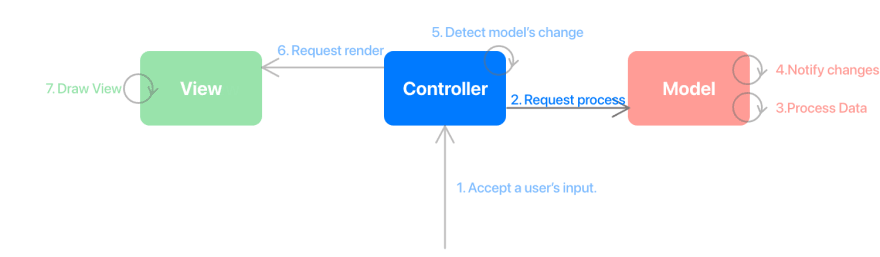
Secondly, the Controller requests Counter Model to count up
// Accept input
@IBAction func OnPlusButtonTapped(_ sender: Any) {
    // Request model to process
    counterModel.countUp()
}
3. Process data
Thirdly, CounterModel count up the count.
class CounterModel {
    ...
    // Count up count
    func countUp(){ count += 1 }
    ...
}
4. Notify changes

After process data, Model notify changes to subscribers.
class CounterModel {
    ...
    internal var count: Int = 0 {
        didSet {
            // Notify changes to subscribers
            notificationCenter.post(
                name: .init(rawValue: CounterModel.notificationName),
                object: count
            )
        }
    }
    ...
}
5. Detect model's change

Controller detects model's change via the notification observer.
class CounterViewController: UIViewController {
    override func viewDidLoad() {
        ...
        // Monitor model's change
        counterModel.notificationCenter.addObserver(
            self,
            selector: #selector(self.handleCountChange(_:)),
            name: .init(NSNotification.Name(rawValue: CounterModel.notificationName)), object: nil
        )
    }
    ...

    // Method fires when model is changed
    @objc func handleCountChange(_ notification: Notification) {
        ...
    }
}
6. Request View to render

Controller requests View to render updated count.
@objc func handleCountChange(_ notification: Notification) {
    if let _ = notification.object as? Int {
        // Request View to render
        counterView.render(count: counterModel.count)
    }
}
7. Render View
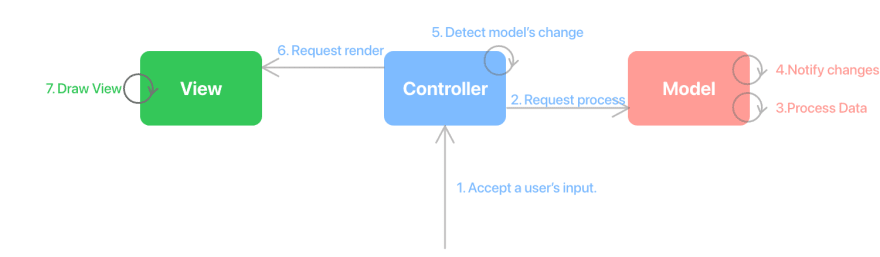
CounterView reflects counter changes to the view.
class CounterView: UIView {
    // Render view
    public func render(count: Int){
        countLabel.text = String(count)
    }
}
At the end
How was that?
Software architecture patterns are hard to understand at first, but once you understand them, they are a very powerful weapon for engineers.
If you don't fully understand something, I recommend you to try to understand it by writing example by yourself.


Top comments (0)