A comprehensive Todo app with APIs and E2E tests with GitHub Actions enabled.
See the repository: https://github.com/burakkantarci/playwright-todo-app
This project is a boilerplate to demonstrate the usage of modern stacks together. The project stack:
- Next.js Todo App
- Playwright
- GitHub Actions
- Foresight
Motivation
The tech stack market is expanding more and more and seeing everything in action is the easiest way to see the benefits. I decided to create a combination of Next.js, Playwright, GitHub Actions, and Foresight to create an E2E stack for a web application.
All the external tooling is free; therefore, you don’t need to pay anything to try this stack.
What will be the result
- A Serverless Next.js based TODO application with Upstash, the simplest way of production ready web application.
- Playwright testing framework so works in any browser and any platform. It is lightweight and easy to adopt. We will implement JUnit so that we can generate a test report.
- GitHub Actions for creating a CI pipeline. Don’t need to explain GitHub, but GitHub Actions has 2000mins of free CI execution; therefore, it makes it easy to automate all your software workflows.
- Foresight provides full visibility and deep insights into the health and performance of your tests and CI/CD pipelines. We won’t just build the stack; we are going to make sure it works fast and efficiently.
Setting up the Todo App
I followed the Upstash's guide as a starting point because it is very minimalistic and easy to understand.
Setting up a Next.js app is mandatory. If you have Next.js configured in the app, you can also use them. I recommend using the example above if you don’t have any prior setup.
Setting up Playwright
To initialize the Playwright, run the following command and select the configurations to get started:
npm init playwright@latest
- Choose JavaScript (you can also choose Typescript)
- Name of your Tests folder
- Add a GitHub Actions workflow to easily run tests on CI.
After the installation has finished, you will have the base Playwright setup. Your test will be under the tests folder, and you can see the simple GitHub Action playwright.yml under the .github folder.
One thing to mention about the Playwright is they provide example test specs so that you can have an understanding of how it is working.
Writing our E2E test
We will add an E2E test which will add a Todo item and Complete it. This spec will help us ensure our APIs and user interactions are working.
Create add.spec.js file under the tests folder and paste the following code:
// @ts-check
const { test, expect } = require('@playwright/test');

const TODO_ITEMS = [
 'buy some cheese',
 'feed the cat',
 'book a doctors appointment'
];

test.beforeEach(async ({ page }) => {
 await page.goto('https://localhost:3000/');
});

test('add a todo item', async ({ page }) => {

 var todoName = TODO_ITEMS[0];

 // Text input
 await page.locator('#todo').fill(todoName);
 await page.locator('#todo').press('Enter');

 // Make sure the list only has one todo item.
 await expect(page.locator('.Home_card__2SdtB')).toHaveText([
   todoName
 ]);

});

test('complete a todo item', async ({ page }) => {

 var todoName = TODO_ITEMS[0];

 // Text input
 await page.click(`.Home_card__2SdtB:has-text("buy some cheese")`);
  // Make sure the list only has one todo item.
 await expect(page.locator('.Home_card__2SdtB')).not.toHaveText([todoName]);
});
Go to playwright.config.js and disable the parallelization. This will help our tests work one by one.
/* Run tests in files in parallel */
 fullyParallel: false,
Also, you can test your web application in different browsers at the same time with Playwright. For our configuration, I used only chromium, but you can enable or disable it on the Playwright config file.
Go to package.json and add a test script
"test": "playwright test"
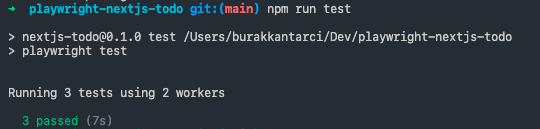
With that command, you will be able to run the test by the npm run test command in your terminal and in the GitHub Actions.
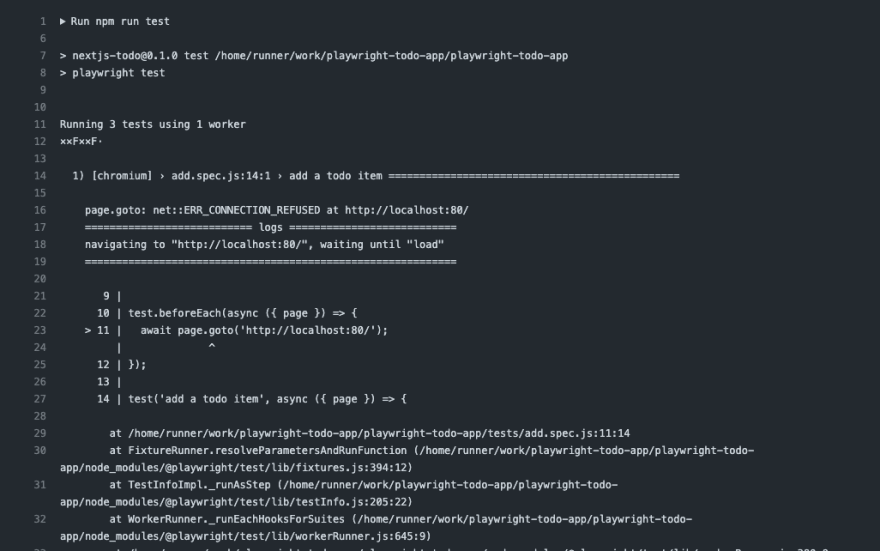
Run your test and check whether your configuration works correctly so far. You should see an output similar to this:
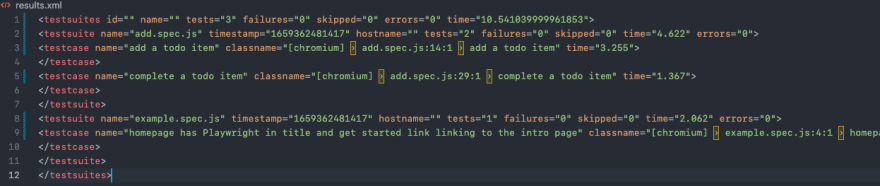
Creating a JUnit Report
JUnit reporter produces a JUnit-style XML report. We will use test reporting to monitor the health of our test. This is essential for ensuring our Todo web app achieves an acceptable quality level.
Go to playwright.config.js and add the following:
reporter: [ ['junit', { outputFile: 'results.xml' }] ],
When you run your tests, it will generate a file named results.xml and it will look like this:
When there is an error, the reporter will include the error logs and messages as well.
Configuring our GitHub Actions
Push your code to a GitHub repository. The initial playwright.yml action will help us to run our test in every commit and pull request. Your configuration should look like this:
name: Playwright Tests
on:
 push:
   branches: [ main, master ]
 pull_request:
   branches: [ main, master ]
jobs:
 test:
   timeout-minutes: 60
   runs-on: ubuntu-latest
   steps:
   - uses: actions/checkout@v2
   - uses: actions/setup-node@v2
     with:
       node-version: '14.x'
   - name: Install dependencies
     run: npm ci
   - name: Install Playwright Browsers
     run: npx playwright install --with-deps
   - name: Run Playwright tests
     run: npx playwright test
   - uses: actions/upload-artifact@v2
     if: always()
     with:
       name: playwright-report
       path: playwright-report/
       retention-days: 30
You will be able to see your workflow runs as below if your Action works.
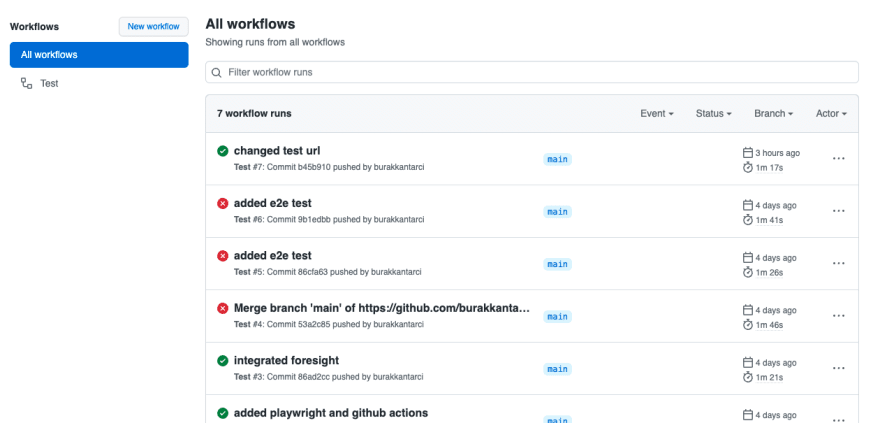
GitHub Action works flawlessly to automate the works you have done manually. You don’t need to run npm run test by yourself; GitHub Actions does it automatically when you commit a new code. However, GitHub Actions is not offering enough information about your tests and their performance. When they fail, you need to understand by finding them in a log pile in the workflow run details.
We will use Foresight to monitor our Tests. Disclaimer, I’m working for Foresight. It is free for all open-source projects. It requires a very simple configuration to start.
Configuring Foresight
You can use this guide for setting up your Foresight configuration. What you need to do is set up an account, install Foresight’s GitHub app and watch the repository that you’ve initiated for this tutorial.
After watching this repository, you need to update your YAML file. You can remove the last step and add Foresight’s test kit.
name: Playwright Tests
on:
 push:
   branches: [ main, master ]
 pull_request:
   branches: [ main, master ]
jobs:
 test:
   timeout-minutes: 60
   runs-on: ubuntu-latest
   steps:
   - uses: actions/checkout@v2
   - uses: actions/setup-node@v2
     with:
       node-version: '14.x'
   - name: Install dependencies
     run: npm ci
   - name: Install Playwright Browsers
     run: npx playwright install --with-deps
   - name: Run Playwright tests
     run: npx playwright test
   - name: Foresight test kit
     if: success() || failure()
     uses: runforesight/foresight-test-kit-action@v1
        with:
       api_key: ${{ secrets.FRS_PROD_API_KEY }}
       test_format: JUNIT
       test_framework: JEST
       test_path: ./results.xml
As you can see, we entered the format, framework, and path fields by the configuration we’ve created above.
This action will automatically send your test report to Foresight, and Foresight will analyze your tests in the most user-friendly way. After updating your YAML, your workflow will run automatically, and you will be able to see your workflow run results as below in Foresight:
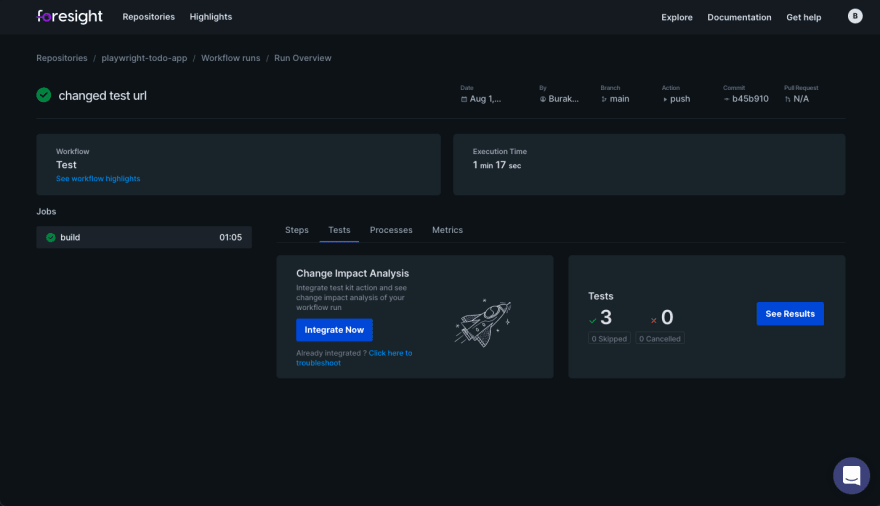
It looks very similar to GitHub Actions; however, it is powered up with unique features such as Change Impact Analysis and Highlights. Unlike GitHub’s messy log view, you can easily access your test results with a clean design. You can learn more about Foresight here.
Summary
I hope this project will be a toolkit for you to start an E2E-covered Next.js project. It is a basic application with APIs, Playwright tests, and GitHub Actions.
With the help of Foresight and Upstash, you can power up your processes and get benefited from the latest tech stacks.


Latest comments (1)
I'm confused, I had a look at the repo and it doesn't even look like the playwright tests are testing anything with NextJS