
What is Hertz
Hertz [həːts] is a high-performance, high-usability, extensible HTTP framework for Go. It’s designed to simplify building microservices for developers.
Why Hertz
One of the highlights of Hertz is its extremely high performance. You can get an intuition for this by looking at the following statistics on echo requests.
- Horizontal Comparison
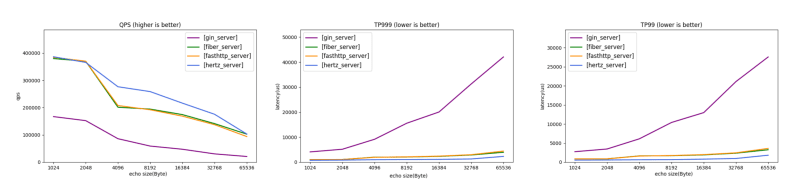
- Time Delay Comparison
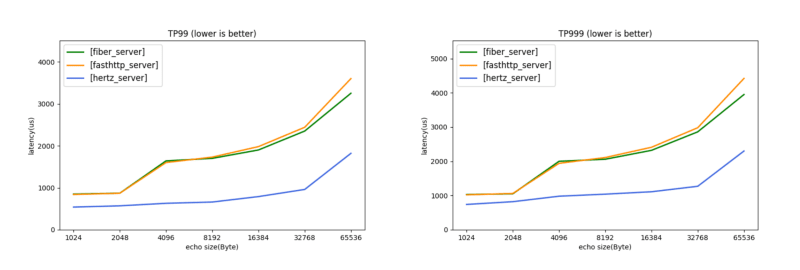
You may refer to hertz-benchmark for more information.
Another point is its ease of use, which we'll discuss next.
How to use Hertz
Here we'll write a simple demo to help you get familiar with the basic features of the Hertz framework.
Installation
Before using Hertz, you need to set up your Golang development environment and make sure it's >= v1.15.
Once we have our Golang environment ready, let's create the project folder of our little demo which usually under $GOPATH/src.
mkdir userdemo
cd userdemo
I highly recommend using the Hertz command-line tool hz that comes with Hertz.
hz is a tool provided by the Hertz framework for generating code. Currently, hz can generate scaffolding for Hertz projects based on thrift and protobuf’s IDL.
The code generated by hz, part of it is generated by the underlying compiler (usually about the struct defined in IDL), and the other part is the user-defined routing, method and other information in IDL. The user can run the code directly.
In terms of execution flow, when hz uses thrift IDL to generate code, hz calls thriftgo to generate the go struct code and executes itself as a plugin to thriftgo (named thrift-gen-hertz) to generate the rest of the code. This is also true when used with the protobuf IDL.
You may refer to hz toolkit usage for more information.
Install hz with the following command:
go install github.com/cloudwego/hertz/cmd/hz@latest
hz -v
If the hz version information is displayed correctly as followed, then we have finished the installation and are ready with the base Hertz development environment.
hz version v0.2.0
Define IDL
In this section we will write the IDL file for our project userdemo.
hz can use thrift IDL or protobuf IDL to generate code and needs to install the appropriate compiler thriftgo or protoc. We will use thrift as an example.
Let's create an idl folder and define user.thrift.
// idl/user.thrift
namespace go user

struct BaseResp {
    1: i64 StatusCode;
    2: string StatusMsg;
    3: string data;
}

struct RegisterRequest {
    1: string Username;
    2: string Password;
}

struct RegisterResponse {
    1: BaseResp BaseResp;
}

struct LoginRequest {
    1: string Username;
    2: string Password;
}

struct LoginResponse {
    1: BaseResp BaseResp;
}

struct InfoRequest {
    1: string Username;
}

struct InfoResponse {
    1: BaseResp BaseResp;
}

service UserService {
    RegisterResponse Register(1: RegisterRequest req) (api.post="/user/register");
    LoginResponse Login(1: LoginRequest req) (api.post="/user/login");
    InfoResponse Info(1: InfoRequest req) (api.get="/user/:username");
}
As you can see, we have defined the HTTP request method and route in the form of api annotations. hz will generate the route handler for us based on these annotations.
You may refer to Supported api annotations to get all the api annotations supported by hz.
Generate Code
Execute the following command under the project directory. hz will generate the scaffolding code for us.
hz new -idl idl/user.thrift
go mod tidy
If you modify user.thrift that has generated code, you can also update the generated code by using the following command.
hz update -idl idl/user.thrift
Here is the structure of the code generated by user.thrift and what it means. A simple understanding of it will help you get started.
.
├── biz                               // business layer, which stores business logic related processes
│   ├── handler                       // store handler file
│   │   ├── user                      // user corresponds to the namespace defined in thrift IDL; for protobuf IDL, it corresponds to the last level of go_package
│   │   │   |
│   │   │   |__  user_service.go      // the handler file, the user will implement the method defined by the IDL service in this file, it will search for the existing handler in the current file when "update" command, and append a new handler to the end
│   │   └── ping.go                   // ping handler carried by default, used to generate code for quick debugging, no other special meaning
│   ├── model                         // IDL content-related generation code
│   │   └── user                      // hello/example corresponds to the namespace defined in thrift IDL; for protobuf IDL, it corresponds to the last level of go_package
│   │         └── user.go             // the product of thriftgo, It contains go code generated from the contents of hello.thrift definition. And it will be regenerated when use "update" command.
│   └── router                        // generated code related to the definition of routes in IDL
│       ├── user                      // hello/example corresponds to the namespace defined in thrift IDL; for protobuf IDL, it corresponds to the last level of go_package
│       │     ├── hello.go            // the route registration code generated for the routes defined in hello.thrift by hz; this file will be regenerated each time the relevant IDL is updated
│       │     └── middleware.go       // default middleware function, hz adds a middleware for each generated route group by default; when updating, it will look for the existing middleware in the current file and append new middleware at the end
│       └── register.go               // call and register the routing definition in each IDL file; when a new IDL is added, the call of its routing registration will be automatically inserted during the update; do not edit
├── go.mod                            // go.mod file, if not specified on the command line, defaults to a relative path to GOPATH as the module name
├── idl                               // user defined IDL, location can be arbitrary
│   └── user.thrift
├── main.go                           // program entry
├── router.go                         // user defined routing methods other than IDL
└── router_gen.go                     // the route registration code generated by hz, for calling user-defined routes and routes generated by hz
Use Middleware
Middleware can help with things like jwt authentication before or after the request has officially entered the handler function for processing.
Hertz supports a number of commonly used middleware. In this case, we'll use Session middleware to help us count how many times a user has logged in.
As mentioned earlier, hz helped us set up a lot of scaffolding codes. We only need to focus on the business code. To use Session middleware you just need to simply modify the _loginMw method of middleware.go as below.
func _loginMw() []app.HandlerFunc {
   // your code...
   return []app.HandlerFunc{
      // use session middleware
      sessions.Sessions("usersession", cookie.NewStore([]byte("secret"))),
   }
}
Well, isn't that easy?
Improve Handler
Next we'll write the handler, specifically the user_service.go file.
Hertz takes care of the simple validation of the data binding and some chores. All we need to do is handle the request.
Note: There are no database operations involved in this demo, all the data will be simply stored in a map structure with no persistent storage.
- Let's look at the
Registermethod first.
We can receive data from a Post request form via the PostForm method. You can also use the String or JSON method to return string or JSON data to the client and specify the response status code.
// Register .
// @router /user/register/ [POST]
func Register(ctx context.Context, c *app.RequestContext) {
   var err error
   var req user.RegisterRequest
   err = c.BindAndValidate(&req)
   if err != nil {
      c.String(400, err.Error())
      return
   }

   resp := new(user.RegisterResponse)

   username := c.PostForm("username")
   password := c.PostForm("password")

   if dal.CheckUsername(username) {
      dal.CreateUser(username, password)

      resp.BaseResp = &user.BaseResp{
         StatusCode: 0,
         StatusMsg:  "register success",
      }

      c.JSON(200, resp.BaseResp)
      return
   }

   resp.BaseResp = &user.BaseResp{
      StatusCode: 1,
      StatusMsg:  "register failed",
   }
   c.JSON(400, resp.BaseResp)
}
- Next, let's go though the
Loginmethod.
Most of these methods are similar to the Register, except that we use Session middleware which is just set up to count how many times different users have logged in.
We can use the sessions.Default method to retrieve the session object and use the Get and Set methods to edit the values stored in the session.
// Login .
// @router /user/login/ [POST]
func Login(ctx context.Context, c *app.RequestContext) {
   var err error
   var req user.LoginRequest
   err = c.BindAndValidate(&req)
   if err != nil {
      c.String(400, err.Error())
      return
   }

   resp := new(user.LoginResponse)

   username := c.PostForm("username")
   password := c.PostForm("password")

   if dal.CheckPassword(username, password) {
      session := sessions.Default(c)
      var count int
      cnt := session.Get(username)
      if cnt == nil {
         count = 0
         dal.SetFrequency(username, count)
      } else {
         count = cnt.(int)
         count++
         dal.SetFrequency(username, count)
      }
      session.Set(username, count)
      _ = session.Save()

      resp.BaseResp = &user.BaseResp{
         StatusCode: 0,
         StatusMsg:  "login success",
      }
      c.JSON(200, resp.BaseResp)
      return
   }

   resp.BaseResp = &user.BaseResp{
      StatusCode: 1,
      StatusMsg:  "login failed",
   }
   c.JSON(400, resp.BaseResp)
}
- Finally, let's take a look at the
Infomethod.
In this method, we're using Hertz's Parametric Route feature, which allows us to specify a route using a named parameter such as :name, so that the parameter matches a path segment.
We set the :username parameter route and use the Param method to get the value in the request path.
For example, if your request path is /user/foobar, then username will be foobar.
// Info .
// @router /user/:username [GET]
func Info(ctx context.Context, c *app.RequestContext) {
   var err error
   var req user.InfoRequest
   err = c.BindAndValidate(&req)
   if err != nil {
      c.String(400, err.Error())
      return
   }

   resp := new(user.InfoResponse)

   username := c.Param("username")

   frequency := dal.GetFrequency(username)

   resp.BaseResp = &user.BaseResp{
      StatusCode: 0,
      StatusMsg:  "info success",
      Data:       strconv.Itoa(frequency),
   }

   c.JSON(200, resp)
}
Run userdemo
Execute the following commands under the project folder:
go build
./userdemo
Hertz listens on local port 8888 by default. You can test this simply by running the following command:
curl 127.0.0.1:8888/ping
If you receive the following response, congratulations on running this demo successfully!
{"message":"pong"}
Other Feature
If you look at the router/user/user.go generated by hz, you'll see that Hertz automatically uses Route Group feature, which helps you sort and organize complex routes.
When we use server.Default in main.go, Hertz also registers the recover middleware for us by default, which handles panic gracefully.
Now that we've covered some of the main Hertz methods and how to use them, I hope this will help you get started with Hertz quickly.
Summary
This demo only covers a very small part of Hertz features. You can check out the cloudwego/hertz for more information. I'm sure the documentation has answers to all your questions.
The code of this demo is here. It's just a simple example. There are many imperfections, but I would be happy if this could help you.


Top comments (0)