A couple of years ago I went down the rabbit hole of custom mechanical keyboards and I had no idea I was about to uncover a mountain of ideas, concepts, layouts and boards that I never considered!
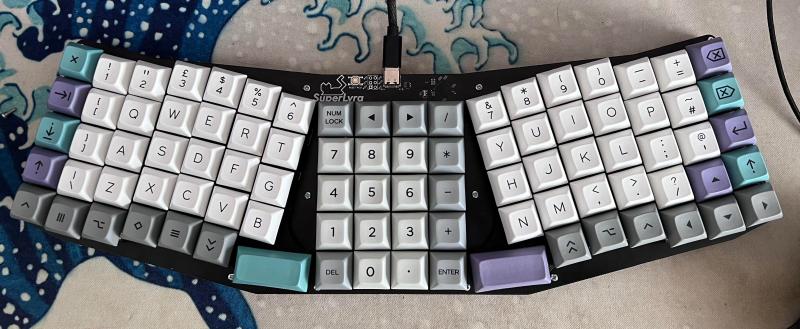
It started with gaming. I was looking for a smaller keyboard to give me more mousing room after getting back into PC gaming and found myself in awe of the crazy keyboards I was coming across like this beast!
After ALOT of research, my focus shifted from gaming to programming and my everyday use of the interface to my world. The first board I got was a Niu Mini I really liked the feel of this board and was excited to try something new where the layout dictated that I wouldn't have to move my fingers more than the length of one key away to produce any keystroke I desired. How is that achieved? With layers! You can think of these as extra shift keys that allow you to move any keystroke or even macros to your desired location.

This seemed long-winded at first, having to learn a whole new layout but seeing as I plan to use my digits to earn money for the foreseeable future I thought I better start looking after them!
Learning to type.... again
At this point, I could type at a modest 40-60 words per minute but I knew that I wasn't typing correctly. My fingers would press keys on the far side of the keyboard and it felt like my hands were floating around causing lots of incorrect key presses. I had built up some pretty shocking muscle memory over the years.
First on the agenda was to learn how to type correctly. I used sites to try and learn the 'correct' way to type, Typeracer was the first I found. Although this was good for training speed it wasn't teaching me how to do things correctly. This is where Typing Club came in. It teaches you what fingers should go where and builds you up slowly by issuing challenges that only use a certain set of keys to slowly retrain your muscle memory.
Typing Club allows you to do so much before you hit a paywall. I did buy the full version but the free version is more than suitable to get you going and you can use other sites once you hit the wall.
I found these sites very useful but found my fingers still moving across to the wrong side every now and again, Damn muscle memory! It was getting better but I would hit keys like y, b and n with my left hand. The solution to rid my fingers of this curse was to use a split board so I had no choice in the matter other than furiously hitting my desk with my index finger.

Split boards
I had read quite a bit about split boards after seeing a video about the Kenesis advantage 2 but didn't fancy a rubber dome style board after feeling the feedback that mechanical keys had to offer.
The first split board was a let's split.
This worked great for retraining my muscle memory and the benefits of split boards started to become more apparent to me. It's a great feeling leaning back in your chair, arms shoulder-width apart, not only is it far comfier than keeping your hands centre stage constantly but it really gives you that feeling of being a Hackerman :D

Less is more!
Over my iterations of keyboards, I had realised that I didn't need as many keys as I thought, in fact, a lot less which led me to the mini version of the CRKBD/Corne style board.
This had the right amount of keys that I was looking for and for extra ergonomic points has keys that are staggered vertically to closer match the shape of your hand!
It foregoes the end rows that normally have your modifiers buttons and tab when compared to the Let's Split. This helped my typing by removing the 'distractions' for my fingers, in the same way, removing the number row had when getting the Let's Split.
The reduction in keys has meant more layer gymnastics and layout changes to accommodate the smaller number of keys, that was until I found out about home row modifiers. These changed the game for me, if you aren't familiar with home row mods I implore you to read this article as it doesn't get any better:
They allow you to bind the hold function of any key to act as a modifier. I cannot tell you how liberating this felt after building up all this knowledge about how my fingers should live on the home row and it felt great! Not only can you bind modifiers but also layer shifts to ANY button! There are lots of other features software like QMK, ZMK and KMonad provide but this for me is by far the most useful.
Software and controllers
As mentioned I've tried a few boards and it's the microcontroller that will dictate what software you can and can't use with your new board. The most common is QMK which is the OG of the mechanical keyboard world as most microcontrollers will support it. With my latest board, I wanted to go wireless which either requires a fair bit of modding/overhead to get going with your standard Arduino micro so I opted for the NiceNano! This board supports Bluetooth as a first-party feature so was perfect for what I wanted to achieve.
Up until this point I had only used QMK but Nice!nano doesn't support it which led me to ZMK. It is very similar but like the Nice!nano it supports wireless keyboards out of the box, perfect!

I mentioned Kmonad earlier, this software lets you remap any keyboard that's attached as an OS level. I use this on my laptop to replicate the layout of my mechanical board the best I can. I'm not going to go into Kmonad here but it does mention it in the home row mods article mentioned earlier. Here's a peek at my config
My layout
Layouts are very personal to each user but looking at what other people have done is always a good starting point. I remembered an article that I had read a while back that really started me off on this journey of creating my own shift keys/layers so I used that as a starting point.
And boyyy how it's changed over the years. We are always looking for an endgame but I feel accepting your ever-changing fate is part and parcel of wandering down this road. I will say that for the last 6 months to a year the layout hasn't changed that much but you will always find things to improve the ergonomics of your layout, at the time of writing this I have updated my layout just a few days previous!
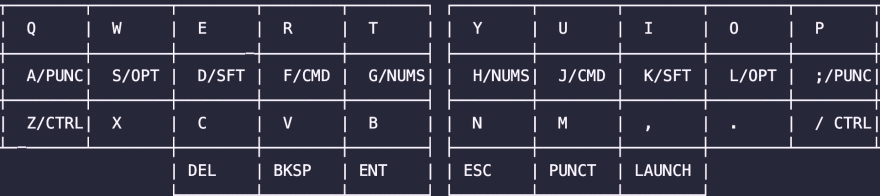
Here are my layers:
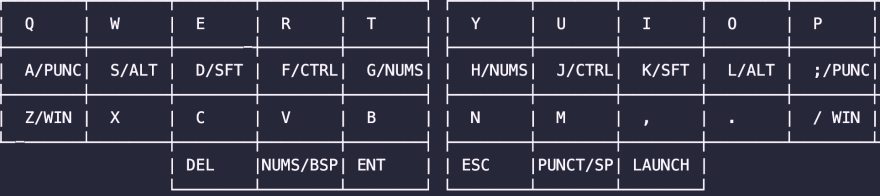
Mac(base)
Windows
 Windows(base)
Punctuation
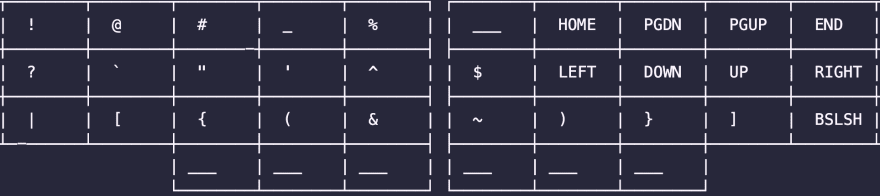
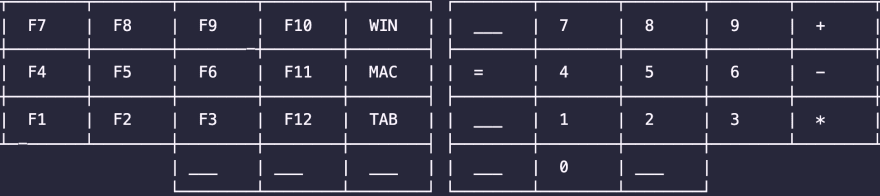
Numbers
For the full config check it out here
This is my most 'sane' layout so far with the latest edition being placing the Punctuation buttons under my pinkies and moving either the Windows or Control keys to the Z and / keys depending on the OS I'm using. This lessens the dependency on my thumbs (which I'm not 100% on yet) to switch layers as much as I was starting to feel like it was breaking my flow when programming too much. The same goes for the Numbers keys although I had moved them some time ago. You will notice I still have these layer swaps on my thumbs but the plan is to remove them once I'm a bit more used to it or if it doesn't work rollback!
I originally had the Numbers and Punctuation layers split across even more layers but with the intro to home row modifiers, I was able to condense four extra layers to two. Doesn't seem that bad right?
Having home row mods means having to utilise the correct modifier with the opposite hand to where your desired key lives. This at first was jarring as I did a lot of one hand combos but I'm falling in love with Vim more and more each day and working like this means keeping both hands firmly on the board which is one of my goals.
I know I should swap to I3 or another tiling window manager to get there fully but I've found my setup intuitive enough.... for now.
Wrapping it up

Now, if you have read all of this and think the intention was so to become a faster typer, this was never the goal. I would argue that my typing speed is now a little higher than it was before but the goal of this journey has always been ergonomics. My hands move exponentially less than they did before and it feels a great deal comfier and I feel better knowing I'm looking after my work tools better XD
To take that to the next level I'm considering learning a new layout like Colemak or Workman but one step at a time... and I don't have the time at the moment to take a typing holiday to readjust but I know I'm going there at some point. I may even learn Stenography, the method used in courtrooms and on live subtitles to type at speeds of up to 240 words per minute!?! Here's a great talk by the creator of the Plover software that vastly reduces the barrier to entry.
I hope you have enjoyed my journey and if the mood strikes please leave a comment! For example: 'Hey Julian, nice article but your layout is trash and here's why!' I don't put myself out there nearly enough and really appreciate any and all feedback!


Oldest comments (2)
Nice article. I think changing the layout from the default qwerty is a nice upgrade. I does not take that long to learn a new layout.
I am a fan of mechanical keyboards with blank key caps.
Hi, thanks for your feedback! I'm considering switching to somthing else just not sure what yet!
I also like blank keycaps, when I got the Niu Mini I got a set to force myself not to look at the keys and they have come with me on every board I've used since!