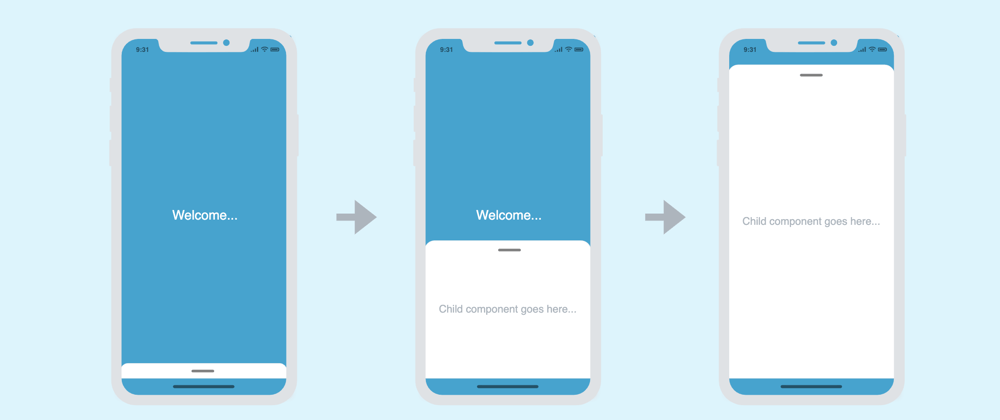
Ever wondered (or struggling with) how to create a bottom drawer, a popular feature in apps such as Airbnb? This post is here to help you! The drawer can be used for navigation between screens. It is also a handy element to display information as an overlay over maps or other screens.
In this post, we will use React Native's PanResponder to handle the swipe gestures.
The drawer states
Firstly, we will create an enum of the various stages/states of the drawer. In this example, there are three - closed, peek (open about 1/3 of screen height) and open.
const { height } = Dimensions.get('window');
export enum DrawerState {
  Open = height - 230,
  Peek = 230,
  Closed = 0,
}
Creating the BottomDrawer component
The Animated View
The next step is to create a BottomDrawer component and add an Animated.View element as show below. The Animated.View is the ReactNative component that we will transform into the bottom drawer. In this example, I would like the view when closed to be still visible hence, setting the bottom to -height + 30. Feel free to play around with the styling!
const BottomDrawer: React.FunctionComponent<any> = () => {

  const { height } = Dimensions.get('window');

  return (
    <Animated.View
      style={[
        {
          width: '100%',
          height: height,
          backgroundColor: '#fff',
          borderRadius: 25,
          position: 'absolute',
          bottom: -height + 30,
        },
      ]}
    </Animated.View>
  );
};

export default BottomDrawer;
The horizontal line
Create the styling for the horizontal line. This was implemented using styled-components but of course, it could also be done using styleSheets.
export const HorizontalLine = styled(View)`
  margin: 25px 0px 15px 0px;
  height: 1px;
  width: 100%;
  background-color: #D3D3D3
`;
Import the HorizontalLine as a child of the Animated.View.
Handling gestures
We proceed by extending the BottomDrawer by adding the PanHandlers to handle the gestures. Most of the logic will be focused on the 'Y' axis/coordinate, as swiping up and down are vertical gestures. The BottomDrawer is a function component, therefore it uses the useRef hook to link the the animated values and pan handler. Why this hook? Read more about it on the react website.
The PanHandlers
const BottomDrawer: React.FunctionComponent<any> = () => {
  const { height } = Dimensions.get('window');
  /* Declare initial value of y. In this case, we want it to be closed when the component is closed */
  const y = React.useRef(new Animated.Value(DrawerState.Closed)).current;
  /* Declare another variable to keep track of the state. We need a separate variable for this because y will also change whilst the user is in the process of moving the drawer up or down */
  const state = React.useRef(new Animated.Value(DrawerState.Closed)).current;
  const margin = 0.05 * height;
  const movementValue = (moveY: number) => height - moveY;

  /* This event is triggered when the animated view is moving. We want the user to be able to drag/swipe up or down and the drawer should move simultaneously. */
  const onPanResponderMove = (
    _: GestureResponderEvent,
    { moveY }: PanResponderGestureState,
  ) => {
    const val = movementValue(moveY);
    animateMove(y, val);
  };

/* Here is where we snap the drawer to the desired state - open, peek or closed */
  const onPanResponderRelease = (
    _: GestureResponderEvent,
    { moveY }: PanResponderGestureState,
  ) => {
    const valueToMove = movementValue(moveY);
    const nextState = getNextState(state._value, valueToMove, margin);
    state.setValue(nextState);
    animateMove(y, nextState);
  };

/* This determines if the responder should do something. In this scenario, it is set to true when the distance moved by Y is greater than or equal to 10, or lesser than or equal to -10. */
  const onMoveShouldSetPanResponder = (
    _: GestureResponderEvent,
    { dy }: PanResponderGestureState,
  ) => Math.abs(dy) >= 10;

/* Here we're creating a panResponder object and assigning th event handlers to it. */
  const panResponder = useRef(
    PanResponder.create({
      onMoveShouldSetPanResponder,
      onStartShouldSetPanResponderCapture: onMoveShouldSetPanResponder,
      onPanResponderMove,
      onPanResponderRelease,
    }),
  ).current;

  return (
    <Animated.View
      style={[
        {
          width: '100%',
          height: height,
          backgroundColor: '#fff',
          borderRadius: 25,
          position: 'absolute',
          bottom: -height + 30,
          /* Refers to y variable which changes as the user performs a gesture */
          transform: [{ translateY: y }],
        },
      ]}
      /* Refers to the PanResponder created above */
      {...panResponder.panHandlers}>
      <HorizontalLine />
    </Animated.View>
  );
};

export default BottomDrawer;
The helpers
We will implement the logic that handles what the next state will be : getNextState and another function that will handle the animation of the y coordinate : animateMove.
export const animateMove = (
  y: Animated.Value,
  toValue: number | Animated.Value,
  callback?: any,
) => {
  Animated.spring(y, {
    toValue: -toValue,
    tension: 20,
    useNativeDriver: true,
  }).start((finished) => {
/* Optional: But the purpose is to call this after the the animation has finished. Eg. Fire an event that will be listened to by the parent component */
    finished && callback && callback();
  });
};

export const getNextState = (
  currentState: DrawerState,
  val: number,
  margin: number,
): DrawerState => {
  switch (currentState) {
    case DrawerState.Peek:
      return val >= currentState + margin
        ? DrawerState.Open
        : val <= DrawerState.Peek - margin
        ? DrawerState.Closed
        : DrawerState.Peek;
    case DrawerState.Open:
      return val >= currentState
        ? DrawerState.Open
        : val <= DrawerState.Peek
        ? DrawerState.Closed
        : DrawerState.Peek;
    case DrawerState.Closed:
      return val >= currentState + margin
        ? val <= DrawerState.Peek + margin
          ? DrawerState.Peek
          : DrawerState.Open
        : DrawerState.Closed;
    default:
      return currentState;
  }
};
Bonus: Add children and onDrawerStateChanged event
We will extend the properties to emit an event when the state has changed and support the addition of children to the component from its parent component. The final implementation looks like this:
interface BottomDrawerProps {
  children?: React.ReactNode;
  onDrawerStateChange: (nextState: DrawerState) => void;
}

const BottomDrawer: React.FunctionComponent<BottomDrawerProps> = ({
  children,
  onDrawerStateChange,
}) => {
  const { height } = Dimensions.get('window');
  const y = React.useRef(new Animated.Value(DrawerState.Closed)).current;
  const state = React.useRef(new Animated.Value(DrawerState.Closed)).current;
  const margin = 0.05 * height;
  const movementValue = (moveY: number) => height - moveY;

  const onPanResponderMove = (
    _: GestureResponderEvent,
    { moveY }: PanResponderGestureState,
  ) => {
    const val = movementValue(moveY);
    animateMove(y, val);
  };

  const onPanResponderRelease = (
    _: GestureResponderEvent,
    { moveY }: PanResponderGestureState,
  ) => {
    const valueToMove = movementValue(moveY);
    const nextState = getNextState(state._value, valueToMove, margin);
    state.setValue(nextState);
    animateMove(y, nextState, onDrawerStateChange(nextState));
  };
  const onMoveShouldSetPanResponder = (
    _: GestureResponderEvent,
    { dy }: PanResponderGestureState,
  ) => Math.abs(dy) >= 10;

  const panResponder = useRef(
    PanResponder.create({
      onMoveShouldSetPanResponder,
      onStartShouldSetPanResponderCapture: onMoveShouldSetPanResponder,
      onPanResponderMove,
      onPanResponderRelease,
    }),
  ).current;

  return (
    <Animated.View
      style={[
        {
          width: '100%',
          height: height,
          backgroundColor: '#fff',
          borderRadius: 25,
          position: 'absolute',
          bottom: -height + 30,
          transform: [{ translateY: y }],
        },
      ]}
      {...panResponder.panHandlers}>
      <HorizontalLine />
      {children}
    </Animated.View>
  );
};

export default BottomDrawer;
The BottomDrawer can now be added to another component.
<ParentComponent>
  <BottomDrawer onDrawerStateChange={doSomething}>
    <SomeChild/>
  </BottomDrawer>
</ParentComponent>


Top comments (4)
Very helpful, as this is my first foray into the Animation black magic. However, I am more in favor of the workflow demoed in the document, especially the use of
setOffset()andflattenOffset()to control the drawer animation while it is being dragged.Good explanation, but as @fanchenbao commented the approach using setOffset() and flattenOffset() is much better and lass complicated. It would be good to link a snack code in your post.
My snack implementing a bottomDrawer: snack.expo.dev/@cybercris/panrespo...
Making it work in the App I'm making, my frustration was the animation when dragging. After a lot of head scratching, I found the solution to make the animation without it lagging. Inside animateMove function, set useNativeDriver to false.
Ace! This is great, thank you 🙏