
🥅Goal
The goal here was to follow the basics of what I had learned and follow instructions from an "app developer" to take and turn a Node.js app into a container image. I want to gain experience building the layers of an image so that I can make edits to layers in the future if need be.
💯Success Criteria
Success in this case will be a Node.js application that I am able to deploy by running a single docker container run command.
🧑🏫Instructions
I have no knowledge of Node.js, so some of it is explicitly given to me. The instructions are as follows:
- you should use the
nodeofficial image, with the alpine 6.x branch- This app listens on port 3000, but the container should listen on port 80 of the Docker host, so it will respond to http://localhost:80 on your computer
- Then it should use the alpine package manager to install tini:
apk add --no-cache tini.- Then it should create directory /usr/src/app for app files with
mkdir -p /usr/src/appor with WORKDIR- Node.js uses a "package manager", so it needs to copy in package.json file.
- Then it needs to run 'npm install' to install dependencies from that file.
- To keep it clean and small, run
npm cache clean --forceafter the above, in the same RUN command.- Then it needs to copy in all files from current directory into the image.
- Then it needs to start the container with the command
/sbin/tini -- node ./bin/www. Use CMD to do this.
A hefty bit of instructions but also very helpful.
🧑🍳Prerequisites
📍Docker Engine + CLI installed
📍Node.js files

⏰Time to Start
Step 1: FROM & EXPOSE
FROM node:6-alpine
FROM initializes a new build stage and sets the base image. This command will always be used. In this case, we're grabbing the alpine version of Node.js v6. Alpine builds are typically very small.
EXPOSE 3000
EXPOSE exposes the container's ports to allow access outside the container. This is needed to access the app with our web browser, since the container needs to communicate with our computer's network.
Step 2: Install tini & WORKDIR
RUN apk add --no-cache tini
tini is used for containerized apps and is actually requested by the app developer here, so no need to really understand it beyond that. To do this, we use the RUN instruction, which is used to execute a BASH command.
WORKDIR /usr/src/app
WORKDIR is a Docker instruction used to set the current working directory. It will also create the directory if it hasn't been created.
Step 3: Copy package.json & Install Node-related Items
COPY package.json ./
We need to copy the package.json file into the layer so that Docker has access to it. The COPY instruction lets us do this. We will copy the file to our working directory, ./
RUN npm install && npm cache clean --force
We also need to setup npm, which is a Node-related item requested by the dev. We will use RUN to let Docker know we want to run a BASH command.
Step 4: Copy Files to Directory & Start Container
COPY . .
We need to copy all the files to the container so that the application can work correctly. To copy all the files within your working directory, we can use . .
`CMD ["/sbin/tini", "--", "node", "./bin/www"]
Lastly, we need to start the app within the container. These are the commands given to use by the application developer to actually start the Node app.
Step 5: Build the Image
docker build --tag app-1 .
Now that we have our Dockerfile, let's actually build it! docker build -t tells Docker we're building from a Dockerfile, app-1 is the name I'm giving it, and . tells docker that the Dockerfile is located within the current working directory.

Step 6: Run the Image
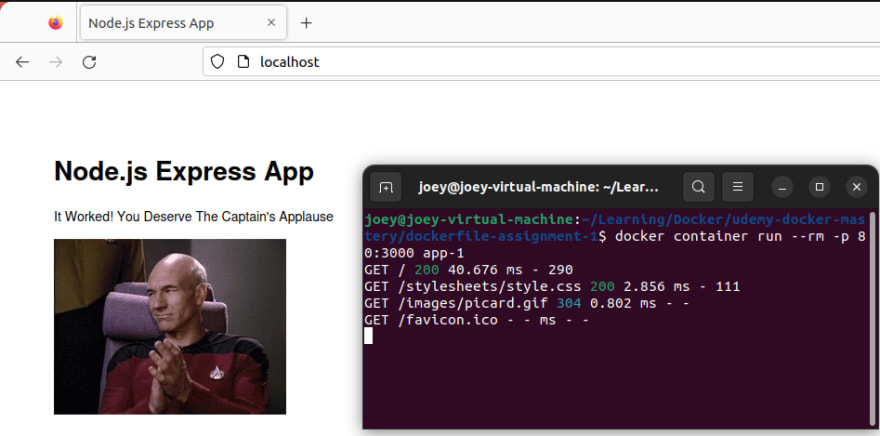
docker container run -p 80:3000 app-1
docker container run tells Docker we're starting a container image. -p 80:3000 lets Docker open up port 80 on the host and listen in on port 3000 and app-1 tells Docker the image we want to run is named app-1.
When all is said and done, this is our Dockerfile.
FROM node:6-alpine

EXPOSE 3000

RUN apk add --no-cache tini

WORKDIR /usr/src/app

COPY package.json ./

RUN npm install && npm cache clean --force

COPY . .

CMD ["/sbin/tini", "--", "node",  "./bin/www"]
🔥Results
I learned how to manipulate the layers of a Dockerfile using Docker instructions like FROM, RUN, EXPOSE, COPY, and CMD. I also buffed up my terminal navigate skills and am getting a lot more comfortable working with the command line.


Latest comments (4)
Very well written, great for beginners out there
Thanks a bunch! I'm writing these mainly for myself to document my journey but I'm happy to hear that others think it's well written :D
Nice, informative article. I suggest including the package-lock file and using "npm ci" instead of "npm install".
The difference
npm ci (also known as Clean Install) is meant to be used in automated environments — such as test platforms, continuous integration, and deployment — or, any situation where you want to make sure you're doing a clean install of your dependencies.
It installs dependencies directly from package-lock.json and uses package.json only to validate that there are no mismatched versions. If any dependencies are missing or have incompatible versions, it will throw an error.
Use npm install to add new dependencies, and to update dependencies on a project. Usually, you would use it during development after pulling changes that update the list of dependencies but it may be a good idea to use npm ci in this case.
Use npm ci if you need a deterministic, repeatable build. For example during continuous integration, automated jobs, etc. and when installing dependencies for the first time, instead of npm install.
Remove dev dependencies
but we can do the same with npm ci
Thanks, I'll definitely keep this in mind next time I come across a Node project.