This article shows how to set up and get started with CCSM (Consul Connect service mesh) or more recently called just Consul Service Mesh.
This article will cover how to install and configure services to use CCSM. An example application Dgraph, a distributed graph database, will be used as this demonstrates a real world application.
📔 NOTE: This was tested on following below
and may not work if versions are significantly
different.

* Kubernetes API v1.22
* gcloud 402.0.0
* gsutil 5.13
* kubectl v1.22
* kustomize v4.5.4
* helm v3.8.2
* helmfile v0.144.0
* Docker 20.10.17
* Dgraph v21.03.2
* Consul 1.13.2
About Consul
Consul is a popular tool for service discovery and a key-value store that was released in April-2014.
Service discovery is important for clusters members or microservices as it provides “automatic detection of devices and services offered by these devices on a computer network (ref)”. This allows “applications and microservices locate different components on a network (ref)”.
The key-value store is a network database to store hash maps (also called associative arrays or dictionaries). This allows services create and retrieve configuration.
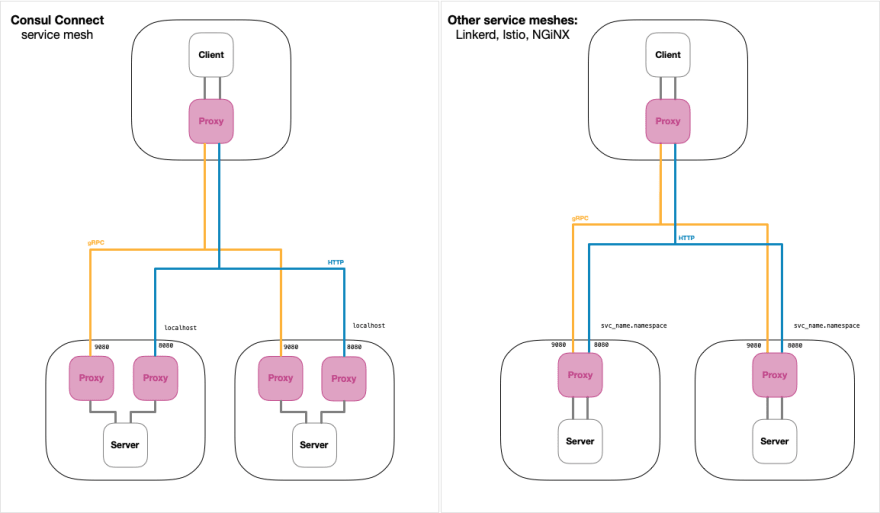
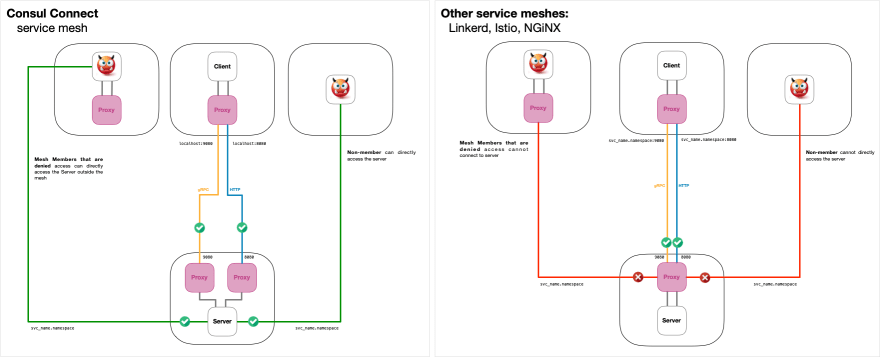
Building upon this, Hashicorp developed consul-template, which is essentially cloud native change configuration, and Consul Connect, now called Consul Service Mesh, which can automatically inject side-car proxy containers into your network, so that services can communicate securely.
About Service Mesh
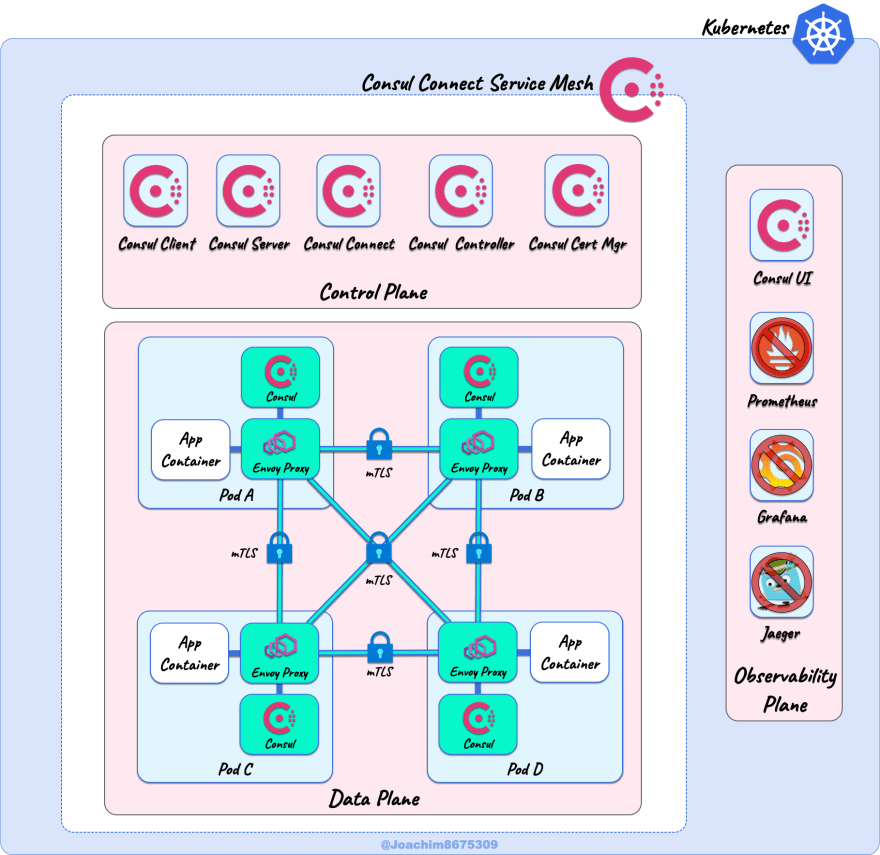
A service mesh uses automation to secure internal network traffic between member nodes. It does this by inserting reverse-proxy sidecar containers to every pod that is apart of the service mesh.
With a network of side-car proxies installed, the traffic can be further secured using strict mTLS, where not only the client must authenticate the validity of the server, but the server must authenticate the validity of the client. This is on top of the encryption of traffic between all the members of the mesh.
A service mesh is divided into three planes (illustration below): control plane to manage the overall service mesh, a data plane that consists of the members within the mesh that are secured with a proxy, and observability plane to monitor traffic from within the mesh.
📔 NOTE: Observability is not supported for Consul Service
Mesh with services that use multiple-ports.
Consul Connect leverages off of Consul to manage the connectivity through use of service discovery, health checks, and a service catalog. Envoy is the default proxy that is injected into each of the pods to create the service mesh. This proxy can be swapped for another proxy component, such as HAProxy or NGINX.
Requirements
These are the requirements to use this solution.
Accounts
No commercial licenses are needed for either Consul and Dgraph. All of the tools are accessible from the public Internet. For creating resources on Google Cloud, you will need to create an account.
- Google Cloud account with ownership of a project where you can deploy resources (where billing account was linked to the project)
Knowledge
You should be familiar or have exposure to the following concepts to get more thorough understanding of this tutorial:
- virtual hosting, reverse-proxy, and load balancer
- Layer 4 vs Layer 7 (OSI), TCP/IP, routing, gateway
- HTTP/1.1 vs HTTP/2 and gRPC
- images vs containers
- virtual machines instances (nodes) vs containers vs pods
For Kubernetes, experience with deploying applications with service resources is useful, but even if you don’t have this, this guide will walk you through it. Configuring KUBECONFIG to access the Kubernetes cluster with Kubernetes client (kubectl) and using Helm (helm), so familiarity to this is useful.
For Google Cloud, you should be familiar Google Cloud SDK (gcloud tool) with setting up an account, project, and provisioning resources. This is important as there are cost factors involved in setting these things up.
Tools (Required)

-
Google Cloud SDK (
gcloudcommand) to interact with Google Cloud -
Kubernetes client (
kubectlcommand) to interact with Kubernetes -
Helm (
helmcommand) to install Kubernetes packages - helm-diff plugin to see differences about what will be deployed.
-
helmfile (
helmfilecommand) to automate installing many helm charts -
Kustomize (
kustomizecommand) to apply patches to existing Helm charts
Tools (Recommended)

These tools are useful in using the automation used form within this article.
- POSIX shell (sh) such as GNU Bash (bash) or Zsh (zsh): these scripts in this guide were tested using either of these shells on macOS and Ubuntu Linux.
- GNU stream-editor (sed) and GNU grep (grep): scripts were tested with these tools. Note that BSD versions of these tools may NOT WORK, such as tools bundled with macOS or BSD.
- Docker Engine (docker command) to automate building and pushing running pydgraph client to Google container registry.
- git (git command) to download source code from git code repositories.
Project Setup
This will setup all the content for this tutorial.
Directory Structure
The directory structure should look like this:
~/projects/consul_connect
├── consul
│   └── helmfile.yaml
└── examples
    └── dgraph
        ├── helmfile.yaml
        └── pydgraph_client.yaml
In GNU Bash, you can create the above structure like this:
export PROJECT_DIR=~/projects/consul_connect
mkdir -p $PROJECT_DIR/{examples/dgraph,consul}
cd $PROJECT_DIR
touch {consul,examples/dgraph}/helmfile.yaml \
 examples/dgraph/pydgraph_client.yaml
Environment Variables
These environment variables will be used in this project. Create a file called env.sh with the contents below, changing values as appropriate, and then run source env.sh.
# gke
export GKE_PROJECT_ID="my-gke-project" # CHANGE ME
export GKE_CLUSTER_NAME="csm-demo"
export GKE_REGION="us-central1"
export GKE_SA_NAME="gke-worker-nodes-sa"
export GKE_SA_EMAIL="$GKE_SA_NAME@${GKE_PROJECT_ID}.iam.gserviceaccount.com"
export KUBECONFIG=~/.kube/$GKE_REGION-$GKE_CLUSTER_NAME.yaml

# other
export USE_GKE_GCLOUD_AUTH_PLUGIN=True
export ClOUD_BILLING_ACCOUNT="<my-billing-account>" # CHANGEME
Google Project Setup
For this tutorial, we’ll need to setup a Google cloud project and provide access to allow use to create the necessary cloud resources. Here is an example of how you can set this up with gcloud:
# enable billing and APIs for GKE project if not done already
gcloud projects create $GKE_PROJECT_ID
gcloud config set project $GKE_PROJECT_ID
gcloud beta billing projects link $GKE_PROJECT_ID \
  --billing-account $ClOUD_BILLING_ACCOUNT
gcloud services enable "container.googleapis.com"
Provision Cloud Resources
These instructions will create the necessary cloud resources for this project.
Provision Google Kubernetes Engine cluster
The steps below will allow you to bring up a Kubernetes cluster with 3 worker nodes.
📔 NOTE: This will deploy a robust 3 worker node Kubernetes
cloud that is suitable for Consul.  This will create a
principal identity (Google Service Account) with the minimal
necessary privileges required to manage the Kubernetes nodes
(GCE).

📔 NOTE: For production environments, you will want to
explore further security measures, such as private cluster,
to block access from the public Internet.
source env.sh

#######################
# GSA with least priv for GKE
##########################################
ROLES=(
  roles/logging.logWriter
  roles/monitoring.metricWriter
  roles/monitoring.viewer
  roles/stackdriver.resourceMetadata.writer
)

gcloud iam service-accounts create $GKE_SA_NAME \
 --display-name $GKE_SA_NAME --project $GKE_PROJECT_ID

# assign google service account to roles in GKE project
for ROLE in ${ROLES[*]}; do
 gcloud projects add-iam-policy-binding $GKE_PROJECT_ID \
  --member "serviceAccount:$GKE_SA_EMAIL" \
  --role $ROLE
done

#######################
# GKE with least priv. GSA + Workload Identity
##########################################
gcloud container clusters create $GKE_CLUSTER_NAME \
  --project $GKE_PROJECT_ID \
  --region $GKE_REGION \
  --num-nodes 1 \
  --service-account "$GKE_SA_EMAIL" \
  --machine-type "e2-standard-2" \
  --enable-ip-alias \
  --workload-pool "$GKE_PROJECT_ID.svc.id.goog"

#######################
# KUBECONFIG
##########################################
gcloud container clusters get-credentials $GKE_CLUSTER_NAME \
  --project $GKE_PROJECT_ID \
  --region $GKE_REGION
You can test access to the cluster as well as the components installed with the following commands:
kubectl get nodes
kubectl get all --all-namespaces
Another useful command to test a new cluster is to see how many resources are available and what is consumed in the new cluster:
kubectl top nodes
kubectl top pods --all-namespaces
Deploy Kubernetes Resources
This section covers deploying Kubernetes resources such as Deployment, StatefulSet, ServiceAccount, Service, and so on. This will cover installing the Consul Connect service mesh, Dgraph, and pydgraph-client to access Dgraph through the service mesh.
Deploy Consul Connect service mesh
This will deploy the Consul Connect Service mesh. Save the following code below as consul/helmfile.yaml:
repositories:
  # https://artifacthub.io/packages/helm/hashicorp/consul
  - name: hashicorp
    url: https://helm.releases.hashicorp.com

releases:
  - name: consul
    namespace: consul
    chart: hashicorp/consul
    version: 0.49.0
    values:
      - global:
          name: consul
          datacenter: dc1
          {{- if eq (env "CCSM_SECURITY_ENABLED") "true" }}
          tls:
            enabled: true
            enableAutoEncrypt: true
            verify: true
          gossipEncryption:
            autoGenerate: true
          acls:
            manageSystemACLs: true
          {{- end }}
        server:
          securityContext:
            runAsNonRoot: false
            runAsUser: 0
        connectInject:
          enabled: true
        controller:
          enabled: true
        ui:
          enabled: true
This Helm chart configuration values will install Consul Connect service mesh with automatic injection enabled. When you deploy a pod with annotation of consul.hashicorp.com/connect-inject: "true", side-car containers will be installed to copy the consul binary into the container and setup and configure Envoy proxy. The service proxy resources will be used as a blueprint to register the service with Consul's service catalog and configure the Envoy proxy.
Run the following to deploy the service mesh:
source env.sh
helmfile --file ./consul/helmfile.yaml apply
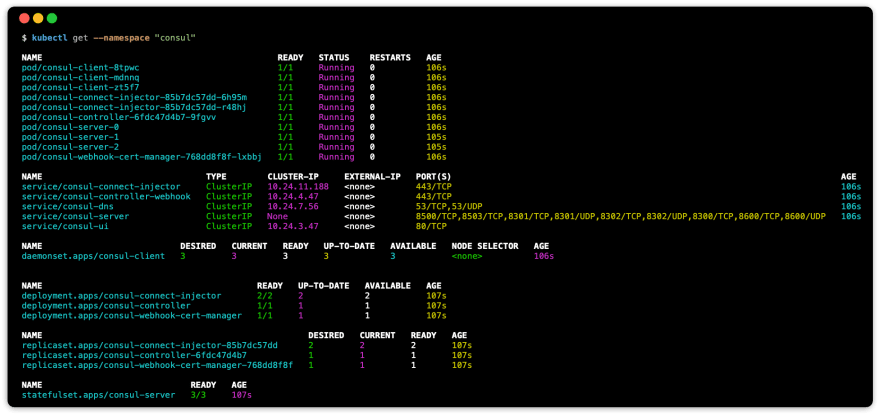
You can check that everything is deployed with:
kubectl get all --namespace consul
This should show something like this:
Deploy Observability
Currently observability is not supported with multi-port services like Dgraph. Hopefully this will get fixed in the future.
For further information, see:
- Caveats for Multi-port Pods
- injection stack traces when deploying multi-port application (issue 1594)
Deploy Dgraph
Dgraph is a distributed graph database communicates through both HTTP on port 8080 and gRPC on port 9080. Dgraph uses the DQL (Dgraph Query Language) through either gRPC or HTTP, and can also use GraphQL with HTTP. Dgraph supports administrative operations using GraphQL or REST.
For this reason, to fully use Dgraph on a service mesh, you have to use the recently added multi-port configuration with Consul Connect. This requires separating the single multi-port service proxy into two separate service proxies: one for gRPC (9080) and one for HTTP (8080).
Save the following helmfile config below as examples/dgraph/helmfile.yaml:
repositories:
  # https://artifacthub.io/packages/helm/dgraph/dgraph/0.0.19
  - name: dgraph
    url: https://charts.dgraph.io
  # https://artifacthub.io/packages/helm/main/raw
  - name: bedag
    url: https://bedag.github.io/helm-charts/

releases:
  # Dgraph additional resources required to support Consul
  - name: dgraph-extra
    chart: bedag/raw
    namespace: dgraph
    version:  1.1.0
    values:
      - resources:
          - apiVersion: v1
            kind: ServiceAccount
            metadata:
              name: dgraph-dgraph-zero

          - apiVersion: v1
            kind: ServiceAccount
            metadata:
              name: dgraph-dgraph-alpha

          - apiVersion: v1
            kind: ServiceAccount
            metadata:
              name: dgraph-dgraph-alpha-grpc

          - apiVersion: v1
            kind: Service
            metadata:
              name: dgraph-dgraph-alpha-grpc
            spec:
              ports:
              - name: grpc-alpha
                port: 9080
              publishNotReadyAddresses: true
              selector:
                app: dgraph
                chart: dgraph-0.0.19
                component: alpha
                release: dgraph
              type: ClusterIP

  # Dgraph cluster with 2 x StatefulSet (3 Zero pods, 3 Alpha pods)
  - name: dgraph
    namespace: dgraph
    chart: dgraph/dgraph
    version: 0.0.19
    needs:
      - dgraph/dgraph-extra
    values:
      - image:
          tag: v21.03.2
        zero:
          extraAnnotations:
            consul.hashicorp.com/connect-inject: 'true'
            # disable transparent-proxy for multi-port services
            consul.hashicorp.com/transparent-proxy: 'false'
            consul.hashicorp.com/transparent-proxy-exclude-inbound-ports: "5080,7080"
            consul.hashicorp.com/transparent-proxy-exclude-outbound-ports: "5080,7080"
        alpha:
          extraAnnotations:
            consul.hashicorp.com/connect-inject: 'true'
            # disable transparent-proxy for multi-port services
            consul.hashicorp.com/transparent-proxy: 'false'
            # use these registered consul services for different ports
            consul.hashicorp.com/connect-service: 'dgraph-dgraph-alpha,dgraph-dgraph-alpha-grpc'
            consul.hashicorp.com/connect-service-port: '8080,9080'
            consul.hashicorp.com/transparent-proxy-exclude-inbound-ports: "5080,7080"
            consul.hashicorp.com/transparent-proxy-exclude-outbound-ports: "5080,7080"
          configFile:
            config.yaml: |
              security:
                whitelist: {{ env "DG_ACCEPT_LIST" | default "0.0.0.0/0" | quote }}
    # patch existing resources using merge patches
    strategicMergePatches:
      # add serviceAccountName to Alpha StatefulSet
      - apiVersion: apps/v1
        kind: StatefulSet
        metadata:
          name: dgraph-dgraph-alpha
        spec:
          template:
            spec:
              serviceAccountName: dgraph-dgraph-alpha

      # add serviceAccountName to Zero StatefulSet
      - apiVersion: apps/v1
        kind: StatefulSet
        metadata:
          name: dgraph-dgraph-zero
        spec:
          template:
            spec:
              serviceAccountName: dgraph-dgraph-zero

      # add label to Alpha headless service
      - apiVersion: v1
        kind: Service
        metadata:
          name: dgraph-dgraph-alpha-headless
          labels:
            consul.hashicorp.com/service-ignore: 'true'

      # add label to Zero headless service
      - apiVersion: v1
        kind: Service
        metadata:
          name: dgraph-dgraph-zero-headless
          labels:
            consul.hashicorp.com/service-ignore: 'true'

    # patch existing resource using jsonPatches
    jsonPatches:
      # remove existing grpc port from serivce
      - target:
          version: v1
          kind: Service
          name: dgraph-dgraph-alpha
        patch:
          - op: remove
            path: /spec/ports/1
This helmfile config uses some advance features to make some necessary changes required by Consul Connect:
- pre-install service accounts and new gRPC service all packaged up as
dgraph-extraschart - render Dgraph resources with required annotations for consul
- apply patches to add Dgraph headless service labels that instructs Consul to ignore these services when is configures the proxies.
- remove gRPC port (
9080) from the Dgraph Alphaservice, as this was defined earlier as a separate gRPCservicewith thedgraph-extraschart.
Consul Connect will inject Envoy sidecar proxy containers. Dgraph Zero will get a sidecar for port 6080, while Dgraph Alpha will have two sidecar proxy containers per pod: one for gRPC at port 9080 and another one for HTTP at port 8080.
When ready to deploy all of this, run the following command:
source env.sh
helmfile --file ./examples/dgraph/helmfile.yaml apply
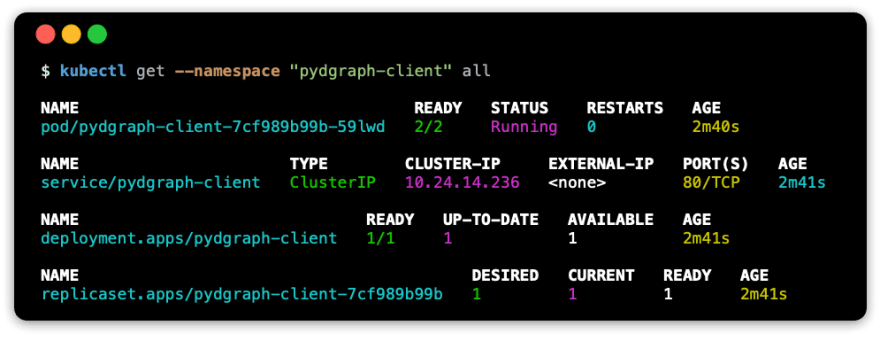
You can check on the status using:
kubectl get all --namespace dgraph
This should show something like:

You notice the extra containers per pod in the ready state, which are the Envoy proxy sidecar containers.
Deploy Pydgraph client
The client is a small python script that can load data into Dgraph using gRPC, and the container also has some useful tools like curl, grpcurl, and jq.
Save the following below as examples/dgraph/pydgraph_client.yaml:
repositories:
  # https://artifacthub.io/packages/helm/main/raw
  - name: bedag
    url: https://bedag.github.io/helm-charts/

releases:
  - name: pydgraph-client
    chart: bedag/raw
    namespace: pydgraph-client
    version:  1.1.0
    values:
      - resources:
          - apiVersion: v1
            kind: ServiceAccount
            metadata:
              name: pydgraph-client
          - apiVersion: apps/v1
            kind: Deployment
            metadata:
              name: pydgraph-client
            spec:
              replicas: 1
              selector:
                matchLabels:
                  app: pydgraph-client
              template:
                metadata:
                  labels:
                    app: pydgraph-client
                spec:
                  serviceAccountName: pydgraph-client
                  containers:
                  - name: pydgraph-client
                    image: {{ requiredEnv "DOCKER_REGISTRY" }}/pydgraph-client:{{ env "BUILD_VERSION" | default "latest" }}
                    ports:
                      - containerPort: 5000
                    env:
                      {{- if eq (env "CCSM_ENABLED") "true" }}
                      - name: DGRAPH_ALPHA_SERVER
                        value: localhost
                      - name: DGRAPH_GRPC_SERVER
                        value: localhost
                      {{- else }}
                      - name: DGRAPH_ALPHA_SERVER
                        value: {{ env "DGRAPH_RELEASE" | default "dgraph" }}-dgraph-alpha.{{ env "DGRAPH_NS" | default "dgraph" }}.svc.cluster.local
                      {{- end }}
                    resources:
                      requests:
                        memory: "64Mi"
                        cpu: "8m"
                      limits:
                        memory: "128Mi"
                        cpu: "25m"

          - apiVersion: v1
            kind: Service
            metadata:
              name: pydgraph-client
            spec:
              type: ClusterIP
              ports:
              - port: 80
                targetPort: 5000
              selector:
                app: pydgraph-client
    {{- if eq (env "CCSM_ENABLED") "true" }}
    strategicMergePatches:
      - apiVersion: apps/v1
        kind: Deployment
        metadata:
          name: pydgraph-client
        spec:
          template:
            metadata:
              annotations:
                consul.hashicorp.com/connect-inject: "true"
                consul.hashicorp.com/transparent-proxy: "false"
                consul.hashicorp.com/connect-service-upstreams: >-
                  {{ env "DGRAPH_RELEASE" | default "dgraph" }}-dgraph-alpha:8080,{{ env "DGRAPH_RELEASE" | default "dgraph" }}-dgraph-alpha-grpc:9080
    {{- end }}
When ready to deploy this, you can run the following:
source env.sh
# https://hub.docker.com/r/darknerd/pydgraph-client
export DOCKER_REGISTRY=darknerd
export CCSM_ENABLED=true
helmfile --file ./examples/dgraph/pydgraph_client.yaml apply
You can check the deployment with the following:
kubectl get all --namespace pydgraph-client
This should result in something similar to the following:
Testing Upstream Traffic
Consul Connect will set up a tunnel between the upstream ports specified in the annotation to the ports that are serviced by Dgraph.
First remote into the client container:
CLIENT_NS="pydgraph-client"
PYDGRAPH_POD=$(kubectl get pods -n $CLIENT_NS --output name)
kubectl exec -ti -c "pydgraph-client" -n $CLIENT_NS \
  ${PYDGRAPH_POD} -- bash
One in the container, test that HTTP traffic is working:
curl --silent localhost:8080/health
For gRPC traffic, you can run the following:
grpcurl -plaintext -proto api.proto \
  localhost:9080 api.Dgraph/CheckVersion
Also, you can try loading data:
python3 load_data.py \
  --plaintext \
  --alpha localhost:9080 \
  --files ./sw.nquads.rdf \
  --schema ./sw.schema
These should work through the tunnel that is configured by Consul Connect using the Envoy proxy side-cars.
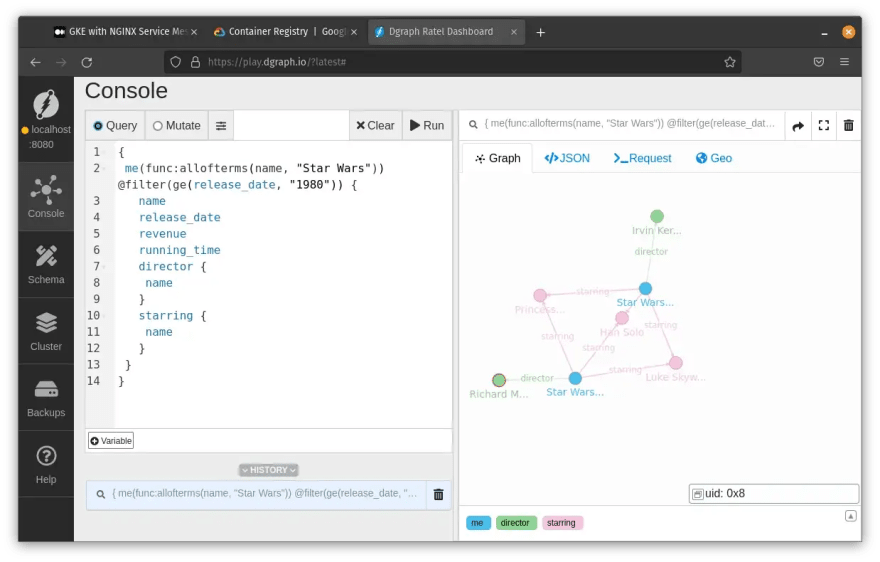
Dgraph Graphical Viewer: Ratel
Dgraph hosts an online graphical viewer at https://play.dgraph.io/. If you would like to access the data we deployed with load_data.py, you can run this in a new terminal tab:
kubectl port-forward svc/dgraph-dgraph-alpha -n dgraph 8080:8080
Now you can you can point the connection configuration in Ratel to http://localhost:8080:

Click on the Console and select Query and enter the following DQL:
{
 me(func:allofterms(name, "Star Wars")) @filter(ge(release_date, "1980")) {
   name
   release_date
   revenue
   running_time
   director {
    name
   }
   starring {
    name
   }
 }
}
Click Run to see the results of the query:
Consul User Interface
The Consul UI can be accessed by running this command in a new terminal tab:
source env.sh
kubectl port-forward service/consul-ui --namespace consul 8500:80
You can access the Consul UI through http://localhost:8500. The Consul UI should look like this below with other services appearing after Dgraph and pydgraph-client were deployed.
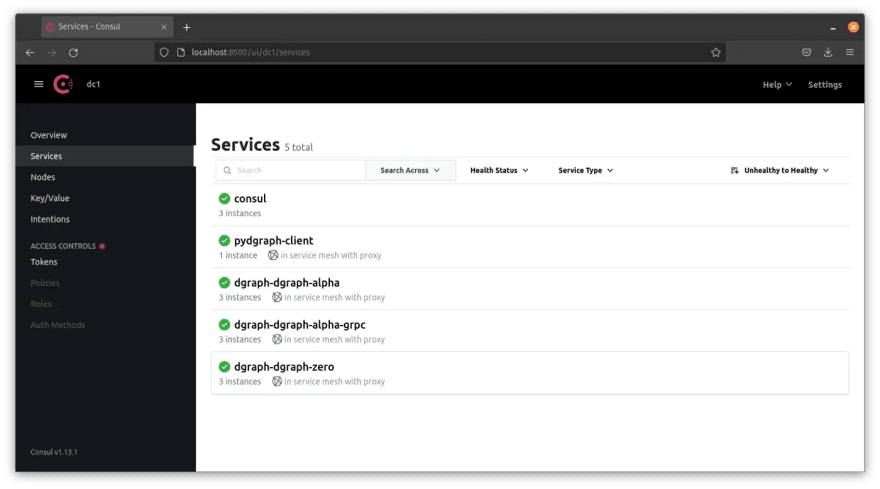
If you click on pydgraph-client, you can see the connections:

Cleanup
Kubernetes Resources
You can cleanup Kubernetes resources with the following:
source env.sh

# delete pydgraph-client
helmfile --file ./examples/dgraph/helmfile.yaml delete
kubectl delete namespace pydgraph-client

# delete dgraph
helmfile --file ./examples/dgraph/helmfile.yaml delete
kubectl delete pvc --selector app=dgraph --namespace "dgraph"
kubectl delete namespace dgraph

# delete consul
helmfile --file ./consul/helmfile.yaml delete
kubectl delete pvc --selector app=consul --namespace "consul"
kubectl delete namespace consul
It is important to delete the consul namespace if you intend to deploy new version of Consul Connect service mesh in the future. This is because there are secrets left behind that will break future installations, so deleting the namespace will avoid this scenario.
Cloud Resources
The Kubernetes cluster and the associated Google service account can be deleted with the following commands:
source env.sh

gcloud container clusters delete $GKE_CLUSTER_NAME \
  --project $GKE_PROJECT_ID --region $GKE_REGION

gcloud iam service-accounts delete $GKE_SA_EMAIL --project $GKE_PROJECT_ID
Addendum: Publishing Pygraph-Client Images
If you would like to publish the pydgraph-client images to an alternative registry, you can run the following steps below.
Download the source code
pushd examples
git clone \
  --depth 1 \
  --branch "consul" \
  git@github.com:darkn3rd/pydgraph-client.git
popd
Publishing to GCR
If you wish to use Google Container Registry, you can run the following.
pushd ./examples/pydgraph-client

###################
# STEP 1: Environment variables
#######################################
source env.sh
export GCR_PROJECT_ID="my-gcr-project"  # CHANGE ME
export DOCKER_REGISTRY="gcr.io/$GCR_PROJECT_ID"
export ClOUD_BILLING_ACCOUNT="<my-cloud-billing-account>" # CHANGEME

###################
# STEP 2: Create GCR project and enable GCR
# NOTE: Best practices is to use a single project for store/retreive images
#######################################
gcloud projects create $GCR_PROJECT_ID
gcloud config set project $GCR_PROJECT_ID
gcloud beta billing projects link $GCR_PROJECT_ID \
  --billing-account $ClOUD_BILLING_ACCOUNT
gcloud services enable "containerregistry.googleapis.com" # Enable GCR API
gcloud config set project $GKE_PROJECT_ID

###################
# STEP 3: Build local image
#######################################
docker build -t pydgraph-client:latest .

###################
# STEP 4: Publish Image to GCR
#######################################
gcloud auth configure-docker
docker tag pydgraph-client:latest $DOCKER_REGISTRY/pydgraph-client:latest
docker push $DOCKER_REGISTRY/pydgraph-client:latest

###################
# STEP 5: Grant GCR read access to GKE containers
#######################################
gsutil iam ch \
  serviceAccount:$GKE_SA_EMAIL:objectViewer \
  gs://artifacts.$GCR_PROJECT_ID.appspot.com

popd
Publising to DockerHub
If you have an account on DockerHub, you can publish it there with these steps:
pushd ./examples/pydgraph-client

###################
# STEP 1: Environment variables
#######################################
source env.sh
export DOCKER_REGISTRY="<your-docker-hub-account-goes-here>"

###################
# STEP 2: Build local image
#######################################
docker build -t pydgraph-client:latest .

###################
# STEP 3: Publish Image to DcokerHub
#######################################
docker login # IMPORTANT: use api-token not the actual password
docker tag pydgraph-client:latest $DOCKER_REGISTRY/pydgraph-client:latest
docker push $DOCKER_REGISTRY/pydgraph-client:latest

popd
Resources
These are some resources and references that may be useful in using this solution.
Consul Documentation
- Kubernetes Pods with Multiple Ports
- Secure Consul and Registered Service on Kubernetes
- Annotations and Labels
- Enable Transparent Proxy Mode
- Transparent Proxy on Consul Service Mesh, 2020-JUL-01
- How does Consul Service Mesh Work on Kubernetes?
Gateways and Ingress
These are links for north-south traffic into mesh.
I have not tested these solutions yet
These are links that cover integration of either ingress controllers or API gateways with Consul. This may be using Consul as a backend database or the Consul Connect service mesh itself.
📔 NOTE: I have not tested the content of this material, just
documenting any material I find on the topic for later
exploration.  If you find any useful material out there,
please send me a note.
- Amabassador Edge Stack integration with Consul
- Consul API Gateway
- Using HashiCorp Consul with Kong Ingress Controller for Kubernetes
- Getting Started With Traefik Proxy and HashiCorp Consul
- Taefik Consul Provider configuration
- traefik-consul walk-through
- consul ingress controllers integration with Traefik or Kong using terrafom
- Consul on EKS using nginx as ingress (transparent mode)
Tracing
- Consul connect integration of jaeger in Kubernetes
- Consul Service Mesh Tracing Demo
- https://github.com/envoyproxy/envoy/tree/main/examples/jaeger-tracing
Dgraph Documentation
Helmfile
- https://github.com/helmfile/helmfile
- What is Helmfile? by Paul Czarkowski (VMWare Tanzu Developer Center)
Blog Source Code
This is some code that I developed when testing Consul Connect service mesh solution.
- Blog Source Code: https://github.com/darkn3rd/blog_tutorials/tree/master/kubernetes/gke/service-mesh/consul-connect
- HTTP/gRPC Greeter Application: https://github.com/darkn3rd/greeter
- pydgraph-client w consul support: https://github.com/darkn3rd/pydgraph-client/tree/consul
Conclusion
There you have it, a small (cough) overview how to get started with Consul Connect Service Mesh. In particular, here some of the takeaways:
- Provisioning Kubenertes (GKE)
- (addendum) Provisioning GCR and publishing images to GCR
- Deploying Consul Connect Service Mesh on GKE
- Deploying a server and a client with multiport support: HTTP and gRPC
- Testing HTTP traffic with
curland gRPC traffic withgprcurl. - Limitations and Challenges with current multi-port scenarios
Additionally, here’s some extra takeaways beyond just using Consul Connect:
- Using Helmfile to deploy Helm charts with templated chart config values, where values and branch logic is set by env vars.
- Using Helmfile to patch using Kustomize merge and JSON Patch
- Helm raw chart to package Kubernetes manifests as templated values
- Introduction to Dgraph distributed graph database
The Challenges with Consul
You may have noticed that Consul is, dare I say, complex, beyond complex. The documentation is good, but perhaps maybe not all that well organized, with many missing things.
The underlying tool Consul is very powerful, and Consul Connect service mesh on top of this tool is quite robust and extremely flexible where you can swap out the default CA for other solutions, like Vault CA, and swap out the Envoy proxy for another solution, like NGINX or HAProxy. For ingress into the cluster, you can use Consul API Gateway, or another API Gateway or an ingress controller.
Consul Connect service mesh has some challenges or limitations (see below) when you have a service that supports multiple ports.
Complexity
I have experimented with other service meshes and I was able to get up to speed quickly: Linkerd = 1 day, Istio = 3 days, NGINX Service Mesh = 5 days, but Consul Connect service mesh took at least 11 days to get off the ground. This is by far the most complex solution available.
Unable to Update
If you need to update Consul Connect with a configuration change and use helm to update consul, the consul-server pods may not reach a healthy state. You may have to delete everything and recreate it from scratch.
Apparently there’s some way to ameliorate this by adding leave_on_terminate: true setting in the server.extraConfig (ref).
Higher Memory Footprint
Consul Connect service mesh has a higher memory footprint, so on a small cluster with e5-medium nodes (2 vCPUs, 4 GB memory), you will only be able to support a maximum of 6 side-car proxies. In order to get an application like Dgraph working, which will have 6 nodes (3 Dgraph Alpha pods and 3 Dgraph Zero pods) for high availability along with at least one client, a larger footprint with more robust Kubernetes worker nodes were required.
Requirement for Service Resource
One challenge to Consul Connect service mesh is that it configures the Envoy side-car proxy based on what you specify for a service. This added some challenges.
- A pure client that is not listening on a port, still requires you to specify a
serviceresource so that it can be added to the service mesh. - A
StatefulSetthat requires specifying a headlessservicein addition toserviceendpoint into the cluster will fail spectacularly if both service and headless service use the same port.
The docs explicitly note this:
Note: As of consul-k8s
v0.26.0and Consul Helmv0.32.0, having a Kubernetes service is required to run services on the Consul Service Mesh. (ref)
More Complexity with Multiport
The Kubernetes service API supports an array of ports that you can specify, but Consul Connect only supports a single port for transparent-proxy mode. This is very bizarre, because a service with multiple ports is quite common, such as an admin port vs API port, or scenarios where a service has both HTTP and gRPC interfaces.
This is also part of the Kubernetes service API specification, which Consul Connect reads to configure the Envoy proxy. So, in this sense, Kubernetes is not fully supported as far a parity with the service API.
For the multi-port scenario, the following will need to be done on the server:
- all
serviceswith multiple ports will need to be broken up into separate services with only one port - need to specify
consul.hashicorp.com/connect-serviceannotation listing each of the services supported that will be mapped into consul. - need to specify
consul.hashicorp.com/connect-service-port annotationlisting ports that correspond to the previous above annotation - if ACLs are enabled, a
serviceaccountneeds to be specified corresponding to eachservicespecified. - if ACLs are enabled and Kubernetes 1.24+ is used, a corresponding
secretfor the service token needs to be created as well.
The client will need the following in order to connect to the server:
- specify
consul.hashicorp.com/connect-service-upstreamsannotation listing the consul service and outbound port to use fromlocalhost. - if ACLs are enabled, a
serviceaccountthat corresponds to theservicespecified for the client.
The client is now required to connect to localhost at the target outbound port, not to the service endpont DNS name, such as mysvc.myns.svc.cluster.local. This will be the only way to use the service mesh. Directly connecting to the service endpoint, e.g. mysvc.myns.svc.cluster.local, will bypass the service mesh and thus will not be protected with encryption.
Insecurity with Multiport
When transparent-proxy is enabled, members can communicate using the DNS of the service endpoint, for example: mysvc.myns.svc.cluster.local. And when you use multi-port scenario, transparent-proxy is unfortunately disabled.
Because of this situation, security through mTLS or ACLs (tokens) can be bypassed completely when multi-port services are configured. Any non-mesh member or mesh member that does not have access granted (through configuring an intention) can connect to the service endpoint, such as mysvc.myns.svc.cluster.local. The only thing ACLs offer at this point is blocking encrypted traffic through the mesh, and thus the ACL feature is pointless.
This issue can be ameliorated by configuring the service itself to only communicate through localhost, which forces it to use the service mesh, but then this poses problems, such as trying to use an ingress. Alternatively, you could use a firewall, such as a network policy. Ultimately, another non-Consul solution is needed.
Ingress Challenge with Multiport
An ingress controller is an interesting challenge to integrate to the service mesh, as annotations will be needed to put the ingress controller pods onto the service mesh. The ingress controller will route traffic to the backend service using the local DNS, such as mysvc.myns.svc.cluster.local, where the service named mysvc running in the myns namespace.
With multi-port scenario however, this will not work, because the ingress controller is now required to route to localhost for a specific outbound ports that are specified in the consul.hashicorp.com/connect-service-upstreams annotation. The normal ingress resource API does not support this setup, as it routes to Kubernetes service DNS name, not to localhost.
There may be some ingress controllers that may provide extra non-standard configurations that could support this requirement to route to localhost, but unfortunately no one at Hashicorp has even tested this common use case (ref).
No Observability with Multport

If you are using multi-port scenario, observability is not an option. Just forget you even heard of the word observability, one of the three planes that make up the service mesh solution. The Consul Connect injection process will actually cause stack traces.
Wrapping Up
I hope this is useful in exposure to Consul Connect service mesh and can help you get started should you want to try this out. If you have services that only listen on a single port, then this certainly an interesting solution to explore.
If however, you have an application service that needs support for 2+ ports, because you know, Kubernetes supports this, I would recommend avoiding Consul Connect, as it is not functional to meet minimum requirements for a service mesh. Perhaps someday, when Hashicorp prioritizes basic functionality and usability in future version, this product can be considered.


Oldest comments (0)