
I wanted to share some tips I have learned while configuring CircleCI with Elastic Beanstalk.
What is Elastic Beanstalk?
Elastic Beanstalk is a Platform as a Service offering from Amazon Web Services. It provides an easy means of building Web Applications without the need for manual server configuration and maintenance.
What is CircleCI?
CircleCI is a continuous integration tool. It allows for rapid deployment of code to production.
The goal of this article is to show how CircleCi can be used to quickly deploy code to AWS without the need for manual configuration of your web server.
Table of Contents
1. Create New Repository
2. Create a Node application
3. Deploy to Elastic Beanstalk
4. Connect GitHub and CircleCI
5. Configure CircleCI
6. Configure Elastic Beanstalk with CircleCi
5. Merge a change to master and auto deploy to AWS
Requirements:
- git and node.js installed on your development machine
- a GitHub account
- a CircleCI account
- and AWS account
Let's start by building out a simple node application to deploy to AWS Elastic Beanstalk.
Create and clone a new repository on GitHub
- log into your GitHub account and click on the "new Repository" button.
- Give your repository a name and click create repository
- Open a terminal and clone your repo using the git clone command.
git clone https://github.com/<yourAccount>/<your repo>
We should also add a .gitignore file:
touch .gitignore
edit the file with whatever files you do not want included in your repository, but make sure you add node_modules.
example .gitignore:
node_modules
.DS_store
.env
Ok, now we have created an empty repository, let's set up a basic Node application for deployment testing.
Create a basic node application
For this I am just going to use the popular express library to create a basic Nodejs application.
navigate to your project folder and let's start by running:
npm init
Just click through the default options for this example. Take note of the application entry point. In this example, we will use index.js. You should now have a package.json file in your application directory.
Next we want to install express so lets run:
npm install --save express
Finally let's configure our express application to run and return a basic Hello World message.
We need to create our index.js entry point, so in terminal run:
touch index.js
Now open up your favorite editor or IDE and edit index.js with the below code.
const express = require('express');
const app = express();

const PORT = process.env.PORT || 3000;

app.use('/', (req, res) => {
  res.send(`<h1>Hello World</h1>`);
});

app.listen(PORT, () => console.log(`listening on port: ${PORT}`));
This configuration creates a Express application with a basic route that returns "Hello World"
finally let's edit the scripts section of our package.json to run our application with the start command:
  "scripts": {
    "start": "node ./index.js"
  },
Now we should be able to run our application with
npm run start
let's try it out. If you open your browser to http://localhost:3000, you should get a familiar "Hello
World" message
Deploying to Elastic Beanstalk.
Now that our node app is up and running. Let's setup an elastic beanstalk environment. First log on to your AWS account and navigate to the AWS Management Console.
Expand the All Services section and look for the compute section. There you will find an Elastic Beanstalk option. Once clicked you will notice on the top right of the screen a link that says:
"Create New Application"
Fill in an application name and click on the create button.
This should bring you to a screen that says "No environments currently exist for this application." Click on the link to the right that says "Create one now."
Next you will have an option that ask you to choose a Web server environment or worker environment. Since we are making a node web app, choose Web Server environment and click the "Select" button to move on.

On the next screen, you can fill out anything you want for a name or let AWS auto-create a name for you. Under Base configuration, select Node.js as the prefered preconfigured platform.
Under application code, choose to upload your code. You need to zip up your code at the root level. From the command line, in the root directory of your project, run the following command:
git archive -v -o ../appArchive.zip --format=zip HEAD
You should now have a zip archive in the same directory as your root project folder. In the AWS console, choose Upload your code radio button select your zip file and choose upload. Finally click on Create environment
Now wait a few minutes for the environment to create.
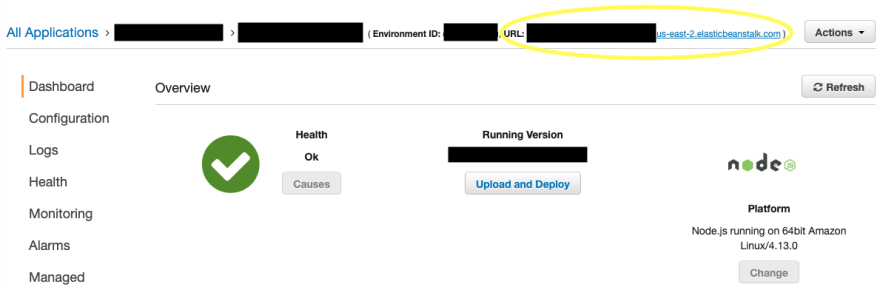
You should be taken to a dashboard that shows the health of the environment as OK (hopefully). In the top, there is a URL link. Click on it and we should get a web page with our awesome "Hello World" now deployed on AWS Elastic Beanstalk.

Connect your GitHub repository to CircleCI.
- In your browser, go to https://circleci.com and log in (create a free account if you don't have one).
- Browse to your dashboard and then navigate to your account page by clicking on your account icon in the top right. Or navigate directly to your account page by going to https://circleci.com/account
- Click on the account integrations link on the left side of your circleci account page, and click the connect button next to the GitHub icon.
- Complete the authorization process allowing CirclCI GitHub authorization.
- If you are part of multiple organizations or accounts, make sure the organization your repository is in is selected in the organization switcher in the top left of the CircleCi dashboard.
- Click on Add Projects on the navigation bar on the left. Find your repo to add in the list and click Set Up Project.
Set up your CircleCI configuration
- You will be presented a page that has a button to start building. This will create a config.yml file and start a build. This build will most likely fail, but it will get us started.
- Download this file into a new folder called .circleci in the root of our project
- Open the config.yml file in your code editor and edit to look like below.
example:
version: 2.1
orbs:
  node: circleci/node@1.1
jobs:
  build-and-test:
    executor:
      name: node/default
    steps:
      - checkout
      - node/with-cache:
          steps:
            - run: npm install
            - run: npm test
            - run:
                name: Installing deployment dependencies
                command: |
                  sudo apt-get -y -qq update
                  sudo apt-get install python-pip python-dev build-essential
                  sudo pip install --upgrade setuptools
                  sudo pip install awsebcli --upgrade
            - run:
                name: Deploying
                command: eb deploy <Your AWS Environment Name>

workflows:
  build-and-test:
    jobs:
      - build-and-test:
          context: aws
          filters:
            branches:
              only:
                - master
Edit your config.yml file to look similar to the above. Since Yaml files are sensitive to indentation, I suggest you run the code through a validator. VS-code has an excellent extension called YAML by RedHat that works well.
Some important sections to note. The ORB section is basically letting CircleCI use pre-configured settings for node applications. The steps what is needed to run aws deployment commands using the elastic beanstalk cli. We will configure our AWS EB settings in the next step. We also have a test command to run, but we have not configured any tests yet
Finally under the workflows, we want to filter and only deploy the master branch.
Configure EB Circle Integration
- create a folder called ".elasticbeanstalk" and create a file called config.yml
mkdir .elasticbeanstalk
touch .elasticbeanstalk/config.yml
Now open .elasticbeanstalk/config.yml and configure the settings like below:
branch-defaults:
  master:
    environment: <elasticbeanstalk:environment-name>
global:
  application_name: <Application Name>
  default_ec2_keyname: <elasticbeanstalk:environment-id>
  default_platform: <platform name>
  default_region: <AWS region>
  sc: git
Now we need to fill out the information above. Start by logging into your AWS console and navigating to Elastic Beanstalk then click on your application. You can find all the required information in the below screenshot. Fill out the values for your app in the config.yml file of your .elasticbeanstalk folder.

-
set up AWS security access for CircleCI
- navigate back to the AWS management console and select Identity and Access Management
- select Users in the left menu bar, then click on add user
- enter any name you want and check the "programatic access" checkbox

- on the next page select "Attach existing policies directly"
- in the search box, enter "AWSElasticBeanstalkFullAccess" and select the profile that is returned

- click next and next through and finally create user.
- click on the option to download credentials and save the .csv file somewhere safe. DO NOT save in your repository
-
Add AWS credentials to your CircleCI project
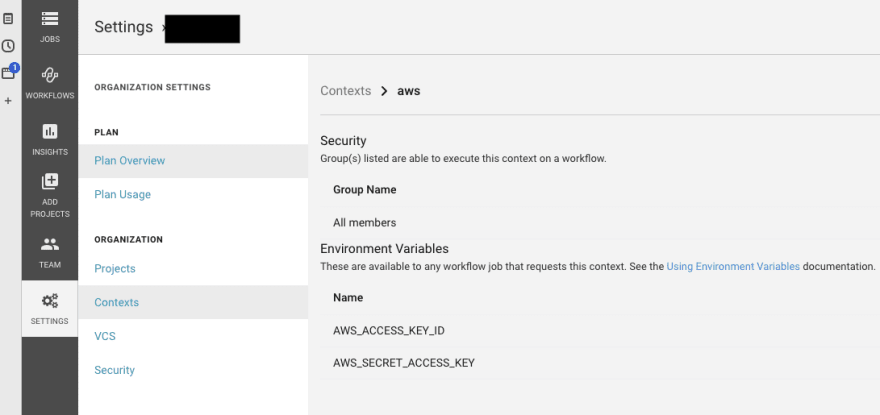
- Navigate back to your Circle CI page and select the organization with your project then click on the settings icon on the left. Click on the context option then "create context"
- I am choosing the name aws to match the context specified in my .circleci/config.yml file in the workflows section.
- Click on the newly created context and add two new variables.
- AWS_ACCESS_KEY_ID
- AWS_SECRET_ACCESS_KEY
- Enter in the value of these variables from the credentials.csv file downloaded in the previous step.
Merge a change to master and update your EB build.
Finally we should be ready to go. Let's change index.js of our Hello World app to now return: "Hello Elastic Beanstalk," and commit and push to master on GitHub.
Now wait for CircleCI to work it's magic, it should take about 10-15 minutes before your changes are live. You can open the EB url to see your changes.
Congrats!!! You have automated deployment from master to AWS using the power of CircleCI and Elastic Beanstalk.
However, we can use CircleCI to run tests and reject our builds if they fail a set of specified tests. I'm not going to add tests in this article, but use your favorite testing platform and configure the run under "tests" in your package.json and your .circleci config file. If the tests fail, Circleci will not push your changes to master or deploy your branch.
Happy Cloud computing!


Top comments (2)
Good article Justin! Really clear the steps to follow. The procedure is similar using AWS CodePipeline?
Thanks! There are some differences like the structure of the config files for CodePipeline, but the concept is similar.