This article is part of oAuth series using AWS Cognito, see links to other articles in Series Summary: oAuth Made Simple with AWS Cognito.
In this article, we go through a simple step by step process of creating a Cognito user pool, configuring oAuth 2.0 Implicity Grant and testing it out successfully using browsers and curl command. It helps readers to understand what AWS Cognito is, and how it works through one of the simplest examples without confusing them with too much details at the very beginning journey of oAuth.
A very brief introduction of oAuth grant types
OAuth 2 provides several "grant types" for different use cases. Some commonly used grant types are:
- Implicit was a legacy grant type, previously recommended for clients without a secret.
- Client credentials for application access without a user present, mostly between a web server to another server application.
- Authorization Code for apps running on a web server, browser-based and mobile apps.
It is not recommended to use the implicit flow due to the inherent risks of returning access tokens directly in an HTTP redirect without any confirmation that it has been received by the intended client. It has been superseded by using the Authorization Code grant type for mobile or web applications. However, for this quick tutorial, we use Implicit grant type for simplicity, without confusing readers with too much details, which tends to be overwhelming complex and confusing for beginners. For readers who will develop a real world application using oAuth, it is recommended to research further into Authoriztion Code grant type, which is also supported by Cognito.
OK, let’s try to set it up in AWS Cognito:
1. Create User Pool. Go to the Amazon Cognito console. Choose Manage User Pools, select “Create a user pool”, in the resulting screen, enter “SunnyUserPool” as the pool name; select “Review defaults”. In the next screen, scoll down to the end, and select “Create pool” to confirm the creating of the pool with all the default values.


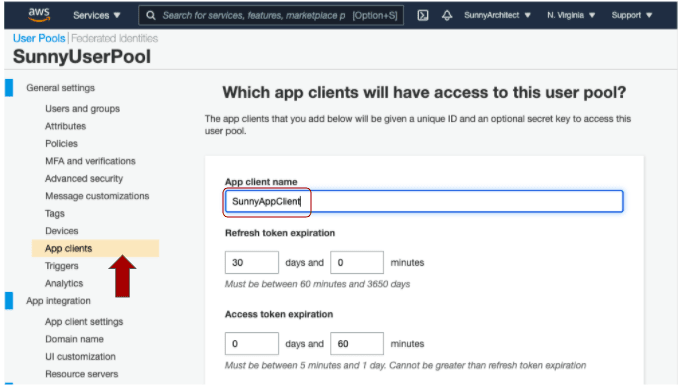
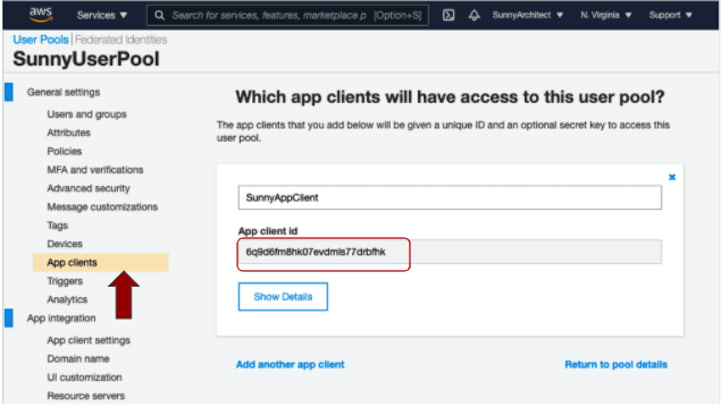
2. Create App Client. Choose “App clients” tab from the left panel, and select “Add an app client” link. Enter “SunnyAppCient” in the app client text box, leave everything else as default. Scroll down to the end, and select “Create app client” to confirm the creation of the app client. Save its App client id - “1vvp0tt53g1uhntoa5bmvnvk2a” and App client secret(by choosing the "Show Details" button to reveal the secret field) for later use.


3. Configure App Client. Choose “App client settings” tab from the left panel. Choose “Select All” to select the only option “Cognito User Pool” to turn on Cognito as identify provider; Set Callback URL(s) as https://example.com. Scroll down the screen to expose other sections. Select “Implicit Grant” for “Allowed oAuth Flows”, select “phone”, “email”, and “openid” for “Allowed oAuth Scopes”, and select “Save Changes” to save changes;


4. Configure Domain Name. Choose “Domain Name” tab from the left panel. Enter “sunnyoauth” for Domain prefix textbox. This prefix has to be globally unique, and you can use “Check availability” to make sure it is available. Select “Save Changes” to save the changes.

Testing Time
Assemble a url in the format of https://<domain prefix>.auth.us-east-1.amazoncognito.com/oauth2/authorize?client_id=<client id>&redirect_uri=<url encoded call back url>&scope=openid&response_type=token. It is worth noting that the call back url has to be url encoded (use online encoder like https://meyerweb.com/eric/tools/dencoder/ or javascript function encodeURIComponent(url)), and the call back url has to match the one configured in Step 3 of previous section, otherwise, Cognito will return "redirect mismatch" error and stop authentication process.
In our case, the domain prefix is “sunnyoauth”, the call back url is https://example.com, and the client id is 1vvp0tt53g1uhntoa5bmvnvk2a, so the final url would be:
https://sunnyoauth.auth.us-east-1.amazoncognito.com/oauth2/authorize?client_id=1vvp0tt53g1uhntoa5bmvnvk2a&redirect_uri=https%3A%2F%2Fexample.com&scope=openid&response_type=token
Copy and paste the above url into Chrome browser, follow the instruction to sign up a new account (for the first time only), or sign in if you have an existing account. Continue to follow the instructions, until you get a url in the format of
https://example.com/#id_token=<id token>&access_token=<access token>&expires_in=3600&token_type=Bearer
Save the <access token> for our next step. Next we will show how we can get the user info through /oauth2/userInfo by passing in the access token in “Authorization” http header, with the value in the format of Bearer <access token>. Copy and paste the following curl command and run it through the terminal:
curl -X GET https://sunnyoauth.auth.us-east-1.amazoncognito.com/oauth2/userInfo -H 'Authorization: Bearer <access token>'
And the result is shown below:
{"sub":"95fb5614-18b0-4f48-b49e-d8601934a1df","email_verified":"true","email":"fakeemail@hotmail.com","username":"jinlianwang"}
As you can see, with access token, the server side (in our case, https://example.com, though it can be any other server you are developing that will take advantage of Cognito as its identity provider) is able to know who exactly is authenticating to Cognito, such as login id, email and other info. Another way that the server side can find out this kind of information is through examining the id and/or access token, as Cognito is returning them as a JWT token. You can use online JWT inspector, like https://jwt.io/ to check the payload of the token, and for id token, it would have structure like the following:
{

"at_hash": "R3M35vd4LoXYZDs5Uf3TBw",

"aud": "1vvp0tt53g1uhntoa5bmvnvk2a",

"auth_time": "1618859559",

"cognito:username": "jinlianwang",

"email": "fakeemail@hotmail.com",

"email_verified": "true",

"event_id": "79d01f1c-4101-4ed5-a51b-938146bb142b",

"exp": "Mon Apr 19 20:12:39 UTC 2021",

"iat": "Mon Apr 19 19:12:39 UTC 2021",

"iss": "https://cognito-idp.us-east-1.amazonaws.com/us-east-1_aLG1fB7hx",

"sub": "95fb5614-18b0-4f48-b49e-d8601934a1df",

"token_use": "id"

}
Summary
This concludes this quick introduction to Cognito User Pool. In summary, we create a user pool through 4 simple steps, and test it out using browser and curl command. Again, Implicit Grant is not recommended for most of the use cases, keep an eye out for an upcoming blog for comparison of “authorization code grant type ” and “implicit grant type”, and why authorization code is a much safer way for oAuth. Stay tuned!
** Updated: Find out why Authorization Code is a much safer grant type to used compared to Implicit in this new article in this series: User authentication through authorization code grant type using AWS Cognito.


Top comments (1)
Hey @jinlianwang , thanks for sharing this! I'm trying to sort out how to implement token refreshes for sessions. It seems this is an ongoing issue that hasn't been addressed by AWS. Have you come across a workaround for your projects?
github.com/aws-amplify/amplify-js/...
github.com/amazon-archives/amazon-...