Introduction
I'm going to create a continuous integration (CI) workflow to build, test and publish the project in Github Packages.
The project:
Spring boot with maven
Postgres database with a table users.

One endpoint /users that returns a list of users. In the example, I just have the user jonathan with ID 1. My integration test will check /users returns a list of size 1.
@RestController
@RequestMapping("/users")
public class UserController {

    private final UserService userService;

    @Autowired
    public UserController(UserService userService) {
        this.userService = userService;
    }

    @GetMapping
    public List<User> findAll() {
        return userService.findAll();
    }
}
@SpringBootTest(webEnvironment = SpringBootTest.WebEnvironment.RANDOM_PORT)
@TestInstance(TestInstance.Lifecycle.PER_CLASS)
public class UserEndpointIT {
    @Autowired
    private TestRestTemplate restTemplate;

    @Autowired
    protected DatabaseService databaseService;

    @LocalServerPort
    private int port;

    @BeforeAll
    public void initDatabase(){
        databaseService.fill();
    }

    @Test
    public void user_endpoint_should_return_all_users() {
        HttpHeaders headers = new HttpHeaders();
        HttpEntity entity = new HttpEntity(headers);

        ResponseEntity<List<User>> response = this.restTemplate.exchange(createUrlWith("/users"), HttpMethod.GET, entity, new ParameterizedTypeReference<List<User>>() {
        });
        int EXPECTED_USERS = 1;

        assertEquals(EXPECTED_USERS, response.getBody().size());
    }

    private String createUrlWith(String endpoint) {
        return "http://localhost:" + port + endpoint;
    }
}
Flyway as a database migration tool. (checkout my post about flyway if you don't know about it)
The following Maven plugin (docker-maven-plugin) in my pom.xml to run a postgres docker container for my integration tests.
...
<plugin>
   <groupId>io.fabric8</groupId>
   <artifactId>docker-maven-plugin</artifactId>
   <version>${docker-maven-plugin.version}</version>
   <configuration>
      <images>
         <image>
            <name>${it.postgresql.image}</name>
            <run>
               <ports>
                  <port>${it.postgresql.port}:5432</port>
               </ports>
               <env>
                  <POSTGRES_USER>${it.postgresql.username}</POSTGRES_USER>
                  <POSTGRES_PASSWORD>${it.postgresql.password}</POSTGRES_PASSWORD>
                  <POSTGRES_DB>${it.postgresql.db}</POSTGRES_DB>
               </env>
               <wait>
                  <log>database system is ready to accept connections</log>
               </wait>
            </run>
         </image>
      </images>
   </configuration>
   <executions>
      <execution>
         <id>start</id>
         <phase>pre-integration-test</phase>
         <goals>
            <goal>start</goal>
         </goals>
      </execution>
      <execution>
         <id>stop</id>
         <phase>post-integration-test</phase>
         <goals>
            <goal>stop</goal>
         </goals>
      </execution>
   </executions>
</plugin>
...
Github actions allow us Continuous Integration (CI) and Continuous Deployment (CD) from our Github repositories.
How does it work? An event triggers a workflow, for example a push to master branch or a pull request, and that workflow could have different jobs. We can have a job to run our tests and another job to deploy the app. Each job uses steps that has different tasks or better known as actions. We can create our own actions or use the ones created by the community. We are also allowed to name each action and give a brief description about what it does by using name key. It's important to note that by default, jobs will run in parallel unless we configure them to run sequentially (maybe any job depends on another).

Creating the workflow
First of all, we need to create the workflow file in the .github/workflows directory.

name: my first workflow for a java project
on:
  push:
    branches: [ master ]

jobs:
  publish:
    runs-on: ubuntu-latest
    steps:
      - uses: actions/checkout@v2
      - uses: actions/setup-java@v1
        with:
          java-version: 11
          settings-path: ".m2/"
      - uses: actions/cache@v2
        with:
          path: ~/.m2/repository
          key: ${{ runner.os }}-${{ hashFiles('**/pom.xml') }}
      - name: Publish package
        run: mvn $MAVEN_CLI_OPTS clean deploy
        env:
          GITHUB_TOKEN: ${{ secrets.GITHUB_TOKEN }}
          MAVEN_CLI_OPTS: "-s .m2/settings.xml --batch-mode"
      - name: Copying target jar
        run: |
          mkdir myTarget
          cp target/*.jar myTarget
      - name: Uploading jar
        uses: actions/upload-artifact@v2
        with:
          name: myPackage
          path: myTarget
We begin by adding a name for our workflow and setting the event that will trigger it. In this case, the event is a push to my master branch. Now, we need to set the jobs for the workflow. The runs-on configures the job to run on a virtual machine hosted by Github, to be more precise an Ubuntu Linux runner (read more here). In the above example, I just have one job called publish that performs the following steps:
- The checkout action downloads a copy of our repository on the runner.
- The setup action configures the Java environment. The with key allow us to specify the variables that will be available to the action. In the example, we set up the JDK version and with settings-path, we specify the location for the settings.xml file.
- Considering jobs on hosted GitHub runners start in a clean virtual environment, we want to save time so that dependencies don't need to be downloaded each time a job is ran. In the example, I'm caching all the dependency jars. It's important to set a key so that the action will try to restore the cache files based on that key. To create the key, I'm using the runner.os that gives me where the job is currently running, and the hashfile function that returns a hash for the given files (read more here).
- Im going to publish my project to Github Packages, that's why you see I run mvn clean deploy. At this point, is important to know that the action actions/setup-java@v1 used previously, is going to set up automatically a Maven settings.xml file generating the authentication for the server like the shown below. To use the GITHUB_TOKEN secret, we must reference it in our workflow file, as you see in my workflow file, I'm passing the token as an input to the action Publish package. If we don't do this, we can see an error in the logs (401 Unauthorized).
<servers>
    <server>
        <id>github</id>
        <username>${{ secrets.GITHUB_ACTOR }}</username>
        <password>${{ secrets.GITHUB_TOKEN }}</password>
    </server>
</servers>
The server created will have an id of github, GITHUB_ACTOR environment variable is our username and GITHUB_TOKEN environment variable is our password (these env. variables exist in our github repository by default). In my pom.xml, I I just need to add the repository configuration where the package will be uploaded.
...
<distributionManagement>
    <repository>
        <id>github</id>
        <name>github packages</name>
        <url>https://maven.pkg.github.com//[your_github_username]/[your_repository_name]</url>
    </repository>
</distributionManagement>
...
If we make a push, on the right side of our repository, we can find our package.

If we click on it, we can see the dependency.

- One of the last steps is to upload the artifact. Remember that an artifact is file or a collection of files produced during a workflow run. First, what I do is to create myTarget folder and copy the jar. The last actions used is upload-artifact@v2 that receives two inputs, the name of the artifact and the files that will be uploaded.

If we download myPackage and unzip it, we can see the jar.

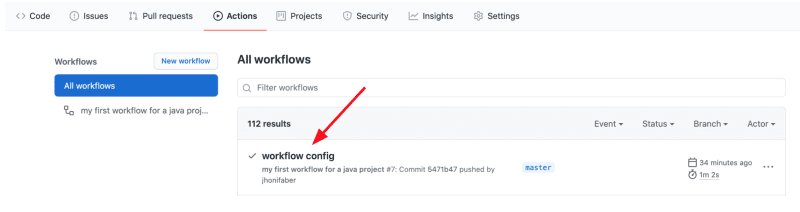
When we make a push to the repository, in the Actions tab we can see the workflow running. If everything is fine, we'll see a green tick.
When we click on the workflow, we can see a detailed list of the jobs and their steps. In my example, I just have the publish job.
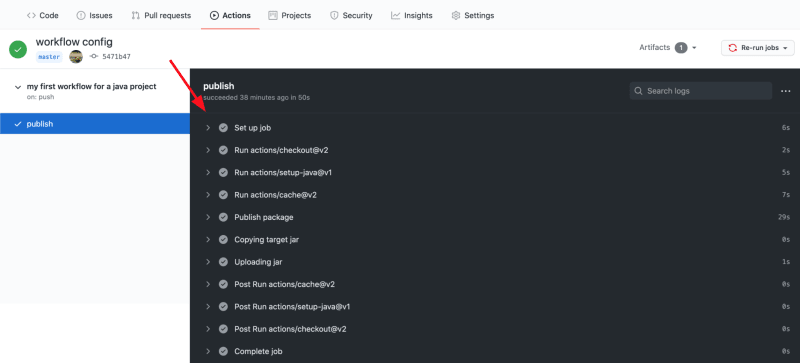
If we check the log of the publish package action, we can see how my database container is running, the spring context is up, flyway migrations are okay, and the tests passed successfully


Github packages
GitHub Packages is a hosting service that allows us to host our packages privately or publicly and use them as dependencies in our projects. As we saw in the previous section, we have uploaded the project as a dependency to Github Packages. But how can I install a maven dependency stored in github packages registry? apart from adding the dependency in the pom.xml, we must follow the following steps:
- In our pom.xml, we need to point to the repository where the dependency we want to install is located.
...
<repositories>
    <repository>
        <id>github</id>
        <url>https://maven.pkg.github.com/[github_username]/[repository_name]</url>
    </repository>
</repositories>
...
- The github package registry is available through the GitHub api and needs authorization, so we need to add our github credentials in the settings.xml. In my case I have added them to my global settings (~ / .m2 / settings.xml)
<settings xmlns="http://maven.apache.org/SETTINGS/1.0.0"
          xmlns:xsi="http://www.w3.org/2001/XMLSchema-instance"
          xsi:schemaLocation="http://maven.apache.org/SETTINGS/1.0.0
                          https://maven.apache.org/xsd/settings-1.0.0.xsd">

    <servers>
        <server>
            <id>github</id>
            <username>[your_github_username]</username>
            <password>[your_github_token]</password>
        </server>
    </servers>

</settings>
To create a token, we should go to our github Settings > Developer Settings > Personal access tokens and enable the read: packages permission.
Once these steps have been followed and if everything has gone well, the dependency will be installed correctly 😃.


Top comments (0)