For the past few weeks I've been learning Selenium in anticipation for an upcoming project. Below is some information and useful resources I've gathered that I can pass onto you! This will be a tutorial for beginners on using Selenium WebDriver & NUnit with C# and some things to keep in mind as you begin writing your first tests. There is a ton of information I could cover on this topic but I will only be touching on certain aspects.
This tutorial starts by covering basic topics, ramping up the power of our tests, then implementing better practices. I will provide code examples and improve them as we work through the sections together. As we work through the tutorial you may see that I change the class names (EX: Test2 to Test3). This is for my own use to keep different versions of the tests. It is up to you if you'd like to keep one version or separate them as I do.
PreReqs:
-Microsoft Visual Studio is downloaded (I will be using VS 2015)
-Chrome, Firefox and IE are downloaded
-Basic knowledge of C#
-Basic knowledge of HTML/CSS
Useful Resources:
-Microsoft Unit Test Best Practices
-Selenium CheatSheet
-Selenium Docs
-Selenium Waiting
-Selenium Exceptions
-Guru99, selenium/nunit tutorial
-NUnit CheatSheet
-Guru99 Demo Site for testing
-Udemy Video Course on Selenium
-BrowserFactory
-Page Object Model
-Execute Automation Parallel Testing Videos
What is Selenium WebDriver?
Selenium is used for website testing. Instead of a person manually opening a browser and using a mouse to select something on the page we can use Selenium WebDriver to do this for us. It uses a "driver" to open up your browser of choice, find elements on the page and interact with them.
Why Automated Testing?
Speed & Precision - We use calculators because they can perform mathematical procedures with greater accuracy and speed than humans. This is also why we would choose to perform automated testing. In general, a computer can complete a test faster than a human. A computer can also run multiple tests at the same time! And while the automated tests are running we are free to perform other tasks.
Re-usability - Every time you make a change to your website you need to make sure that the update did not have unintended side effects. Instead of manually testing every time a small change is made, we can run automated tests to confirm that the preexisting functionality remains intact.
Let's Get Started
1.Open Visual Studio and create a new project.

2.Create a .Net Console App and name it whatever you want!
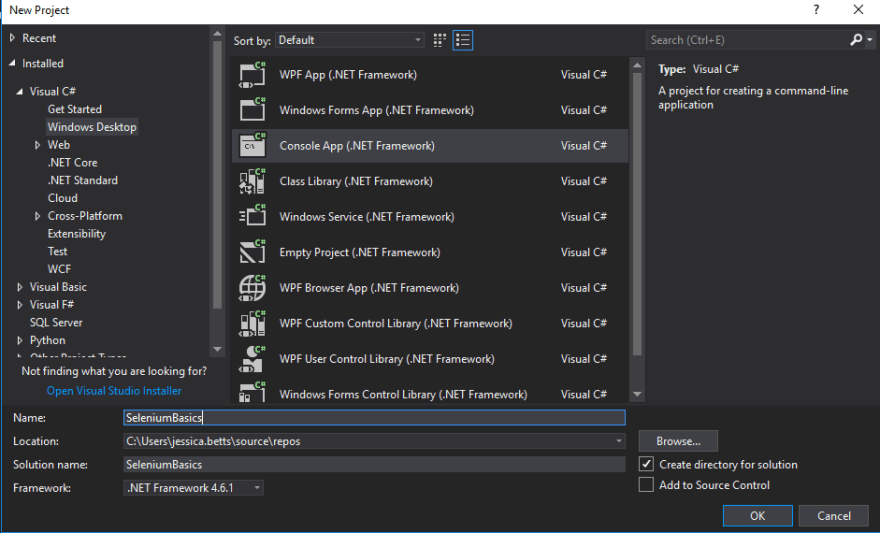
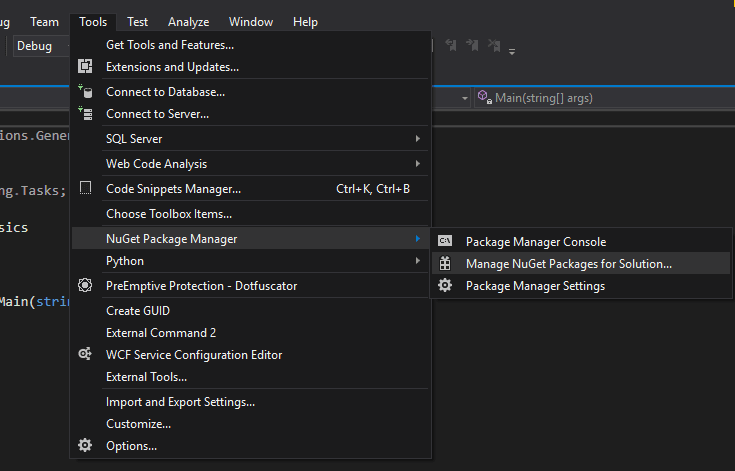
3.We need to download the Selenium packages by going to Tools -> NuGet Package Manger -> Manage NuGet Packages for Solution...
4.Browse for Selenium, You'll need to install Selenium.WebDriver, Selenium.Support and Selenium.WebDriver.ChromeDriver
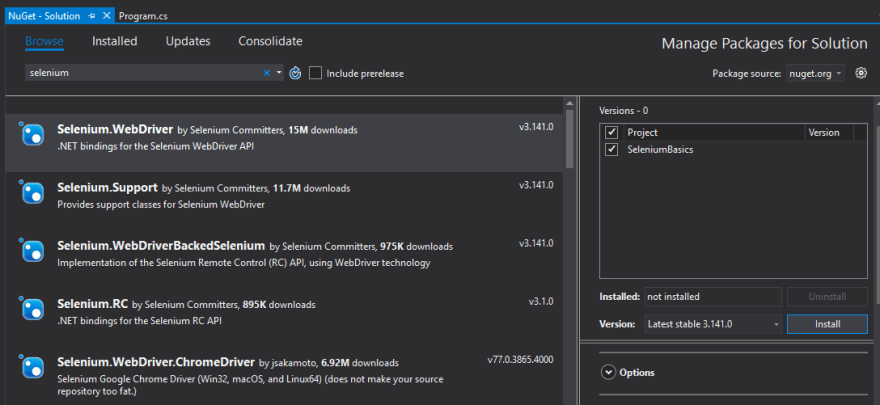
Once these packages have been installed you can start trying out Selenium!
The first thing we need to do is use a driver to open up a browser. We will be using ChromeDriver to open the Google Chrome browser. In your Program.cs file (which was automatically created by VS) we will write code to open a browser, navigate to a specific url and then close the browser.
using OpenQA.Selenium;
using OpenQA.Selenium.Chrome;
using OpenQA.Selenium.Support.UI;
using System;
using System.Collections.Generic;
using System.Linq;
using System.Text;
using System.Threading.Tasks;

namespace SeleniumBasics
{
    class Program
    {
        static void Main(string[] args)
        {
            IWebDriver _driver = new ChromeDriver(); //initialize the driver
            _driver.Navigate().GoToUrl("http://demo.guru99.com/V4"); //open the browser to the specified URL
            //_driver.Quit(); close the browser
            _driver.Close();// close the browser
        }
    }
}
Make sure to add import statements to get rid of the highlighted errors AKA red lines.
Tangent about quit vs close:
In the example above we have _driver.Quit() commented out. Both Quit and Close will dispose of a driver. Close() will close the current browser window that the focus is on while Quit() will close all browser windows. For every driver you initialize, make sure you close it properly! When I was first writing tests I discovered a bunch of open drivers running in the background because I wasn't closing each driver that was opened. Even though all the tests were completed I still had drivers that were running.
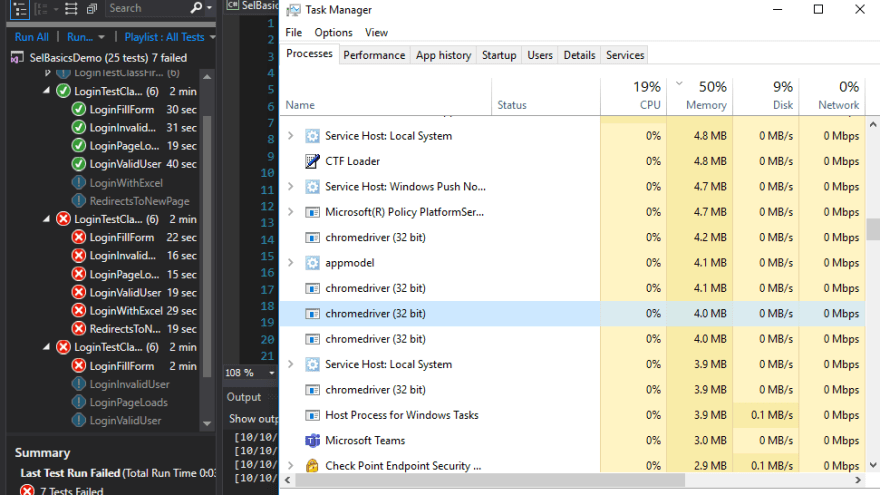
To ensure that all drivers have been closed you can browse your task manager after all your tests have completed.
Finding Elements
In order for Selenium to interact with an element of the page we need to figure out a unique way to identify that element. You can find elements using locators. Below I will cover examples of different locators and which are recommended.
In Chrome:
1.Open a new window, go to Dev.to.com and right click on the search bar.
2.Select Inspect and a window will appear showing you the site's HTML code under the elements tab. The element you inspected should be highlighted.
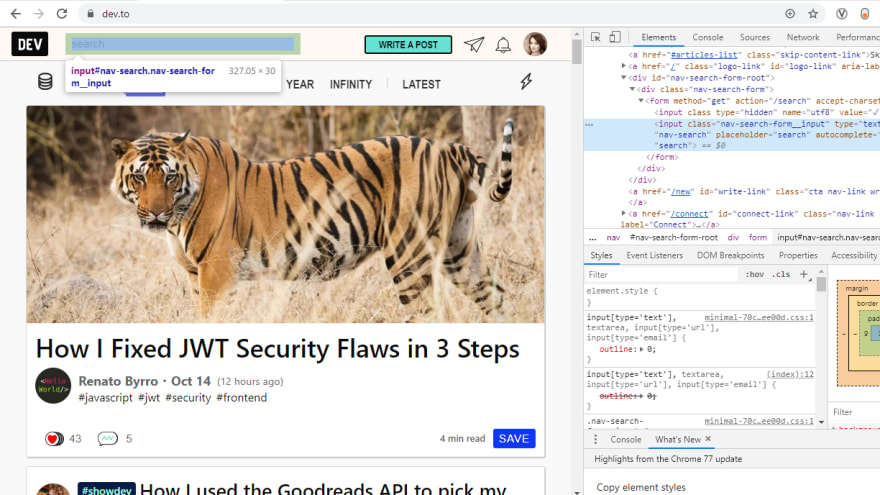
3.This search bar has some identifiable attributes like Id and Name that we can see just by looking at the html.
OR
4.Right Click on the highlighted element -> Go to Copy to see other options we can use for Selenium to locate that specific element.
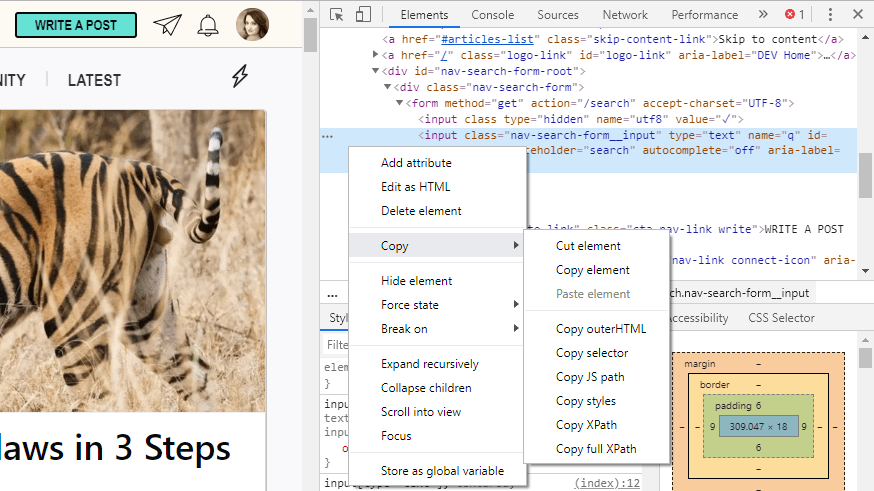
Below are the most common options Selenium uses to search for elements on a page:
-Id/Name
-ClassName
-CSS Selector
-XPath
The general rule is to use Id or Name if available. These values are unique and more maintainable in the future. If you use Id or Name and the location of the element or class changes, the tests will likely remain in tact. Css selectors and path locators are less stable locators because those values are more likely to be altered. When Id and Name are not available you could request the front end developer to add those attributes to the element or use ClassName, CSS Selector or XPath. In general, CSS Selectors are preferred over XPath due to speed.
Let's look at the syntax of how Selenium finds elements on a page.
IWebDriver _driver = new ChromeDriver();
_driver.Navigate().GoToUrl("https://dev.to/");
IWebElement searchBar = _driver.FindElement(By.Id("nav-search"));
//or
//IWebElement searchBar = _driver.FindElement(By.XPath("//*[@id='nav-search']"));
//get rid of extra white spaces if there are any when you copy
//use single quotes if your XPath has double qoutes inside
_driver.Close();
Here a list of locators from a cheatsheet I found:
this.driver.FindElement(By.ClassName("className"));
this.driver.FindElement(By.CssSelector("css"));
this.driver.FindElement(By.Id("id"));
this.driver.FindElement(By.LinkText("text"));
this.driver.FindElement(By.Name("name"));
this.driver.FindElement(By.PartialLinkText("pText"));
this.driver.FindElement(By.TagName("input"));
this.driver.FindElement(By.XPath("//*[@id='editor']"));
// Find multiple elements
IReadOnlyCollection<IWebElement> anchors = this.driver.FindElements(By.TagName("a"));
// Search for an element inside another
var div = this.driver.FindElement(By.TagName("div")).FindElement(By.TagName("a"));
Interacting with Elements
As testers our duties may be to test if the element exists or interact with the element to verify functionality. There are many ways to interact with these elements depending on their type or what you are trying to accomplish.
Going back to the search bar example. Let's find the search bar, give it a value to search for and submit.
IWebDriver _driver = new ChromeDriver();
_driver.Navigate().GoToUrl("https://dev.to/");
IWebElement searchBar = _driver.FindElement(By.Id("nav-search"));
searchBar.SendKeys("google maps api react"); // types the string into the search bar
searchBar.SendKeys(Keys.Enter); //submits the values
_driver.Close();
OR find the button with the text "LATEST" and click it!
IWebDriver _driver = new ChromeDriver();
_driver.Navigate().GoToUrl("https://dev.to/");
IWebElement latestBtn = _driver.FindElement(By.LinkText("LATEST"));
latestBtn.Click(); //clicks on the button
_driver.Close();
Use this cheatsheet again to explore different ways to interact with elements.
Practice Practice Practice!
There are many different types of html elements that you will encounter. I suggest building up your skills with this Selenium Udemy Intro Course that works with this site that has great testing for each way to search for elements and working with different types of elements.
Error Handling
There are many different types of errors you may come across while using selenium. Here is a list of all the Exceptions in Selenium! Let's go through an example of how to handle them.
Let's work off of the previous example where we try to locate the search bar element. If we did not locate the element correctly it will throw a NoSuchElementException. Let's modify our code to get this exception!
Change the line of code to find the search bar element:
 IWebElement searchBar = _driver.FindElement(By.Id("navigation"));
 //IWebElement searchBar = _driver.FindElement(By.Id("nav-search"));
If you are familiar with C# then you are probably familiar with the concept of try catch blocks.
The format is:
try
{
   //some logic
}
catch(Exception ex)
{
   //more logic
}
As a general rule we should give specific exceptions for our catch statement.
Add a try/catch block to your method and move the driver outside so you can close the driver no matter what! Try searching for an element that exists and an element that doesn't exist!
        static void Main(string[] args)
        {
            IWebDriver _driver = new ChromeDriver();
            try
            {
               _driver.Navigate().GoToUrl("https://dev.to/");
               IWebElement searchBar = _driver.FindElement(By.Id("navigation"));
               //IWebElement searchBar = _driver.FindElement(By.Id("nav-search"));
               searchBar.SendKeys("google maps api react");
               searchBar.SendKeys(Keys.Enter);
               _driver.Close();
            }
            catch(NoSuchElementException ex)
            {
                Console.WriteLine("The element didn't exist!");
                _driver.Close();
            }
         }
This is all I will cover about error handling since we will no longer need this when we implement NUnit! NUnit takes care of exceptions as part of its job.
Waiting
Waiting refers to the act of intentionally pausing your test. This can be done for different reasons and in different ways.
The previous code examples may be used to show why a developer may want to add a wait in the test. The driver performed its operations so quickly that it may have been difficult to see what was actually happening. If we pause the program between steps we can more easily see what is happening and to make sure the driver is doing what we expect. Second, if the page has not fully loaded and we search for an element, we might receive a ElementNotVisibleException exception.
Let's revisit the search bar example: (Try this on your own)
-We want to find the search bar, give it a search value, press enter and navigate to the results page
-We expect the url after the page is navigated to be https://dev.to/search?q=google%20maps%20api%20react
-get current url (Hint: _driver.Url)
-check to see if url is correct and display to the console
PAUSE (Paws)
After you try solving it on your own you can continue.

You may have gotten something like this:
static void Main(string[] args)
        {
            IWebDriver _driver = new ChromeDriver();
            _driver.Navigate().GoToUrl("https://dev.to/");

            IWebElement searchBar =_driver.FindElement(By.Id("nav-search"));
            searchBar.SendKeys("google maps api react");
            searchBar.SendKeys(Keys.Enter);

            string url = _driver.Url;
            string expectedUrl = "https://dev.to/search?q=google%20maps%20api%20react";
            if (url == expectedUrl)
            {
                Console.WriteLine("Correct Navigation");
                Console.WriteLine(url + " = " + expectedUrl);
            }
            else
            {
                Console.WriteLine("Invalid Navigation");
                Console.WriteLine(url + " != " + expectedUrl);
            }
            _driver.Close();
        }
In the console you may see something like this:
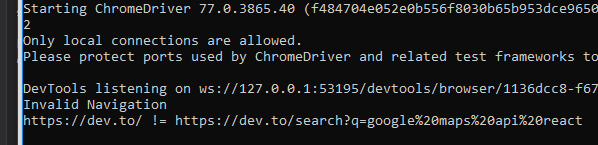
We see that the website navigated to the new page but the console printed "Invalid Navigation". This is because the driver retrieved the url before the the results page was loaded. Add Thread.Sleep(5000); after the line of code searchBar.SendKeys(Keys.Enter); and rerun the code.

Thread.Sleep() causes the program to pause for the specified amount of milliseconds. After the sleep is finished it continue executing code. When we have the driver wait for a few seconds it allows the results page to fully load before grabbing the url.
There are a few different ways to implement waits:
1.The worst option. Thread sleeping. This method of waiting is not best practice because the program will ALWAYS wait the given amount of time before moving on. This is not an optimal way to wait. Let's say we have an image element that typically takes 5 to 10 seconds to be displayed. Using Thread.Sleep we would need to have it wait the entire 10 seconds to make sure the images loads every time. When we hypothetically ran our test, the image took 6 seconds to load. Using this method we waste 4 seconds, which isn't a lot if we are only running 1 test, but realistically it could waste a significant amount of time if we are running many tests. Alternatively, lets say the site was slower on a particular day because of high traffic. If the image you tried to access took 12 seconds to load then the test would break. This approach is the least dynamic.
Thread.Sleep(5000)
//the number inside the parenthesis are milliseconds
2.Implicit waits can be used when you know how long it will typically take the browser to load an element or preform a task. If the task is unable to be preformed immediately then the driver will continue trying for a specified amount of time. You only have to set an implicit wait once then it is set for the entire life cycle of the driver object. Implicit waits are smarter than the previous option because the driver will stop waiting if it finds the task can be preformed before the timeout. However! You still have the same issue if the task runs longer than your set timeout period. Also because you set the timeout once and different elements take different amounts of time to load, it may be difficult to choose a suitable timeout or you will reset the timeout again and again.
_driver.Manage().Timeouts().ImplicitWait = TimeSpan.FromSeconds(5);
IWebElement input = _driver.FindElement(By.Name("uid"));
3.Explicit waits. Driver waits until a task can be preformed. We set the timeout of the wait and tell the driver what to wait for specifically. This approach is generally considered the best practice.
WebDriverWait wait = new WebDriverWait(_driver, TimeSpan.FromSeconds(15));
IWebElement input = wait.Until<IWebElement>(d => d.FindElement(By.Id("elementId")));

//or

WebDriverWait wait = new WebDriverWait(_driver, TimeSpan.FromSeconds(15));
IWebElement element = wait.Until(ExpectedConditions.ElementToBeClickable(By.Id("elementId")));
Make sure to not mix explicit and implicit waits. You may experience unexpected results.
Implementing NUnit
NUnit is a testing framework that allows us to write test methods within tests classes. NUnit allows us to run tests without using a main method. It gives us more powerful testing and more readable results.
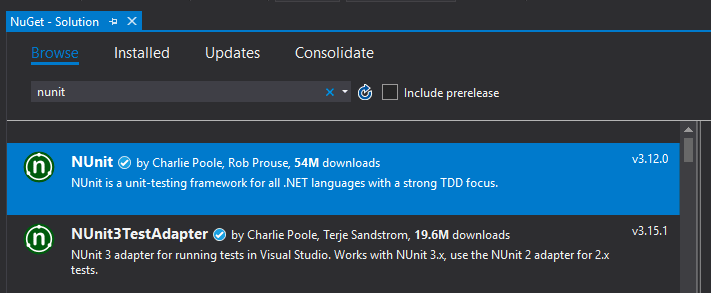
To set up NUnit:
1.Go to Tools -> NuGet Package Manager -> Manage NuGet Packages for Solution

2.Search for NUnit in the Browse tab
3.Download NUnit and NUnit3TestAdapter
Add a new test file:
1.Click on your project -> Add -> New Item
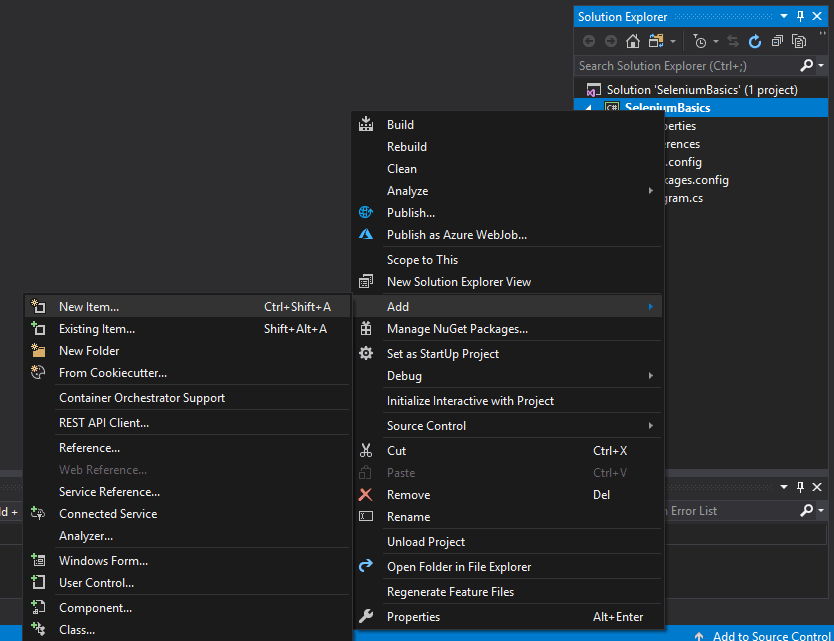
2.Under the Test section choose NUnit Test Fixture
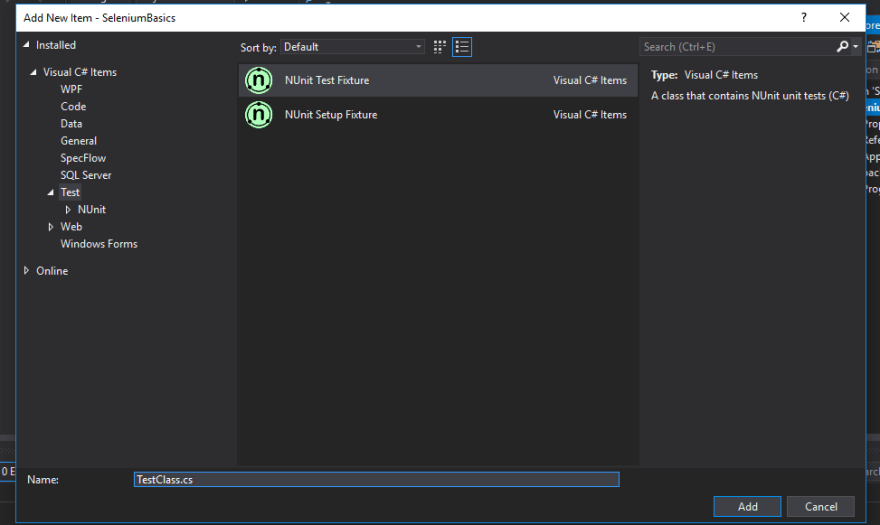
Now we have a premade file that looks like:
using System.Collections.Generic;
using System.Linq;
using System.Text;
using System.Threading.Tasks;

namespace SeleniumBasics
{
    [TestFixture]
    public class TestClass
    {
        [Test]
        public void TestMethod()
        {
            // TODO: Add your test code here
            var answer = 42;
            Assert.That(answer, Is.EqualTo(42), "Some useful error message");
        }
    }
}
Above TestMethod() there is a [Test] annotation. This denotes that the method should be treated as a test by Visual Studio. In our method we see a variable and an assert statement. The assert checks some specified conditions to determine whether a test is passing or not. This assert is easily understandable, we are checking if the value of the variable answer is equal to 42. If the condition is not met it responds with a message given in the last part of the assert statement.
There is no main function. Instead we will use Test Explorer to run our tests from now on. Open Test Explorer by selecting Test -> Windows -> Test Explorer.

We can run all tests by clicking "Run All" or select an individual test by selecting that specific test, right clicking, "Run Selected Tests". Test Explorer shows passed and failed tests by using green and red circles.

We can see by the green circles that the test has passed. Let's change our method to:
[Test]
public void Test1()
{
      // TODO: Add your test code here
      var answer = 22;
      Assert.That(answer, Is.EqualTo(42), "The numbers do not match!");
}
Rerun your code and you should get the following. To see the details of the test left click on it in Test Explorer.
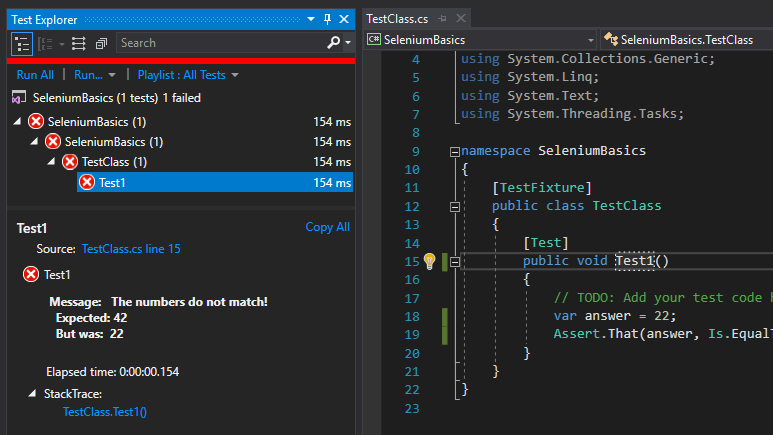
Above shows our error message, what the test expected (42) and what the actual given value was (22). Let's use our previous code from Program.cs and implement it in using NUnit in the TestClass.cs file.
        [Test]
        public void Test1()
        {
            IWebDriver _driver = new ChromeDriver();
            _driver.Navigate().GoToUrl("https://dev.to/");

            IWebElement searchBar = _driver.FindElement(By.Id("nav-search"));
            searchBar.SendKeys("google maps api react");
            searchBar.SendKeys(Keys.Enter);
            Thread.Sleep(5000);
            string url = _driver.Url;
            //if (url == expectedUrl)
            //{
            //    Console.WriteLine("Correct Navigation");
            //    Console.WriteLine(url + " = " + expectedUrl);
            //}
            //else
            //{
            //    Console.WriteLine("Invalid Navigation");
            //    Console.WriteLine(url + " != " + expectedUrl);
            //}
            string expectedUrl = "https://dev.to/search?q=google%20maps%20api%20react";
            Assert.AreEqual(url, expectedUrl, "The actual URL does not match the expected URL");
            _driver.Quit();
        }
Most of the code remained the same but instead of the if statement we used an assert to accomplish the same goal of checking to make sure the search navigated to the place we expected.
Here are some more assert examples from AutomateThePlanet:
Assert.AreEqual(28, _actualFuel); // Tests whether the specified values are equal.
Assert.AreNotEqual(28, _actualFuel); // Tests whether the specified values are unequal. Same as AreEqual for numeric values.
Assert.AreSame(_expectedRocket, _actualRocket); // Tests whether the specified objects both refer to the same object
Assert.AreNotSame(_expectedRocket, _actualRocket); // Tests whether the specified objects refer to different objects
Assert.IsTrue(_isThereEnoughFuel); // Tests whether the specified condition is true
Assert.IsFalse(_isThereEnoughFuel); // Tests whether the specified condition is false
Assert.IsNull(_actualRocket); // Tests whether the specified object is null
Assert.IsNotNull(_actualRocket); // Tests whether the specified object is non-null
Assert.IsInstanceOf(_actualRocket, typeof(Falcon9Rocket)); // Tests whether the specified object is an instance of the expected type
Assert.IsNotInstanceOf(_actualRocket, typeof(Falcon9Rocket)); // Tests whether the specified object is not an instance of type
StringAssert.AreEqualIgnoringCase(_expectedBellatrixTitle, "Bellatrix"); // Tests whether the specified strings are equal ignoring their casing
StringAssert.Contains(_expectedBellatrixTitle, "Bellatrix"); // Tests whether the specified string contains the specified substring
StringAssert.DoesNotContain(_expectedBellatrixTitle, "Bellatrix"); // Tests whether the specified string doesn't contain the specified substring
StringAssert.StartsWith(_expectedBellatrixTitle, "Bellatrix"); // Tests whether the specified string begins with the specified substring
StringAssert.StartsWith(_expectedBellatrixTitle, "Bellatrix"); // Tests whether the specified string begins with the specified substring
StringAssert.IsMatch("(281)388-0388", @"(?d{3})?-? *d{3}-? *-?d{4}"); // Tests whether the specified string matches a regular expression
StringAssert.DoesNotMatch("281)388-0388", @"(?d{3})?-? *d{3}-? *-?d{4}"); // Tests whether the specified string does not match a regular expression
CollectionAssert.AreEqual(_expectedRockets, _actualRockets); // Tests whether the specified collections have the same elements in the same order and quantity.
CollectionAssert.AreNotEqual(_expectedRockets, _actualRockets); // Tests whether the specified collections does not have the same elements or the elements are in a different order and quantity.
CollectionAssert.AreEquivalent(_expectedRockets, _actualRockets); // Tests whether two collections contain the same elements.
CollectionAssert.AreNotEquivalent(_expectedRockets, _actualRockets); // Tests whether two collections contain different elements.
CollectionAssert.AllItemsAreInstancesOfType(_expectedRockets, _actualRockets); // Tests whether all elements in the specified collection are instances of the expected type
CollectionAssert.AllItemsAreNotNull(_expectedRockets); // Tests whether all items in the specified collection are non-null
CollectionAssert.AllItemsAreUnique(_expectedRockets); // Tests whether all items in the specified collection are unique
CollectionAssert.Contains(_actualRockets, falcon9); // Tests whether the specified collection contains the specified element
CollectionAssert.DoesNotContain(_actualRockets, falcon9); // Tests whether the specified collection does not contain the specified element
CollectionAssert.IsSubsetOf(_expectedRockets, _actualRockets); // Tests whether one collection is a subset of another collection
CollectionAssert.IsNotSubsetOf(_expectedRockets, _actualRockets); // Tests whether one collection is not a subset of another collection
Assert.Throws<ArgumentNullException>(() => new Regex(null)); // Tests whether the code specified by delegate throws exact given exception of type T
You should play around with these, create more tests and try different types of Assert statements.
SetUp and TearDown
Let's use the two methods below as an example. For each test we will need to set up our driver and close it when we are done. As programmers we should recognize and try to eliminate redundancies.
        [Test]
        public void SearchForKeywords()
        {
            IWebDriver _driver = new ChromeDriver();
            _driver.Navigate().GoToUrl("https://dev.to/jessicabetts");

            IWebElement searchBar = _driver.FindElement(By.Id("nav-search"));
            searchBar.SendKeys("google maps api react");
            searchBar.SendKeys(Keys.Enter);
            Thread.Sleep(5000);
            string url = _driver.Url;
            string expectedUrl = "https://dev.to/search?q=google%20maps%20api%20react";
            Assert.AreEqual(expectedUrl, url, "The actual URL does not match the expected URL");
            _driver.Quit();
        }

        [Test]
        public void NavToHome()
        {
            IWebDriver _driver = new ChromeDriver();
            _driver.Navigate().GoToUrl("https://dev.to/jessicabetts");

            IWebElement logoIcon = _driver.FindElement(By.Id("logo-link"));
            logoIcon.Click();
            Thread.Sleep(5000);
            string url = _driver.Url;
            string expectedUrl = "https://dev.to/";
            Assert.AreEqual(expectedUrl, url, "The actual URL does not match the expected URL");
            _driver.Quit();
        }
Instead of writing the same lines of code in both methods we can move the driver initialization code into a method and driver.quit() into another method. Similarly to the [Test] annotation, we will use [SetUp] and [TearDown] annotations to tell VS how we want these methods to behave. Methods with these labels are automatically called before and after each test, respectively. As a bonus, we can also move the code to check the url into its own method. After making these changes our new code might look something like this:
[TestFixture]
    public class TestClass
    {
        IWebDriver _driver;

        [SetUp]
        public void SetUp() //you can name this method however you want
        {
            _driver = new ChromeDriver();
            _driver.Navigate().GoToUrl("https://dev.to/jessicabetts");
        }

        public bool IsCorrectUrl(string expectedUrl)
        {
            Thread.Sleep(5000);
            string url = _driver.Url;
            return url == expectedUrl;
        }

        [Test]
        public void SearchForKeywords()
        {
            IWebElement searchBar = _driver.FindElement(By.Id("nav-search"));
            searchBar.SendKeys("google maps api react");
            searchBar.SendKeys(Keys.Enter);
            string expectedUrl = "https://dev.to/search?q=google%20maps%20api%20react";
            Assert.AreEqual(true, IsCorrectUrl(expectedUrl), "The actual URL does not match the expected URL");
        }

        [Test]
        public void NavToHome()
        {
            IWebElement logoIcon = _driver.FindElement(By.Id("logo-link"));
            logoIcon.Click();
            string expectedUrl = "https://dev.to/";
            Assert.AreEqual(true, IsCorrectUrl(expectedUrl), "The actual URL does not match the expected URL");
        }

        [TearDown]
        public void TearDown() //you can name this method however you want
        {
            _driver.Quit();
        }
   }
NUnit does not run the tests sequentially based on their position in the Test Fixture. For example, the NavToHome test may run before SearchForKeywords. If that is the case VS will call the methods in this order:
SetUp -> NavToHome -> IsCorrectUrl -> TearDown
then
SetUp -> SearchForKeywords -> IsCorrectUrl -> TearDown
Observe this by adding print statements in the SetUp and TearDown methods.
You can also use [OneTimeSetUp] and [OneTimeTearDown] to call a method once per [TestFixture] instead of once per [Test].
Adding test data
To make tests more dynamic we can pass parameters to a test method to test multiple sets of input. To do this we use the [TestCase] annotation above the method. Inside the annotation we pass parameters to the method. It should be noted that the number and type of method parameters should match the Test Case parameters. We can also use more than one TestCase on the same method to test multiple sets of data.
Example:
        [TestCase(0, 1)]
        [TestCase(3, 4)]
        public void AddOne(int initialNumber, int expectedResult)
        {
            int newNum = initialNumber + 1;
            Assert.AreEqual(newNum, expectedResult);
        }
Here is an excellent video that clearly explains this concept with examples!
Multiple Browsers
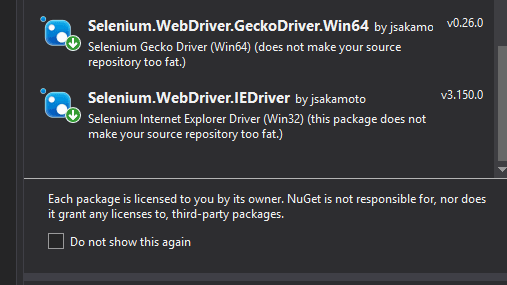
Though most of us use Google Chrome, it is not everyones primary browser. To ensure cross browser compatibility you should test your website in as many browsers as possible. To do this we need to download more drivers. For our purposes we will only download Mozilla Firefox & Internet Explorer.
Install these drivers from NuGet Manager:
In other tutorials I've seen FirefoxDriver work as follows:
IWebDriver _driver = new FirefoxDriver();
If this works for you great! However, I was receiving the error:
System.InvalidOperationException : Expected browser binary location, but unable to find binary in default location, no 'moz:firefoxOptions.binary' capability provided, and no binary flag set on the command line (SessionNotCreated)
The firefox driver setup that worked for me came from this stack overflow question.
FirefoxDriverService service = FirefoxDriverService.CreateDefaultService();
service.FirefoxBinaryPath = @"C:\Path\to\firefox.exe"; //put your path here
FirefoxOptions options = new FirefoxOptions();
IWebDriver _driver = new FirefoxDriver(service, options);
Similarly, at one point this internet explorer driver worked for me:
IWebDriver _driver = new InternetExplorerDriver();
But started giving me the timeout error:
OpenQA.Selenium.WebDriverException : The HTTP request to the remote WebDriver server for URL http://localhost:63719/session/6e2d52a8-723b-4a37-bad2-3df42bfb67b7/url timed out after 60 seconds.
----> System.Net.WebException : The request was aborted: The operation has timed out.
I used this thread to implement the internet explorer driver:
InternetExplorerDriverService driverService = InternetExplorerDriverService.CreateDefaultService();
driverService.LibraryExtractionPath = Environment.CurrentDirectory;
InternetExplorerOptions options = new InternetExplorerOptions();
options.EnableNativeEvents = true;
options.IntroduceInstabilityByIgnoringProtectedModeSettings = true;
IWebDriver _driver = new InternetExplorerDriver(driverService, options, TimeSpan.FromSeconds(180));
Don't forget to add your assembly references to get rid of your red lines
Now that we have three different drivers our testing becomes complicated. If we want to test one functionality we COULD write the following:
namespace SeleniumBasics
{
    [TestFixture]
    public class TestClass2
    {
        [Test]
        public void ChromeTest()
        {
            IWebDriver _driver = new ChromeDriver();
            _driver.Navigate().GoToUrl("https://dev.to/jessicabetts");

            //some code to test
            _driver.Quit();
        }

        [Test]
        public void FireFoxTest()
        {
            IWebDriver _driver = new FirefoxDriver();
            _driver.Navigate().GoToUrl("https://dev.to/jessicabetts");

            //some code to test
            _driver.Quit();
        }

        [Test]
        public void IETest()
        {
            IWebDriver _driver = new InternetExplorerDriver();
            _driver.Navigate().GoToUrl("https://dev.to/jessicabetts");

            //some code to test
            _driver.Quit();
        }
    }
}
But that doesn't mean we SHOULD!! Instead we can write one method and test it across three different browsers. To do this we can use [TestFixtures].
Test Fixtures
Not only can we have more than one test fixture but we can actually use them to pass arguments to our class constructor. For our purposes each fixture will correspond to a different browser. NOTE: Each fixture is creating an instance of the test class
    [TestFixture("Chrome")]
    [TestFixture("FireFox")]
    [TestFixture("IE")]
Use a constructor to accept the arguments sent in through the test fixtures. Have your SetUp method decide which driver should be implemented.
[TestFixture("Chrome")]
[TestFixture("FireFox")]
[TestFixture("IE")]
public class TestClass3
    {
        IWebDriver _driver;
        string browser;

        //constructor for test class that takes in which type of browser to use
        public TestClass3(string browserType)
        {
            browser = browserType;
        }

        [SetUp]
        public void SetUp()
        {
            if (browser == "Chrome")
            {
                _driver = new ChromeDriver();
            }
            else if (browser == "FireFox")
            {
                _driver = new FirefoxDriver();
            }
            else if (browser == "IE")
            {
                _driver = new InternetExplorerDriver();
            }
        }
Again, the code above can be improved further.
The above information was obtained by this thread.
Driver Class
We should organize our code in a way that makes more sense. It is not the responsibility of the test classes to worry about different browser drivers. Alternatively, we can implement a driver class that is responsible for this logic.
Create a new driver class and move all your driver setup logic into a method that returns a driver object.
public class DriverClass
    {

        public static IWebDriver GetDriver(string browserType)
        {
            IWebDriver Driver;

            if (browserType == "Chrome")
            {
                Driver = new ChromeDriver();
            }
            else if (browserType == "FireFox")
            {
                Driver = new FirefoxDriver();

            }
            else if (browserType == "IE")
            {
                Driver = new InternetExplorerDriver();
            }
            else
            {
                Driver = null;
            }

            return Driver;
        }
Now we can just call the GetDriver method and set our _driver property.
    public class TestClass4
    {
        IWebDriver _driver;
        string browser;

        public TestClass4(string browserType)
        {
            browser = browserType;
        }

        [SetUp]
        public void SetUpDriver()
        {
            _driver = DriverClass.GetDriver(browser);
            _driver.Navigate().GoToUrl("https://dev.to/jessicabetts");
        }
DISCLAIMER: I'm demonstrating an idea about code organization and separation. There are better and more eloquent implementations of the idea. For example: ToolsQA or FriendlyTester
Similarly to the Driver class, we can also encapsulate page specific information into it's own class by implementing the Page Object Model.
Page Object Model
The idea of the Page Object Model is to use OOP design by separating all the concerns of a page you are interacting with, into its own class.
Let's Use Guru99's Demo Site's Sign In Page as an example. Follow along for practice!
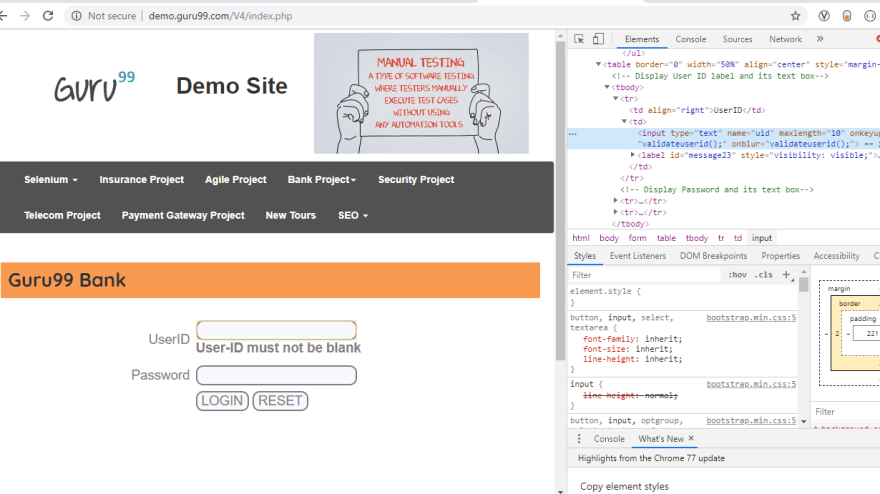
I wrote some code to fill out the UserId input box then use the reset button to clear it. The assert statement checks to make sure the value of the UserId input box is empty. (Sleeps are added so you can see what is happening if you are following along)
    public class TestClass5
    {
        IWebDriver _driver;
        string browser;

        public TestClass5(string browserType)
        {
            browser = browserType;
        }

        [SetUp]
        public void SetUpDriver()
        {
            _driver = DriverClass.GetDriver(browser);
            _driver.Navigate().GoToUrl("http://demo.guru99.com/V4/index.php");
        }

        [Test]
        public void ResetFeilds()
        {
            IWebElement userIdInput = _driver.FindElement(By.Name("uid"));
            string validUserId = "userId";
            userIdInput.SendKeys(validUserId);
            Thread.Sleep(2000);
            IWebElement resetBtn = _driver.FindElement(By.Name("btnReset"));
            resetBtn.Click();
            Thread.Sleep(4000);
            Assert.AreEqual(userIdInput.GetAttribute("value") == "", true, "did not clear userId");
        }

        [TearDown]
        public void TearDownDriver()
        {
            _driver.Quit();
        }
    }
Let's start implementing POM. Create a class for the SignIn page. This page will hold information about its own url, store variables that hold elements of the page and methods to interact with those elements.
In the SignIn Class, divide the logic that comes from the ResetFeilds method(in the test class) into small functions that serve a singular purpose:
        public void NavigateToPage()
        {
            _driver.Navigate().GoToUrl("http://demo.guru99.com/V4/index.php");
        }

        public void FillOutUserId()
        {
            _driver.FindElement(By.Name("uid")).SendKeys("userId");
            Wait();
        }

        public void ResetForm()
        {
            _driver.FindElement(By.Name("btnReset")).Click();
            Wait();
        }

        public string GetUserIdValue()
        {
            return _driver.FindElement(By.Name("uid")).GetAttribute("value");
        }

        public void Wait(){ Thread.Sleep(2500); }
Move all element locators and URL info to the top of the class. This trims redundancy and makes future changes easier. You can expect that a website will not stay the same forever. If the location or identifier of an element is modified you will only have to update the variable once, instead of modifying it in multiple places. For us, this is especially helpful since we search for the UserId input field more than once.
class SignInPage
    {
        string url = "http://demo.guru99.com/V4/index.php";
        By userInputLocator = By.Name("uid");
        By resetBtnLocator = By.Name("btnReset");
        string userId = "userId";
We need to create a driver property in the SignIn class in order to manipulate the driver. Pass the driver object as an argument to the SignIn constructor so we can set that property.
        IWebDriver _driver;

        public SignInPage(IWebDriver newDriver)
        {
            _driver = newDriver;
        }
After these steps you will end up with this:

Let's go back to our test class and make adjusts in our ResetFields method!
1.Create an instance of the SignIn Page
SignInPage signInPage = new SignInPage(_driver);
2.Use the signInPage object to call its methods and comment out old logic
            signInPage.NavigateToPage();

            signInPage.FillOutUserId();
            //IWebElement userIdInput = _driver.FindElement(By.Name("uid"));
            //string validUserId = "userId";
            //userIdInput.SendKeys(validUserId);
            //Thread.Sleep(2000);

            signInPage.ResetForm();
            //IWebElement resetBtn = _driver.FindElement(By.Name("btnReset"));
            //resetBtn.Click();
            //Thread.Sleep(4000);

            string UserIdValue = signInPage.GetUserIdValue();
            Assert.AreEqual( UserIdValue == "", true, "did not clear userId");
            //Assert.AreEqual(userIdInput.GetAttribute("value") == "", true, "did not clear userId");
3.Remove the driver navigation from Setup method.
You should end up with something like this.

Organization
As your tests expand to incorporate different pages of the website, create more page classes. Some developers create a folder that holds all of the Page Object Classes.
Parallel Testing
The most important contribution of automated testing is speed. The driver preforms tasks more quickly than a person using a browser. We can improve the speed further through parallel testing by running multiple tests at the same time
(AKA parallel testing).
You may have noticed when we ran our tests with TestFixtures, the first TestFixture completed before the second started, meaning our tests were running sequentially. We can use the [Parallelizable] annotation to indicate that the tests should run at the same time. This annotation has a few scope options.
To run TestFixtures in parallel you can add one of the following annotations above your class:
    [TestFixture("Chrome")]
    [TestFixture("FireFox")]
    [Parallelizable]
    public class TestClass7
    {
or
[Parallelizable(ParallelScope.Fixtures)]
This allows different TestFixtures to be tested at the same time. For our particular case that means we can test multiple browsers at once.
Try this out! You can tell which tests are running by the swirling circle next to the tests in the Test Explorer!

Observe the time difference when running tests with and without the [Parallelizable] annotation. For me the time difference was about 10 seconds increase in speed. The difference may not be as large as expected! This may be due to computer limitations, internet speed or even the way you write your tests!
We can also run test methods within a fixture at the same time using:
[Parallelizable(ParallelScope.Children)]
At this point we only have one method. I wrote an additional method that will fill out both fields of the login page and click the login button. If the username and password is correct we will be redirected to managers homepage (url: http://demo.guru99.com/V4/manager/Managerhomepage.php").
Add this code to your test class:
        [Test]
        public void ValidLogin()
        {
            SignInPage signInPage = new SignInPage(_driver);
            signInPage.NavigateToPage();
            signInPage.FillOutUserId();
            signInPage.FillOutPassword();
            signInPage.Login();
            string currentUrl = _driver.Url;
            Assert.AreEqual(currentUrl, "http://demo.guru99.com/V4/manager/Managerhomepage.php", "Login was unsuccessful");
        }
Add these variables at the top of your SignIn Page class:
        By passwrdInputLocator = By.Name("password");
        By loginBtnLocator = By.Name("btnLogin");
        string password = "PASSWORD"; //we will update this soon
Add the two methods:
public void FillOutPassword()
{
      _driver.FindElement(passwrdInputLocator).SendKeys(password);
      Wait();
}

public void Login()
{
      _driver.FindElement(loginBtnLocator).Click();
      Wait();
}
Change your username and password variables with your own credentials
Attempt to manually login in to the demo site using your generated credentials.
Now we have to change our TestClass a little to work with testing multiple methods in a fixture. We need to modify the TestClass to create multiple drivers instead of using the same driver for multiple tests.
1.Get rid of the _driver static variable at the top of the class.
2.Remove the SetUp method.
3.Remove the TearDown method.
4.Each test method will instantiate and close its own driver.
        [Test]
        public void ResetFeilds()
        {
            IWebDriver driver = DriverClass.GetDriver(Browser);
            SignInPage2 signInPage = new SignInPage2(driver);

            signInPage.NavigateToPage();
            signInPage.FillOutUserId();
            signInPage.ResetForm();
            string UserIdValue = signInPage.GetUserIdValue();
            Assert.AreEqual(UserIdValue == "", true, "did not clear userId");
            driver.Close();
        }
5.Repeat the same steps for the ValidLogin method!
6.Change to use:
[Parallelizable(ParallelScope.Children)]
Run your tests!
We can observe that our test methods are running in parallel but our test fixtures are not! This can be observed through the test explorer.

Again, try running with and without parallelization to notice the time difference between the two.
So now we can use run either test fixtures in parallel or test methods in parallel. But what about both? In the ideal scenario we would run tests with both levels of parallelization.
Now, we only need to change our parallelizable annotation:
[Parallelizable(ParallelScope.All)]
When you run the code make sure all tests are running.

What's Next?
As your number of tests grow you can imagine that it becomes more and more important to run as many tests as possible without overloading the system. We can do this by implementing Selenium Grid.
Ideally if you are testing you would want to run tests in an environment that is dedicated to testing. It will speed up the run time of your tests by eliminating the execution of other background tasks. SauceLabs is a popular solution. Though this is more likely not in the scope of what we are trying to accomplish. I suggest using the free trial to become acquainted with working in a testing server.
When you have many tests you should create a report, or have a way to notify the development team that a test is not passing.
I will not be covering these topics further but its a good next point to research when you are ready.
Le Fin
I hope this compilation of information could help assist in your journey to becoming an entry level automated tester! That's all folks!
As a developer that is new to testing I would love to learn more. That being said if you find error, have suggestions or additional information, feel free to share it! The point of this blog is to be helpful to beginners, like me, as they start their journey becoming automation testers.


Top comments (4)
Hi Jessica,
Really enjoying this article. I've run into a bit of a roadblock after I download NUnit. When I go to add it, it doesn't exist in the list of options. I don't have a test folder available and no amount of googling and stackoverflowing has helped. Would appreciate your thoughts
Update for anyone reading this. I just needed to create a new class and manually input the setup. Seems to be working
Thanks for updating :) it can help others in the future!
for dev.to site, use find element by name "q" for it to work.