Introduction
Azure one of the leading cloud platform open tremendous ways to give lot of Solutioning options in SharePoint. Being a collaborative platform SharePoint Site Design is one of the essential features to maintain consistent look and feel and functionality across different department sites.
Refer below official documentation to implement Site Designs at Site Collection level. Here we are going to learn a workaround to implement site design and maintain consistency on creating subsites.
Below are the components that we will deal with to get this work done.
- Azure App Service – to host Remote Event Receivers
- PnP Provisioning template
- Azure Function – to execute PowerShell scripts.
Implementation Approach
Before proceeding let’s see the approach to implement site design for subsites in simple steps as below,
- Create a Remote Event Receiver using Provider Hosted app
- Register the App-Installed event.
- In App-Installed event, register Web Provisioned Event.
- Publish the app in Azure App Service.
- Package and Install the app in Site Collection.
- Get PnP Template of one Site subsite to create lists/libraries/webparts/pages.
- Create Azure function to run PowerShell scripts.
- Upload the PnP Template xml in Azure Function.
- Write PowerShell script to apply the PnP Template on the site.
- When Web Provisioned event triggers call the Azure Function by passing subsite context info.
- Site Provisioning will trigger and complete in few minutes based on complexity of the template.
Remote Event Receiver
Remote event receivers work like an online web service which will be called when an event is triggered. It avoids the purpose of running the event code on the server. In SharePoint Online we don’t have control of the server so here it will be helpful to handle events in the site.
How to create Remote Event Receiver
SharePoint Provider-hosted add-ins can be used as a remote event receiver. Go ahead and create a regular provider hosted add-in using Visual Studio and follow all the approaches that are required for Provider hosted app like registering Client ID and Client Secret.
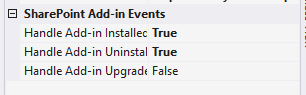
Enabling events in Provider-hosted add-in
In Visual Studio, open the Solution explorer and click on the Project created for Add-in and click “F4” in your machine. It will open a properties section, enable the Installed and Uninstalled event as you see in below picture.
WCF service to work as a receiver
Add a new WCF service to your web application project named AppEventReceiver.svc.cs Register this service in AppManifest file like below,
<Properties>
    <Title>Name Of Add-in</Title>
    <StartPage>~remoteAppUrl/?{StandardTokens}</StartPage>
    <InstalledEventEndpoint>~remoteAppUrl/Services/AppEventReceiver.svc</InstalledEventEndpoint>
    <UninstallingEventEndpoint>~remoteAppUrl/Services/AppEventReceiver.svc</UninstallingEventEndpoint>
</Properties>
This registration has to be done for app level events.
AppEventReceiver.svc.cs
Namespaces
using System;
using System.Text;
using Microsoft.SharePoint.Client;
using Microsoft.SharePoint.Client.EventReceivers;
using System.ServiceModel;
using System.ServiceModel.Channels;
using System.Net;
using System.Net.Http;
using System.Threading;
Process Event method
public SPRemoteEventResult ProcessEvent(SPRemoteEventProperties properties)
        {
            SPRemoteEventResult result = new SPRemoteEventResult();

            using (ClientContext clientContext = getClientContext(properties))
            {
                if (clientContext != null)
                {
                    clientContext.Load(clientContext.Web);
                    clientContext.ExecuteQuery();

                    switch (properties.EventType)
                    {
                        case SPRemoteEventType.WebProvisioned:
                            WebProvisionedMethod(properties);
                            break;
                        case SPRemoteEventType.AppInstalled:
                            AppInstalledMethod(properties);
                            break;
                        case SPRemoteEventType.AppUninstalling:
                            AppUnInstallingMethod(properties);
                            break;
                        default:
                            break;
                    }
                }
            }

            return result;
        }
Getclientcontext method
private ClientContext getClientContext(SPRemoteEventProperties _properties)
        {
            string _contextTokenString = _properties.ContextToken;
            string webUrl = string.Empty;

            if (_properties.AppEventProperties != null)
                webUrl = _properties.AppEventProperties.HostWebFullUrl.AbsoluteUri;
            else if (_properties.WebEventProperties != null)
                webUrl = _properties.WebEventProperties.FullUrl;

            if (!string.IsNullOrWhiteSpace(webUrl))
            {
                Uri webUri = new Uri(webUrl);

                string realm = TokenHelper.GetRealmFromTargetUrl(webUri);
                string accessToken = TokenHelper.GetAppOnlyAccessToken(TokenHelper.SharePointPrincipal, webUri.Authority, realm).AccessToken;
                var clientContext = TokenHelper.GetClientContextWithAccessToken(webUrl, accessToken);

                return clientContext;
            }
            else return null;
        }
AppInstalled method
Register the Web Provisioned event in app installed event.
private void AppInstalledMethod(SPRemoteEventProperties _properties)
        {
            using (ClientContext clientContext = getClientContext(_properties))
            {
                OperationContext op = OperationContext.Current;
                Message msg = op.RequestContext.RequestMessage;

                Web web = clientContext.Web;
                clientContext.Load(web);
                clientContext.Load(clientContext.Site);
                clientContext.Load(clientContext.Site.EventReceivers);
                clientContext.ExecuteQuery();

                EventReceiverDefinitionCreationInformation receiver = new EventReceiverDefinitionCreationInformation();
                receiver.EventType = EventReceiverType.WebProvisioned;
                receiver.ReceiverUrl = msg.Headers.To.ToString();
                receiver.ReceiverName = "WebProvisionedEvent";
                receiver.Synchronization = EventReceiverSynchronization.Synchronous;
                receiver.SequenceNumber = 5000;

                //adding receiver the host web.
                // we are adding event receiver to site context so that event receriver fires for sub-sub-sites
                clientContext.Site.EventReceivers.Add(receiver);
                clientContext.ExecuteQuery();
            }
        }
Web Provisioned method
Call the Azure function when a subsite is created.
private void WebProvisionedMethod(SPRemoteEventProperties _properties)
        {
            using (ClientContext clientContext = getClientContext(_properties))// creating remoteeventreceiver client context
            {
                Web web = clientContext.Web;
                clientContext.Load(web);
                clientContext.ExecuteQuery();

                string azureFnUrl = "https://FunctionAppName.azurewebsites.net/api/FunctionName";

                StringBuilder sbURL = new StringBuilder(azureFnUrl);
                try
                {
                    sbURL.Append("?code=");
                    sbURL.Append("{YourAuthCodeToAccessAzureFunction}&url=");
                    sbURL.Append(web.Url);

                    ServicePointManager.SecurityProtocol = (SecurityProtocolType)3072;
                    ServicePointManager.SecurityProtocol = SecurityProtocolType.Tls | SecurityProtocolType.Tls11 | SecurityProtocolType.Tls12 | SecurityProtocolType.Ssl3;

                    HttpClient client = new HttpClient();
                    client.BaseAddress = new Uri(Convert.ToString(sbURL));
                    client.DefaultRequestHeaders.TryAddWithoutValidation("Content-Type", "text");
                    client.DefaultRequestHeaders.TryAddWithoutValidation("Accept", "*/*");
                    client.Timeout = Timeout.InfiniteTimeSpan;

                    HttpRequestMessage httpRequestMessage = new HttpRequestMessage(HttpMethod.Get, new Uri(Convert.ToString(sbURL)));
                    client.SendAsync(httpRequestMessage).Wait();
                }
                catch (Exception ex)
                {
                    throw ex;
                }
            }
        }
Deploy Event Receiver using Azure App Service
Now we are done with event receiver part publish the code in Azure App service. Once it is published in install the Provider hosted add-in the SharePoint site collection on which you want to automate the SubSite Provisioning.
Get Site Provisioning
It’s hard to generate the provisioning xml with list library page and webpart information, better create one subsite and manually design the site with all the components needed and then take provisioning using below PnP command.
Refer this URL to get provisioning template of a site Get-PnPProvisioningTemplate
Azure Function to Run PowerShell commands
Create a function app using azure portal and create a Azure Function by selecting the Runtime Stack as “PowerShell Core” as below screen shot.

Once function created go to the resource do below actions,
- From the left menu, go to configuration and add the Client ID and Client Secret generated for Provider hosted add-in
- From the left menu, go to Functions. Add a new function by choosing the template as HTTP Trigger
Add PowerShell script in Azure Function
Once function is created go to the resource and choose “Code + Test” paste the below code and click save
#param($SiteURL)
$url = $REQ_QUERY_url
Connect-PnPOnline -AppId $env:SPO_AppId -AppSecret $env:SPO_AppSecret -Url $url
Apply-PnPProvisioningTemplate -Path D:\home\site\wwwroot\{FunctionName}\pnpTemplate.xml
Upload files in Azure Function
Go to the Kudu services for the function using below url structure,
https://YourFunctionName.scm.azurewebsites.net/DebugConsole
In the explorer kind of window go to your function folder under site/wwwroot/FunctionName
Here you can upload the pnpTemplate.xml generated by running Get-PnPProvisioning command.
Create a folder called “Modules”, find the modules required to run this PowerShell commands from your local machine where SharePoint Online PowerShell module is installed and upload the entire modules folder (entire folder where folder name will be specific version).
Now we are all set to create a subsite and implement automatic site design. Go ahead and create a subsite where you have installed the Provider hosted add-in. Once the sub site is created, it will be provisioned with the template xml uploaded in Azure Function.
Conclusion
I hope this article helps you to get understand how to implement site design for SharePoint Subsites with the help of PnP Template and Azure functions. If you have any questions/issues about this article, please let me know in comments.


Top comments (0)