
Content
- Introduction
- Features
- Server-side Rendering
- Performance and User Experience (UX)
- Partial Hydration
- Slots
- Drawbacks
- Conclusion
Introduction
Astro is a new framework which takes a different approach to challenge the existing rendering patterns used by many other frameworks (Gatsby, Next.js, Remix.run to name few).
Even though the framework is still in beta, the features offered by the team is quite impressive so far. It brings many fresh ideas that I think are worth looking into.
I can feel that the team really tries to bridge the developer experience (DX) and performance by leveraging their own Astro compiler.
In this article, we’ll discuss the key feature offered by Astro, then dive into a few of them in details.
Then, we’ll move into Server-side rendering (SSR) from a fundamental level to form a basis for our discussion around the concepts introduced by Astro. Then move to discuss how Astro does things differently!
Finally, we will take a look at some of its draw backs and what type of application it is most applicable to at this time.
Features
- Out of the box features
- Templating (via “slots”)
- Page Layouts
- Markdown support
- Code blocks
- fetch
- Filesystem routing convention (simlar to Next.js)
- Astro component (
.Astro)
- Support multiple frameworks (Vue.js, React.js, Svelte, Solid.js etc)
- Opt-in interactivity optimization
- Through the hydration directives (
client:*- provided by Astro compiler)
- Through the hydration directives (
- Pagination
- RSS feed
Server-side rendering
The use case for server side rendering is to improve the SEO for search engine crawling.
This is because single page applications or sites that only run on client side are difficult for search engines to index its data like meta tags and other open graph details.
As a result, without the generated html which contain these details, it has a big impact on the ranking of the website when users make a search.
So, server-side rendering was a solution to this problem. The process goes like this, a html file (along with css and js) is served to the user on the initial request then the client side application will “hydrate” the DOM elements.
Finally, once all the previous steps are done, it’ll then be ready to observe the user’s interactions (ie Clicks).
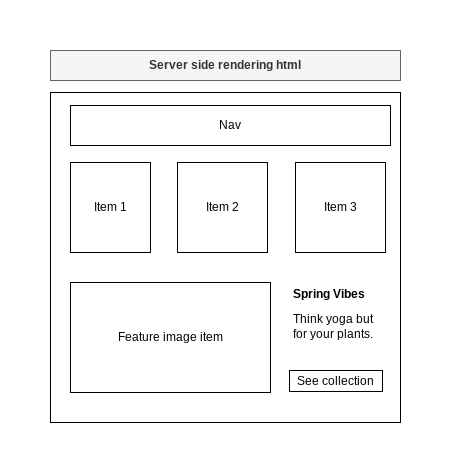
Let’s take a look at a visualization of this process to better understand it.
1. Initial load (html, js, css)
Initial page load where the user only see the blank page.
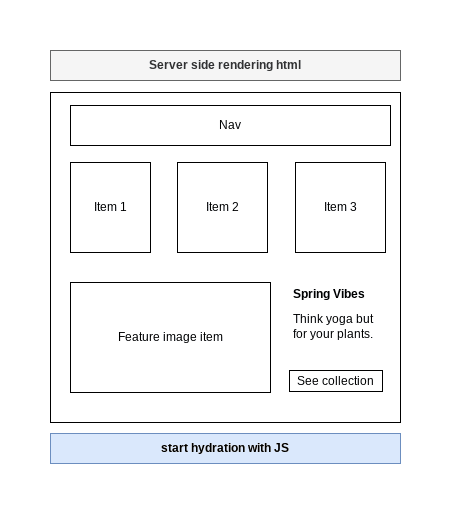
2. Start hydration
This is where the Javascript start attaching the DOM event listeners (ie Click, Key Press).
At this point, the css should also be loaded and available.
3. Finish hydration
Finally, there will be some time between the start and end of the hydration. If you are using React (<18) then this process happens all at once and it is ”blocking”.
Meaning it’ll hydrate the whole application then only when it is done then users will be able to interact with it.
For performance critical application, this can make all the difference especially on low end devices, and when using a slow network connection (ie 3G).

Performance and User Experience (UX)
Looking the the above steps in another way, it looks like the following on a timeline:
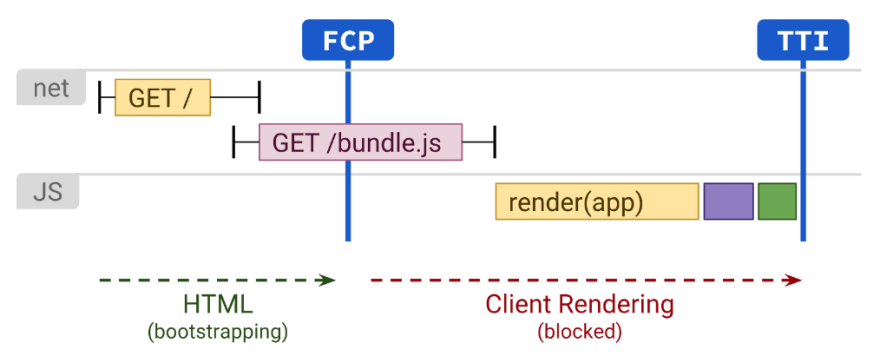
Rendering on the web by Jason Miller & Addy Osmani
As you can see, there is a small period between the First Content Paint (FCP) and Time to Interactive (TTI) where the client application is going through the hydration phase.
This impacts the performance, as your bundle becomes larger, the longer it will take for the request to load to hydration your client side site/application.
In addition, performance is not the only thing impacted, the UX is impacted too. The longer the hydration process takes, the more time it takes for user to be able to interact with your website or web application.
This can be frustrating for user clicking on an element on the page while it is still hydrating, and having it not do anything at all.
Partial Hydration
So, how exactly does Astro solve this problem ?
It does this through partial hydration. As I mentioned in the features section, website built using Astro are static by default. Meaning, no JS will be served, all the JS will be stripped during the process.
⚠️ Note: when we say “no JS” is served, we mean JS from > our application and not Astro’s core JS bundles. This is
required for things like defer loading and hydrating of
components (when it is applicable).
You may be asking, ok if JS from our application is stripped then how do you get click events on buttons ? Great question!
Astro provided directives that allow you to explicitly specific which component you’d like to hydrate and when.
In addition, Astro follows the “Island Architecture” which has the benefit of:
- Allowing the components load independently from each other
- Allowing the components to render in isolation
Hydration process (partial/selective hydration)
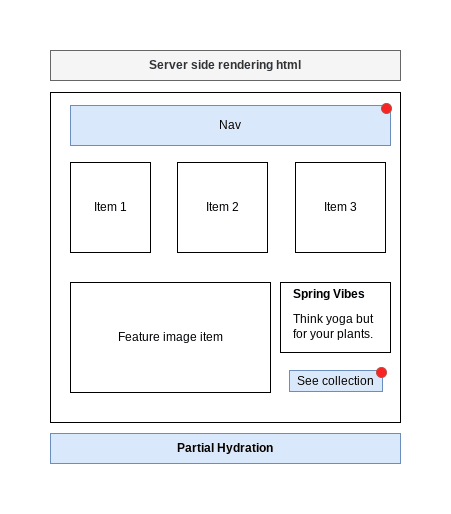
In this example, while the rest of the page is static, the <Nav /> and <Button /> components are hydrated on load.
Benefits
The Benefit of this is the following:
- Serving less JS to the client (smaller JS bundle)
- Independent “Islands” to load and hydrate the component in isolation rather than whole application
Example of this:
Depending on use cases, you can also use client:visible which loads and hydrates the component only when it is visible. There are a few other directives, feel free to check out the documentation.
If you just want to make sure your component gets hydrated on load, then you would add the following directive:
<Nav client:load />
...
<Button client:load />
To me, with Astro, you can really find a good balance the speed you get from html and the dynamism from javscript.
It’s so easy to optimize the code via the provided directive. The compiler handles all the heavy lifting. No additional code needs to be written to handle this. That is a big deal!
📝 Helpful reference:
- Astro - Hydrate Interactive Components
- Astro - Island Architecture
- Astro - Partial Hydration
- Jason Miller - Island Architecture concept
Slots
Another feature I found interesting was Astro’s slots. This provides a more powerful primitive than compared to react’s prop and children.
I felt the slot was more similar to other templating libraries like (Rails) erb where you can define where different children components go within layout component and let the templating engine do the work of rendering it in the right place.
Example
// Card.tsx
import * as React from 'react';

import {
  CardHeading,
  CardWrapper,
} from '~/components';

interface CardProps {};
const Card: React.FC<CardProps> = (props) => {
  return (
    <CardWrapper>
      <CardHeading>
        <slot name="card-heading">
      </CardHeading>
      <CardImageWrapper>
        <slot name="card-image">
      </CardImageWrapper>
      <CardFooter>
        <slot name="card-footer">
      </CardFooter>
    </CardWrapper>
  );
};

// App.tsx
import { Card, Footer } from '~/components';
import * as React from 'react';

interface AppProps {};
const App: React.FC<AppProps> = (props) => {
  return (
    <Card>
      <div slot="card-heading">
        <h2>Suzy</h2>
      </div>
      <div slot="card-image">
        <img src="/images/cat-suzy.png" slot="card-image">
      </div>
      <Footer slot="card-footer" />
    </Card>
  );
};
Astro Component
Astro provides it’s own component which is very similar to svelte (if you have used it before).
Everything (html, js, css) is in one file and it uses the extension .Astro.
💡 Note: Inside the Astro component is where you can import and render the different components (.vue, .tsx, .jsx, svelte)
Example
---
const title = "this is my title";
---

<h1 class="title">{title}</h1>

<style>
  .title {
    color: grey;
  }
</style>
💡 Note: The CSS in the astro component is scoped to the component by default!
📝 Helpful reference:
Data fetching
Within Astro’s script block, common syntax like await/async, typescript and fetch are supported.
Fetching the data is simple as what is highlighted below:
---
interface PokemonResult {
  name: string;
  url: string;
}
interface PokemonResponse {
  count: number;
  next: string;
  previous: number | null;
  result: PokemonResult[];
}
const response = await fetch('https://pokeapi.co/api/v2/pokemon');
const data: PokemonResponse = await response.json();
const result: PokemonResult = data?.result ?? [];
---

<ul>
  {(result) => <li>{result}</li>}
</ul>

<style></style>
📝 Helpful reference:
Environment variables
Astro offers environment variables via .env* files. The convention it uses is very similar to other frameworks.
There are two categories of environment variables
- Public (on the client side) - Available at run-time, this can be defined via
PULIC_*prefix - Private (on server/build) - Available at build time, this is the default
⚠️ All environment variable are Private unless explicitly defined using the PUBLIC_ prefix
Usage
.env file:
UNSPLASH_API_KEY=xxxxxx
astro file:
---
const requestUrl = 'https://api.unsplash.com/search/photos?page=1&per_page=15&query=surfing';
const response = await fetch(requestUrl, {
  headers: {
    'Authorization': `Client-ID ${import.meta.env.UNSPLASH_API_KEY}`
  }
});

const data = await response.json();
const results = data?.results || [];
const images = results.map(images => images.urls);
---

<section class="image-section">
  <ul>
    {images.map((imageSizes) => (
      <li class="image-container">
        <img src={imageSizes.small} />
      </li>
    ))}
  </ul>
</section>

<style></style>
📝 Helpful reference:
Drawbacks
The only drawback with Astro in this current stage is that it’s use cases feels a little niched.
Many of the out of the box features like code blocks and markdown seems to be very focused on building developer blogs. I am sure this is temporary only to gain developer adoption then expand to other use cases later.
On the point of multiple framework being supported, the support for routing and state management has not been mentioned nor does it seem like there is a potential solution.
This is understandable as the framework is still in beta. Nevertheless, I am excited to see what the team has planned for upcoming releases.
Unfortunately, as impressive as it is so far, I hesitant to build a large application with this just yet because of the lack of tooling and ecosystem.
However, it doesn’t mean you shouldn’t jump in and try it out. The documentation is clear and easy to understand.
I still believe Astro introduces a lot of interesting new concepts that can be applied regardless if you are using Astro or not.
Conclusion
To summarize, Astro is a project that has an unique take on building fast websites. It brings many fresh ideas which I feel will likely pollinate to other frameworks — which is very common thing. In addition, I noticed that there is a real focus on DX within the features provided which I really appreciate.
We started a discussion regarding the fundamentals to better understand Server side rendering (SSR) then broke it down further to understand what exactly Astro does differently that makes it better and how that impacts both the performance & UX.
Astro allows you to find a sweet spot between the static (with html) and the dynamism (from js) when developing your web sites. It does this by layering in advanced techniques such as static first with selective/partial hydration where our page are thought of as isolated “Islands” which are loaded and hydrated independently.
Give it a try, see for yourself. Astro provides many sample applications in their example repo which is a great starting point for experimentation!


Latest comments (0)