
In this article, I will walk you through how to create dynamic images using Amazon CloudFront and AWS Lambda@Edge that will be shared on social networks.
This solution is a simplified version of one of the modules from a project we did at Jam3 some months ago. This project had strict performance requirements as it reached vast audiences from every continent. We had fun crafting the solution, and I hope you'll find it useful.
Stack
There are many ways to achieve this result. After analyzing the pros and cons of all of them, we decided to move forward with:
Goal
Our goal is to generate images that don't exist on the fly, and images that do exist will be cached and returned. Subsequence visits will get the CDN cached version until it expires.
Disclaimer:
We will use the dummy domains app.com and social.app.com as examples, but those are not real domains.
Use case - First time generation
- Image https://social.app.com/12-34-10.jpg is requested for the very first time.
- The cloud backend will generate that image on the fly and will return it as fast as possible.
Use case - Cached version
- Image https://social.app.com/12-34-10.jpg is requested again in less than x number of days.
- The image will be returned from the cache of Amazon CloudFront.
Use case - Cache expired version
- Image https://social.app.com/12-34-10.jpg is requested again after x number of days.
- The cached version of the image already expired, a new image will be cache and returned.
These images will be used in the og-image tag of a site, and when the site is shared on social networks with a dynamic URL query string, the right image will be rendered.
Example:
When the site https://app.com?social=12-34-10 is shared on Facebook, the image https://social.app.com/12-34-10.jpg will be fetched.
Solution
There are three (dummy) domains working here:
- The main application domain: https://app.com
- The dynamic image generation service: https://social.app.com
- A secret domain, only accessible by social.app.com, with an excellent performance site that will be used to generate the dynamic image
When the main application (app.com) loads, we will dynamically build the URL in the og-image tag based on its query parameters. If the page is shared on social networks, like Facebook, the social network crawler will fetch the dynamic image. If the dynamic image is cached or was already generated, it will be returned immediately. In case it doesn't exist it will be generated, cached, and returned.
To generate the image, we created a high-performance site in which the markup was precisely the image we wanted to share. We loaded that site on AWS Lambda@Edge and, with Puppeteer, we took a screenshot that would be returned to the user.

We tried other approaches like compositing the image together using image libraries. But after many tests, the generation time on our approach was considerably less than the rest.
In-depth explanation
Updating og-image
When the user lands on https://app.com?social=12-34-10 we verify that the query string social has the expected format and, if it's valid, we update the site og-image metadata with the value https://social.app.com/12-34-10.jpg.
If the social query string doesn't exist or the value is incorrect, a default image will be used. This logic must be coded and tested carefully to avoid any attempt of reflected XSS.
Image generation service AWS infrastructure
To build the dynamic image on the site hosted at https://social.app.com, we will use some Amazon Web Services including Amazon Route53, Amazon S3, Amazon CloudFront, and Lambda@Edge. An extended production-ready application will also use AWS WAF, Amazon CloudWatch, Amazon SNS.

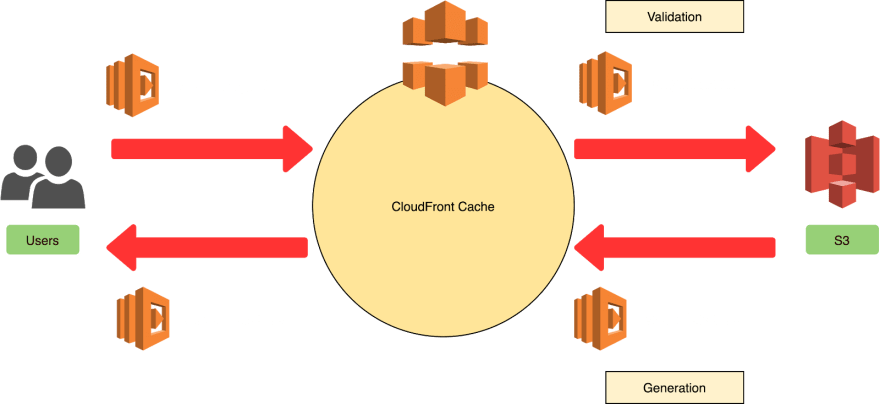
To briefly describe the AWS infrastructure, Route 53 will serve a CDN version of the site using CloudFront. Lambda@Edge will render the dynamic images and save them in an Image S3 bucket. The CloudFront distribution has a Web Firewall with some custom and out of the box rules, and everything is being logged to CloudWatch. If the Lambda@Edge fails the rendering or another suspicious activity/error is detected, CloudWatch will trigger alarms that will be delivered to the development team through Amazon Simple Notification Service (SNS).
We will use two lambdas at the edge of the CloudFront distribution. The first Lambda will validate that the URL path is what we are expecting; otherwise, it will return a default image avoiding any 404. The validation Lambda@Edge will be executed before the request hits the CloudFront origin, on the Origin Request event. If the URL path is what we are expecting, we will let the request through toward the CloudFront origin, aka Amazon S3.
We are executing this Lambda after the CloudFront cache to improve performance.
When the CloudFront origin responds, it can come with an actual object or with a 404. If the image wasn't found, the second Lambda@Edge will be executed on the Origin Response event and it will generate the image dynamically, save it in Amazon S3, and return it to the cache.
The Lambda@Edge will save the image in the S3 bucket for future requests. When the CloudFront cache expires, the cache will be updated on the object stored in S3 and will be distributed available again.
Image generation with puppeteer
Although there are many ways to generate dynamic images, there isn't a one-size-fits-all solution/approach for all cases. In our case, the images to generate had many variations and crafting them with libraries like sharp or jimp, or a similar image manipulation library was not performing well; we also evaluated using a third-party service like Cloudinary, but the desired compositions were not possible.
So our solution was to do all the magic in a mini React application and, with Puppeteer, take a screenshot. As you can imagine, our requirements for the React application were mainly hyper-performance. Using only hooks, brotli, webp, super lightweight dependencies, and other features, we were able to easily achieve the expected performance (loading times of 150-200ms).
We are not going to cover how to protect the third secret domain, but you can use basic-auth or tokens. Because the performance is outstanding, I would recommend avoiding more heavy solutions like OAuth v2 or JWT.
If you can afford a different domain for this third site, that would avoid any discovery using a DNS scanning tool for subdomains.
Implementation
Let's dive into some code.
Heads up:
I'll omit some advanced details that will be covered at the end of this article.
Validation Lambda
The validation Lambda@Edge looks similar to:
'use strict';

const isPathInvalid = require('./is-path-invalid');

const defaultPath = '/default.jpg';

exports.handler = async (event, context, callback) => {
  const request = event.Records[0].cf.request;

  if (isPathInvalid(request.uri)) {
    console.warn(`Invalid path, redirecting to ${defaultPath}`);
    request.uri = defaultPath;
  } else {
    console.log('Valid path, moving request to the origin');
  }

  callback(null, request);
};
As you can see, there's some logic that validates the URL path. If the URL path has the expected format, the request will continue to the next Lambda. In case it's invalid, it will change the requested image for the default image.
The module isPathInvalid depends on your validation. If it's too simple, you might want to consider writing the validation directly instead of having it on a separate file. In our case, it's better to have it on another module because we can write unit tests over the isPathInvalid function.
Main Lambda
The main Lambda@Edge which generates and uploads assets to Amazon S3 looks similar to:
'use strict';

const path = require('path');

const generateImage = require('./generate-image');
const uploadImage = require('./upload-image');

exports.handler = async (event, context, callback) => {
  const response = event.Records[0].cf.response;
  const request = event.Records[0].cf.request;
  let globaErrorStatus = false;

  if (response.status == 404 || response.status == 403) {
    try {
      const urlPath = path.parse(request.uri);
      const s3key = urlPath.base;
      const imageId = urlPath.name;

      const imageBuffer = await generateImage(imageId);

      if (imageBuffer) {
        await uploadImage(imageBuffer, s3key);

        response.status = 200;
        response.statusDescription = 'OK';
        response.body = imageBuffer.toString('base64');
        response.bodyEncoding = 'base64';
        response.headers['content-type'] = [{ key: 'Content-Type', value: 'image/jpeg' }];
      } else {
        console.error('The image generation and the default is invalid, letting the request to fail');
        globaErrorStatus = true;
      }
    } catch (error) {
      console.error(`General exception, something failed on the way: ${error.message}`);
      globaErrorStatus = true;
    }
  }

  if (globaErrorStatus) {
    response.status = 500;
    response.statusDescription = "We couldn't retrieve the asset";
  }

  callback(null, response);
};
The following steps explain what this function is doing:
Step #1
It's executing only if the image was not found in origin.
if (response.status == 404 || response.status == 403)
Step #2
Assuming the URL Path is coming as we are expecting, because of the validation Lambda@Edge, we are parsing the URL Path we need.
const urlPath = path.parse(request.uri);
const s3key = urlPath.base;
const imageId = urlPath.name;
For a path like 12-23-12.jpg, s3key will be 12-23-12.jpg, and imageId will be 12-23-12.
Step #3
We generate a dynamic image and return a buffer with the raw image (we'll cover this functionality later on).
const imageBuffer = await generateImage(imageId);
Step #4
If the image was successfully generated we proceed to upload it to S3.
if (imageBuffer) {
  await uploadImage(imageBuffer, s3key);
Step #5
Once the image has been uploaded to S3, we prepare the CloudFront response for caching.
response.status = 200;
response.statusDescription = 'OK';
response.body = imageBuffer.toString('base64');
response.bodyEncoding = 'base64';
response.headers['content-type'] = [{ key: 'Content-Type', value: 'image/jpeg' }];
Step #6
Unexpected error handling in case something outside of our edge cases goes sideways. In that case, we will be returning a 500 error to the client.
if (globaErrorStatus) {
  response.status = 500;
  response.statusDescription = "We couldn't retrieve the asset";
}

callback(null, response);
Generation module
In the main Lambda, we used the function generateImage(imageId) to generate the dynamic image; we will go through our approach in this chapter.
A simplified version of the module looks like:
'use strict';

const fs = require('fs').promises;
const chromium = require('chrome-aws-lambda');

const domain = 'https://sharing-secret-site.com/';
const defaultImage = './assets/default.jpg';
const token = 'xxxxxxxxxxxxxxxxxxxxxxxxxxxxxxxxxxxx';

async function generateImage(imageId) {
  let browser = null;
  let imageBuffer = null;

  try {
    browser = await chromium.puppeteer.launch({
      args: chromium.args,
      defaultViewport: {
        width: 1200,
        height: 630,
        deviceScaleFactor: 2
      },
      executablePath: await chromium.executablePath,
      headless: chromium.headless
    });

    let page = await browser.newPage();

    const targetPage = `${domain}?social=${imageId}?token=${token}`;

    const pageResponse = await page.goto(targetPage, {
      waitUntil: ['networkidle0'],
      timeout: 3000
    });

    const pageStatus = pageResponse.status();

    if (pageStatus >= 400 && pageStatus < 600) {
      throw new Error(`${domain} is not loading`);
    }

    imageBuffer = await page.screenshot({ type: 'jpeg' });
  } catch (error) {
    try {
      imageBuffer = await fs.readFile(defaultImage);
    } catch (fsError) {
      console.error(`Exception while returning the default image: ${fsError.message}`);
    }
  } finally {
    if (browser !== null) {
      await browser.close();
    }
  }

  return imageBuffer;
}

module.exports = generateImage;
Highlights:
- It's using
chrome-aws-lambdabecause headless chrome by default is bigger than the maximum size supported by Lambda. - The sharing application will load only if the token is right. You can also add basic-auth to the headers.
- We will wait until the network is idle, usually after the 500ms average.
- We are taking the screenshot of the loaded site and returning the image buffer.
- If there is any kind of error generating the screenshot, we will return the default image.
Note:
After some timing tests, it's better for us not to compress the screenshot before sending it, but it may be better to consider it for your case.
S3 Uploader module
Finally, this is what the module that sends the generated image to S3 looks like:
'use strict';

const AWS = require('aws-sdk');

const S3 = new AWS.S3({
  signatureVersion: 'v4'
});

const BUCKET = 'xxx-xxxxxxx-xxxx-xxxxxxx';

async function uploadImage(buffer, s3key) {
  return S3.putObject({
    Body: buffer,
    Bucket: BUCKET,
    ContentType: 'image/jpeg',
    CacheControl: 'max-age=31536000',
    Key: s3key,
    StorageClass: 'STANDARD'
  })
    .promise()
    .catch(error => {
      console.error('Exception while writing image to bucket', JSON.stringify(error));
    });
}

module.exports = uploadImage;
Highlights:
- We are setting a high cache in origin (and CloudFront will respect it).
- For the Lambda to be able to upload objects to S3, it will need permissions in the bucket.
Conclusion
The solution works as expected, and we recommend it if you have a similar use case.
Costs reductions:
If we want to reduce Lambda running costs and pre-populate the most expected images, we just need to upload them to S3.
Production-ready considerations
We've covered the main components of the solution to simplify this post, but to make the solution production-ready, there are a couple of extra things to have in mind. We will briefly cover some of them.
Main site query string validation & sanitization
The main site responsibility is to move the query string to the og-image and build the dynamic social image URL.
Requesting https://app.com?social=12-34-10 will render
<head>
 <meta property="og:image" content="https://social.app.com/12-34-10.jpg">
</head>
We strongly recommend avoiding passing any kind of domain in the query string. If you need to pass it, make sure you whitelist it to avoid "URL Redirection to Untrusted Site" vulnerabilities.
In our example, the social id has a specific format (like 12-34-10). We strongly recommend to sanitize it and verify that social id before update the og-image tag, and it will avoid "Reflected XSS" vulnerabilities.
And last but not least, if you use a regex to verify your social id, be aware of "ReDoS" vulnerabilities and make sure your regex is safe.
Cloudfront best practices
- Use All Edge Locations for better performance.
- Make sure you're using one SSL certificate per domain instead of wildcard SSL certificates.
- Enable WAF (we will cover it later).
- Use the latest version of TLS.
- Enable Logging.
- Enable IPv6.
- Handle only HTTPS connections for the social and private domains, and Redirect HTTP to HTTPS for the main application.
- Allow only GET and HEAD requests.
- Cache as much as you can (there are multiple options).
- Disable any type of compression (we are returning an image).
Route53
- Setup query logging for your Hosted Zone.
Web Application Firewall
Everything outside of what we are expecting is an attempt to misuse the service. It's up to us how much we want other people to play with the service.
- Enable WAF for CloudFront.
- Enable logging with Kinesis Firehose.
- Consider some managed rules like (IP reputation list or Known bad inputs).
- Consider creating rules to block unexpected query strings.
- Consider validating the URI path using a regex match.
- Consider restricting the size of the URI path.
- Consider blocking any request with a body (we are expecting only HTTP GET requests).
S3 best practices
- The buckets should be private.
- Enable versioning (you shouldn't expect different versions of the images).
- Enable Cloudtrail for writing events.
- Enable server access logging (on another private bucket).
- Enable Server-Side encryption, KMS is recommended.
- If you are not expecting to delete the stored images, you can enable "Object Lock" when creating the bucket to increase the security around the bucket.
- Enabling "Transfer acceleration" will give you a better performance uploading the screenshots to S3 with an additional cost.
- If Object Lock was not used, add an event when objects are deleted and receive a notification.
- If you want to get isolated notifications per image created, you can create an event (if you enabled Cloudtrail, you will have this information).
- Make sure to achieve the Least Privilege Permissions and be specific with your bucket policies.
CloudWatch
- Consider adding CloudFront alarm when requests are more than the expected.
- Consider adding CloudFront alarm when 4xx or 5xx happens.
- Consider adding alarms for both Lambda@Edge based on Errors and Duration.
- Consider adding alarms for both Lambda@Edge based on the content of the logs using Metric Filters.
- Create a dashboard with a collection of metrics of your interests (CloudFront and Lambdas).
Testing
- Make sure your code is unit test friendly, and your test coverage covers your critical flows.
- Make sure to create integration tests that test all the functionality from end to end, with the AWS UI built-in test runner or better off AWS with lambda-local or serverless.
Infrastructure
- High recommended to use a code repository (GitHub, Gitlab, Bitbucket, etc.) and keep the source code there.
- High recommended having everything automated using a CI/CD platform.
- Infrastructure as Code is essential to avoid differences between environments and keep track of the changes, tune your skills with CloudFormation, Terraform, or Serverless.
I hope you enjoyed reading this post and, most importantly, I hope it helps you.


Latest comments (0)