Introduction
We are in the age of the multiplatform economy and APIs are the "glue" in this digital scenario. Since they are so important, they are seen by developers as a service or product to be consumed. Therefore, usage experience is a crucial factor for its success.
In order to improve this experience, specification standards such as the OpenAPI Specification (OAS) are increasingly being adopted in the development of RESTFul APIs.
What is IRIS ApiPub?
IRIS ApiPub is an Open Source project whose main goal is to automatically publish RESTful APIs created with Intersystems IRIS technology, in the simplest and fastest way possible using the Open Specification API (OAS) standard, version 3.0.
It allows the user to focus on the API's implementation and business rules (Web Methods), abstracting and automating other aspects related to service documentation, exposure, execution and monitoring.

This project also includes a complete sample implementation (apiPub.samples.api) of the Swagger Petstore, which is the official swagger sample.
Test it with your current SOAP services
If you already have published SOAP services, you can test it using Rest/JSON with OAS 3.0.
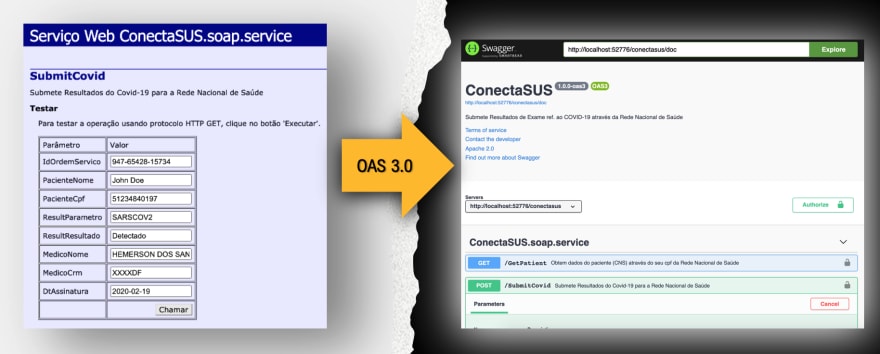
When publishing methods with complex types, the object's class must be a subclass of %XML.Adapter. In this way, previously installed SOAP services are made automatically compatible.

Monitor your APIs with IRIS Analytics
Enable API monitoring to manage and track all your Rest calls. You can also set up your own indicators.
Installation
- Perform a clone/git pull from the repository in the local directory.
$ git clone https://github.com/devecchijr/apiPub.git
- Open the terminal in this directory and run the following command:
$ docker-compose up -d
- Run the IRIS container with the project:
$ docker-compose up -d
Testing the Application
Open the swagger URL http://localhost:52773/swagger-ui/index.html
Try to run some operation using the Petstore API, such as performing a post of a new pet.
See the apiPub monitor dashboard. Try to drill down on the petStore domain to explore and analyze the messages.
Change or create methods in the apiPub.samples.api class and go back to the generated documentation. Note that all changes are automatically reflected in the OAS documentation or in the schemas.
Publish your API to the OAS 3.0 standard in just 3 steps:
Step 1
Define your API's implementation class and tag the methods with the [WebMethod] attribute
This step is not necessary if you already have a WebServices implementation.
Step 2
Create a subclass of apiPub.core.service and set its DispatchClass property as the Implementation class created earlier. Also include the OAS 3.0 documentation path. If you wish, point to the apiPub.samples.api class (PetStore).
Step 3
Create a Web Application and set the dispatch class as the service class created above.
Use Swagger
With iris-web-swagger-ui you can expose your service specification. You just need to point to the documentation path and... VOILÁ!!
Set the OAS specification header

There are two ways to set the OAS 3.0 header:
The first is by creating a JSON XDATA block named apiPub in the implementation class. This method allows more than one tag and modeling is compatible with the OAS 3.0 standard. The properties that can be customized are info, tags and servers.
XData apiPub [ MimeType = application/json ]
{
    {
        "info" : {
            "description" : "This is a sample Petstore server.  You can find\nout more about Swagger at\n[http://swagger.io](http://swagger.io) or on\n[irc.freenode.net, #swagger](http://swagger.io/irc/).\n",
            "version" : "1.0.0",
            "title" : "IRIS Petstore (Dev First)",
            "termsOfService" : "http://swagger.io/terms/",
            "contact" : {
            "email" : "apiteam@swagger.io"
            },
            "license" : {
            "name" : "Apache 2.0",
            "url" : "http://www.apache.org/licenses/LICENSE-2.0.html"
            }
        },
        "tags" : [ {
            "name" : "pet",
            "description" : "Everything about your Pets",
            "externalDocs" : {
            "description" : "Find out more",
            "url" : "http://swagger.io"
            }
        }, {
            "name" : "store",
            "description" : "Access to Petstore orders"
        }, {
            "name" : "user",
            "description" : "Operations about user",
            "externalDocs" : {
            "description" : "Find out more about our store",
            "url" : "http://swagger.io"
            }
        } ]
    }
}
The second way is by setting parameters in the implementation class, such as in the following example:
Parameter SERVICENAME = "My Service";

Parameter SERVICEURL = "http://localhost:52776/apipub";

Parameter TITLE As %String = "REST to SOAP APIs";

Parameter DESCRIPTION As %String = "APIs to Proxy SOAP Web Services via REST";

Parameter TERMSOFSERVICE As %String = "http://www.intersystems.com/terms-of-service/";

Parameter CONTACTNAME As %String = "John Doe";

Parameter CONTACTURL As %String = "https://www.intersystems.com/who-we-are/contact-us/";

Parameter CONTACTEMAIL As %String = "support@intersystems.com";

Parameter LICENSENAME As %String = "Copyright InterSystems Corporation, all rights reserved.";

Parameter LICENSEURL As %String = "http://docs.intersystems.com/latest/csp/docbook/copyright.pdf";

Parameter VERSION As %String = "1.0.0";

Parameter TAGNAME As %String = "Services";

Parameter TAGDESCRIPTION As %String = "Legacy Services";

Parameter TAGDOCSDESCRIPTION As %String = "Find out more";

Parameter TAGDOCSURL As %String = "http://intersystems.com";
Customize your APIs

You can customize several API aspects, such as tags, paths and verbs. For this, you need to use a special notation, declared in the comment for the customized method.
Syntax:
/// @apiPub[assignment clause]
[Method/ClassMethod] methodName(params as type) As returnType {}
All customizations shown as examples in this documentation can be found in the apiPub.samples.api class.
Customizing verbs
When no complex type is used as an input parameter, apiPub automatically assigns the verb as Get. Otherwise, the Post verb will be assigned.
In case you wish to customize the method, add the following line to the method's comments.
/// @apiPub[verb="verb"]
Where verb can be get, post, put, delete or patch.
Example:
/// @apiPub[verb="put"]
Customizing paths
This tool automatically assigns paths or routing to Web Methods. It uses the method name as the path, by default.
In case you wish to customize the path, add the following line to the method's comments.
/// @apiPub[path="path"]
Where path can be any value preceded by a slash, as long as it doesn't conflict with another path in the same implementation class.
Example:
/// @apiPub[path="/pet"]
Another very common use of the path is to define one or more parameters in the path itself. For this, the parameter name defined in the method must be enclosed in curly braces.
Example:
/// @apiPub[path="/pet/{petId}"]
Method getPetById(petId As %Integer) As apiPub.samples.Pet [ WebMethod ]
{
}
When the name of the internal parameter differs from the name of the displayed parameter, the name can be equalized according to the following example:
/// @apiPub[path="/pet/{petId}"]
/// @apiPub[params.pId.name="petId"]
Method getPetById(pId As %Integer) As apiPub.samples.Pet [ WebMethod ]
{
}
In the example above, the internal parameter pId is displayed as petId.
Customizing the tags
It's possible to define the method's tag(grouping) when more than one tag is defined in the header.
/// @apiPub[tag="value"]
Example:
/// @apiPub[tag="user"]
Customizing the success Status Code
In case you wish to change the method's success Status Code, which is 200 by default, the following notation should be used.
/// @apiPub[successfulCode="code"]
Example:
/// @apiPub[successfulCode="201"]
Customizing the exception Status Code
This tool treats any exceptions as Status Code 500 by default. In case you wish to add new exception codes to the documentation, use the following notation.
/// @apiPub[statusCodes=[{code:"code",description:"description"}]]
Where the statusCodes property is an array of objects containing code and description.
Example:
/// @apiPub[statusCodes=[
/// {"code":"400","description":"Invalid ID supplied"}
/// ,{"code":"404","description":"Pet not found"}]
/// ]
When raising the exception, include Status Code in the exception's description between the "<" and ">" characters.
Example:
Throw ##Class(%Exception.StatusException).CreateFromStatus($$$ERROR($$$GeneralError, "<400> Invalid ID supplied"))}
See the getPetById method of the apiPub.samples.api class
Marking the API as deprecated
For the API to be displayed as deprecated, the following notation should be used:
/// @apiPub[deprecated="true"]
Customizing the operationId
According to the OAS specification, operationId is a unique string used to identify an API or operation. In this tool, it's used for the same purpose when monitoring and tracking operations.
By default, it has the same name as the implementation class method.
If you wish to change it, use the following notation
/// @apiPub[operationId="updatePetWithForm"]
Changing the method's charset
The default charset of is generally defined using the CHARSET parameter in the service class, described in Step 2. In case you wish to customize a method's charset, you should use the following notation:
/// @apiPub[charset="value"]
Example:
/// @apiPub[charset="UTF-8"]
Customizing names and other parameter features
You can customize several aspects of each method's input and output parameters, such as the names and descriptions that will be displayed for each parameter.
To customize a specific parameter, use the following notation
/// @apiPub[params.paramId.property="value"]
or for responses:
/// @apiPub[response.property="value"]
Example:
/// @apiPub[params.pId.name="petId"]
/// @apiPub[params.pId.description="ID of pet to return"]
In this case, the name petId and description ID of pet to return are being assigned to the parameter defined as pId
When customization is not specific to a given parameter, the following notation is used
/// @apiPub[params.property="value"]
In the following example, the description This can only be done by the logged in user is assigned to the entire request, not just to a single parameter:
/// @apiPub[params.description="This can only be done by the logged in user."]
Other properties that can be customized for specific parameters
Use the following notation for input or output parameters:
/// @apiPub[params.paramId.property="value"]
For responses:
/// @apiPub[response.property="value"]
| Property |
|---|
| required: "true" if the parameter is required. All parameters of type path are already automatically required |
| schema.items.enum: display enumerators for types %String or %Library.DynamicArray. See the findByStatus method of the apiPub.samples.api class |
| schema.default: Points to a default value for enumerators. |
| inputType: For simple types, it defaults as a query parameter. For complex types (body), it defaults as application/json. In case you wish to change the input type, you can use this parameter. Usage example: Uploading an image, which is not usually of the JSON type. See the uploadImage method of the apiPub.samples.api class. |
| outputType: For %Status types, it defaults to header. For the remaining types it defaults to application/json. In case you wish to change the output type, you can use this parameter. Usage example: Returning a token ("text/plain"). See the loginUser method of the apiPub.samples.api class |
Relate parseable schemas to dynamic JSON types (%Library.DynamicObject)
 You can relate OAS 3.0 schemas to internal dynamic types.
The benefit of associating the schema to the parameter, besides informing the user about a required object specification, is the automatic parsing of the request, which is performed during the API call. If the API user, for example, submits a property that is not in the schema, or sends a date in an invalid format, or doesn't include a mandatory property, one or more errors will be returned to the user containing information about these issues.
The first step is to include the desired schema in the XDATA block as shown below. In this case the schema called User can be used by any method. It must follow the same rules used in OAS 3.0 modeling.
XData apiPub [ MimeType = application/json ]
{
    {
        "schemas": {
            "User": {
                "type": "object",
                "required": [
                    "id"
                ],
                "properties": {
                    "id": {
                        "type": "integer",
                        "format": "int64"
                    },
                    "username": {
                        "type": "string"
                    },
                    "firstName": {
                        "type": "string"
                    },
                    "lastName": {
                        "type": "string"
                    },
                    "email": {
                        "type": "string"
                    },
                    "password": {
                        "type": "string"
                    },
                    "phone": {
                        "type": "string"
                    },
                    "userStatus": {
                        "type": "integer",
                        "description": "(short) User Status"
                    }
                }
            }
        }
    }
}
The second step is to associate the name of the schema informed in the previous step to the internal parameter of type %Library.DynamicObject using the following notation:
/// @apiPub[params.paramId.schema="schema name"]
Example associating the user parameter to the User schema:
/// @apiPub[params.user.schema="User"]
Method updateUserUsingOASSchema(username As %String, user As %Library.DynamicObject) As %Status [ WebMethod ]
{
    code...
}
Example submitting a request with an error. The username2 property does not exist in the User schema. The id property is also not set but it's required:
{
  "username2": "devecchijr",
  "firstName": "claudio",
  "lastName": "devecchi junior",
  "email": "devecchijr@gmail.com",
  "password": "string",
  "phone": "string",
  "userStatus": 0
}
Example of a response with an error:
{
  "statusCode": 0,
  "message": "ERROR #5001: <Bad Request> Path User.id is required; Invalid path: User.username2",
  "errorCode": 5001
}
See updateUserUsingOASSchema and getInventory methods from the apiPub.samples.api class. The getInventory method is an example of a schema associated with the method's output (response), so it's not parsable.
Generate the OAS 3.0 schema from a JSON object
To assist in the generation of the OAS 3.0 schema, you can use the following:
Define a variable with a sample of the JSON object.
set myObject = {"prop1":"2020-10-15","prop2":true, "prop3":555.55, "prop4":["banana","orange","apple"]}
Use the utility method from the apiPub.core.publisher class to generate the schema:
do ##class(apiPub.core.publisher).TemplateToOpenApiSchema(myObject,"objectName",.schema)
Copy and paste the schema returned in the XDATA block:
Example:
XData apiPub [ MimeType = application/json ]
{
    {
        "schemas": {
            {
                "objectName":
                {
                    "type":"object",
                    "properties":{
                        "prop1":{
                            "type":"string",
                            "format":"date",
                            "example":"2020-10-15"
                        },
                        "prop2":{
                            "type":"boolean",
                            "example":true
                        },
                        "prop3":{
                            "type":"number",
                            "example":555.55
                        },
                        "prop4":{
                            "type":"array",
                            "items":{
                                "type":"string",
                                "example":"apple"
                            }
                        }
                    }
                }
            }
        }
    }
}
Enable monitoring (optional)
1 - Add and activate the following components in your Production (IRIS Interoperability)
| Component | Type |
|---|---|
| apiPub.tracer.bm | Service (BS) |
| apiPub.tracer.bs | Service (BS) |
| apiPub.tracer.bo | Operation (BO) |
2 - Activate monitoring for the class described in Step 2
The Traceable parameter must be activated.
Parameter Traceable As %Boolean = 1;

Parameter TracerBSName = "apiPub.tracer.bs";

Parameter APIDomain = "samples";
The APIDomain parameter is used to group the APIs for monitoring.
3 - Import the dashboards
zn "IRISAPP"
Set sc = ##class(%DeepSee.UserLibrary.Utils).%ProcessContainer("apiPub.tracer.dashboards",1)
Other dashboards, based on the apiPub Monitor cube, can also be created.
Use this tool together with Intersystems API Manager
Route your generated APIs and benefit from the Intersystems API Manager
Compatibility
ApiPub is compatible with Intersystems IRIS or Intersystems IRIS for Health, from version 2018.1.
Repository
Github: apiPub


Oldest comments (0)