Hello! This post starts my new post series dedicated to beginners willing to dive into Avalonia. In this post I gonna describe Avalonia usage basics. In later posts I will explain some undocumented sides of developing Avalonia app.
AvaloniaUI is cross-platform UI framework for .Net Core. It supports Windows, Linux and macos out of box. Avalonia follows WPF way in building desktop apps but it has few improvements if compare with WPF.
I wanna explain Avalonia principles using my own pet project called Camelot as an example. It has everything that I gonna show in this blog post series and I hope it could be good example for beginners. I think that one good example is better than 100 docs. Even for Avalonia where docs cover most of needs.
Short architecture overview
Desktops frameworks have completely different solution structure from structure that web developers used to see. Avalonia apps could be separated into following components:
1) Views (UI markup). Markup is represented by XAML files, one XAML file per view/control. XAML is XML-based markup language which was introduced in WPF. It's some kind of HTML in web world.
2) Styles. Styles are added in separate XAML files. This way is similar to web css files. In styles file root tag is Styles
3) Code-behind files. Similar to old ASP.NET code-behind approach. Every view should have a related class in code-behind file. In most cases it only loads XAML of a class. In some cases it also contains some logic. Previously it was popular to write business logic in code-behind files but it's wrong approach. Code-behind files are attached to their views so they are not reusable and depends on view. View update can easily break code-behind file. I will describe better approach below.
4) View models. Here is proper replacement for code-behind files which is very popular now. View model is a class which is connected to view using binding mechanism, in Avalonia each view model inherits ReactiveObject. In XAML you can specify property that you want bind to and your control will be connected to this property. For example, you can connect text box and string property. Every change in text box will change property and every change of property will change text on UI. Sounds better than processing events or manual reading text box value, right?
5) App business logic. Represented by C# classes. Mostly it's separated into business and domain logic. This part is completely independent from UI and view models layers.
6) Tests. Optionally you can have tests for your UI and view models or business logic.
View
As mentioned before, view is XAML file with XML-like syntax:
<Window xmlns="https://github.com/avaloniaui"
        xmlns:x="http://schemas.microsoft.com/winfx/2006/xaml"
        xmlns:d="http://schemas.microsoft.com/expression/blend/2008"
        xmlns:mc="http://schemas.openxmlformats.org/markup-compatibility/2006"
        xmlns:p="clr-namespace:Camelot.Properties"
        xmlns:dialogs="clr-namespace:Camelot.ViewModels.Implementations.Dialogs;assembly=Camelot.ViewModels"
        mc:Ignorable="d" d:DesignWidth="800" d:DesignHeight="450"
        x:Class="Camelot.Views.Dialogs.CreateDirectoryDialog"
        Width="400" Height="150"
        Title="{x:Static p:Resources.CreateDirectoryTitle}">

    <Design.DataContext>
        <dialogs:CreateDirectoryDialogViewModel />
    </Design.DataContext>

    <Grid RowDefinitions="Auto,Auto,Auto" Margin="10" HorizontalAlignment="Center">
        <TextBlock Classes="dialogTextBlock" Text="{x:Static p:Resources.EnterDirectoryNameWithColon}" />
        <TextBox Grid.Row="1" x:Name="DirectoryNameTextBox" Text="{Binding DirectoryName}" />
        <StackPanel Grid.Row="2" Orientation="Horizontal" HorizontalAlignment="Center">
            <Button Classes="dialogButton transparentDialogButton" Content="{x:Static p:Resources.Cancel}" Command="{Binding CancelCommand}" />
            <Button Classes="dialogButton" Content="{x:Static p:Resources.Create}" Command="{Binding CreateCommand}" />
        </StackPanel>
    </Grid>
</Window>
It could be window or user control. It has connected code-behind class (x:Class="Camelot.Views.Dialogs.CreateDirectoryDialog")
<Design.DataContext> contains reference to view model for design time purpose. It enables intellijsense for bindings and helps to show preview of your view.
View itself represented by xml tags with attributes like in html. Let's look closer at following tag:
<TextBox Grid.Row="1" x:Name="DirectoryNameTextBox" Text="{Binding DirectoryName}" />
TextBox is control name. Text is attribute which is connected to DirectoryName property of my view model via binding. x:Name attribute specifies unique control name.
Note that like in WPF or HTML some controls act like containers (panels) for other controls, for example Grid from code snippet above. For better understanding of Avalonia controls I recommend to read official Avalonia docs. They are pretty good.
Useful links:
1) XAML quick start
2) User controls
3) Panels
Code-behind files
Typical code-behind files looks like this one:
using Avalonia.Controls;
using Avalonia.Markup.Xaml;

namespace Camelot.Views.Main
{
    public class OperationsView : UserControl
    {
        public OperationsView()
        {
            InitializeComponent();
        }

        private void InitializeComponent()
        {
            AvaloniaXamlLoader.Load(this);
        }
    }
}
All it does is XAML loading for itself. In some complicated cases you can write some logic there. Here is an example. As I said before it's not good approach to put your business logic here but in some cases there is no other option due to missing features in Avalonia.
Styles
Style files contains a lot of <Style> tag with styles for elements. Example:
<Style Selector="Button">
    <Setter Property="BorderThickness" Value="0" />
    <Setter Property="Background" Value="Transparent" />
    <Setter Property="Cursor" Value="Hand" />
</Style>
Every style is pretty simple. Selector describes what control we want to restyle, in every setter there is name and value for styled property. For example <Setter Property="Cursor" Value="Hand" /> sets hand cursor for a buttons which should be default for buttons in framework I think :) Selectors could be complex like in css, for example ComboBoxItem:selected TextBlock will style text block inside selected combo box item. Avalonia has pretty good style docs, I recommend to check them out.
View model
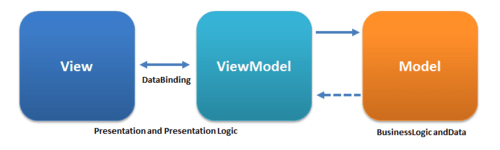
View model is a key element of MVVM pattern. It allows you to connect your UI and and backend properly and update UI implicitly from your code without need to know UI details. Also with this pattern your view and view model are separated because they are connected via binding instead of element names like in code-behind files. So you reuse your view models with different views w/o adjusting your code and so on.
In Avalonia ReactiveUI is used in view models. It's open source framework that allows to write view models code in asynchronous "reactive" way. It allows to create chains of functions that reacts on user input. Here is an example:
this.WhenAnyValue(x => x.CurrentDirectory, x => x.SelectedTab)
    .Throttle(TimeSpan.FromMilliseconds(filePanelConfiguration.SaveTimeoutMs))
    .Subscribe(_ => SaveState());
In this example if any of observable properties changed after filePanelConfiguration.SaveTimeoutMs ms after change view model saves its state to database. Although I'm using reactive way too, I prefer using old-school WPF approach for view models mostly (actually I'm using mixed approach). What is the difference? WPF approach doesn't use function chains for configuring view models. It's simple and more readable in most cases because there is no need to analyze list of operations in chains which can be long and difficult to understand. I will explain details in next posts.
Business logic
Nothing interesting here, just business logic. I connected my view models to business logic (services) using dependency injection approach. In this approach view models get all services by their interfaces in constructor so they don't know exact implementation details. This approach is flexible and allows to modify both services and view models independently. I will provide implementation details in one of next posts. Here is an example of using DI:
namespace Camelot.ViewModels.Implementations.Dialogs
{
    public class CreateDirectoryDialogViewModel : ParameterizedDialogViewModelBase<CreateDirectoryDialogResult, CreateDirectoryNavigationParameter>
    {
        // readonly fields for injected services
        // note that only interfaces are used
        private readonly IDirectoryService _directoryService;
        private readonly IFileService _fileService;
        private readonly IPathService _pathService;

        // some code

        // constructor with injected dependecies
        public CreateDirectoryDialogViewModel(
            IDirectoryService directoryService,
            IFileService fileService,
            IPathService pathService)
        {
            _directoryService = directoryService;
            _fileService = fileService;
            _pathService = pathService;
        }

        // some code here
    }
}
Tests
Also I added tests for my app (link) using XUnit and Moq. As for now I have only business logic and view models tests, but in future I gonna add UI tests as well. I will write post with detailed explanations later in this series (Avalonia docs miss that information). I wanna note that you can test your view models too (example). Why did I do that? For most beginners it's not obvious why tests are so important. In fact they help to prevent regression bugs and allow to reduce manual testing effort. In my case I refactored and modified too much code so unit tests saved a lot of time for me and helped to find many bugs.
What is next
In next post in this series I gonna touch Avalonia styling approach which differs from WPF and could be confusing for WPF developers. Also it has some undocumented things every Avalonia dev should know. Stay tuned!


Top comments (2)
Create tutorial! Thanks!
Great job! Thanks!