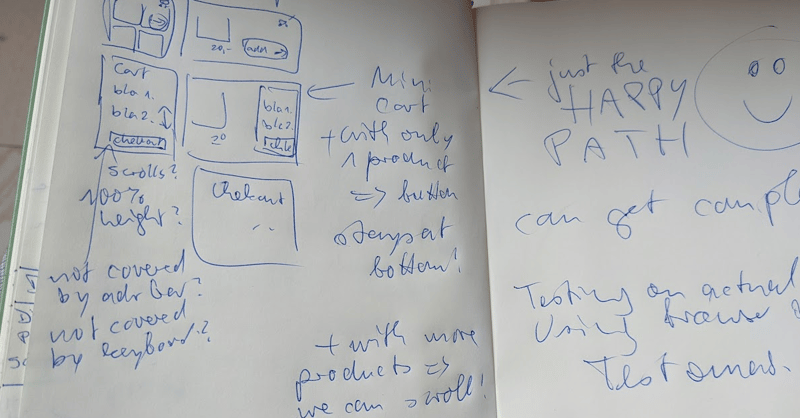
Doing some manual testing on the fly can get quite complex, even if it's "just the happy path".
"Just the (Complex) Happy Path"
No matter which one you prefer, any test framework is possibly better than not using tests at all, and there are a lot of popular choices and other less known newcomers.
Choosing (and Mixing) Test Frameworks
There are enough blog posts about Jest or Cypress already, so let me introduce Codecept. It comes in two flavors. There is Codeception for PHP, and there is CodeceptJS for JavaScript which we will be using here.
Testomat.io is a software as a service to manage our automated tests to monitor our quality management.
Importing mostly any existing Test Scenario into Testomat.io
Nice: we can import mostly any existing test that we already have! Jasmine, jest, mocha, cucumber and all the other classic stuff, or Cypress, Codecept, and Codeception from our latest projects. (If you don't have any existing tests, skip to the "advanced" part of this article, where I show you some ways to improve my (non)existent tests, this might be a good start for a first simple scenario.)
Importing existing code will set up our first test in Testomat.io. We don't have to upload any files, as we can sync our projects using an API key. Let's sign up and start our first project as a practical example.
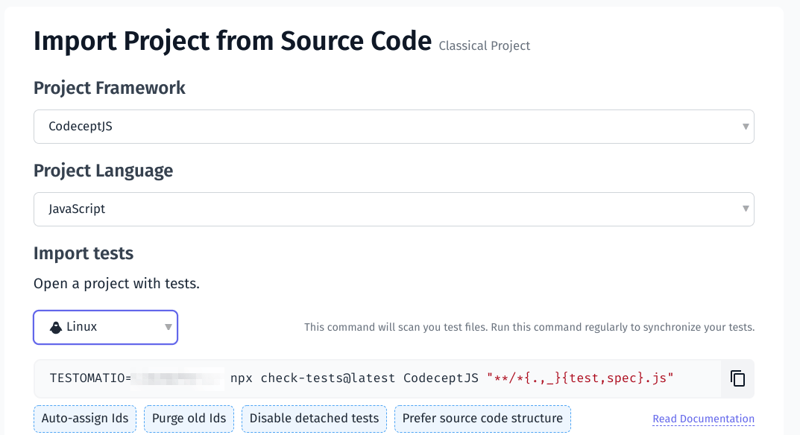
Import Tests from Source Code
TESTOMATIO=__$APIKEY__ npx check-tests@latest CodeceptJS "**/*{.,_}{test,spec}.js"
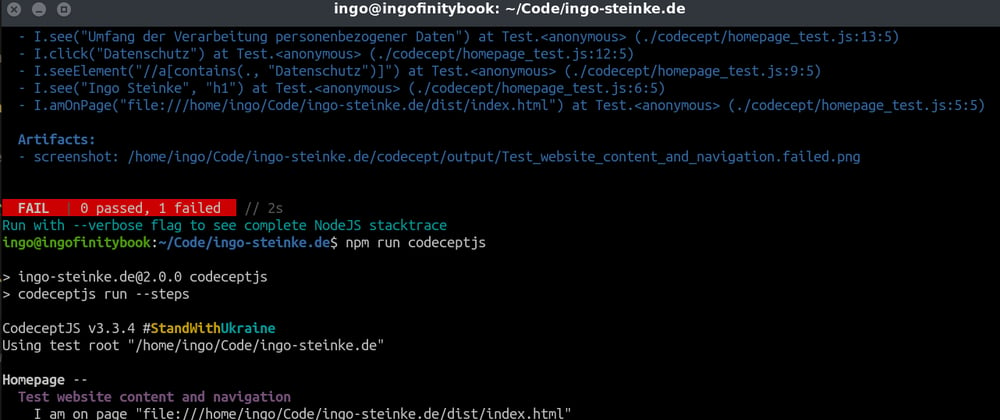
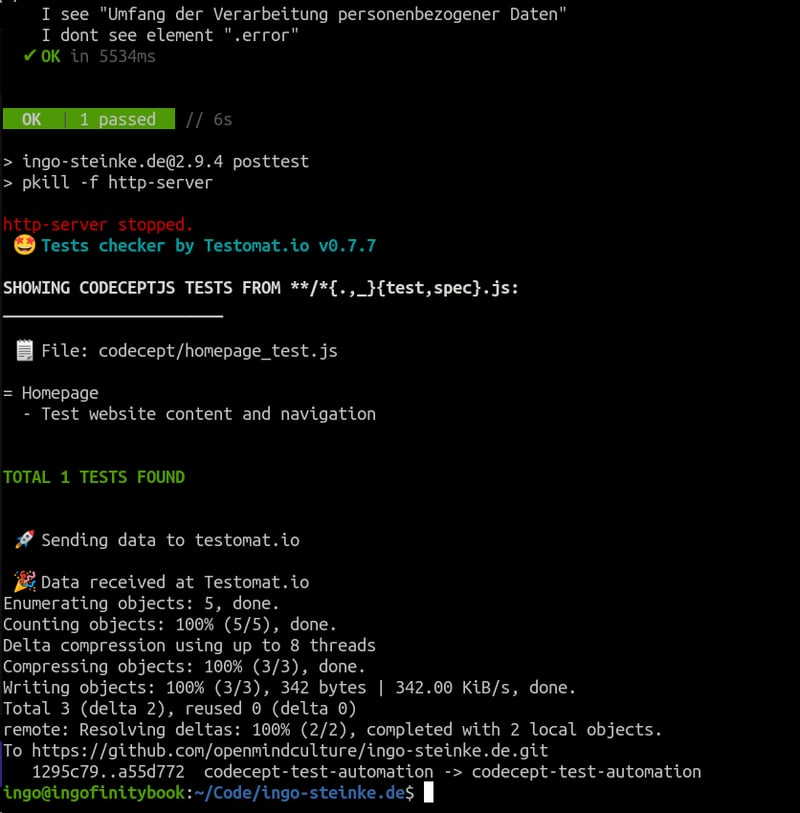
Running the above on the command line (replacing $APIKEY with our actual, secret, API key we just got from Testomat.io), the importer will proceed our data and print a summary:

Updating Tests from Source Code
To update, run the same script again.
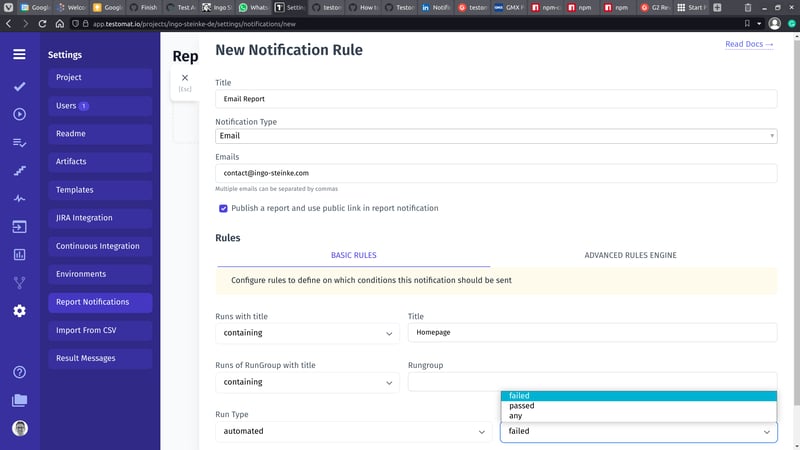
Configuring Reporting
In the settings, we can configure Report Notifications based on sets of Rules, like which test results (based on test titles or groups) should be reported in which case (failure, success, always) on which channel (like Slack, Jira, Teams, or email).
We can use Testomat.io for monitoring our sites and applications over time and spot positive trends to prove our bug fixing progress, or verify expected negative trends proving increased test coverage of a legacy application, or else getting a timely warning that something is not working as expected causing an unexpected negative test result.
Visual Testing
Using CodeceptJS to compare Screenshots
Codecept will save screenshots in case of failure.
So maybe we can do even more with screenshots, like recording one in any case and comparing to the previous version. Then we can safely upgrade SASS or PostCSS without worrying that some arbitrary 5 bytes difference in the resulting 1000 lines CSS file will actually break anything in the frontend!
Yes, we can! Documented as "Visual Testing", the screenshot feature is a possible means of testing. We can use Resemble.js, which is a great tool for image comparison and analysis, after adding the codeceptjs-resemblehelper to our project:
npm install codeceptjs-resemblehelper --save
This helper should be added to the configuration file codecept.conf.js to define the folders to store screenshot image files.
   "helpers": {
      "ResembleHelper" : {
        "require": "codeceptjs-resemblehelper",
        "screenshotFolder" : "./codecept/output/",
        "baseFolder": "./codecept/screenshots/base/",
        "diffFolder": "./codecept/screenshots/diff/"
      }
   }
Now we can take and compare screenshots in our tests!
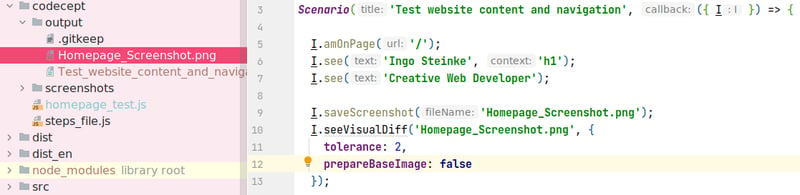
  I.saveScreenshot('Homepage_Screenshot.png');
  I.seeVisualDiff('Homepage_Screenshot.png', {
    tolerance: 2,
    prepareBaseImage: false
  });
If we don't want to provide an initial screenshot image, we can let CodeceptJS prepare an initial "baseImage" in the first run, or after an intentional visual change, by temporarily setting prepareBaseImage: true.
The generated screenshots should be committed to our git repository.
Now let's explore what happens if the screenshots differ!
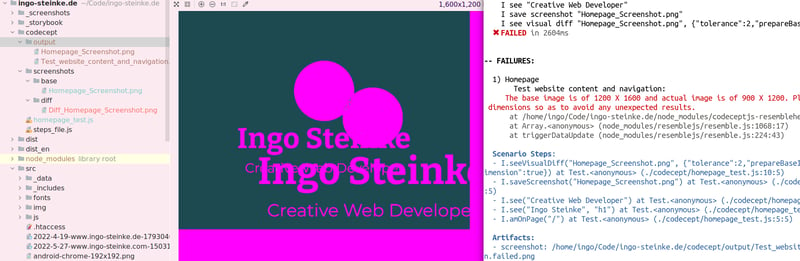
We can simply change the test browser's viewport dimensions to cause a visual change. Re-running the test fails due to a difference of the screenshots. Apart from the text message, a diff image has been generated to point out the differences between the original and the actual screenshot.
I save screenshot "Homepage_Screenshot.png"`
I see visual diff "Homepage_Screenshot.png",`
{"tolerance":2,"prepareBaseImage":false}`
✖ FAILED in 2604ms

-- FAILURES:

1) Homepage
  Test website content and navigation:
    The base image is of 1200 X 1600 and actual image
    is of 900 X 1200. Please use images of same dimensions
    so as to avoid any unexpected results.
If this is an intended change, I can now set prepareBaseImage: true to recreate a new base image in the next run. After that, the tests will pass and show green status again unless there is another new change to be detected.
Screenshot testing is just one of the aspects that used to be hard to handle when writing tests in the past. As CodeceptJS is based on Playwright, we can test iframes, and file uploads and downloads natively. And (unlike Cypress) CodeceptJS has a parallel running mode.
Extending and Improving our local Tests
Checking our Code for False Assumptions
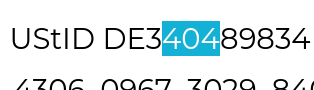
This is the funny part: I tried to add an assertion that there is no "404 not found" error, starting with a very naive approach.
I.dontSee('404');
But might have a 404 in your phone number, bank account information or a product ID. So this assertion might seem to work at first sight, but fail later when tested with real world data.
Use npm pre- and post-test Script Hooks
If you don't have a localhost preview server already, you can add one using the http-server package and adding a "serve" target in package.json (see example source code below).
For a local test run, we can combine our lint and build process with test automation, making use of the built-in pre- and post-scripts feature of npm. By splitting our tasks in pretest, test, and posttest we don't need to worry about the dev server blocking the terminal, waiting forever for a test that does not run, or how to make Codecept wait for our server if the scripts ran in parallel.
Integrating Linting, Building, and Testing
Before starting build and test, let's also make sure that our source code passes static quality control, by adding the popular linting tools (eslint for JavaScript and stylelint for CSS) at the beginning of our test tool chain:
- Lint the source code using eslint and stylelint.
- Build the source code (using eleventy and postCSS in my case, replace with the tools of your choice).
- Start the localhost development server.
- Run CodeceptJS test steps (run in an actual browser session).
- Stop the development server (using pkill as suggested on StackOverflow).
Local Setup - Summary
You can verify, copy and paste the relevant code snippets below. I have left out some of my project's details to focus on the test setup. You can find my original source code on GitHub.
Scripts and dependencies in package.json:
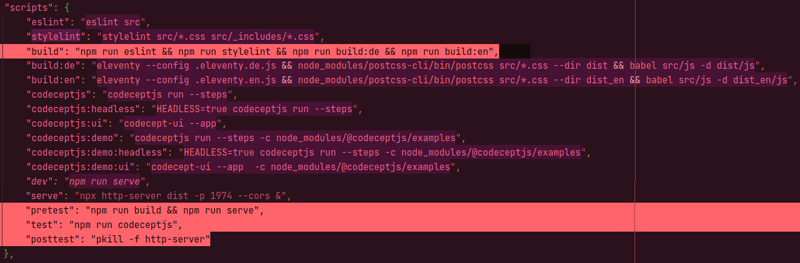
  "scripts": {
        "eslint": "eslint src",
        "stylelint": "stylelint src/*.css",
        "build": "npm run eslint && npm run stylelint && ... your own build steps ...",
        "codeceptjs": "codeceptjs run --steps",
        "serve": "npx http-server dist -p 1974 --cors &",
        "pretest": "npm run build && npm run serve",
        "test": "npm run codeceptjs",
        "posttest": "pkill -f http-server"
    },
    "devDependencies": {
        "@codeceptjs/configure": "^0.8.0",
        "codeceptjs": "^3.3.4",
        "eslint": "^8.6.0",
        "http-server": "^14.1.1",
        "playwright": "^1.25.0",
        "puppeteer": "^16.1.0",
        "stylelint": "^14.10.0",
        "stylelint-config-html": "^1.1.0",
        "stylelint-config-standard": "^27.0.0"
    }
}
Codecept configuration file ./codecept.conf.js. Note: please consult the latest codecept documentation for the right syntax to use!
This is just a simple sample configuration used with CodeceptJS 3.3.4 which is probably already outdated at the time of reading.
const { setHeadlessWhen, setWindowSize } = require('@codeceptjs/configure');

// turn on headless mode when running with HEADLESS=true environment variable
// export HEADLESS=true && npx codeceptjs run
setHeadlessWhen(process.env.HEADLESS);

setWindowSize(1600, 1200);

exports.config = {
  tests: './codecept/*_test.js',
  output: './codecept/output',
  helpers: {
    Puppeteer: {
      url: 'http://localhost:1974',
      show: true,
      windowSize: '1200x900'
    }
  },
  include: {
    I: './codecept/steps_file.js'
  },
  bootstrap: null,
  mocha: {},
  name: 'ingo-steinke.de',
  plugins: {
    pauseOnFail: {},
    retryFailedStep: {
      enabled: true
    },
    tryTo: {
      enabled: true
    },
    screenshotOnFail: {
      enabled: true
    }
  }
}
I have created alternative configurations to be used in different environments, so I have moved the common configuration settings to ./codecept.common.conf.js which I include in the specific configuration files, to avoid redundant project code.
Here, I simply provide a different URL to test the deployed site on the public production URL:
./codecept.ci.conf.js:
const { setHeadlessWhen, setWindowSize } = require('@codeceptjs/configure');
exports.config = require ('./codecept.common.conf.js');
exports.config.helpers.Puppeteer.url = 'https://www.ingo-steinke.de';

// turn on headless mode when running with HEADLESS=true environment variable
// export HEADLESS=true && npx codeceptjs run
setHeadlessWhen(process.env.HEADLESS);
Adding Tests Steps to Our Test Scenario
Last, but not least, we need test definitions. We can use a common steps_file.js and specific test scenarios like this "Homepage" feature test scenario defined in homepage_tests.js.
We do some straightforward things here:
Open the home page ("I am on page /") and verify that some expected content is visible. We can specify content text, specific elements, and even use XPath selectors, if necessary.
Although we can specify a screen size in our configuration, there is no need to scroll explicitly. Our assertions work with the whole document, like if we would use "find on page" in our browser.
Using its description as a key, we are looking for a certain button, click it, and verify that a certain paragraph becomes visible, that has been hidden initially.
Feature('Homepage');

Scenario('Test website content and navigation', ({ I }) => {

  I.amOnPage('/');
  I.see('Ingo Steinke', 'h1');
  I.see('Creative Web Developer');
  I.seeElement('//a[contains(., "privacy")]');

  // find button by caption text, click it ...
  I.click('privacy');
  // ... and verify that this reveals a hidden paragraph.
  I.see('Your legal rights');

  // We can ensure NOT to see something:
  I.dontSeeElement('.error');
  // I.dontSee('404');

  // so the following would fail:
  // I.dontSee('Ingo');
});
So this is a simple test scenario using npm and CodeceptJS. We can extend everything, using more complex and less naive test scenarios and add alternative test configurations.
As we use Testomat.io to manage test automation, let's not forget to update our test definitions after we changed anything.
This will run our lint + build + test pipeline, and if that finished sucessfully, updates the test suite on the Testomat.io server. And pushing to git (or more specifically, pushing or merging into my main branch) will trigger a build and deployment, so in the end we will have an updated web page build and updated test definitions to test that live page in production.
npm run test && \
TESTOMATIO=__$APIKEY__ npx check-tests@latest CodeceptJS "**/*{.,_}{test,spec}.js && \
git push"


Latest comments (3)
Today I learned: we can use hybrid require + import/export projects if we need to. Just found out after struggling with divergent requirements of existing project parts (no babel, no webpack, no rollup, just
esbuildto handleimportandexportstatements for client-side code) vs. node modules and test libraries likejasmineandcodeceptjs.The best practice to use codecept with modules so far is switching to TypeScript (if you haven't been using it in yet) and configuring the babel transpiler as discussed in this codeceptjs issue: ESM imports cause errors #3181. But there is another alternative.
While I still failed to understand where to add
require('import-export');or if it will work at all in my specific setup, I found another workaround and added anotherpackage.jsonin thecodeceptdirectory, containing nothing much but"type": "commonjs".So it may look like we have to decide and either set
"type": "module"for ESM ES6 module type using import/export or set"type": "commonjs"to use good oldrequire()functions, but we can actually mix both on a per-directory basis.Hybrid project packages:
/package.jsonsetting"type": "module"/codecept/package.jsonsetting"type": "commonjs"Thanks for the post! It is very helpful to get started with CodeceptJS and Testomat.io!
Thanks @davert for your support! I have closed the GitHub issue and updated this blog post.