If you have been working with a Gatsby blog site, you’d most likely know how to source markdown files from the filesystem.
This is not bad for someone technical and enjoys working with the markdown syntax.
But, as a developer, you’d also want to consider those that would be managing their Gatsby blog content from the admin interface.
In this tutorial, you’ll learn how to set up Gatsby with Contentful CMS (Content Management System) and deploy on Netlify for free.
At the end of this tutorial, you will be able to create this Gatsby blog site where its content comes from the content management system.
If you are not familiar with GatsbyJS, consider reading this step by step guide to creating a Gatsby site. There, you will learn the fundamentals of Gatsby and GraphQL. You’ll also learn how to source Gatsby markdown content from the filesystem.
For those of us that are conversant with Gatsby, let’s get started.
Installing a Gatsby Starter
Just like every other Gatsby site, we will start by installing a Gatsby starter. Here, we will be installing the official default starter.
From the terminal, run this command:
C:\Users\Your Name > gatsby new gatsby-contentful-blogsite
Heads-up: Make sure you have NodeJS, Git and Gatsby CLI installed. You should know this if you follow the Gatsby tutorial guide.
The command will create a new project folder called gatsby-contentful-blogsite and include all of the starter files.
Switch inside the directory (cd gatsby-contentful-blogsite) and run gatsby develop.
Now, you should have your default home page at http://localhost:8000/

Before we dive in, let’s quickly make some changes to the rendered content.
Open your project with your favourite text editor.
When it comes to page creation, the src/pages directory is where Gatsby looks to create site pages. Files in this directory automatically become static pages.
So in the src/pages folder, rename the page-2.js file to blog.js.
Then, go inside the src/pages/index.js and modify the Link component so that it points to the blog page.
...
const IndexPage = () => (
  <Layout>
    <SEO title="Home" />
    ...
    <Link to="/blog/">Visit the Blog Page</Link>
  </Layout>
)
...
One more thing, let’s go inside the gatsby-config.js file and modify the global data in the siteMetadata property.
siteMetadata: {
  title: `Gatsby Blog Site`,
  description: `Write your site description here!`,
  author: `@ibaslogic`,
},
Save your files and restart the development server.
Awesome! This is a good start.
Now that we have the basic setup, let’s see how to start sourcing content from the Contentful CMS and load them dynamically in our Gatsby site.
Storing Post Content in the Contentful CMS
Contentful CMS, like every other headless CMS, focuses on the backend task (i.e storing content and providing a friendly editing interface). It then allows us to pull the content into any frontend technologies by providing an API.
The other types of CMS including the traditional CMSs like WordPress and Drupal also provides options to work with the frontend technologies by supporting the API approach.
All you need to source content from these CMSs is the Content Delivery API.
Ok. Enough said.
Let's head over to contentful.com and create a free account. After that, you’ll need to click on the Explore content modeling button to create an example project or simply browse to app.contentful.com.
Once this is done, you can create an empty space. Think of space as a storage area for your project content.
To create it, open the sidebar menu and click on the create space link. Go ahead and use the free space and give it a name. In my case, I will call it Ibaslogic Gatsby Blog.
Select Create an empty space and proceed.
Next, we will focus on defining the type of data we want to track. Here, we will look at the Content model and the Content tab.
For a typical blog post, you’ll want to get the post title, date, featured image, excerpt, slug and the actual posts content.
So, we will add these fields in the model.
Let’s click on the Content model tab to add a content type.
Name your content type (for instance, Blog Post) and click on the Create button.

Next, we need to start adding the necessary fields for our blog posts.
To add these fields, click the Add field button.
We will be using four of these fields for our Blog Post model. The Text for the post title, slug and excerpt, Date and time for the date, Media for the featured image and Rich text for the post body.

To add a Title field, you’ll select Text and give it a name (for instance, Title). Then click Create.
Note: Unlike the Title where the Shot text radio button is selected, the Excerpt will use the Long text.
Also, the generated Field ID will be useful to access the data in the GraphQL. So make sure you name your field in a way you can easily remember.
Once you add the remaining fields, your content model should look like this:

Again, take note of the field types for each of the field names.
Save the model by clicking on the Save button at the top right corner.
Now, you have your content model in place. Let’s go ahead and start creating the post content based on this model.
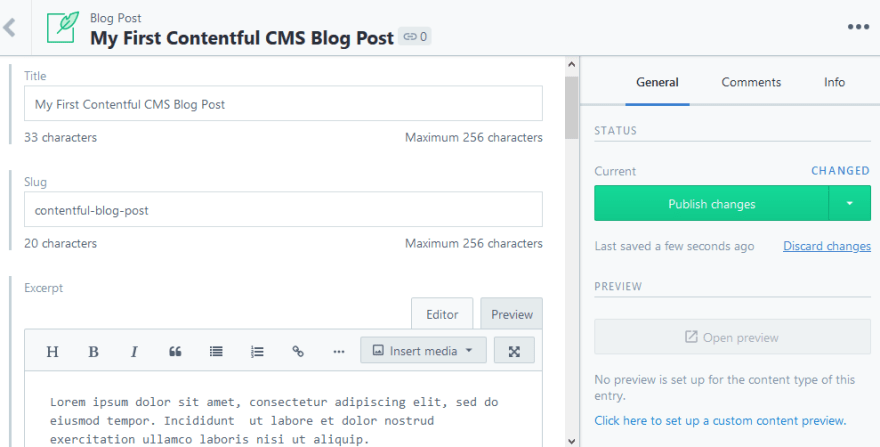
Head over to the Content tab and click on the Add Blog Post button.
Go ahead and fill all the fields you specified earlier and click the Publish button.
Add more entries to the post list. Here, I’ve added one more entry.

At this point, we can start accessing these data from our Gatsby site.
Accessing Contentful Data from the Gatsby Site
Let’s start by installing the necessary plugins. In your terminal, run:
C:\Users\Your Name\gatsby-contentful-blogsite > npm install gatsby-source-contentful gatsby-transformer-remark
The gatsby-source-contentful allows us to pull our contents from a Contentful CMS while the gatsby-transformer-remark will help us format that data into something useful for our site.
Add these plugins to your gatsby-config.js file like so:
module.exports = {
  siteMetadata: { ... },
  plugins: [
    ...
    `gatsby-transformer-remark`,
    {
      resolve: `gatsby-source-contentful`,
      options: {
        spaceId: "",
        accessToken: "",
      },
    },
    ...
  ]
}
Now, to ensure that this source plugin fetch your data from Contentful, you’ll need to grab the spaceId and the accessToken from the CMS.
In Contentful CMS, go to the Settings dropdown menu and click on the API Keys. From there, you can either use the example API key by clicking on the Example Key link or create a separate API key by clicking on the Add API Key button.
Either way, you should see something like this:

These data are sensitive and should be made secret. So, pasting them directly in the gatsby-config.js file is wrong since we will be pushing the code to GitHub.
Though it would work.
Instead, let’s create a file called .env.development in the project root directory and add them like this:
CONTENTFUL_SPACE_ID="vf0ielhy9a1g"
CONTENTFUL_ACCESS_TOKEN="NtjCzgXgLXlNAhuw8zn4ZReQwATR-frfB-PTousRodU"
Make sure you replace the ID and the token with yours.
Next, open the .gitignore file located in the root directory and include .env.development. Now, this file will be ignored when you make a commit to your repo.
Finally, go inside the gatsby-config.js file and add this at the top:
require("dotenv").config({
  path: `.env.${process.env.NODE_ENV}`,
})
This code ensures that the environment variables are available in the gatsby-config.js file. And they can be accessed via the global variable process.env
Now, update the spaceId and the accessToken so you have:
require("dotenv").config({
  path: `.env.${process.env.NODE_ENV}`,
})

module.exports = {
  siteMetadata: { ... },
  plugins: [
    ...
    `gatsby-transformer-remark`,
    {
      resolve: `gatsby-source-contentful`,
      options: {
        spaceId: process.env.CONTENTFUL_SPACE_ID,
        accessToken: process.env.CONTENTFUL_ACCESS_TOKEN,
      },
    },
    ...
  ]
}
Save all your files and start the development server.
Make sure you are connected to the internet.
Now, the Contentful data are available for us to use in the frontend.
Rendering Contentful Data in the Frontend
To render the Contentful data, let’s start by opening the GraphiQL IDE (http://localhost:8000/___graphql) and see what queries we have access to.
Your area of focus should be on the allContentfulBlogPost (for fetching the list of posts) and contentfulBlogPost (for the individual post).
Note: The
BlogPostattached to theallContentfulBlogPostis the name of our content type. If you had specified another name, that’s what you would see.
Generating a list of posts
If you explore some of the fields that are available on the allContentfulBlogPost node, you will have something like this:
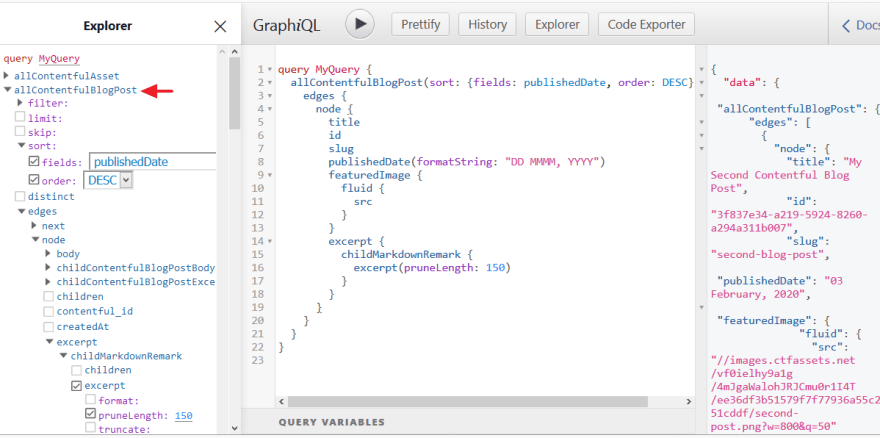
As seen in the image above, the query is returning the Contentful data that we need.
If the query looks strange to you, you need to start from here.
Now, we need to use this query to construct the blog page (post listing page).
So, go inside the src/pages/blog.js file and replace the code with the following:
import React from "react"
import { useStaticQuery, graphql, Link } from "gatsby"

import Img from "gatsby-image"
import Layout from "../components/layout"
import SEO from "../components/seo"

const Blog = () => {
  const data = useStaticQuery(
    graphql`
      query {
        allContentfulBlogPost(sort: { fields: publishedDate, order: DESC }) {
          edges {
            node {
              title
              id
              slug
              publishedDate(formatString: "Do MMMM, YYYY")
              featuredImage {
                fluid(maxWidth: 750) {
                  ...GatsbyContentfulFluid
                }
              }
              excerpt {
                childMarkdownRemark {
                  excerpt(pruneLength: 150)
                }
              }
            }
          }
        }
      }
    `
  )
  return (
    <Layout>
      <SEO title="Blog" />
      <p>
        <Link to="/">Go back to the homepage</Link>
      </p>
      <ul className="posts">
        {data.allContentfulBlogPost.edges.map(edge => {
          return (
            <li className="post" key={edge.node.id}>
              <h2>
                <Link to={`/blog/${edge.node.slug}/`}>{edge.node.title}</Link>
              </h2>
              <div className="meta">
                <span>Posted on {edge.node.publishedDate}</span>
              </div>
              {edge.node.featuredImage && (
                <Img
                  className="featured"
                  fluid={edge.node.featuredImage.fluid}
                  alt={edge.node.title}
                />
              )}
              <p className="excerpt">
                {edge.node.excerpt.childMarkdownRemark.excerpt}
              </p>
              <div className="button">
                <Link to={`/blog/${edge.node.slug}/`}>Read More</Link>
              </div>
            </li>
          )
        })}
      </ul>
    </Layout>
  )
}

export default Blog
Save the file and check the blog page. You should have your Contentful post listed.
The code should be self-explanatory. It is similar to how you’d render the markdown data.
In essence, we are using the query we constructed in the GraphiQL IDE to render the Contentful data in the JSX.
Now, if you click on the Read More link to access the single post, you’ll get a 404 error page.
We do not want that. So we need to generate a single post page.
Let’s take a look at the gatsby-node.js file located in the root directory. Gatsby allows us to use this file to dynamically create the single post page.
Also, we will need a template file alongside the gatsby-node.js. This file will be used to render every of the single post on the screen.
First, let's add the following code to the gatsby-node.jsfile:
const path = require("path")

exports.createPages = async ({ graphql, actions }) => {
  const { createPage } = actions
  const response = await graphql(`
    query {
      allContentfulBlogPost {
        edges {
          node {
            slug
          }
        }
      }
    }
  `)
  response.data.allContentfulBlogPost.edges.forEach(edge => {
    createPage({
      path: `/blog/${edge.node.slug}`,
      component: path.resolve("./src/templates/blog-post.js"),
      context: {
        slug: edge.node.slug,
      },
    })
  })
}
What’s happening in the code?
Gatsby allows us to use an API function called createPages to dynamically generate a single post page based on the slug we fetched from Contentful.
Notice we are using the async/await syntax to get a promise response from the graphql function. This response holds all of the data we need.
So we looped through its edges array (which contains the list of posts) and then dynamically create each post page by calling the createPage function.
In this function, we specified the parameters needed to create the pages.
Pay attention to the component parameter that points to the template file. We need to create this file in the src directory.
So let’s quickly do that.
In the src directory, create a new folder called templates. In this folder, create a file named blog-post.js and add the following code:
import React from "react"
import { graphql, Link } from "gatsby"

import Layout from "../components/layout"
import Img from "gatsby-image"
import SEO from "../components/seo"

export const query = graphql`
  query($slug: String!) {
    contentfulBlogPost(slug: { eq: $slug }) {
      title
      publishedDate(formatString: "Do MMMM, YYYY")
      featuredImage {
        fluid(maxWidth: 750) {
          ...GatsbyContentfulFluid
        }
      }
    }
  }
`

const BlogPost = props => {
  return (
    <Layout>
      <SEO title={props.data.contentfulBlogPost.title} />
      <Link to="/blog/">Visit the Blog Page</Link>
      <div className="content">
        <h1>{props.data.contentfulBlogPost.title}</h1>
        <span className="meta">
          Posted on {props.data.contentfulBlogPost.publishedDate}
        </span>

        {props.data.contentfulBlogPost.featuredImage && (
          <Img
            className="featured"
            fluid={props.data.contentfulBlogPost.featuredImage.fluid}
            alt={props.data.contentfulBlogPost.title}
          />
        )}
      </div>
    </Layout>
  )
}

export default BlogPost
Save all your files and restart the development server.
You should see your single post rendered in the frontend.
In the query, we are using the contentfulBlogPost to fetch the individual post based on the slug that is dynamically passed in.
This slug comes from the context object of the gatsby-node.js file.
Notice we are not rendering the post body yet. This requires additional steps.
We will take a look at that now.
Rendering the Contentful Rich Text
Remember, when working with Contentful CMS, we selected the Rich Text for the body content. This provides capabilities similar to that of the traditional editors.
You’ll be able to embed assets and do all sort of things within your content.
We can query this content and render them in the frontend.
Let's see how to do this from the GraphiQL IDE.

Note: For Contentful Rich text, you’d want to grab
jsonfrom thebodyfield.
In the image above, the structure of the response object is complex. So we need to customize it using an npm library that Contentful provides.
So, shutdown the terminal and run this:
C:\Users\Your Name\gatsby-contentful-blogsite > npm install @contentful/rich-text-react-renderer
This library parses the Contentful Rich Text data into a set of React component.
Once the installation is done, start your development server.
To use this library, head over to the src/templates/blog-post.js file and update the query to grab the json from the body field:
...
export const query = graphql`
  query($slug: String!) {
    contentfulBlogPost(slug: { eq: $slug }) {
      title
      publishedDate(formatString: "Do MMMM, YYYY")
      featuredImage {
        fluid(maxWidth: 750) {
          ...GatsbyContentfulFluid
        }
      }
      body {
        json
      }
    }
  }
`
...
After that, import a function, documentToReactComponents from the Contentful library like so:
import { documentToReactComponents } from "@contentful/rich-text-react-renderer"
Then, update the JSX to include this function to render the body content.
...
const BlogPost = props => {
  return (
    <Layout>
      <SEO title={props.data.contentfulBlogPost.title} />
      <Link to="/blog/">Visit the Blog Page</Link>
      <div className="content">
        ...
        {props.data.contentfulBlogPost.featuredImage && (
          <Img
            className="featured"
            fluid={props.data.contentfulBlogPost.featuredImage.fluid}
            alt={props.data.contentfulBlogPost.title}
          />
        )}

        {documentToReactComponents(props.data.contentfulBlogPost.body.json)}
      </div>
    </Layout>
  )
}
...
Save the file and check the single post. You should have your content rendered.
Great!
But, the embedded images are not rendering (that’s if you added any).
What’s happening?
Rendering the Contentful Rich Text Images
By default, embedded images are ignored. To display them, you need to customize how certain node types are rendered.
If you take a look at the returned data in the GraphiQL IDE, you will find your embedded image URL and title in the embedded-asset-block node.

We can customize this node type and generate our images.
To do that, add this code just above the return statement in src/templates/blog-post.js file.
const options = {
  renderNode: {
    "embedded-asset-block": node => {
      const alt = node.data.target.fields.title["en-US"]
      const url = node.data.target.fields.file["en-US"].url
      return <img alt={alt} src={url} />
    },
  },
}
Then, update the documentToReactComponents function to include the options object.
{
  documentToReactComponents(props.data.contentfulBlogPost.body.json, options)
}
Save your file and see your images rendered in the frontend.
Problem with Contentful Post Update
If you update your Contentful post by adding or removing images, it’s likely you encounter a “page break” while trying to access the content in the frontend.
Note: Once you make changes in Contentful editor, you need to restart your development server.
To fix this problem, go inside the gatsby-config.js file and add the forceFullSync configuration option to the gatsby-source-contentful.
...
{
  resolve: "gatsby-source-contentful",
  options: {
    spaceId: process.env.CONTENTFUL_SPACE_ID,
    accessToken: process.env.CONTENTFUL_ACCESS_TOKEN,
    forceFullSync: true,
  },
},
...
Save your file and restart the development server.
Now you should be good.
Before we go ahead and deploy our site to Netlify, let’s add some styling.
It is recommended to scope your component styles locally using the CSS Module. But for the sake of this tutorial, we’ll add a few lines of CSS styles in the src/components/layout.css file.
So go ahead and add the following style:
.posts {
  list-style-type: none;
  margin: 0;
}
.post {
  padding-bottom: 40px;
}
.post h2,
.content h1 {
  text-align: center;
}
.post h2 a {
  color: #555;
}
.meta {
  font-size: 13px;
  text-align: center;
  font-weight: 300;
  margin-bottom: 20px;
  display: block;
}
.excerpt {
  margin: 30px 0 15px;
  font-weight: 300;
  letter-spacing: 0.02em;
}
.button {
  font-size: 14px;
  font-weight: 300;
  text-align: center;
  padding: 20px 0;
}
.button a {
  color: #555;
  padding: 8px 12px;
  text-decoration: none;
  border: 1px solid #555;
}
.button a:hover {
  color: #fff;
  border-color: #222;
  background-color: #222;
}
Save the file. Now the frontend should look more appealing.
Deploying Gatsby Site to Netlify
The first step to deploying your site is to push your project files to your GitHub repository. This should be a piece of cake. But if you need a refresher, have a quick look.
Next, we will go ahead and connect this repo to Netlify.
So head over to Netlify and sign up for a free account if you don't have one. Once you are logged in, click on the New site from Git button.
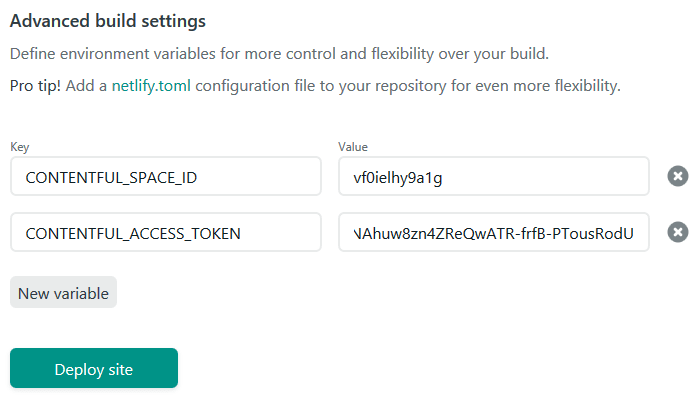
After that, select GitHub as your Git provider and choose your website repository. On the deploy settings page, leave the default options and click on the Show advanced button to set up the environment variables.
Here, you will add the space id and the access token that Contentful provide for you. Remember, you have them in the .env.development file.
Add them and click on the Deploy site button to start the deployment process.
Once the deployment is complete, you’ll see your site URL.
Visit the link and see your site live!
You can as well change your site name from the Site information section in the Settings page.
Continuous Deployment for Contentful CMS
Anytime you make changes to your site code, you’ll need to push this code to GitHub to see a new version of your site on the web.
But if you make changes to your Contentful post data, you can either trigger a deploy manually from Netlify or generate a Netlify build hook (that you can add to Contentful CMS) to trigger an automatic redeploy of your site.
I will show you both methods.
To trigger a redeploy manually from Netlify, all you have to do is to click on the Clear cache and deploy site from the Deploys tab of your project.

Simple as that!
For automatic Netlify redeploy, click on the Settings tab and select Build & deploy from the left menu. In the Build hooks section, click on the Add build hook button.
Name your hook (in my case, I will name it contentful) and click on the Save button.
This generates a unique build hook URL. Copy it and head over to your Contentful dashboard.
From the Settings dropdown, click on Webhooks and select Netlify to add your URL.

Once you add the URL, make sure you click the Create webhook button.
At this point, if you add a new Contentful blog post or modify an existing post, a new redeploy will be triggered as soon as you hit the Publish button in your Contentful dashboard.
And you should be able to see your changes live in a few seconds.
Great!
Now, you know how to work with data from a headless CMS. It’s time to put what you’ve learned into practice and create a beautiful Gatsby site for yourself.
But before that, make sure you share this post around the web and follow me on Twitter for latest updates.
Again, you can view the project here and the source code here.


Top comments (0)