Make a new folder where you want to store the project and open it in VS-Code.

This code will create react project for you in the same folder.
Remove all the files except App.js, Index.js, App.css from src.
Move to src/App.css and remove every line of code from there.
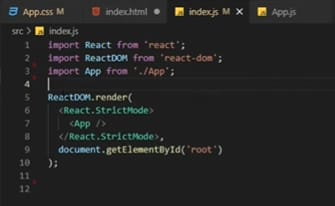
Move to src/index.js and make it look like this.
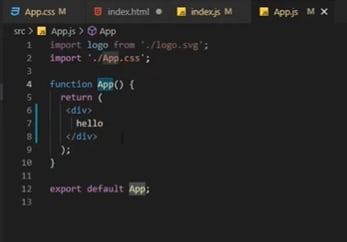
Move to src/App.js and make it look like this.
Create a new folder in src named as data and copy the json file from the source code present at my github account.
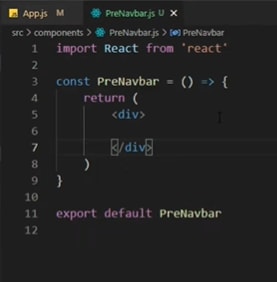
Make a folder components in src and with in that one file PreNavbar.js a component and import and use it in App.js.

Now make another folder named styles where we will store the stylings of all the components and start with making the CSS file of the PreNavbar.
Import this CSS in the PreNavbar component.


In PreNavbar add this lines of code inside the div.

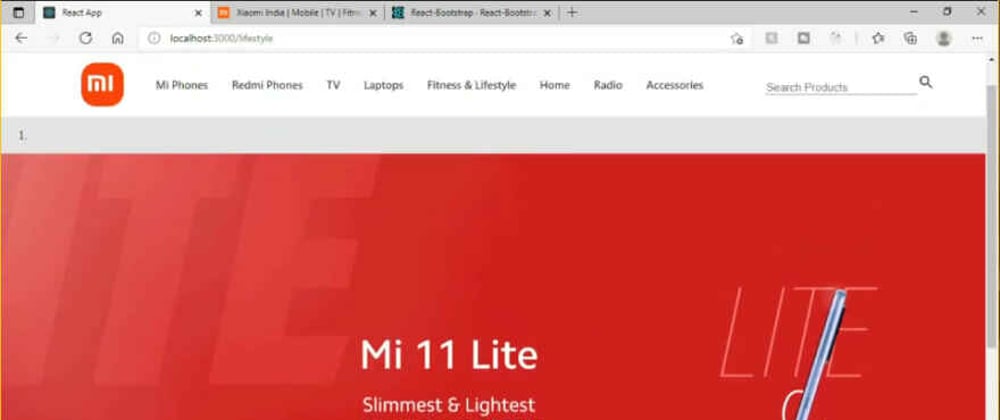
All the given links are the real links from the MI India Website.
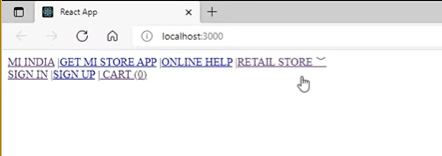
This will look like this in the browser.
Now let's work on the CSS.

This will look like this in the browser.

In App.css add this styles.

This will result in this.


Now lets add cart icon in our PreNavbar in order to do that visit google icons and search for the cart in the search bar.

Select whatever you want and download as svg.
Once the file is downloaded copy t hat svg code make a variable in PreNavbar.js and add that code in that variable line 5 in the fig below.

Once done use that as shown below.

Now if you visit the browser you will get the cart icon but something like black in color which doesn't look good.

Move to PreNavbar.css and try to change the color of the cart icon line 19 in the figure below.

Now in the browser cart icon will appear.

Now let's add some hover effect to the cart icon line 23.
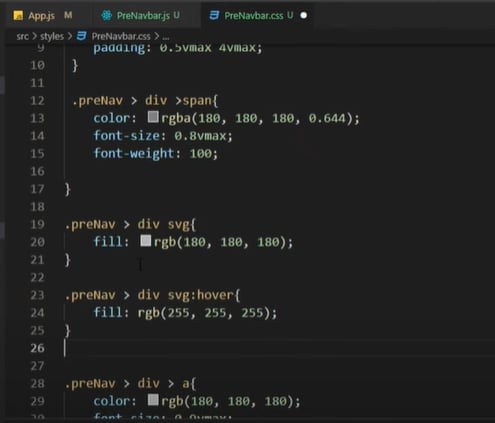
Style is looking a bit messy so let's add some more styling to it in .preNav > div display it as flex and align it at center line 8.

It will result in something like this.

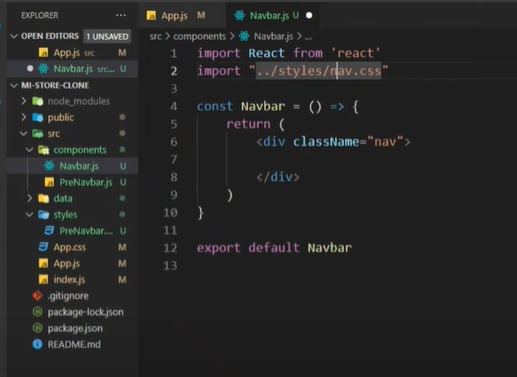
Working with the NAV-BAR -
Make a navbar component and import it in App.js.

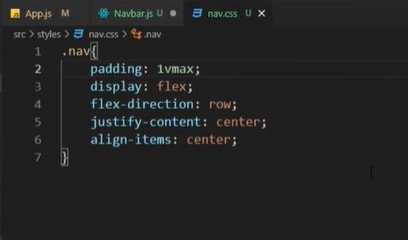
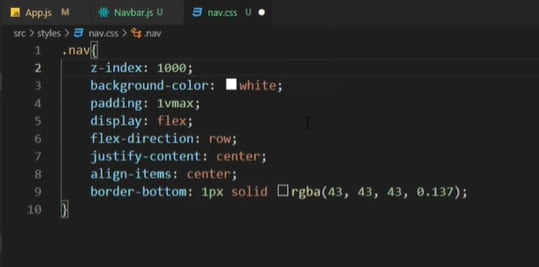
Add the following styling to nav.css.
Lets add something in the Navbar.js.

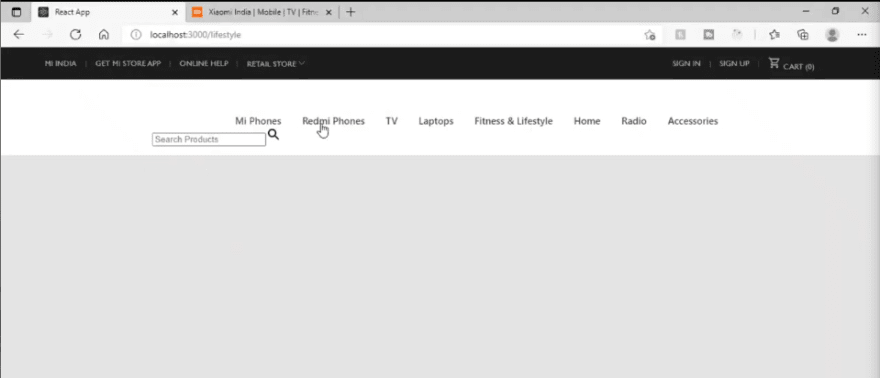
Now in the browser it will look something like this.


Now we need react-router-dom lets install it using following commands.

Once done with the installation move to App.js and import BrowserRouter from react-router-dom line 4 and wrap all the imported components in to it.

Move to Navbar.js and import Link from react-router-dom line 4 and also import logo line 3 in line 12 to 14 we will use the link tag and with in that we use img tag as shown below.

Here we are just linking the image with the path "/" so that if any one clicks on that image (logo in our case) we can redirect the user to home page or any page with address "/".

We are getting our logo here since our logo is white we are unable to see.


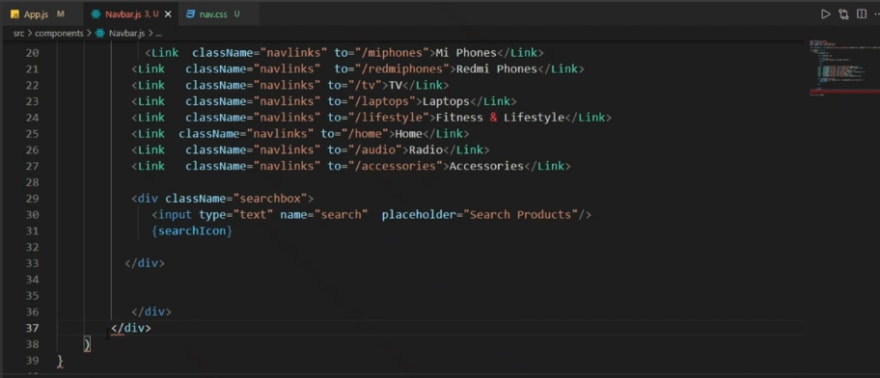
Now we added all the links to the navbar and a search box.
Now we need a search icon beside the search box so copied the svg code from google icons and stored in a variable line 6.

Now use this icon just after the search box.

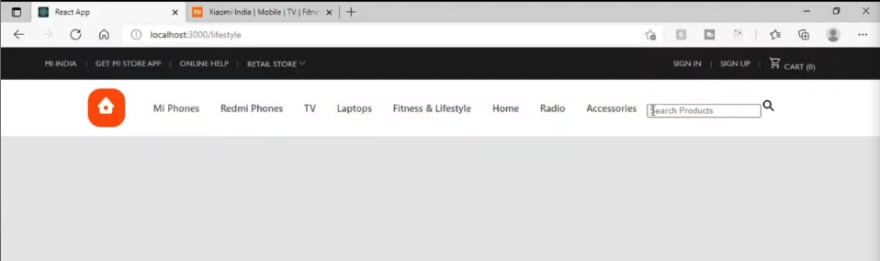
If you visit the browser it will look some thing like this.

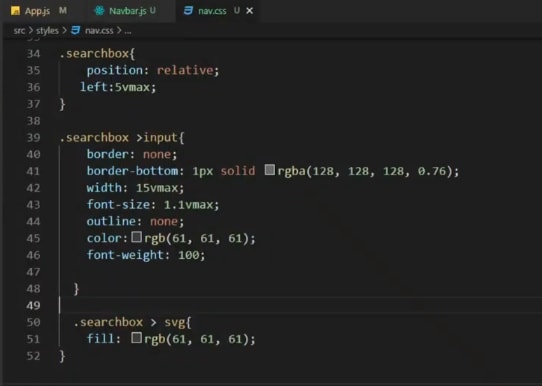
Now visit the nav.css and add this css to it line 12 to 20.

Now website will look some thing like this.
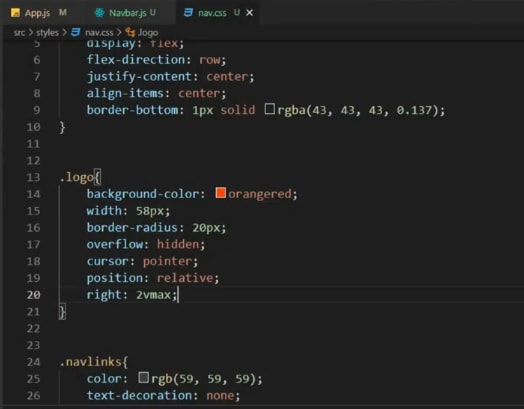
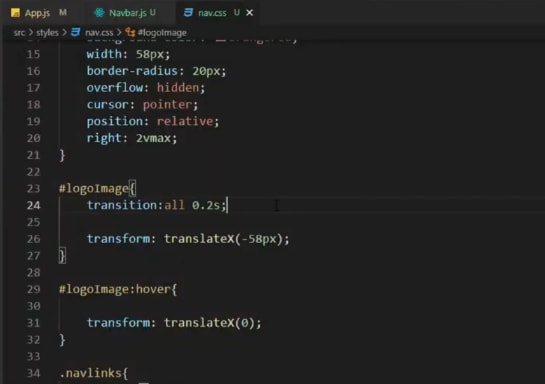
Now add css to the logo.
There is one correction in the file Navbar.js we need to close the div opened in line 12 for the logo as shown in the figure below so in order to do so we added a closing div tag at line 18 and remove an extra closing div tag from the bottom of the page Line 37 in the second fig

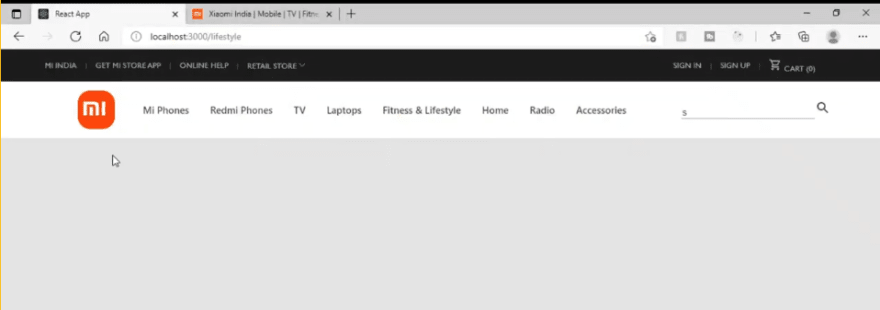
Now if we visit our website it will look like this.
Now its time to design search box.

Style the navlink's hover effect.


If you visit MI's website you will see that whenever you hover on the logo it changes from MI to Home now let's work on it.

Now let's design the slider.
In order to do that we will use bootstrap so let's install that.

In order to create the slider move to the components folder and make a new component Slider.js.
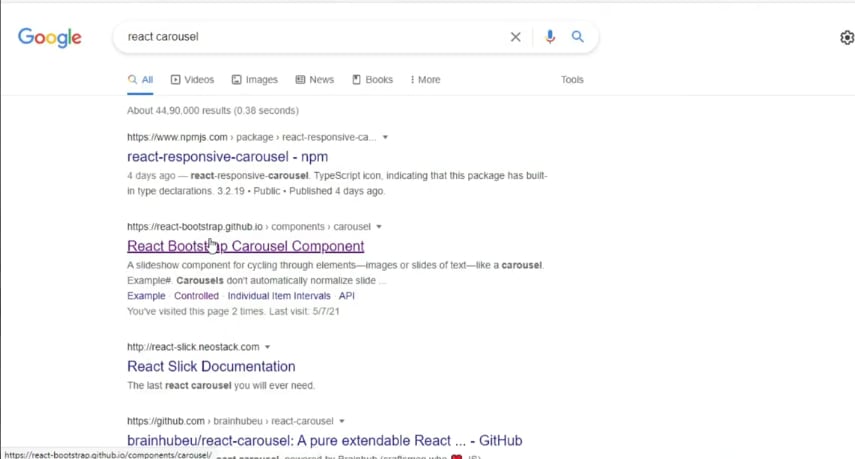
In order to read the documentation or to find the way that how the slider will be prepared using bootstrap move to the link shown below in the image.
Copy the code from the site and change accordingly as shown in the fig. below.

In order to make this run we need to import the carousel from bootstrap.

Used image's link in the carousel can be obtained from the file we stored data.
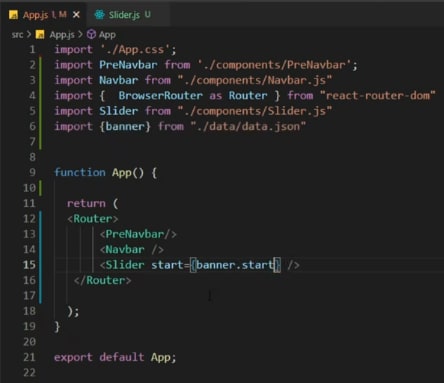
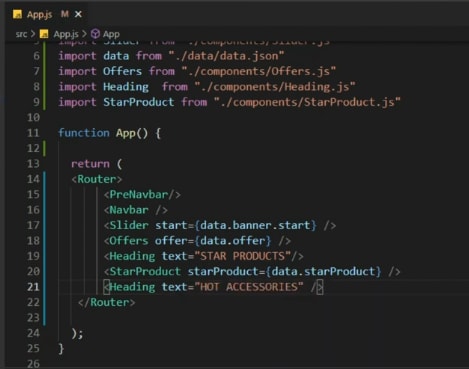
Now move to the App.js and import that slider.

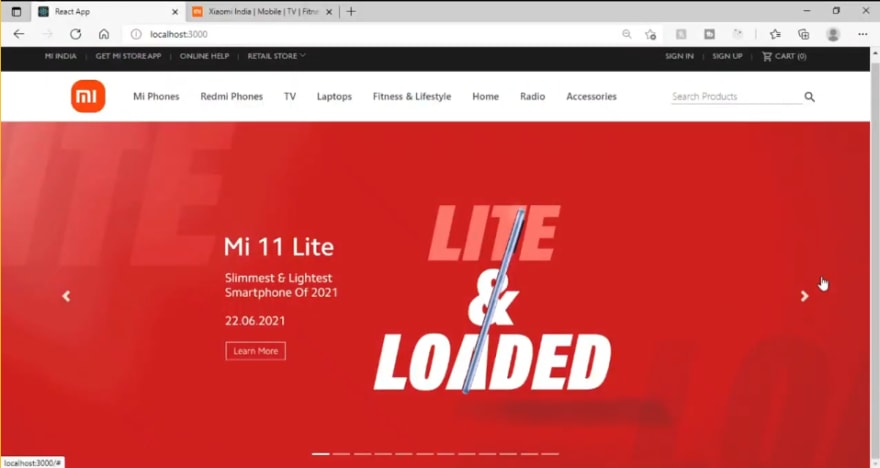
Now if you move to the browser.


But this is not the right way of using the image.
Here we will send data from App.js here we import the data.json file and send the banner data as shown below.
In the above fig in line 6 we imported banner(an object of images and captions of both the sliders used in the website one named as start(an array of image links) another as "End"(array of images with there captions) from the data.json and in line 15 just sent the start part of the banner to the Slider as props since we are designing the carousel at the start of the site.
Now move to the Slider.js.
In the first slider we just need the image not the captions.

In the above figure we imported carousel from the bootstrap in Line 2 and in Line 3 we imported bootstrap's css.
In line 6 we passed start you can pass any letter or word this is just to capture the prop send from the App.js.
In line 8 we passed fade it is the effect needs to be applied while switching between the slides of the carousel.
In line 11 we used map function on the start (Which is accepting the prop(banner.start from data.json) from App.js), so map is iterating all the items in the array banner and every time it encounters an item it store that in the variable item passed in the map function line 11.
Line 13, 14, 15 different tags, classnames and attributes from bootstrap.
Line 15 we passed that item( contains the link from data .json ) in the src.
Now if you move to the browser you carousel will be there.
Here in the slider we didn't used css because we used bootstrap.
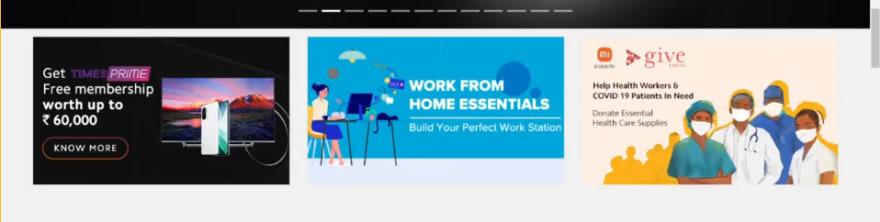
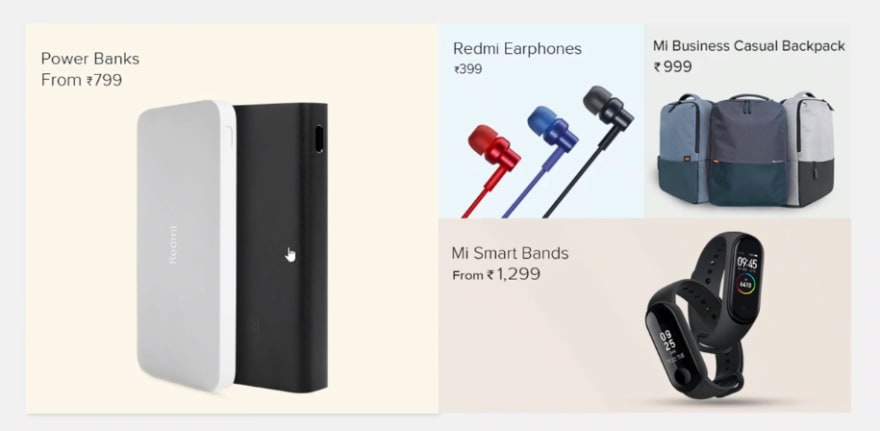
Now after the sliders we have offer components showing the offers in the form of cards as shown below.
In order to make this component we again need images from data.json so instead of importing banner from data.json in App.js why don't we import whole data and use it as shown below.

Line 6 imported the whole data instead of just the banner.
Line 7 imported the offers component.
Line 15 instead of banner.start now in order to get the start we need to go one step deeper because we imported data not the banner so data.banner.start
Line 16 we passed offer as props in which we put the array of data offer from data.json

Offer in data.json.
Now lets move to Offers component.
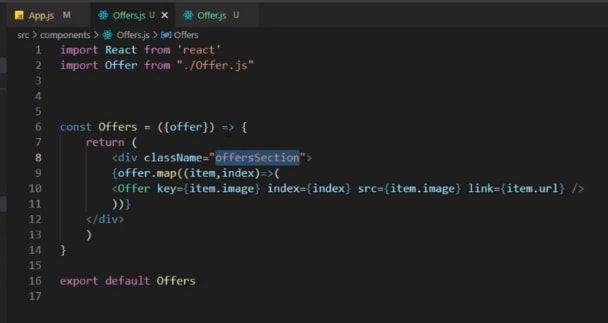
Here in Line 2 we imported offer.js(we will discuss on it later).
Line 6 we passed the data coming from offer(from app.js to offers.
Line 9 we applied map function to the offer to iterate all the items in the offer present in data.json and information of each offer will be stored in the item and index is to count the number of items.
Line 10 we made a component offer.js so we passed all the information coming from data.json about offer, Here in index we just need to pass the index and in src item's image and in link item's url this three are required to do the work but key is an essential if you don't use key map will throw errors in console so we used key and passed the first attribute of the offer data comming from data.json.
Now move to the offer.js.

Line 3 Here we took all the data comming from offers.js.
Line 4 returned an anchor tag with an image tag encapsulated in that.
Here image will show up on the website and will behave like an anchor tag with some link and index is used in template literals as alternate text.

Now just below our carousel we got our offers which doesn't look the way we want so now we need to add some css to it.
Make a css file and move to offers.js and import the Css file.


Now if you move to the browser you will get this.

Now we start working on the Heading component because in the rest of the page multiple headings are used of same style as shown below.


Now lets create a Heading.js.

Once done let's import them in App.js.

Now within the App.js pass a value in the Heading component as shown below.

Here we passed STAR PRODUCTS as the value for heading now the question arises that how we will change the value so answer is that we don't need to do so because we need to use heading multiple times so every time we use heading in the App.js we will pass a new value.
Now move to Heading.js.

Line 2 imported the css file.
Line 4 passed the text coming from the App.js as prop.
Then took two divs and a para tag.
Now let's move to the CSS.


Now if you move to the browser it will look like this.

We are done with the Heading.
Now let's work on the Star Product component.

Once component is made let's import it in App.js and pass the relevant data.

Now before moving ahead lets have a look on the data file to come to know that how the data is arranged in the data.json.

If you look to the design you need to create then you come to know that 1st product (power bank) comes in a big box and next two (earphones and bags) in the two halves of a rectangular box(you can say half of the big box in which power banks are present) and at the bottom rectangular box(you can say half of the big box in which power banks are present) smart bands are present.

Now let's design this.

Line 3 passed the data coming from App.js.
Since every product requires different space so we need separate divs for them.
Line 6 a div consist of an anchor tag having the url of the 0th product(or the 1st product power banks) from the data passed in App.js and an image tag within the anchor tag having the image of the 0th product and at last an alternate text.
Now if you move to browser it will look like this.


We wrapped next three in another div.
Now if you move to browser it will look like this.

Now the role of css comes in.

Now use this css.

Line-2 imported the CSS file lets move to browser.

Now lets work on Hot Accessories.

First of all lets add another heading in the App.js.
Let's look in to the browser in order to understand that what happened.

We got a new heading Hot Accessories at the very bottom.
Now lets work on the menu of Hot Accessories and whenever you click on the menu items a list of items will show up which is different for every menu items as shown below.

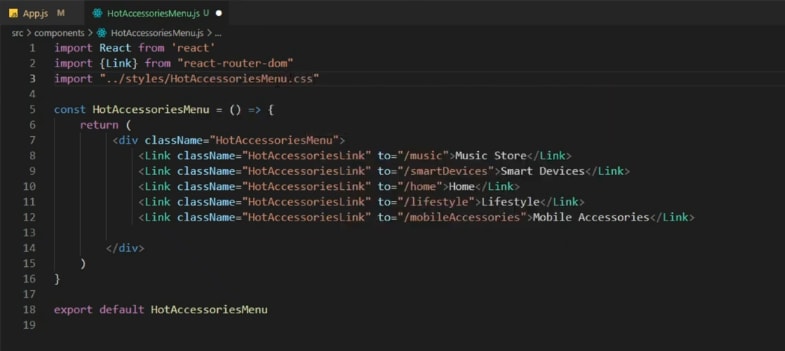
Hot Accessories menu
First of all create the component.

Now import it to App.js.

Line 10 imported the HotAccessoriesMenu.
Line 22 Used it.

Made the links here in every link I used to which specifies the path as shown below we are at the music so at the end we are getting /music in the url.

Now we need to style them.
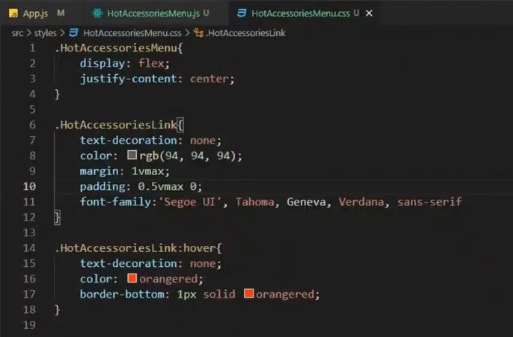
Use this css to style the menu.
Imported the style in HotAccessoriesMenu.js.
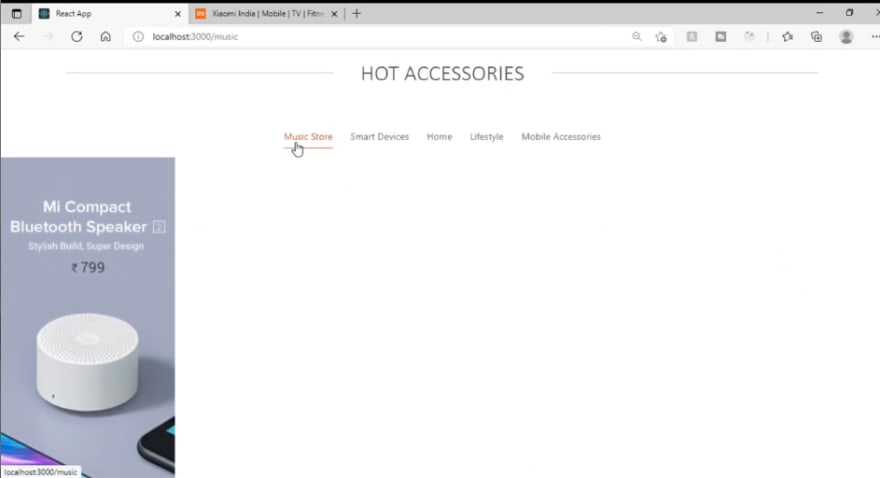
Move to the browser it will look like this.

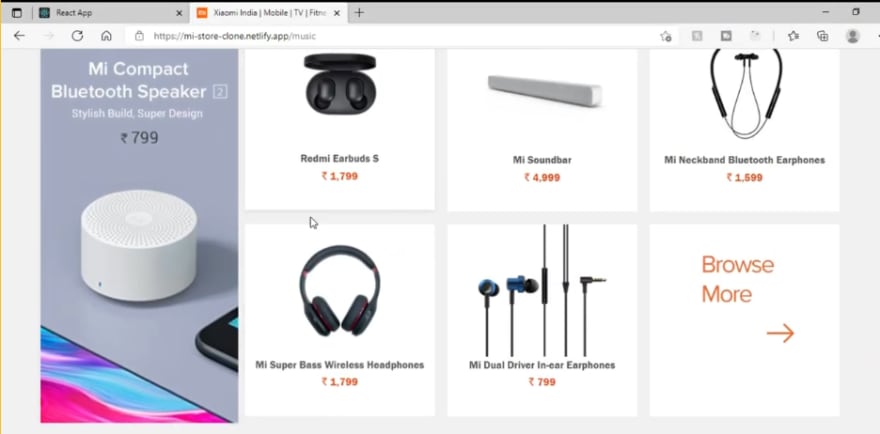
Now start working on the HotAccessories(music).
Create a new file.

Move to App.js.


Line 4 imported Route (we will use it later).
Line 11 imported the component Hot Accessories.
Line 26 using route we specified that if the path is exactly /music then only pass the parameters below to the component HotAccessories.
Before moving ahead let's have a look in to the data.json.


Here we can clearly see that we have an object hotaccessories in data.json and in that object there is an array containing data for each items in the Hot Accessories menu and at the end of the object hotaccessories we have an object hotAccessoriesCover consist of all the cover photos(in the above figure photo of compact bluetooth speaker is the coverphoto of this item of the hotaccessoriesmenu.
Line 27 we passed the data from data.json.
Move to HotAccessories.js.


Line 2 imported HotItemCard(we will talk about it later).
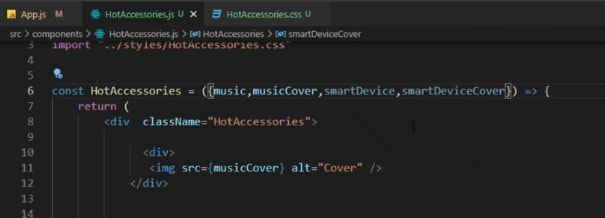
Line 5 passed the value music and music cover comming from App.js.
Line 9 to 11 took a div and just showed the cover image.
Line 15 to 20 another div to show rest of the items.
Line 16 iterated all the data in the music comming from
App.js and stored them in item(one data at a time) index to count the total number of data.
Line 17 Used a component HotItemCard in that we passed all the attributes of the item( Such as its image, name, price and its occurence in data.json using index inorder to clearly understand that let's have a look towards data.json).

In the above image we can see that every item in the music has name, price and its image.
Now let's work on HotItemCard.js.

Line 3 we received all the props coming from HotAccessories.js.
Line 6 used the image and index coming from HotAccessories.js.
Line 7 & 8 used price and names.
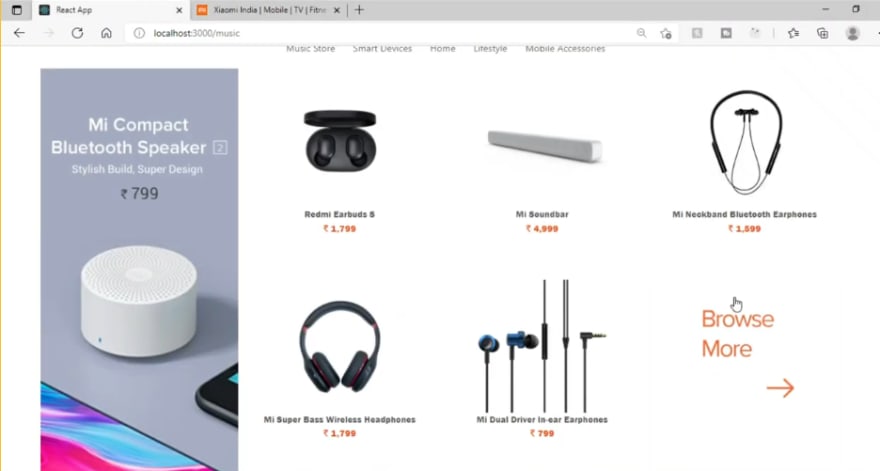
Lets visit the browser to have a look what we did so far.

Now we come to know that every image/card is there but not in the fashion we want.
So in order to do so we need to style HotItemCard.js as well as HotAccessories.js so lets dive in to it.
Styling HotItemCard.js

Once done import this CSS file to the HotItemCard.js.

Line 2 imported the style.

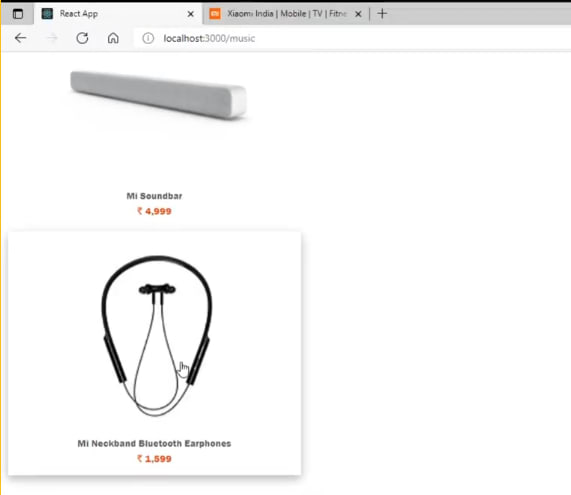
This is how the cards look in the browser.
Styling HotAccessories.js

Once done import this CSS file to the HotAccessories.js.

Line 3 imported the style.

This is how it looks in the browser.
Similarly we will design each items from Hot Accessories.
Hot Accessories (Smart devices).
Move to App.js.

Just below music add the route of Smart devices.

In browser if you click smart devices.
Move to HotAccessories.js
Receive the props Line 6.

In the cover image section/div if the music cover is present then show music cover and if smart devices cover is present the smart devices Line 11.
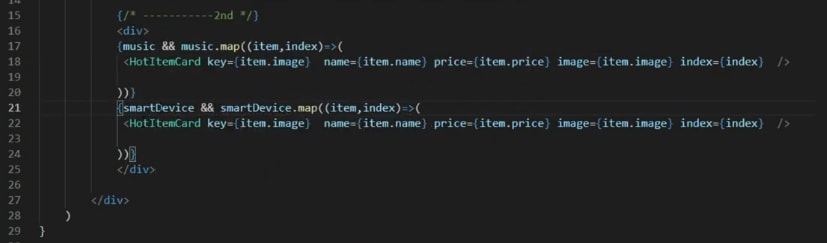
just below music add smart devices here && is used to ensure that if music is present then only show it.

Now if you move to browser you will get this.
Changes we need to make for the rest of the items.
In App.js added routes.

In HotAccessories.js.
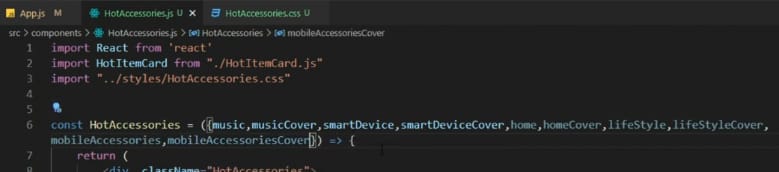
Line 6 received all the props.

Done with the cover images.

Sent the data to the HotItemCard.js.


This is the browser view.
Look on the routes at the top of the every images to confirm don't be confused with the cursor.

Now let's design this.
In order to design it we need to do nothing just take the image link and send it to the HotItemCard.js it will do the work for you.

Line 40 we passed that image.
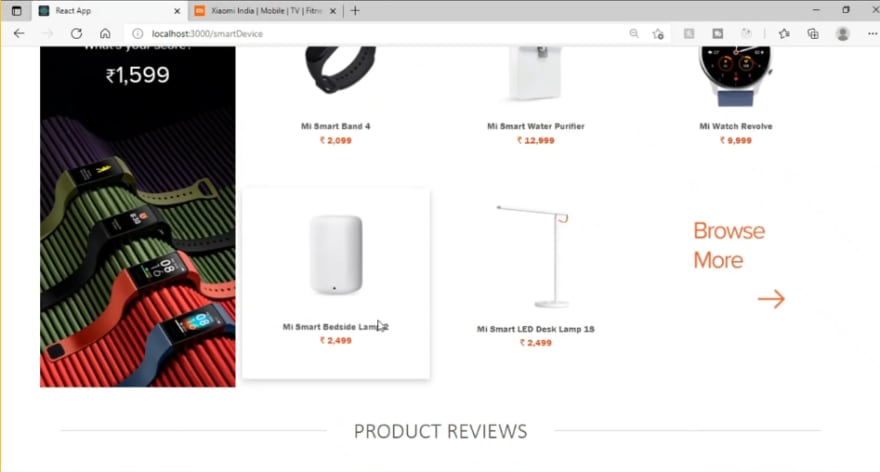
If you move to the browser you will get it.
Product Review Section
Move to App.js and first of all make that heading.

If we look at the browser it will look like this.
Now make a new component ProductReviews.js.

Move to App.js import it and use it.

Line 11 imported it.

Line 52 used that component and passed the data.
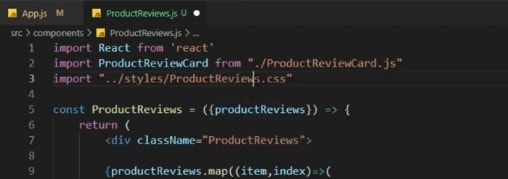
Now move to ProductReviews.js.

Line 2 imported the ProductReviewCard.js(we will talk about it later.
Line 5 received the props coming from the App.js.
Line 9 Iterated through the data and stored one at a time in item and index to count the total number of items in the productReviews(line 5 prop).
Line 11 passed the data to ProductReviewCard.js.
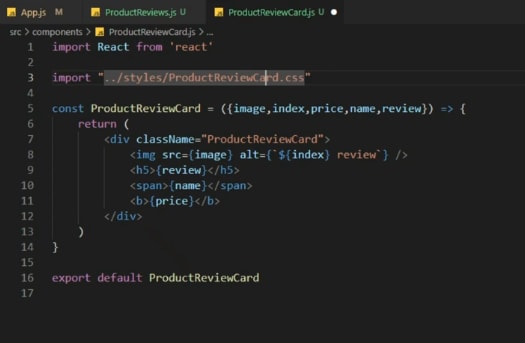
Now lets work on ProductReviewCard.js.

Line 3 received all the props coming from ProductReviews.js.
Line 5 to 10 used that data to structure the card.
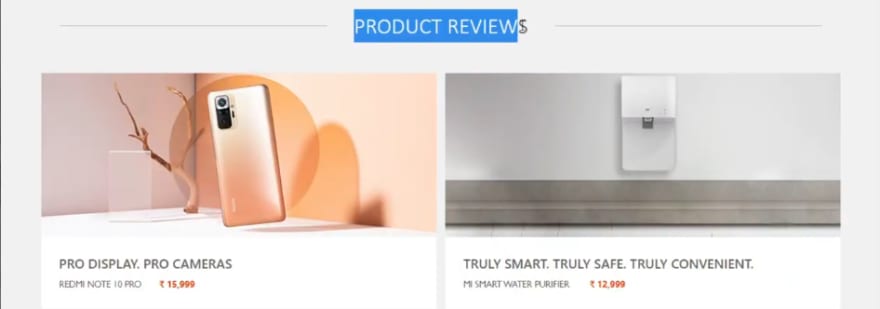
Now if you move to the browser you will get this.

Now its time to design them.
ProductReviewCard.js

Add this CSS file.
Imported the CSS file line 3.

If you move to the browser it will look like this.
Now let's add some CSS to ProductReviews.js.

Add this CSS file to the ProductReviews.js.
Line 3 Imported the CSS file.

Now if you move to the browser it will look like this.
Now let's work on the Videos Section.

Let's first design the headings move to App.js.
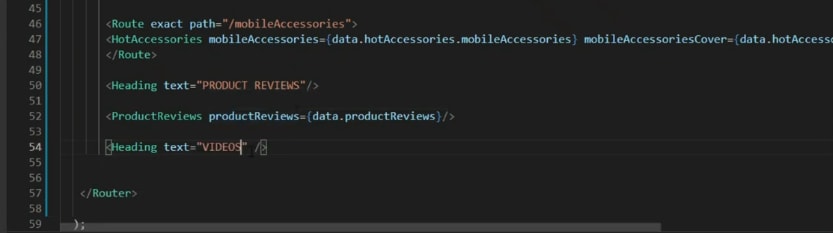
Line 54 added heading.
Make a new component Videos.js.

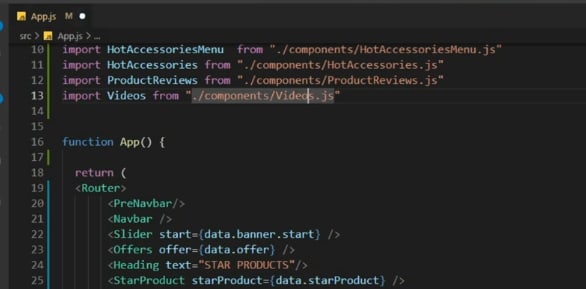
Imported the Videos.js.

Line 54 using the video component and passed the data.
Now move to the Videos.js.
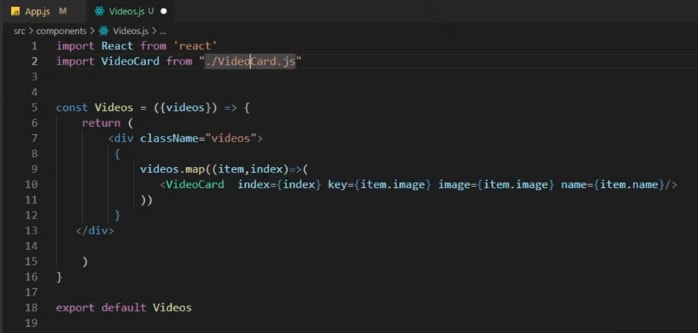
Line 2 imported VideoCard.js(we will work on it later).
Line 5 received the props.
Line 7 to 13 passed all the data to VideoCard.js to design the card.
Styling Videos.js.
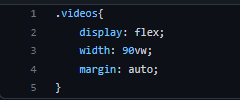
Use this CSS file.

Line 3 imported the CSS file.
Work with VideoCard.js.
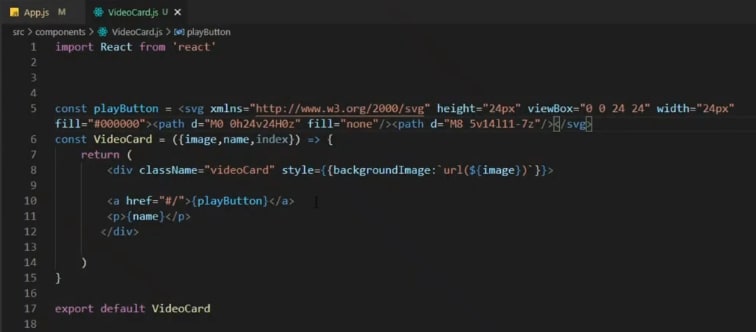
Line 5 in a variable stored the SVG code of the play button icon taken from Google icons.
Line 6 received all the props.
Line 8 set the background image using inline css because the image is coming as prop so it can't be carried or passed to any css file.
Line 10 used that play button declared earlier.
Line 11 used the name.

If you move to browser it will look like this now we need to add a css file to it.
Styling VideoCard.js.
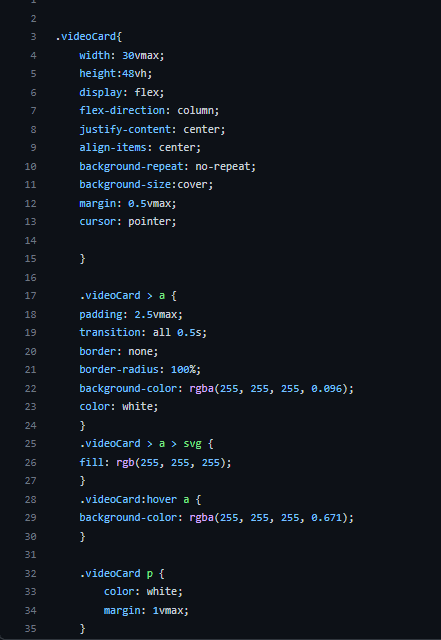
Add this CSS file to VideoCard.js.

Line 2 imported the css file.
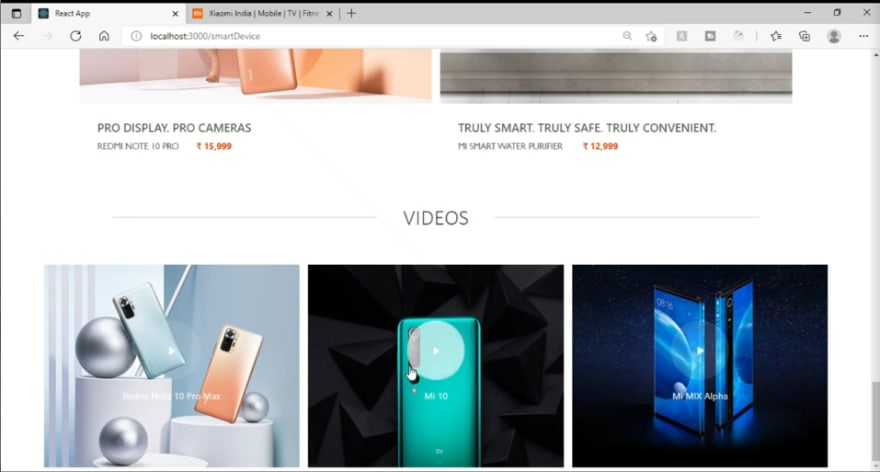
Now if you move to the browser it will look like this.
Now let's work on the In the press Section.

In order to do that first of all create the heading in App.js.

Line 58 created the Heading.

In the browser it looks like this.
Now create a new component Banner.js.

Now let's move to App.js and import it.

Line 14 imported the component.
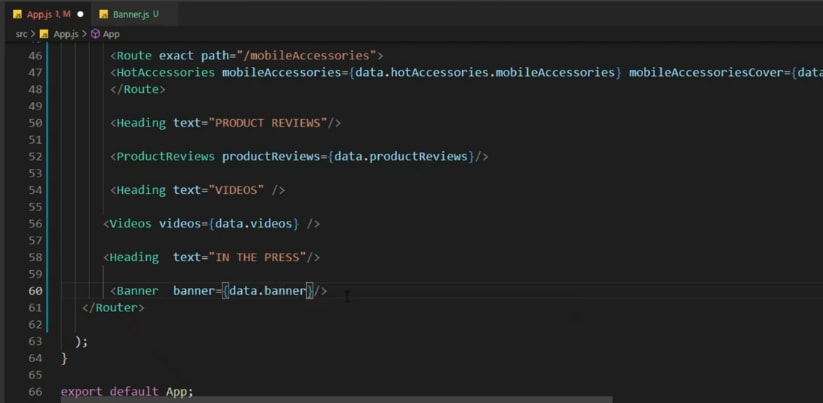
Line 60 used the component and passed the data,
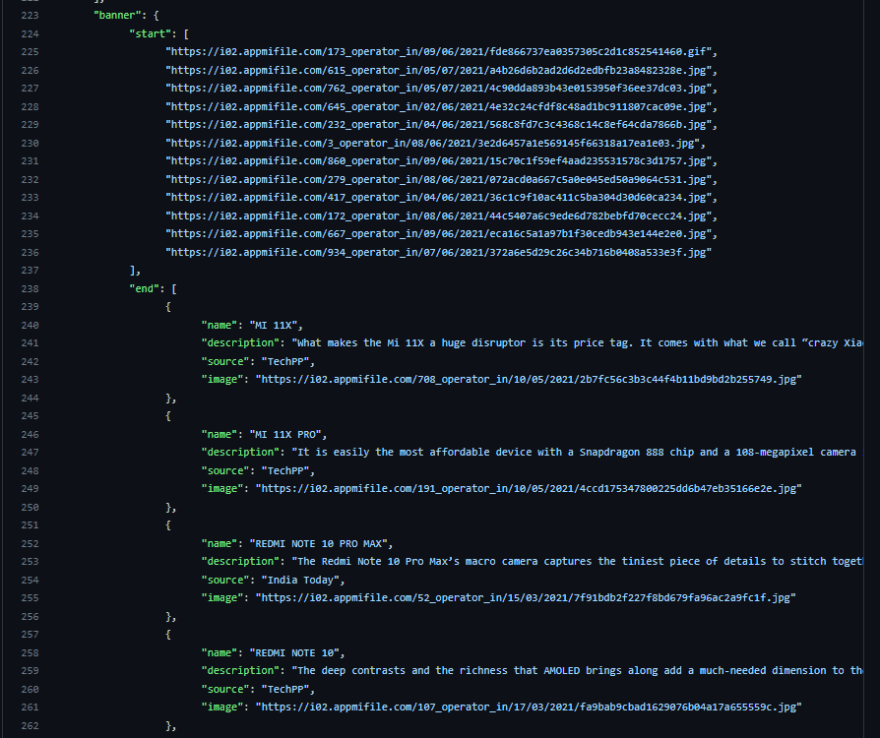
If you remember in our data(shown in above fig) we have banner object which has two arrays of items 1st is start and 2nd is end so using start we created the Slider.js component above now we need to use the End array of items to design this Banner.js.
Now move to Banner.js and design it.

Line 2 & 3 imported the bootstrap and its css file.
Line 9 specified the transition style.
Line 11 iterated the data and used it one by one.
Line 13 interval specifies that in 1000 millisec. the slides will change automatically.
Line 20 to 25 used caption to provide the details which was missing in Slider.js
If you don't understand move to the start of the post and have a look to the slider we made before.

Now if you move to the browser it will look like this.
Let's start working on the Footer.

First of all create anew component named Footer.js.

Import it to App.js.

Line 15 imported it.

Line 63 used that component and passed the data.
import React from 'react'
import "../styles/PreFooter.css"
import "../styles/Footer.css"


const repeatIcon = <svg xmlns="http://www.w3.org/2000/svg" height="24px" viewBox="0 0 24 24" width="24px" fill="#000000"><path d="M0 0h24v24H0V0z" fill="none"/><path d="M12 6v3l4-4-4-4v3c-4.42 0-8 3.58-8 8 0 1.57.46 3.03 1.24 4.26L6.7 14.8c-.45-.83-.7-1.79-.7-2.8 0-3.31 2.69-6 6-6zm6.76 1.74L17.3 9.2c.44.84.7 1.79.7 2.8 0 3.31-2.69 6-6 6v-3l-4 4 4 4v-3c4.42 0 8-3.58 8-8 0-1.57-.46-3.03-1.24-4.26z"/></svg>

const shieldIcon = <svg xmlns="http://www.w3.org/2000/svg" height="24px" viewBox="0 0 24 24" width="24px" fill="#000000"><path d="M0 0h24v24H0V0z" fill="none"/><path d="M12 1L3 5v6c0 5.55 3.84 10.74 9 12 5.16-1.26 9-6.45 9-12V5l-9-4zm7 10c0 4.52-2.98 8.69-7 9.93-4.02-1.24-7-5.41-7-9.93V6.3l7-3.11 7 3.11V11zm-11.59.59L6 13l4 4 8-8-1.41-1.42L10 14.17z" /></svg>

const mapIcon = <svg xmlns="http://www.w3.org/2000/svg" height="24px" viewBox="0 0 24 24" width="24px" fill="#000000"><path d="M0 0h24v24H0V0z" fill="none"/><path d="M20.5 3l-.16.03L15 5.1 9 3 3.36 4.9c-.21.07-.36.25-.36.48V20.5c0 .28.22.5.5.5l.16-.03L9 18.9l6 2.1 5.64-1.9c.21-.07.36-.25.36-.48V3.5c0-.28-.22-.5-.5-.5zM10 5.47l4 1.4v11.66l-4-1.4V5.47zm-5 .99l3-1.01v11.7l-3 1.16V6.46zm14 11.08l-3 1.01V6.86l3-1.16v11.84z"/></svg>


const youtubeIcon = <svg xmlns="http://www.w3.org/2000/svg" width="24" height="24" viewBox="-35.20005 -41.33325 305.0671 247.9995"><path d="M229.763 25.817c-2.699-10.162-10.65-18.165-20.747-20.881C190.716 0 117.333 0 117.333 0S43.951 0 25.651 4.936C15.554 7.652 7.602 15.655 4.904 25.817 0 44.237 0 82.667 0 82.667s0 38.43 4.904 56.85c2.698 10.162 10.65 18.164 20.747 20.881 18.3 4.935 91.682 4.935 91.682 4.935s73.383 0 91.683-4.935c10.097-2.717 18.048-10.72 20.747-20.88 4.904-18.422 4.904-56.851 4.904-56.851s0-38.43-4.904-56.85" /><path d="M93.333 117.558l61.334-34.89-61.334-34.893z" fill="#fff"/></svg>


const twitterIcon = <svg  xmlns="http://www.w3.org/2000/svg" width="24" height="24" viewBox="-44.7006 -60.54775 387.4052 363.2865"><path d="M93.719 242.19c112.46 0 173.96-93.168 173.96-173.96 0-2.646-.054-5.28-.173-7.903a124.338 124.338 0 0030.498-31.66c-10.955 4.87-22.744 8.148-35.11 9.626 12.622-7.57 22.313-19.543 26.885-33.817a122.62 122.62 0 01-38.824 14.841C239.798 7.433 223.915 0 206.326 0c-33.764 0-61.144 27.381-61.144 61.132 0 4.798.537 9.465 1.586 13.941-50.815-2.557-95.874-26.886-126.03-63.88a60.977 60.977 0 00-8.279 30.73c0 21.212 10.794 39.938 27.208 50.893a60.685 60.685 0 01-27.69-7.647c-.009.257-.009.507-.009.781 0 29.61 21.075 54.332 49.051 59.934a61.218 61.218 0 01-16.122 2.152 60.84 60.84 0 01-11.491-1.103c7.784 24.293 30.355 41.971 57.115 42.465-20.926 16.402-47.287 26.171-75.937 26.171-4.929 0-9.798-.28-14.584-.846 27.059 17.344 59.189 27.464 93.722 27.464"/></svg>

const facebookIcon = <svg width="24" height="24" xmlns="http://www.w3.org/2000/svg" data-name="Layer 1" viewBox="0 0 24 24"><path d="M15.12,5.32H17V2.14A26.11,26.11,0,0,0,14.26,2C11.54,2,9.68,3.66,9.68,6.7V9.32H6.61v3.56H9.68V22h3.68V12.88h3.06l.46-3.56H13.36V7.05C13.36,6,13.64,5.32,15.12,5.32Z"/></svg>

const instagramIcon =<svg width="24" height="24" xmlns="http://www.w3.org/2000/svg" data-name="Layer 1" viewBox="0 0 24 24"><path d="M12,9.52A2.48,2.48,0,1,0,14.48,12,2.48,2.48,0,0,0,12,9.52Zm9.93-2.45a6.53,6.53,0,0,0-.42-2.26,4,4,0,0,0-2.32-2.32,6.53,6.53,0,0,0-2.26-.42C15.64,2,15.26,2,12,2s-3.64,0-4.93.07a6.53,6.53,0,0,0-2.26.42A4,4,0,0,0,2.49,4.81a6.53,6.53,0,0,0-.42,2.26C2,8.36,2,8.74,2,12s0,3.64.07,4.93a6.86,6.86,0,0,0,.42,2.27,3.94,3.94,0,0,0,.91,1.4,3.89,3.89,0,0,0,1.41.91,6.53,6.53,0,0,0,2.26.42C8.36,22,8.74,22,12,22s3.64,0,4.93-.07a6.53,6.53,0,0,0,2.26-.42,3.89,3.89,0,0,0,1.41-.91,3.94,3.94,0,0,0,.91-1.4,6.6,6.6,0,0,0,.42-2.27C22,15.64,22,15.26,22,12S22,8.36,21.93,7.07Zm-2.54,8A5.73,5.73,0,0,1,19,16.87,3.86,3.86,0,0,1,16.87,19a5.73,5.73,0,0,1-1.81.35c-.79,0-1,0-3.06,0s-2.27,0-3.06,0A5.73,5.73,0,0,1,7.13,19a3.51,3.51,0,0,1-1.31-.86A3.51,3.51,0,0,1,5,16.87a5.49,5.49,0,0,1-.34-1.81c0-.79,0-1,0-3.06s0-2.27,0-3.06A5.49,5.49,0,0,1,5,7.13a3.51,3.51,0,0,1,.86-1.31A3.59,3.59,0,0,1,7.13,5a5.73,5.73,0,0,1,1.81-.35h0c.79,0,1,0,3.06,0s2.27,0,3.06,0A5.73,5.73,0,0,1,16.87,5a3.51,3.51,0,0,1,1.31.86A3.51,3.51,0,0,1,19,7.13a5.73,5.73,0,0,1,.35,1.81c0,.79,0,1,0,3.06S19.42,14.27,19.39,15.06Zm-1.6-7.44a2.38,2.38,0,0,0-1.41-1.41A4,4,0,0,0,15,6c-.78,0-1,0-3,0s-2.22,0-3,0a4,4,0,0,0-1.38.26A2.38,2.38,0,0,0,6.21,7.62,4.27,4.27,0,0,0,6,9c0,.78,0,1,0,3s0,2.22,0,3a4.27,4.27,0,0,0,.26,1.38,2.38,2.38,0,0,0,1.41,1.41A4.27,4.27,0,0,0,9,18.05H9c.78,0,1,0,3,0s2.22,0,3,0a4,4,0,0,0,1.38-.26,2.38,2.38,0,0,0,1.41-1.41A4,4,0,0,0,18.05,15c0-.78,0-1,0-3s0-2.22,0-3A3.78,3.78,0,0,0,17.79,7.62ZM12,15.82A3.81,3.81,0,0,1,8.19,12h0A3.82,3.82,0,1,1,12,15.82Zm4-6.89a.9.9,0,0,1,0-1.79h0a.9.9,0,0,1,0,1.79Z"/></svg>


const Footer = ({footer}) => {
    return (
       <>
        <div className="PreFooter">
            <div>
                {repeatIcon}
                 <p> <b>Hassle-free replacement</b> <br/>10-day easy replacement policy on mi.com</p>
               </div>
            <div>{shieldIcon} <p> <b>100% secure payments</b> <br/> We support Cards, Wallets, EMI and COD</p></div>
            <div>{mapIcon} <p> <b>Vast service network</b> <br/> 1000 Mi service-centers across 600 cities</p></div>
        </div>

        <div className="PreFooter2">
             <div> <p>LET'S STAY IN TOUCH</p><span>Get updates on sales specials and more</span></div>

             <div>
                 <div>
                     <input type="email" name="email" placeholder="Enter Email Address" />
                     <button>›</button>
                 </div>
                 <span>Thanks. You're on our email list for special offers.</span>
             </div>

             <div>
                    <p>FOLLOW MI</p>
                    <span>We want to hear from you!</span>
             </div>

             <div>
                {facebookIcon} {youtubeIcon} {instagramIcon} {twitterIcon}
             </div>
        </div>

        <div className="footer">
                  <div>
                     <p> SUPPORT</p>
                      {footer.support.map((item,index)=>(
                         <a key={item.url} href={item.url}>{item.name}</a>

                      ))}
                  </div>

                  <div>
                 <p> SHOP AND LEARN</p>
                  {footer.shopAndLearn.map((item,index)=>(
                         <a key={item.url} href={item.url}>{item.name} </a>

                      ))}

                  </div>
                  <div>
                   <p> RETAIL STORE</p>
                    {footer.retailStore.map((item,index)=>(
                         <a key={item.url} href={item.url}>{item.name}</a>

                      ))}
                  </div>

                  <div>
                           <p>  ABOUT</p>
                             {footer.aboutUS.map((item,index)=>(
                         <a key={item.url} href={item.url}>{item.name}</a>

                      ))}
                  </div>

                  <div>
                 <p> CONTACT US</p>
                  {footer.contactUs.map((item,index)=>(
                         <a key={item.url} href={item.url}>{item.name}</a>

                      ))}
                  </div>

                  <div>
                      <div>Chat with our Virtual AI Bot(24/7 Live Agent Support)</div><button>CHAT NOW</button>
                  </div>


        </div>
        <div className="footerBorder">
       <div> Copyright © 2010 - 2021 Xiaomi. All Rights Reserved</div>
        </div>

       </>
    )
}

export default Footer
Since the code of the footer was too long so attached its code here for reference and I will use the code snippits from it to explain.

Line 2 and 3 since the file is big so used two different css files to style the footer.
Line 6 to 23 stored the SVG icons in the variables.

Line 30 received the data coming from App.js.
PreFooter
Line 32 since our footer has 3 parts so we will use three main divs "PreFooter", "PreFooter2" and "Footer" so inorder to wrap them we used this syntactic sugar format.
Line 33 to 40 we made a PreFooter.

In the above fig we can see that our PreFooter has three sections "Hassle free replacement", "100% Secure Payment" and "Vast service network".
PreFooter2

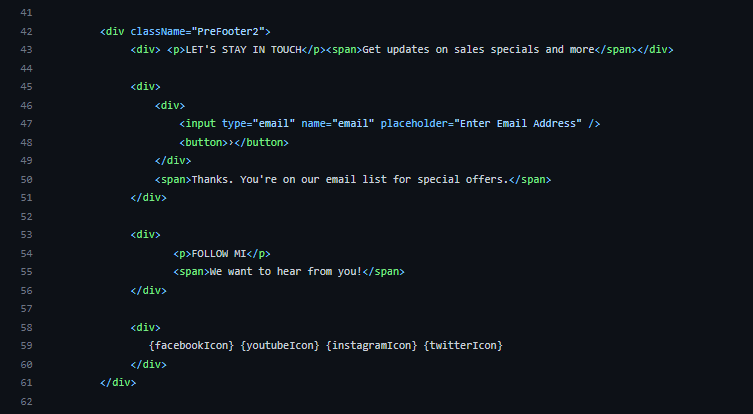
Line 42 to 61 made prefooter2 using input field and all the icons we imported.
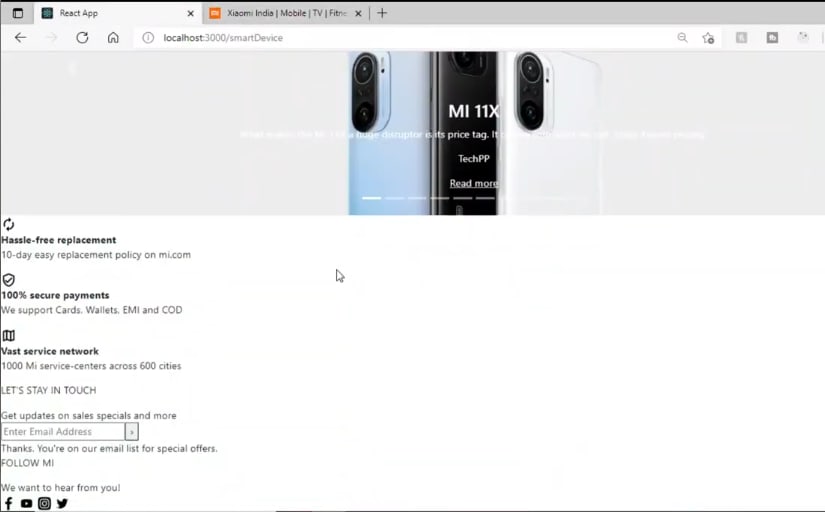
Now if you move to the browser it will look like this let's style them.
Since we already imported the CSS files for both PreFooter and Footer so just add codes to the PreFooter file.
PreFooter2
Add the following CSS to the PreFooter.CSS.
.PreFooter{
    margin: 5vmax 0 0 0;
    background-color: white;
    padding: 1vmax;
    padding-bottom: 0;
    display: grid;
    grid-template-columns: repeat(3,1fr);
}

.PreFooter > div{
    align-items: center;
    justify-content: center;
    display: flex;
    color:rgba(66, 66, 66, 0.829);
cursor: pointer;
}
.PreFooter > div:hover svg{
fill: rgb(34, 34, 34);
}
.PreFooter > div:hover p{
    color: rgb(19, 18, 18);
}


.PreFooter svg{
   transform: scale(2) translateY(-0.2vmax);
   fill: rgba(37, 37, 37, 0.322);
  margin: 2vmax;

}


/* --------------------PRE FOOTER 2---------- */


.PreFooter2{
    display: grid;
    height: 150px;
    grid-template-columns: repeat(4,1fr);
  }

  .PreFooter2 > div{
    display: flex;
    flex-direction: column;
    justify-content: center;
    align-items: center;
  }

  .PreFooter2 > div > p{
    color: rgba(0, 0, 0, 0.842);
    font-family:'Gill Sans', 'Gill Sans MT', Calibri, 'Trebuchet MS', sans-serif;
    font-size:1.5vmax;
    width: 18vmax;
    margin: 0% ;
  }
  .PreFooter2 > div > span{
    color: rgba(51, 51, 51, 0.842);
    width: 18vmax;
    font-size:1vmax;
  }

  .PreFooter2 > div > div > input{
    border: none;
    outline: none;
    padding: 0.5vmax 1vmax;
    background-color: rgb(255, 255, 255);
    font-size: 1vmax;

    width: 20.4vmax;
  }
  .PreFooter2 > div > div > button{
    border: none;
    padding: 0.5vmax;
    background-color: rgb(255, 255, 255);
    outline: none;
  }
  .PreFooter2 > div > div{
  border: 1px solid rgba(126, 126, 126, 0.493);
  }

  .PreFooter2 > div:nth-child(2) > span{
    width: 22vmax;
  }


  .PreFooter2 > div:nth-child(3){
    justify-content: center;
    align-items:flex-end;
  }

  .PreFooter2 > div:nth-child(3) > p{
    width: 14vmax;
  }

  .PreFooter2 > div:nth-child(3) > span{
    width: 14vmax;
  }
  .PreFooter2 > div:nth-child(4) {
    flex-direction: row;
  }
  .PreFooter2 > div:nth-child(4) > svg{
    cursor: pointer;
    margin: 1vmax;
    fill: rgba(138, 138, 138, 0.705);
  }
  .PreFooter2 > div:nth-child(4) > svg:hover{
    fill: rgb(94, 94, 94);
  }
And now if you move to the browser it will look like this.

Lets start working on the Footer.


Before discussing about the above code let's have a look on the data.json.

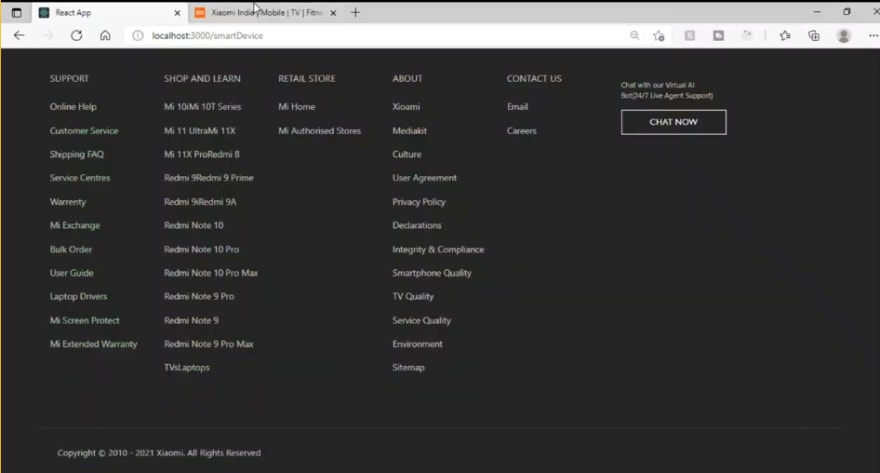
Here you can see that footer is an object and has some array of datas for support, shop and learn, retail store etc so footer will consist that much section.
Line 64 to 70 made the support section of the footer.
Line 72 to 79 made the shop and learn section of the footer.
Line 80 to 86 made the retail store section of the footer.
Line 88 to 94 made the About section of the footer.
Line 96 to 102 made the Contact Us section of the footer.
Line 104 to 106 made the Chat Now button with some text.
Line 110 to 112 a border and the copyright message.
Now if you move to the browser it will look some thing like this let's design them.
.footer{
    display: grid;
    grid-template-columns: 1fr 1fr 1fr 1fr 1fr 2fr;
    padding: 4.5vmax;
    background-color: rgb(37, 37, 37);
    color: rgb(197, 197, 197);
}

.footer > div{
    margin:1vmax;
    display: flex;
    flex-direction: column;

}

.footer > div:nth-child(2){
    display: block;
}
.footer > div:nth-child(2) >a{
        display: inline-block;

}
.footer > div > a{
    color: rgb(197, 197, 197);
    font-size: 1vmax;
    text-decoration: none;
    margin: 0.6vmax 0;
}

.footer > div > a:hover{
    color: white;
}


.footer > div:last-child >div{
    width: 45%;
    margin: 1vmax 0;
    font-size: 0.8vmax;
}

.footer > div:last-child >button{
width: 50%;
border:1px solid white;
background-color: rgb(37, 37, 37);
color: white;
padding: 0.6vmax 0;
font-size: 0.98vmax;
font-weight: 100;
font-family: 'Gill Sans', 'Gill Sans MT', Calibri, 'Trebuchet MS', sans-serif;
transition: all 0.5s;
}

.footer > div:last-child >button:hover{
    background-color: rgb(248, 244, 244);
    color: rgb(37, 37, 37);
}

.footerBorder{
    background-color:   rgb(37, 37, 37)  ;
    color: white;

}
.footerBorder >div{
    border-top: 1px solid rgba(197, 197, 197, 0.185) ;
    color: rgb(197, 197, 197);
    width: 90vmax;
    margin: auto;
    padding: 2vmax;
   font-size: 0.98vmax;
}
Add this CSS Code to Footer.Css.
Now it will look like this in the browser.


Top comments (0)