
Intro
After being a ReactJS developer for a couple of years now (only on the client-side), I started to feel the need to discover and understand which fullstack solutions are currently available.
One that really stands out is NextJS. It has an incredible 56.9K of GitHub stars. In my opinion, the best way to learn a framework or technology is by creating an example application.
That's how the Quiz Game project has born. By any means, this is an exhaustive tutorial, preferably an overview of the project's steps I've used to create the game.
Main libs used in this project:
- Semantic UI React - React Components lib (these have some custom style override with CSS Modules).
- React Toastify - Lib used to add notifications in UI.
- @artsy/fresnel - Lib to create media queries components in JSX.
- react-query - Lib used to manage async requests made on the client-side.
- react-hook-form - React lib used for forms management.
TL;DR:
What is NextJS
NextJS is an opinionated framework made by Vercel built on the top of NodeJS, Webpack, Babel, and ReactJS.
This framework doesn't require additional configuration to have an optimized application for production. The hybrid approach for rendering is another of the main advantages. The decision between static generation (SG) and server-side rendering (SSR) are supported on a per-page basis.
Quiz Game
The idea for this app/game has come up after encountering the Open Trivia API available here. In my mind, I began to see a small application divided into the following sections:
- Homepage with the Top 10 players;
- Authentication pages for Login and Register;
- Game page;
- Account page will display players statistics and game settings;
- About page will display the parsing result of the README.md file.
All these should take into account a responsive layout. But first things first.
Project Setup
1 - Project creation
The easiest way to get started is by using the CLI tool create-next-app, that will set up everything for you:
npx create-next-app quiz-game
# or
yarn create next-app quiz-game
At the time of this article, the versions used for Next was 10.0.1 and for React 17.0.1.
2 - MongoDB Configuration
I opt to use MongoDB to store the application data, mainly because I never used it professionally. The simple way to start using this NoSQL database is to create an account and a new cluster in MongoDB Cloud Atlas.
I've created a cluster named quiz-game and change the built-in role to "Read and write to any database".
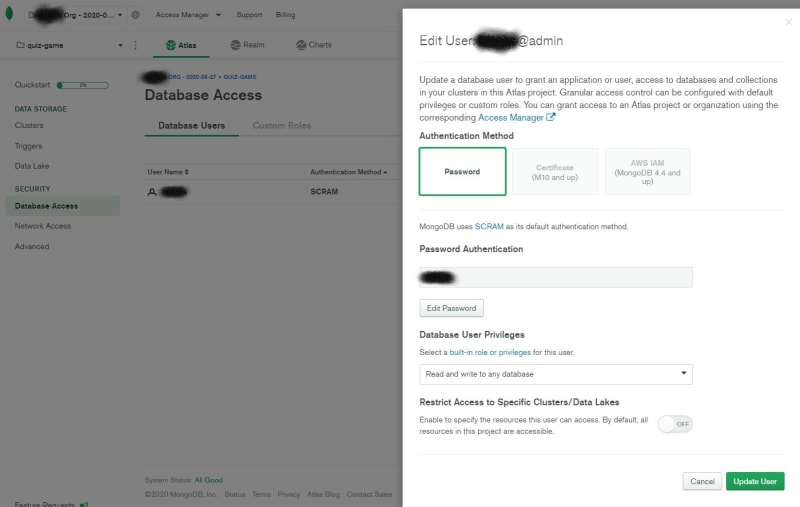
Additionally, I had to insert o 0.0.0.0/0 in the IP Address field in the "Network Access" section. That will allow connecting to your cluster from anywhere.

Backend
1 - API routes
The server logic of the application is mainly based on the API routes feature of NextJS.
Any file inside the folder
pages/apiis mapped to/api/*and will be treated as an API endpoint instead of a page. They are server-side only bundles and won't increase your client-side bundle size.
For example, the following function is executed when a new user tries to register:
import bcrypt from 'bcrypt';
import jwt from 'jsonwebtoken';

import { connectToDatabase } from '../../utils/mongodb';
import errors from '../../utils/errors';

const handler = async (req, res) => {
    const { name, email, password, image, isExternal } = JSON.parse(req.body);

    if (!name || !email || !password) {
        res.statusCode = 422;

        return res.json({ ...errors.REGISTER_FORM_DATA_MISSING });
    }

    try {
        const { db } = await connectToDatabase();

        const savedUser = await db.collection('users').findOne({ email });

        if (!process.env.JWT_SECRET) {
            res.statusCode = 422;

            return res.json({ ...errors.SECRET_NOT_DEFINED });
        }

        if (savedUser && !isExternal) {
            res.statusCode = 422;

            return res.json({ ...errors.ALREADY_REGISTERED });
        }

        const hashed = await bcrypt.hash(password, 12);

        if (hashed) {
            if (savedUser) {
                await db
                    .collection('users')
                    .updateOne({ email }, { $set: { password } });

                const token = jwt.sign(
                    { _id: savedUser._id },
                    process.env.JWT_SECRET
                );

                return res.json({
                    message: 'Saved successfully',
                    user: savedUser,
                    token,
                });
            }

            const user = {
                email,
                name,
                password: hashed,
                image,
                points: 0,
                questionsAnswered: 0,
            };

            await db.collection('users').insertOne(user);

            const foundUser = await db.collection('users').findOne({ email });

            await db.collection('preferences').insertOne({
                user: foundUser,
                numQuestions: 3,
                gender: '',
            });

            const token = jwt.sign({ _id: user._id }, process.env.JWT_SECRET);

            res.status(201);

            return res.json({
                message: 'Saved successfully',
                user,
                token,
            });
        }
    } catch (error) {
        res.statusCode = 500;

        return res.json({ ...errors.ERROR_REGISTERING });
    }
};

export default handler;
After passing the initial validation of the required arguments, I get the DB connection from the connectToDatabase (this will return a cached connection if it was already created) to check if a user with the same email was already inserted. The next step consists of creating a hash (with bcrypt) for the password and signing a token with the user's id and the secret (with JWT) stored in the environment variables file.
I created the .env.local file on the root of the project and added the following var:
JWT_SECRET={your_secret}
Down below are the description of all application API endpoints:

auth/[...nextauth].js- Several dynamic endpoints related to external authentication providers such as Google, Facebook etc.preferences/[userid].js- Dynamic endpoint to fetch the previous preferences saved by the user.preferences/index.js- Endpoint to store preferences saved by the user.login- Endpoint to sign in an existing user.register- Already described above.score- Endpoint to store the player score at the end of each game.
2 - MongoDB connection
Regarding the Mongo DB connection, I've chosen the utility function available in the NextJS example with MongoDB in here. The exported function returns the same single instance of the DB connection for each request, avoiding creating unnecessary multiple connections.
Finally, I needed to add the project's environment variables:
MONGODB_URI=mongodb+srv://{your_connection_string}?retryWrites=true
MONGODB_DB={your_db_name}
If you have any difficulties getting the database connection string, check this video.
Pages
The application is segmented into the following pages:
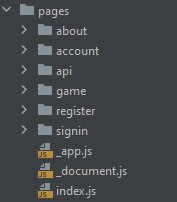
about- About page is the parsing result of the project readme file.account- User's account area.game- The entry point for the new game and final score.register- Registration for new users that choose not to use a social network authentication.signin- Login form and social networks authentication.index.js- Home page with Top 10 players.
1 - SSR Example - Homepage
The main concern of this page is to retrieve the data of the Top 10 players. This should be done before the first render. It doesn't require the user to be logged in.

For me, this is a nice candidate to use SSR in NextJS. This means that the HTML is generated for each request.
Having said that, here is the code for the Home page component:
import React from 'react';
import PropTypes from 'prop-types';
import {
    Label,
    Header,
    Segment,
    Table,
    Image,
    Divider,
} from 'semantic-ui-react';
import isEmpty from 'lodash/isEmpty';

import getAvatar from '../utils/getAvatar';
import { connectToDatabase } from '../utils/mongodb';
import Layout from '../components/layout/Layout';
import useBreakpoints from '../common/useBreakpoints';

const Home = ({ top }) => {
    const { lteSmall } = useBreakpoints();

    return (
        <Layout>
            <Segment raised padded={lteSmall ? true : 'very'}>
                <Header as="h2">Welcome to Quiz Game</Header>
                <p>This is just a game built with NextJS.</p>
                <br />
                <Divider />
                {!isEmpty(top) ? (
                    <>
                        <Header as="h3">Top 10</Header>
                        <Table
                            basic="very"
                            celled
                            collapsing
                            unstackable
                            striped
                        >
                            <Table.Header>
                                <Table.Row>
                                    <Table.HeaderCell>Player</Table.HeaderCell>
                                    <Table.HeaderCell>Score</Table.HeaderCell>
                                    <Table.HeaderCell>
                                        Questions
                                    </Table.HeaderCell>
                                </Table.Row>
                            </Table.Header>
                            <Table.Body>
                                {top?.map((player, index) => (
                                    <Table.Row key={index}>
                                        <Table.Cell>
                                            <Header as="h4" image>
                                                {player?.user?.image ? (
                                                    <Image
                                                        alt={player?.user?.name}
                                                        src={
                                                            player?.user?.image
                                                        }
                                                        rounded
                                                        size="mini"
                                                    />
                                                ) : (
                                                    <Image
                                                        alt={player?.user?.name}
                                                        src={getRandomAvatar(
                                                            player?.gender
                                                        )}
                                                        rounded
                                                        size="mini"
                                                    />
                                                )}
                                                {player?.user?.name}
                                            </Header>
                                        </Table.Cell>
                                        <Table.Cell textAlign="right">
                                            {player?.user?.points > 0 ? (
                                                <Label color="blue">
                                                    {player?.user?.points}
                                                </Label>
                                            ) : (
                                                <Label color="yellow">
                                                    {player?.user?.points}
                                                </Label>
                                            )}
                                        </Table.Cell>
                                        <Table.Cell textAlign="right">
                                            {player?.user?.questionsAnswered}
                                        </Table.Cell>
                                    </Table.Row>
                                ))}
                            </Table.Body>
                        </Table>
                    </>
                ) : null}
            </Segment>
        </Layout>
    );
};

Home.propTypes = {
    top: PropTypes.array,
};

export default Home;

export async function getServerSideProps() {
    const { db } = await connectToDatabase();

    const usersWithPreferences = await db
        .collection('preferences')
        .find()
        .limit(10)
        .sort({ ['user.points']: -1 })
        .toArray();

    return {
        props: {
            top: JSON.parse(JSON.stringify(usersWithPreferences)),
        },
    };
}
The main goal here is to display the list of players with a higher score. This information is available in the prop top ( they needed to be previously registered or signed in with social networks authentication). The magic here is that the async function getServerSideProps will return the top before the first render of this page on the server-side. Internally I'm not doing more than get the DB connection and find the list of users with the score sorted by the score descending. For more info, please press this link.
2 - SG Example - About
The biggest difference between SSR and SG in NextJS is that SG mode will pre-render this page at build time using the props returned by getStaticProps. This means that the same HTML is served for each request.

For example, check the code of the About page component:
import React from 'react';
import PropTypes from 'prop-types';
import { Segment } from 'semantic-ui-react';

import getAboutData from '../../lib/about';
import useBreakpoints from '../../common/useBreakpoints';
import Layout from '../../components/layout/Layout';

import styles from './About.module.css';

const About = ({ aboutData }) => {
    const { lteSmall } = useBreakpoints();

    return (
        <Layout>
            <Segment
                raised
                padded={lteSmall ? true : 'very'}
                className={styles.wrapper}
            >
                <div dangerouslySetInnerHTML={{ __html: aboutData }} />
            </Segment>
        </Layout>
    );
};

export async function getStaticProps() {
    const aboutData = await getAboutData();

    return {
        props: {
            aboutData,
        },
    };
}

About.propTypes = {
    aboutData: PropTypes.string,
};

export default About;
This is another page that doesn't require the user to be logged in. The only thing is required before the render, is the parsing data from the markdown of the README.md file. The final content of the page won't change for any user or page request (static). So with this in mind, the getStaticProps function is used to pass the prop aboutData with the output from the lib/about.js file.
import fs from 'fs';
import path from 'path';

import matter from 'gray-matter';
import remark from 'remark';
import html from 'remark-html';

const readmeDir = path.join(process.cwd());

export default async function getAboutData() {
    const fullPath = path.join(readmeDir, `README.md`);
    const fileContents = fs.readFileSync(fullPath, 'utf8');

    // Use gray-matter to parse the post metadata section
    const matterResult = matter(fileContents);

    // Use remark to convert markdown into HTML string
    const processedContent = await remark()
        .use(html)
        .process(matterResult.content);

    return processedContent.toString();
}
3 - CSR Example - All remaining pages
Except for the Home and About page, the remaining pages depended on the user session status verification. The Game and Account will require the user to be logged in. On the other hand, the authentication pages like Login and Register should be prevented if the user has already signed up. Because of this particular question, the Game and Account content are only rendered on the client side.
Deploy to Vercel
After all the development phases, surprisingly the easiest task was the app deployment through Vercel (also the company's name behind NextJs). For the sake of brevity, that guide can be consulted here. In this platform, you can check the build/function logs and also some cool features such as the recent addition of Analytics (limited for free accounts).
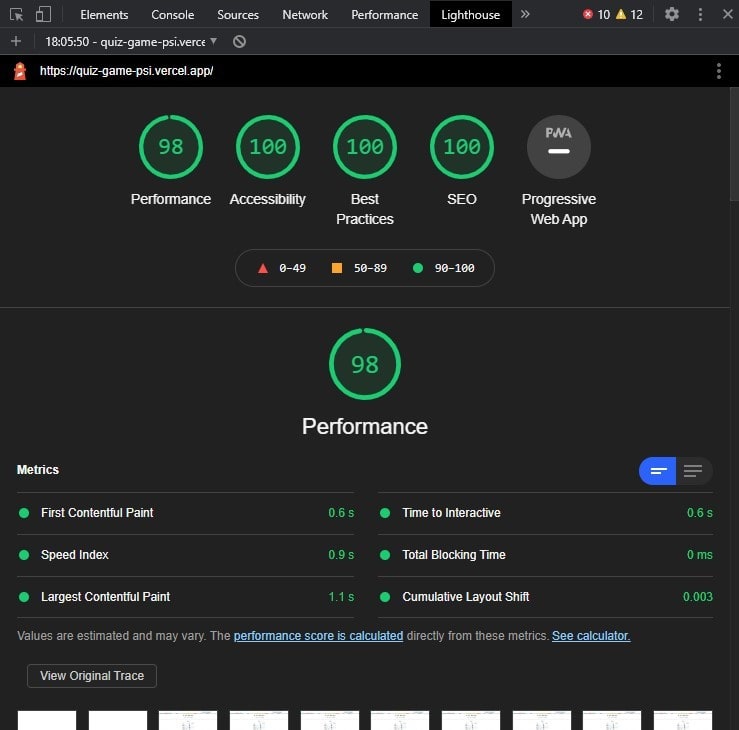
Lighthouse
One of the major promised benefits of using NextJS is it's performance and SEO optimization. These were the results of lighthouse accomplished with the live app in Vercel:
Conclusion
There is no doubt that NextJS is a great framework to create a full-stack application from the scratch. Everything will be already configured and optimized in terms of code splitting and bundling for production. There is a lot of things that you don't need to bother about. But that doesn't mean we cannot easily extend for a more tailored solution. For those with a background in React, the learning curve is minimal.
Development with this framework is fast and refreshing. I strongly recommend at least to try it.
All comments are welcome, thanks.


Top comments (1)
Nice, I like it , indeed Next js is so powerful and deployment in vercel is super easy