When I first started coding in college, one of the scariest pieces of technology to me was the terminal. Back then OSX shipped with bash and the default was just plain hard to look at, so I didn't.
Often tell junior developers to get as comfortable as possible with the terminal as soon as they can. I recount a tale from my college years where, just a few hours before a due date, I rm -rfed my project and had to redo it in a rush. This was solely because I was hesitant to use the terminal and didn't realize what I was doing. Being comfortable on the terminal is a critical skill as a dev, so being on your terminal should feel amazing.
Over the years I've played around with a bunch of different terminal setups and even written themes of my own. But I've really come to love my current setup. This post will detail how do make your's looks like this too!
Terminal App
The default terminal for OSX is okay but I always install iterm for all it's great features.
iTerm settings
Beautiful Font
The default rendering just kind of feels "off". To make it buttery smooth go to Preferences => Profiles => Text and check Enable subpixel anti-aliasing. This is a huge quality of life improvement.
The them I use recommends to install these fonts and I wholeheartedly agree.
Then go to Preferences => Profiles => Text and change the font to MesloLGS NF. I also up the default font size to 16 instead of 12. You will need to restart iTerm for it to save you font selection to the default profile.
Minimal Theme
Go to Preferences => Appearance => General and change Theme to Minimal. This is what makes the terminal's toolbar black and uniform with the rest of the app.
Unfocused Pane Dimming
Go to Preferences => Appearance => Dimming and make sure everything but Dim background windows is checked. This will make it so that when you split panes the unfocused pane isn't distracting.
Split Pane in Same Directory
Something that I hated about terminal splitting was that the new terminal starts out in the home directory.
- Go to
Preferences => Profiles => General => Working Directory - Select
Advanced Configuration - Click
Edit - Change
Working Directory for New Split PanestoReuse previous session's directory
Quiet New Terminal Prompts
When you make a new terminal it will spit out a bunch of text you don't care about. Run the following command to silence all of these! This even works on corporate computers!
touch ~/.hushlogin
Shell Configuration Manager
And then the next thing I install oh-my-zsh. From their website:
Oh My Zsh is a delightful, open source, community-driven framework for managing your Zsh configuration.
We will this utilize the theming and plugin support
sh -c "$(curl -fsSL https://raw.github.com/ohmyzsh/ohmyzsh/master/tools/install.sh)"
Theme
Theming your terminal usually involves a lot of setup and tweaking. Recently I found powerlevel10k and am absolutely in love.
Features:
- Setup is a breeze
- The font the have you install looks amazing on a terminal
- Instantly responsive on a new tab (I type so fast now!)
- Transient Prompt make having information on your terminal prompt useable
Install the theme on your machine:
git clone --depth=1 https://github.com/romkatv/powerlevel10k.git ${ZSH_CUSTOM:-~/.oh-my-zsh/custom}/themes/powerlevel10k
Set the theme in ~/.zshrc:
ZSH_THEME="powerlevel10k/powerlevel10k"
Once you restart your terminal you will go through the setup to customize your terminal. If you like the way mine above is rendered, you can grab mine here.
p10k Customizations
In this section I explain the customization I did to my ~./.p10k.zsh. If you use mine you do not have to read any of this, as it has already been done for you
Left Prompt
On the left side I added a custom icon on the first line, and a prompt character on the second line. The rest of the values are the defaults.
typeset -g POWERLEVEL9K_LEFT_PROMPT_ELEMENTS=(
# =========================[ Line #1 ]=========================
my_icon
dir # current directory
vcs # git status
# =========================[ Line #2 ]=========================
newline # \n
prompt_char # prompt symbol
)
# Display a custom Icon the changes depending on the time
# Use the Font Book on your mac to figure out the character
# To change the color change `-f 070` to a different 256 color
function prompt_my_icon() {
local -i currentTime=${(%):-%D{%H%M}}
if (( currentTime > 1619 || currentTime < 421 )); then
# Weed
p10k segment -f 070 -i 'ﲤ'
else
# Duck
p10k segment -f 227 -i ''
fi
}
Right Prompt
Here I un-commented any node version detection and added three items to the second line of the prompt.
These three segments are only show on previous commands.
-
status- Whether the last command failed or passed -
time- The time the last command was run -
dir- The directory the command was run from
This is super useful when your are looking back on commands you've run. You know the context in which they were ran and that information isn't cluttered with all the other stuff in your prompt.
typeset -g POWERLEVEL9K_RIGHT_PROMPT_ELEMENTS=(
  # =========================[ Line #1 ]=========================
  # ALL THE DEFAULTS DONT DELETE THEM. REMOVED FOR CLARITY
  nodenv                  # node.js version from nodenv (https://github.com/nodenv/nodenv)
  node_version          # node.js version
  battery               # internal battery
  # =========================[ Line #2 ]=========================
  newline                 # \n
  status
  time
  dir
)

# Turn of p10k's transient prompt so we can control it
typeset -g POWERLEVEL9K_TRANSIENT_PROMPT=off

# Hide the second line on the right side
function p10k-on-pre-prompt() {
  p10k display '1|*/left_frame'=show '2/right/(time|dir|status)'=hide
}

# Show the second line on the right side after command is run
function p10k-on-post-prompt() {
  p10k display '1|*/left_frame'=hide '2/right/(time|dir|status)'=show
}
ZSH Plugins
ZSH Plugins offer a lot and most of the are geared towards a specific dev stack. Finding the right plugin means an awesome tab completion experience. Install whatever you need, I don't use plugins for this though.
The two plugin I do use are
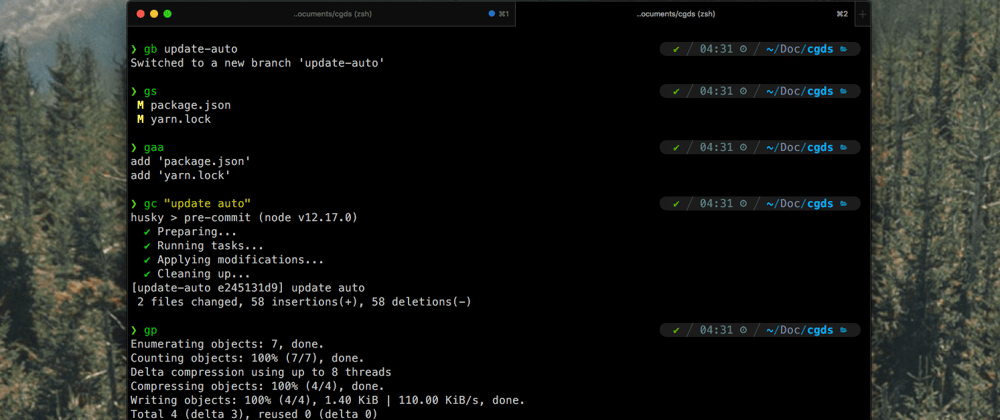
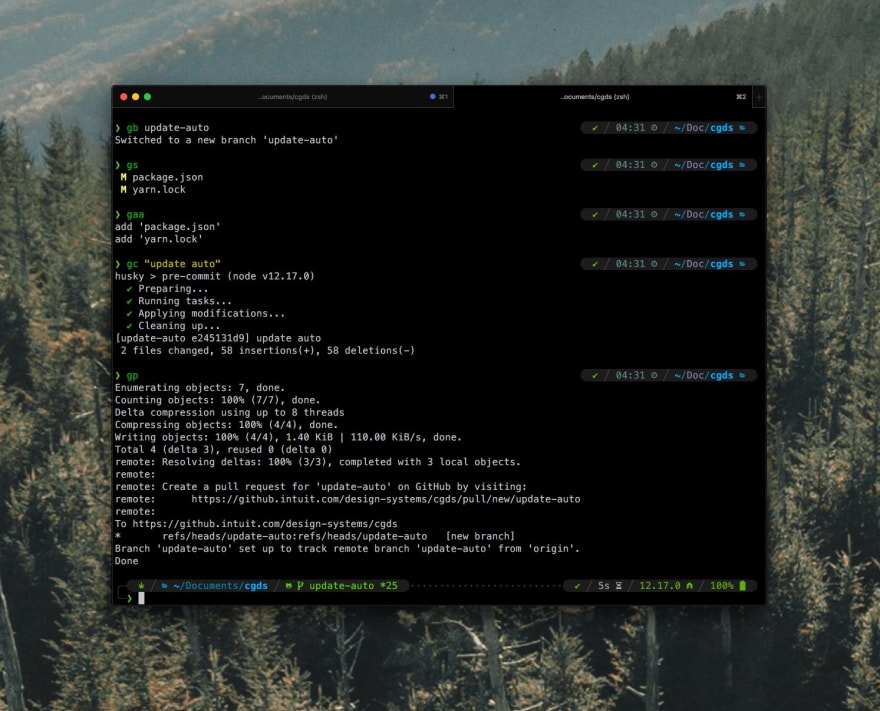
- zsh-syntax-highlighting - Fish shell like syntax highlighting for Zsh. This is what makes my aliases/commands green above. If it's green then it's installed!
- zsh-autosuggestions - Fish-like autosuggestions for zsh. Will show a preview of the last matching command while typing. Press right to use
Aliases
I started out not using aliases all that much, but as you get more comfortable with the terminal they become really useful. Create these as you see fit, that's the easiest way to remember them.
The following ones are simple and can fit most workflows:
# Alias the vs-code "code" command to something shorter
# You can use it to open anything in vscode "c ." will open the current directory
alias c="code"

# Open your .zshrc in VS Code
alias zshrc="c ~/.zshrc"

# Restart the terminal and ZSH
alias restart="exec zsh"
Git
I started as a Git GUI person (I still love and use gitup daily) but as I've grown as a developer I moved more and more into my terminal.
# Open the current repository in Gitup
alias g="gitup"
# Create a new Branch
alias gb="git checkout -b"
# Show the current status of the repo
alias gs="git status --short"
# Stage some files
alias ga="git add -v"
# Stage all files
alias gaa="ga -A"
# Make a commit
alias gc="git commit -m"
# Add all changes, amend the last commit, and force push
alias gaf="gaa && git amend && gp -f"

gitPush()
{
    # If in a git repo - call git mv. otherwise- call mv
    if [[ $(git config "branch.$(git rev-parse --abbrev-ref HEAD).merge") == '' ]];
    then
        git push -u --porcelain "$@"
    else
        git push --porcelain "$@"
    fi
}
# Push to origin and set the upstream if necessary
alias gp=gitPush

# Delete merged branches
alias gcb="git checkout master && git pull && git branch --merged master | egrep -v 'next|master' | xargs -I % sh -c 'git branch -d %; git config --get branch.%.merge && git push origin -d %'"
The gp alias requires you to set a value in your git configuration
[push]
  default = current
The gaf alias requires you to set a value in your git configuration. This will also make the git amend command available. This command will amend the last commit with any staged changes.
[alias]
  amend = commit --no-edit --no-verify --amend
And while you're there you might as well use all my color settings too. Git output should be pretty too!
[color]
  ui = true
  branch = auto
[color "diff-highlight"]
  oldNormal = red bold
  oldHighlight = red bold 52
  newNormal = green bold
  newHighlight = green bold 22
[color "diff"]
  commit = yellow bold
  old = red bold
  new = green bold
  whitespace = red reverse
[color "status"]
  branch = magenta normal bold
  remoteBranch = magenta normal bold
  changed = yellow normal bold
  untracked = red normal bold
  updated = green normal bold
[color "branch"]
  current = magenta normal ul bold
  remote = yellow normal bold
Terminal Keyboard Shortcuts
Being skilled with keyboard shortcuts can make you look like a superhero in a text editor. The default iTerm keyboard shortcuts are nothing like vs-codes so I was always inserting weird character in the terminal instead of quickly navigating text.
To fix this you can set up custom keyboard shortcuts in iTerm. Go to Preferences => Keys. For each of the following click the + button and make the Action set to Send Hex Code.
| Shortcut | Result | Hex Code |
|---|---|---|
cmd + right |
Cursor to end of line | 0x05 |
cmd + left |
Cursor to start of line | 0x01 |
cmd + backspace |
Delete line | 0x15 |
alt + right |
Cursor skip one word right | 0x1b 0x66 |
alt + left |
Cursor skip one word left | 0x1b 0x62 |
alt + backspace |
Delete one word | 0x1b 0x08 |
Better Default Tools
A lot of the tools you use are probably super old! That's great cause they work no problem, but they might not be as pretty as we want them! All of the following are tools I use to replace default tooling that is preinstalled on most computers.
cat => bat
A cat(1) clone with wings.. So much nicer!
brew install bat
Make sure to alias cat in your ~/.zshrc.
alias cat="bat"
ls => exa
A modern version of ‘ls’.. Pretty colors!
brew install exa
Make sure to alias cat in your ~/.zshrc.
alias ls="exa"
# Show lots of info, even with icons!
alias lss="exa -alh --icons --git-ignore"
git diff => diff-so-fancy
Strives to make your diffs human readable instead of machine readable..
brew install diff-so-fancy
Tell git to use diff-so-fancy for all diffs:
git config --global core.pager "diff-so-fancy | less -FR --tabs=4
History search
bash and zsh ship with a nice search history (press ctrl + r). But it's old and ugly. For a better experience I install fzf.
brew install fzf

# To install useful key bindings and fuzzy completion:
$(brew --prefix)/opt/fzf/install
cd => z (zoxide)
Easily jump to directories. Just supply a part of the path and it will change the directory to the last matching path. I still use cd but I use z to jump between projects.
brew tap ajeetdsouza/zoxide
brew install zoxide
And add some config in your ~/.zshrc.
eval "$(zoxide init zsh)"
zoxide ships with a zi alias. This allows you to fuzzy search though all possible directory matches.


Top comments (6)
Function
prompt_customIconis slower than it could be (due to forking) and isn't quite correct. Here's a fixed version:It's also a very good idea to prefix all your custom prompt segments with
my_to avoid clashes with future versions of powerlevel10k.Thanks for the tip! What do you mean by forking?
It calls an external command (date), which is implemented as fork + exec. Both of these calls are very expensive and slow.
Had no idea about
batandexa. I also didn't know about thegitaliases; very cool. Thank you so much!I'd also like to add that's cool is Nerd Font. You may already know this, but they also have tons of packed icons that render powerlevel10k properly. Tons of options outside of Meslo.
I use prezto with history substring search plugin (and many more), so that works pretty well for me instead of the
fzfpackage. But this is also a great tool!I also have a very similar branch deletion tool. Great minds think alike! 😂
Great article, thanks for sharing.
For PowerShell Core users
Install Modules (as admin)
profile.ps1
Random note: love all of your posts 802.11 Savage! Thanks for the great content!