
Cross browser testing is deemed to be an indispensable task for modern day release cycle. However, manual cross browser testing could turn out to be very strenuous and time consuming. A major hindrance that developers & testers face is while performing browser compatibility testing of their website or web-application across different operating systems, browsers, etc. This is where Selenium as a free, and open source software steps in!
Selenium is a popular automation testing framework for browser compatibility testing of a web application or a website. Selenium is utilized for performing automated functional testing with less/minimal learning curve with respect to implementation.
You can use Selenium for automated cross browser testing, it automate interactions with your web application/website in any browser e.g. Google Chrome, Mozilla Firefox, Internet Explorer, Edge, etc.
In this article, we will be touching.
Selenium & Python – Getting Started [Installation, Configuration, and more]
Selenium supports multiple top programming languages for testers namely C#, Java, Ruby, Python, Javascript, PHP etc. but many developers & testers are opting for Python with Selenium since Python is less verbose than other programming languages, libraries are very extensive to help you get more work done by writing, clean and better automation code.
Now that you have understood the advantages of using Selenium with Python for automation testing, we explain the basic steps for installation & configuration.
[Note – In this blog, we use the Windows Environment, Python version 3.6 and Eclipse as Selenium IDE]
- You need to first install Python from here. Choose the appropriate version suitable for your Operating System i.e. Windows, Linux, Macintosh.
- Ensure that your PATH is appended with the location where Python executable is located. e.g. If Python is installed in the location C:\Users\appdata\local\programs\python\Python36; you need to append the folder location to the environment variable PATH.

- Once you have installed Python, the next step is the installation of the Selenium package. It is also termed as ‘Python bindings for Selenium’. These binding are critical for performing python automation testing.

- Now, you need to install the most important component in the testing framework called WebDriver. Selenium WebDriver is used for browser automation by pushing commands to the Web Browser. It is a collection of open-source APIs and since it is platform-agnostic, source code written for Windows platform would execute seamlessly on other Operating Systems e.g. Linux, Mac, etc. To know more, you can refer to our Selenium WebDriver tutorial for cross browser testing. This article will highlight how to perform parallel testing in Selenium Webdriver with Python.
Selenium requires the geckodriver in order to communicate with the Firefox browser. For performing parallel testing in Selenium, WebDriver for various browsers can be downloaded from the below locations:
| BROWSER | DOWNLOAD LOCATION |
|---|---|
| Firefox | https://github.com/mozilla/geckodriver/releases |
| Google Chrome | https://sites.google.com/a/chromium.org/chromedriver/downloads |
| Microsoft Edge | https://developer.microsoft.com/en-us/microsoft-edge/tools/webdriver/ |
In the below code snippet related to python automation testing, after importing the Selenium WebDriver library [Lines 3-4], the developer can invoke a Firefox instance by using Option 1 [Line 8] given that the Firefox installation location is updated in the PATH environment variable and geckodriver.exe is executing in the background.
Option 2 [Line 11] can also be used in case you plan to manually invoke geckodriver.exe which in turn starts a Firefox instance.

Selenium Web Server – The usage of Selenium Web Server is optional and it all depends on the manner in which you want to use the Selenium WebDriver. If you are planning to perform parallel testing in Selenium WebDriver with Python, or any other language through your local machine, where you have the web browsers on which you intend to use for browser compatibility testing, WebDriver API would suffice your requirement. Selenium WebDriver would directly run the browser. Below are the ideal scenarios where you would require the Selenium Web Server:
- You are performing some tests on a browser which is only available in a remote machine, not your local machine.
- You are using a complex distributed Selenium Grid for cross browser testing where the tests are distributed across different Virtual Machines (VMs).
- You are using HTMLUnit Driver and not Java Bindings i.e. C#, Ruby, Python, etc.
The Selenium Web Server can be downloaded from here.
Selenium WebDriver With Python – Usage & Examples
Now that you have the setup ready, you can now use Selenium WebDriver Python Bindings for testing of your web application. Below is a simple piece of code which I used for python automation testing, it will work with the ‘search functionality’ in Google.
# Import the necessary modules for development
import time
import unittest
from selenium import webdriver
from selenium.webdriver.common.keys import Keys

# Invoke a new Firefox Instance
ff_driver = webdriver.Firefox()

# Blocking wait of 30 seconds in order to locate the element
ff_driver.implicitly_wait(30)
ff_driver.maximize_window()

# Open the Home Page
ff_driver.get("http://www.google.com")

# Look for the Search Element and enter the Search Criteria
search_criteria = ff_driver.find_element_by_id("lst-ib")
search_criteria.clear()

search_criteria.send_keys("Lambda Test")

# Submit the Search results
search_criteria.submit()

# Sleep for 10 seconds in order to see the results
time.sleep(10)

# Close the Browser instance
ff_driver.close()
You can save the file as search.py and compile using the following command.
python search.py
(Note – In case you are using an IDE like Eclipse, you can compile & execute your code using the PLAY button playbutton in the Eclipse IDE). Let’s do a code walkthrough and have a look at some of the critical parts in the above example for Selenium Webdriver for Python automation testing.

Import the selenium.webDriver module that provides the WebDriver implementation.
from selenium import webdriver
from selenium.webdriver.common.keys import Keys
Create a Firefox WebDriver instance.
ff_driver = webdriver.Firefox()
Open the Home Page. In any case, the WebDriver will wait until the page loads completely, after which the control returns back to the script. In this example, we have introduced a ‘Blocking Wait’ call of 30 seconds only for demonstration purpose.
ff_driver.implicitly_wait(30)
ff_driver.maximize_window()
ff_driver.get("http://www.google.com")
The next step is to locate the necessary element on the Web Page. WebDriver offers a number of ways in which find_element_by* can be used to find the required element on the page. In order to find the element name, you can make use of ‘Inspect Element’ functionality in the browser. You need to simply Right+Click on the page and select ‘Inspect Element’ option in order to find the necessary element. Below is the snapshot of finding details about ‘Input Box’ and ‘Google Search’ button on the Google Homepage.

Any pre-populated text in the input box is cleared using the clear() method of the WebDriver and the Key press is sent using Keys class imported from selenium.webdriver.common.keys. Once the input operation is complete, submit is invoked using the submit() method in order to process the Search.

search_criteria = ff_driver.find_element_by_id("lst-ib")
search_criteria.clear()
search_criteria.send_keys("Lambda Test")
search_criteria.submit()
Finally, the browser session is closed using the close() method.
ff.driver.close()
Now that you know how Selenium, Python, and WebDriver can be used; we proceed to the next section where we discuss how Selenium can be used for writing effective test cases. In order to write test cases using Selenium, unittest module has to be imported. Though there are other options like py.test and nose, we would focus on unittest.
Note: you can refer to our blog on test automation using Pytest and Selenium WebDriver if you wish to perform parallel testing in Selenium webdriver with Python using Pytest.
Example 2
import unittest
import time
from selenium import webdriver
from selenium.webdriver.common.keys import Keys
from selenium.webdriver.chrome.options import Options

class ChromeSearch(unittest.TestCase):

    def setUp(self):
        chrome_options = webdriver.ChromeOptions()
        self.driver = webdriver.Chrome(r"C:/Program Files (x86)/Google/Chrome/Application/chromedriver.exe", options=chrome_options)
        self.driver.maximize_window()

    # As per unittest module, individual test should start with test_
    def test_search_lambdatest_chrome(self):
        driver_chrome = self.driver
        driver_chrome.get('http://www.google.com')
        time.sleep(10)

        search_criteria = driver_chrome.find_element_by_id("lst-ib")
        search_criteria.clear()
        search_criteria.send_keys("Lambda Test")

        # Check if the search returns any result
        assert "No results found." not in driver_chrome.page_source

        search_criteria.submit()
        time.sleep(10)

    def tearDown(self):
        # Close the browser.
        self.driver.close()

class FirefoxSearch(unittest.TestCase):
    def setUp(self):
        self.driver = webdriver.Firefox()
        self.driver.maximize_window()

    # As per unittest module, individual test should start with test_
    def test_search_lambdatest_firefox(self):
        driver_firefox = self.driver
        driver_firefox.get('http://www.google.com')
        time.sleep(10)

        search_criteria = driver_firefox.find_element_by_id("lst-ib")
        search_criteria.clear()
        search_criteria.send_keys("Lambda Test")

        # Check if the search returns any result
        assert "No results found." not in driver_firefox.page_source

        search_criteria.submit()
        time.sleep(10)


    # Anything declared in tearDown will be executed for all test cases
    def tearDown(self):
        # Close the browser.
        self.driver.close()

if __name__ == "__main__":
    unittest.main()
The above test code can be executed from the shell using the command ‘python file-name.py’. Let’s do a code walkthrough and focus on the important parts of the code.
Before getting into the actual implementation, important modules are imported. unittest is a built-in Python module that is based on JUnit. It is used for organization of the test-cases, more information about unittest can be found here. Similar to the previous example, selenium.webdriver module which supports the WebDriver implementation is imported.
import unittest
import time
from selenium import webdriver
from selenium.webdriver.common.keys import Keys
from selenium.webdriver.chrome.options import Options
Now we start with the actual testcase implementation. ChromeSearch is the name of the testcase. The test case class is inherited from unittest.TestCase
class ChromeSearch(unittest.TestCase):
The setup() method is a part of the initialization and defines instructions that are executed before the testcase. In the snippet below, we create an instance of Chrome WebDriver for performing Selenium WebdDriver with Python for automation testing.
def setUp(self):
        chrome_options = webdriver.ChromeOptions()
        self.driver = webdriver.Chrome(r"C:/Program Files (x86)/Google/Chrome/Application/chromedriver.exe", options=chrome_options)
        self.driver.maximize_window()
Once the initialization is done, we proceed with the testcase method. As per the unittest module, individual test should always start with ‘test_’. In the snippet below, the testcase method is test_search_lambdatest_chrome. driver_chrome, which is the local reference to the driver object which was created in the setUp() method. Henceforth, the local reference (in this case driver_chrome) will be used for further implementation. For details about the WebDriver implementation, please refer to
Example-1 where we have already provided an in-depth explanation.
 def test_search_lambdatest_chrome(self):
        driver_chrome = self.driver
The tearDown() method is called immediately after the test method completes execution since this is the place where cleanup is performed. In the code snippet below, close operation is performed on the Browser i.e. Chrome.
def tearDown(self):
        # Close the browser.
        self.driver.close()
The implementation in FirefoxSearch testcase method [Line-34] is similar to ChromeSearch testcase method [Line-7], except that in that method Firefox WebDriver instance is created.
The final lines of code are the Boiler plate code to run the test suite. unittest.main() provides a command-line interface to execute the test-script, though there are many other options to execute the tests with a finer level of control.
if __name__ == "__main__":
    unittest.main()
The examples that we have showcased above has Firefox & Chrome browser at the center of entire testing process. What if your requirement is to test your web app with Firefox browser (version 64.0) installed on a Windows 10 machine? In such a process, you would require the required setup with the same version of Firefox installed on it. This approach is not only expensive but it is also non-scalable.
During the process of testing your source code, you might land in a situation where you cannot verify the web-app/web application on the local infrastructure (or setup) that is currently available. Performing cross-browser testing is essential to ensure that web pages are rendered properly across different browsers, different operating systems, and devices. This is where Lambdatest’s cloud-based cross-browser infrastructure can be used to verify your web-app/website.
Leveraging LambdaTest Platform For Performing Parallel Testing
While using Selenium WebDriver with Python for automation testing through your source code, you might land in a situation where you cannot verify the web application on the local infrastructure (or setup) that is currently available e.g. Your requirement is to test your web app with Firefox browser (version 64.0) installed on a Windows 10 machine. In such a process, you would require the required setup with the same version of Firefox installed on it. This approach is not only expensive but it is also non-scalable.
By leveraging cloud based, cross browser testing tools such as LambdaTest, you can verify your web app for cross browser compatibility across 2000+ different browsers, OS, resolutions, devices, etc. To get started, you have to create an account on LambdaTest. Once your account is activated, you need to make note of the username & access-key which is located at your LambdaTest Profile.

You have to generate the necessary capabilities i.e. mandatory (and optional) requirements that are necessary for executing the test code e.g. Capabilities could be (platform OS – Windows 10, BrowserName – Firefox, BrowserVersion 64.0, Firefox Driver version – v0.23.0. The Desired capabilities can be generated by visiting LambdaTest Capabilities Generator. You have to make sure that the language for development is selected as ‘Python’.
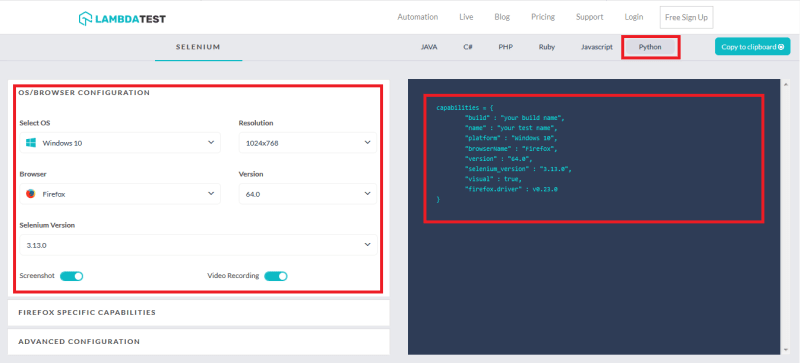
capabilities = {
        "build" : "your build name",
        "name" : "your test name",
        "platform" : "Windows 10",
        "browserName" : "Firefox",
        "version" : "64.0",
        "selenium_version" : "3.13.0",
        "visual" : true,
        "firefox.driver" : v0.23.0
    }
In order to get the maximum throughput from Selenium WebDriver with Python for automation testing through the LambdaTest platform, it is necessary that you choose a plan which provides the feature of ‘Parallel Testing’. More details about the billing plans are available at their pricing page.
Now that our setup is ready, we perform a simple test for performing parallel testing in Selenium WeDriver with Python for automation testing on LambaTest cloud platform. Details about the tests are below.
- Test 1: 1. Invoke Chrome browser (version 67.0) on Windows 10 2. Search for ‘lambatest.com’ on Google 3. Once the page is rendered, close the browser and clear the resources allocated during the start of the test.
- Test 2: 1. Invoke Firefox browser (version 64.0) on Windows 10 2. Search for ‘lambatest.com’ on Google 3. Once the page is rendered, close the browser and clear the resources allocated during the start of the test.
Implementation for Test 1
LambdaTest Selenium automation sample example
Configuration
----------
username: Username can be found at automation dashboard
accessToken:  AccessToken can be generated from automation dashboard or profile section

Result
-------
Execute Python Automation Tests on LambdaTest Distributed Selenium Grid
"""
import unittest
import time
from selenium import webdriver
from selenium.webdriver.common.keys import Keys
import urllib3

class LTAutomate(unittest.TestCase):

    """
    Setup remote driver
    Params
    ----------
    platform : Supported platform - (Windows 10, Windows 8.1, Windows 8, Windows 7,  macOS High Sierra, macOS Sierra, OS X El Capitan, OS X Yosemite, OS X Mavericks)
    browserName : Supported platform - (chrome, firefox, Internet Explorer, MicrosoftEdge)
    version :  Supported list of version can be found at https://www.lambdatest.com/capabilities-generator/

    Result
    -------
    """
    def setUp(self):
        # username: Username can be found at automation dashboard
        username="<user-name>"
        # accessToken:  AccessToken can be generated from automation dashboard or profile section
        accessToken="<access-token>"
        # gridUrl: gridUrl can be found at automation dashboard
        gridUrl = "hub.lambdatest.com/wd/hub"

        desired_cap = {
            'platform' : "win10",
            'browserName' : "chrome",
            'version' :  "67.0",
            "resolution": "1024x768",
            "name": "LambdaTest python google search test ",
            "build": "LambdaTest python google search build",
            "network": True,
            "video": True,
            "visual": True,
            "console": True,
        }

        # URL: https://{username}:{accessToken}@hub.lambdatest.com/wd/hub
        url = "https://"+username+":"+accessToken+"@"+gridUrl

        print("Initiating remote driver on platform: "+desired_cap["platform"]+" browser: "+desired_cap["browserName"]+" version: "+desired_cap["version"])
        self.driver = webdriver.Remote(
            desired_capabilities=desired_cap,
            command_executor= url
        )

    """
    Setup remote driver
    Params
    ----------
    Execute test:  navigate google.com search LambdaTest
    Result
    -------
    print title
    """
    def test_search_in_google(self):
        driver = self.driver
        print("Driver initiated successfully.  Navigate url")
        driver.get("https://www.google.com/ncr")

        print("Searching lambdatest on google.com ")
        time.sleep(8)
        elem = driver.find_element_by_name("q")
        elem.send_keys("lambdatest.com")
        elem.submit()

        print("Printing title of current page :"+driver.title)
        driver.execute_script("lambda-status=passed")
        print("Requesting to mark test : pass")

    """
    Quit selenium driver
    """
    def tearDown(self):
        self.driver.quit()

if __name__ == "__main__":
    unittest.main()
Implementation for Test 2
LambdaTest Selenium automation sample example
Configuration
----------
username: Username can be found at automation dashboard
accessToken:  AccessToken can be generated from automation dashboard or profile section

Result
-------
Execute Python Automation Tests on LambdaTest Distributed Selenium Grid
"""
import unittest
import time
from selenium import webdriver
from selenium.webdriver.common.keys import Keys
import urllib3

class LTAutomate(unittest.TestCase):

    """
    Setup remote driver
    Params
    ----------
    platform : Supported platform - (Windows 10, Windows 8.1, Windows 8, Windows 7,  macOS High Sierra, macOS Sierra, OS X El Capitan, OS X Yosemite, OS X Mavericks)
    browserName : Supported platform - (chrome, firefox, Internet Explorer, MicrosoftEdge)
    version :  Supported list of version can be found at https://www.lambdatest.com/capabilities-generator/

    Result
    -------
    """
    def setUp(self):
        # username: Username can be found at automation dashboard
        username="<user-name>"
        # accessToken:  AccessToken can be generated from automation dashboard or profile section
        accessToken="<access-token>"
        # gridUrl: gridUrl can be found at automation dashboard
        gridUrl = "hub.lambdatest.com/wd/hub"

        desired_cap = {
            'platform' : "win10",
            'browserName' : "firefox",
            'version' :  "64.0",
            "resolution": "1024x768",
            "name": "Parallel Test - LambdaTest python google search test on Firefox",
            "build": "Parallel Test - LambdaTest python google search build on Firefox",
            "network": True,
            "video": True,
            "visual": True,
            "console": True,
        }

        # URL: https://{username}:{accessToken}@hub.lambdatest.com/wd/hub
        url = "https://"+username+":"+accessToken+"@"+gridUrl

        print("Initiating remote driver on platform: "+desired_cap["platform"]+" browser: "+desired_cap["browserName"]+" version: "+desired_cap["version"])
        self.driver = webdriver.Remote(
            desired_capabilities=desired_cap,
            command_executor= url
        )

    """
    Setup remote driver
    Params
    ----------
    Execute test:  navigate google.com search LambdaTest
    Result
    -------
    print title
    """
    def test_search_in_google(self):
        driver = self.driver
        print("Driver initiated successfully.  Navigate url")
        driver.get("https://www.google.com/ncr")

        print("Searching lambdatest on google.com ")
        time.sleep(8)
        elem = driver.find_element_by_name("q")
        elem.send_keys("lambdatest.com")
        elem.submit()

        print("Printing title of current page :"+driver.title)
        driver.execute_script("lambda-status=passed")
        print("Requesting to mark test : pass")

    """
    Quit selenium driver
    """
    def tearDown(self):
        self.driver.quit()

if __name__ == "__main__":
    unittest.main()
Let us do a code-walk through of Test 1 (Note – Apart from the type of browser being invoked, rest of the functionalities are same for Test 2 as well).
All the necessary modules are imported in the beginning (unittest, selenium, etc.)
You need to set the necessary capabilities required for test execution. We recommend that you make use of LambdaTest Capability Generator (which was discussed earlier) to generate the ‘desired capabilities’.
desired_cap = {
            'platform' : "win10",
            'browserName' : "firefox",
            'version' :  "64.0",
            "resolution": "1024x768",
            "name": "Parallel Test - LambdaTest python google search test on Firefox",
            "build": "Parallel Test - LambdaTest python google search build on Firefox",
            "network": True,
            "video": True,
            "visual": True,
            "console": True,
        }
In the setUp() method, you should enter your user-name & access-token for accessing the LambdaTest platform to go ahead with Selenium Webdriver with Python for automation testing. If these credentials are incorrect, you might not be able to execute the code. Since the execution is performed on the cloud, we make use of ‘Remote WebDriver API’ instead of ‘Local WebDriver API’. The inputs to the ‘Remote WebDriver API’ are ‘desired capabilities’ and ‘command execution URL (created using concatenation of [user-name + access-token + grid URL].
You can now execute parallel testing in Selenium WebDriver with Python for automation testing. Notice the two tests on different terminals by using the ‘python’ command.

In order to check the status of the tests, logs, MetaData, etc.; you need to check the ‘Automation’ tab on Lambatest i.e. https://automation.lambdatest.com

As shown in the automation snapshot below, there is a field which mentions how many tests are executing/running. In our case, we executed parallel testing in Selenium WebDriver with Python for automation testing using 2 tests in Parallel (i.e. concurrent sessions). Hence, when you invoke the tests (parallel_test_example-1.py & parallel_test_example-2.py), they are executed in parallel. In this manner, you can speed up your overall test case execution in a significant manner.

Conclusion
Performing parallel testing in Selenium WebDriver with Python for automation testing could save you a lot of time by speeding up your slow automated UI tests. If there are less number of tests, you might not require parallel testing in Selenium WebDriver for Python or any other language, but once the complexity of the project increases (or number of tests to be executed increase), parallel testing is the ideal mechanism to achieve the best results in the minimum possible time. Nowadays, more teams are focused on making use of Continuous Integration (CI) and Continuous Delivery (CD) in the overall software development & testing process. Getting the best out of ‘parallel testing’ is important for the implementation of Continuous Integration (CI).
Using LambdaTest for automated cross-browser testing on the cloud, testing time can be reduced by a considerable margin as you also have the flexibility of executing multiple tests in parallel. It has powerful features (like Timeline, Automation logs, Analytics, etc.) that will come handy while analyzing & debugging the tests. Happy testing!
Original Source: lambdatest.com
Related Articles


Top comments (0)