
One of the best ways to improve your programming skills is collaboration in open source projects. For the first time, it can be quite intimidating and I was pretty scared myself. I thought I was not good enough to submit code to the bigger projects but I'm here to tell you to not be apprehensive about these things and do not be afraid of making a small change and submitting a pull request for a big project, because it's likely that it will help someone.
Finding a Project
The first step is finding a project. Just typing label:beginner, label:easy, label:starter or label:first-timers-only into the search bar on GitHub will bring up issues that the project's developers consider appropriate for beginner programmers. Once you've found a project you like, it's time to dive into your new life as an open source developer.
Fork a Repository (aka make a copy)
The second step is to fork the repository. To do that, click on the Fork button in the top right corner of the project's GitHub page.

You now have your personal copy of the project that you can edit without changing anyone else's work.
Clone the Repository (aka download the copy to your machine)
For this step, you'll need to have GitHub Desktop App installed (In this tutorial, we will use GitHub Desktop App, though every developer is expected to have the knowledge of any Version Control System). Open your GitHub Desktop App and click on File and then Clone repository. You see a list of your repositories and forks on GitHub. Select the forked repository and click Clone.

Now you have a local copy of the project.
Create a new Branch
Each repository has one default branch. As you make commits, you're given the master branch that points to the last commit you made. When you have your own branch, you can make changes without affecting master branch. Click on Current branch, click on New and give your branch a name.
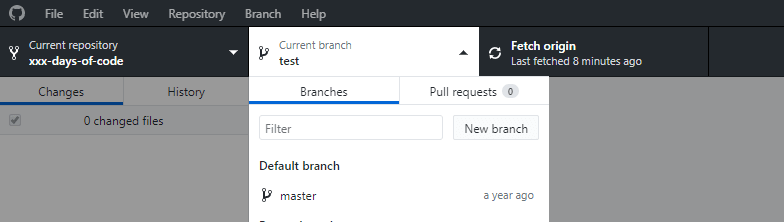
Then create a branch.

Time to do some work
To open the file you want to edit with your favorite code editor, find your project on your computer. The default directory for cloning (for Windows) should be C:\\Users\(username)\Documents\GitHub. Now you are ready to start making changes to it.
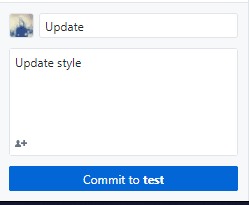
Commit your Changes
After finishing your editing you should group your changes together into a commit and send to GitHub, then submit them to be merged with the main project. Open your GitHub Desktop App and you'll see Git has recorded all the saved changes. To commit you must type your commit message in the Summary field and add a description. Then click the button to commit your changes.
Push your Changes
The next step is to synchronize your local changes with your repository on GitHub. You need to push your changes to GitHub. Click the button that displays Publish branch to sync changes. Now you have the same copy of this branch on your computer as well as on GitHub.

Submit your PR
The next step is to submit your Pull Request. A Pull request notifies the project maintainers that you have some work that they should review and eventually add to the project.

Go to the main page of your fork on GitHub and click on the highlighted PR message with a green button displaying Compare & pull request.
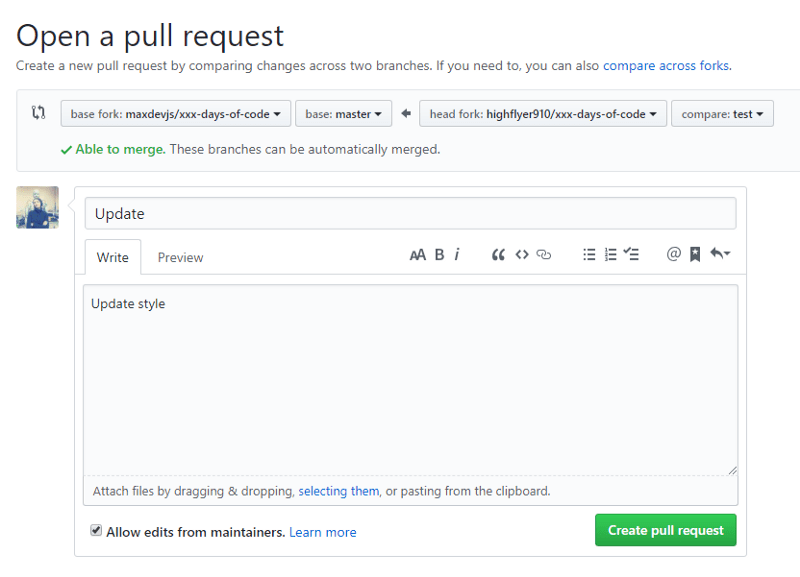
Write a title and in the comments section summarize the work you did. It might be helpful to write something like "This is my first pull request. Let me know if you have any feedback." Click Create pull request and leave the box checked that says Allow edits from maintainers.
The last step is to be patient and expect changes. Remember, it may take a little while before someone will review your work. After that, you might never get a response or you might get a negative one. Then you can try another issue, another project. And once your work is approved, it will be merged in! You did it! Now you have the skills to contribute to open source projects across the web. Congratulations!


Top comments (6)
This is a fabulous breakdown. Can't take this stuff for granted.
Thank you, Ben! :)
Simple but useful thanks.
Hey!
Just saw your article and put it on practice :)
My changes got approved and merged!!!
Thank you for this :D
Thanks a lot, i just started with GitHub thanks to your explanation
Thank you for the detailed explanation. This could be a great start for open-source beginners (like me).