
Thinking back to the stone ages of recruiting, before AI
Something you all may or may not know about me is that I found my way to tech through a very unconventional route: recruiting! No, I wasn’t recruited, I was the recruiter.
Back in the day, my claim to fame was that I was certified in Boolean logic searches. This came in handy when I used to work in government contracting. Very specific and rare combinations of a security clearance and one or many certifications were required for many of our hires. When I first heard about Algolia’s tools for AI-powered search, ranking, and recommendation, I thought back to those days I spent arduously searching for candidates. Naturally, I was curious to delve into what might be possible now that AI has the ability to superpower tasks that were once long and tedious.
With that in mind, join me as I explore some of the capabilities of Algolia! I chose to do this with VueJS, but that was nearly at random considering the vast number of language SDKs available, which you can see more here.
Just a brief note before we begin: the team at Algolia is paying me to explore the tool and jot down my unbiased experiences, so all of the opinions below are my own.
Building out some candidate data
Before taking a look at how Algolia tooling might facilitate a candidate search, I wanted to approximate some kind of candidate data. I came up with some logic that would represent a mix of skills and keywords that someone might search for. (I started this work with this boilerplate Vue project if you would like to follow along). I almost expected there to already be something like tech-ipsum or professional-ipsum that I could lean on for this task, but sadly I didn’t really find anything!
So to start with, at the root of my Vue project I created a small seed.js file with the following logic to generate some “candidates” for us.
// seed.js

const fs = require("fs");

const seedData = {
    weights: [2, 3, 5, 8],
    roles: ["backend", "frontend", "fullstack"],
    termMap: {
        backend: ["back-end", "python", "pytest", "django", "sql", "nosql", "redis", "AWS", "api", "ci/cd"],
        fullstack: ["full-stack", "python", "javascript", "css", "sql", "api", "ui", "html","databases", "typescript", "react"],
        frontend: ["front-end", "ui", "ux", "design", "accessibility", "css", "tailwind", "javascript", "react", "typescript" ]
    },
    titles: [
        "software engineer",
        "senior software engineer",
        "software developer",
        "programmer",
        "software development engineer"
    ],
    randomAchievements: [
        "Led adoption of ",
        "Increased throughput of systems using ",
        "Introduced quality standards for ",
        "Enhanced testing of ",
        "Coached more junior employees in ",
        "Recognized subject matter expert for ",
        "Led research effort on improvements to our ",
        "Decreased bugs by 50 percent related to ",
        "Created platform with ",
        "Spearheaded workshops to train colleagues in "
    ],
    candidateList: []
}

function getRandomArrayItems(items, quantity) {
    let randomItems = []

    for(let i=0; i < quantity; i++) {
      randomItems.push(items[Math.floor(Math.random() * items.length)]);
    }

    return randomItems;
}

function generateCandidateData() {
    // Silly little function to generate some candidate profiles
    let candidates = [];

    for(let i=0; i <= 10; i++) {
      const weight = getRandomArrayItems(seedData.weights, 1)[0];

      seedData.roles.forEach(role => {
        const achievementList = getRandomArrayItems(seedData.randomAchievements, weight);

        let profile = {
          title: `${role} ${getRandomArrayItems(seedData.titles, 1)[0]}`
        }
        let achievementsWithTechKeywords = []

        achievementList.map(achievement => {
          achievementsWithTechKeywords.push(
            `${achievement} ${getRandomArrayItems(seedData.termMap[role], weight).join(", ")}`
          );
        })

        profile["resume"] = `${achievementsWithTechKeywords.join(". ")}.`;
        candidates.push(profile);
      })
    }
    seedData.candidateList = candidates;
};

function writeCandidateData() {
    fs.writeFile("./candidates.json", JSON.stringify(seedData.candidateList), err => {
        if(err) console.error(err);
    })
};

generateCandidateData();
writeCandidateData();
Moving over to my terminal, I’m going to run this logic quickly to generate a file of JSON we can then use with Algolia by running node seed.js .
Looking over to my code editor, I now have a candidates.json file full of slightly nonsensical but vaguely tech-resume-esque data, with a small sample pictured below.

Not necessarily anyone I’m going to hire onto my team tomorrow but a fair enough approximation to start with. On to the star of our show, Algolia!
Getting started with Algolia
If following along, go ahead and create a free account with Algolia for what comes next. We’ll walk through their easy “getting started” wizard and first create an index called candidates.

I’m going to plug in the JSON file we’d previously created, although Algolia also offers an API client that would make this task also super easy programmatically too.

On submitting, we are redirected to the dashboard where we can now see our data listed.

Exploring some of the fun options we get with Algolia
When you get to this point some getting-started-tips in an overlay will quickly prompt you to explore some of the cooler options that this tool makes available, including the customization options. To start with, we can choose to ignore or include attributes. For a start, I’m including both resume and title.

Why is this option cool? Well, I would definitely have benefited from the option to ignore title on occasion in my candidate searches. In my first recruiting job we worked for this terrible client that had all of their IT support roles under an extremely bland title like Support Services Technician or something equally nondescript. It didn’t take me long to learn that the resume keywords were going to be a much better proxy for fit than anything related to titles. This level of control would have helped me there. You also could potentially configure this type of search as part of an Applicant Tracking System (ATS) to assist with anonymizing parts of candidate profiles, to reduce any element of bias. One instance might be that if our data were structured to include fields for Education and Year Completed, you could ignore the year in to reduce the potential for ageism. Algolia explains more about the benefits of customized attributes here, if you’re curious!
We also get the option to customize the fields most relevant in ranking. Since I’m experimenting here, I’m going to set ranking to be exclusively tied to that resume field. My hypothetical scenario here is that I would be more interested in a match on Python skills than getting hung up on whether someone was a Software Developer vs Software Engineer. This side-steps the title field we created for our data.

One last option here that I would have KILLED for when I recruited is best understood through a little backstory.
When I did government recruiting it was extremely common for people to have “synonymous” credentials, or certifications or status indicators that made a HUGE difference in their hirability but were not always expressed clearly. One example is the CompTIA certification Security +, which many people working in government contracting get trained for and certified in on the job through a Department of Defense directive (8750, specifically). Some of these people are so neck-deep in their world that they do not optimize their resume for search, so you might only find them list the directive that required their certification. Algolia has the option to create a list of synonym keywords that could have saved me from long arduous searches like security AND (engineer OR specialist OR analyst) and (8750 or "Security +" or "Security+) and so on and so forth. The synonym option is super easy to use, pictured below:

A mini candidate search prototype
To apply some of these cool options, I went through building a simple approximation of a candidate search page on that sparse skeleton of a Vue app I linked earlier. Feel free to skip this, but I hacked together a small amount of CSS to make this look reasonable, in the <style></style> tags of our App.vue file:
// App.vue

<style>
button.ais-SearchBox-submit,
button.ais-SearchBox-reset {
  display:none;
}

input {
  margin:2em;
}

html {
  background-color:#edeff5;
  margin:4em;
}

h3 {
  color: #3c4fe0;
  letter-spacing:.04ch;
}

h5 {
  font-family: Arial, Helvetica, sans-serif;
  letter-spacing:.03ch;
  color:#5a5e9a;
  line-height: 0.4rem;
  margin:2.5rem;
}

span#header {
  display:flex;
  justify-content:space-between;
}

span#header img {
  height:25px;
  width:25px;
}

div.searchResults {
  background-color:white;
  padding:3rem;
  margin:2rem;
}

.ais-SearchBox-input {
  /* background-color: white; */
  height:45px;
  width:100%;
  margin:0px;
}

.ais-InstantSearch {
  width:50%;
  margin:auto;
}

.ais-Hits {
  margin-top:1rem;
}

.ais-Hits-item p{
  font-size: 1.5rem;
  margin:0rem 2.5rem 1rem 2.5rem;
  line-height: 2.25rem;
}

.ais-SearchBox-form {
  background-color: inherit;
  margin-bottom:2rem;
  height:8rem;
}
</style>
And in the <head></head> section of our public/index.html, linked this minimal CSS framework I like, Wing:
<link rel="stylesheet" href="https://unpkg.com/wingcss"/>
Adding Algolia’s UI elements
I wish I could make my effort on this part sound more interesting, but truly the options here made connecting this minimal UI to Algolia relatively effortless. For search, Algolia offers a number of UI libraries including one for Vue. You can check out some of the others here.
🛑 ✋ A quick note: We’re about to stick our Algolia API key in a
.envfile. That’s completely alright if you’re confident that you haven’t given this particular API key any dangerous permissions. It’s a good thing to check before we start, if you haven’t already.
With that said, to get these values, head to the main dashboard menu tab for API Keys. Here, we’ll want to grab our application ID and search-only API key.

Heading back to the terminal, we’re going to run the following commands to install our needed Algolia packages.
npm install algoliasearch vue-instantsearch --save
We then are going to bind that to our Vue instance, over in main.js.
// main.js

import Vue from 'vue'
import App from './App.vue'
import './registerServiceWorker'
import InstantSearch from 'vue-instantsearch'; // new import

Vue.use(InstantSearch); // now bound to Vue

new Vue({
  render: function (h) { return h(App) }
}).$mount('#app')
Now let’s introduce some changes to App.vue to accomplish a few things:
- We are going to use are markdown section to use pre-made search widgets available through this library which are super convenient
- We’re going to use the JavaScript logic to connect to our previously uploaded data and supply our records
First, let’s update the <template></template> section of App.vue to now include the search and display widget Algolia has handy for Vue.
// App.vue

<template>
  <div>
    <center><h3>Turbocharged searches with Algolia</h3></center>
    <ais-instant-search :search-client="searchClient" index-name="candidates">
      <ais-search-box id="searchInput"/>
      <ais-hits>
        <template v-slot="{ items }">
          <div
            :id="item.objectID"
            class="searchResults"
            v-for="item in items"
            :key="item.objectID"
          >
            <span id="header">
              <h5>{{ item.title }}</h5>
            </span>
            <br/>
            <p>{{ item.resume }}</p>
          </div>
        </template>
      </ais-hits>
    </ais-instant-search>
  </div>
</template>
Next, in the <script></script> section, let’s add the connection to our Algolia index.
<script>
import algoliasearch from 'algoliasearch/lite';

export default {
  data() {
    return {
      searchClient: algoliasearch(
          process.env.VUE_APP_ALGOLIA_APPLICATION_ID,
          process.env.VUE_APP_ALGOLIA_SEARCH_API_KEY
        ),
    };
  },
};
</script>
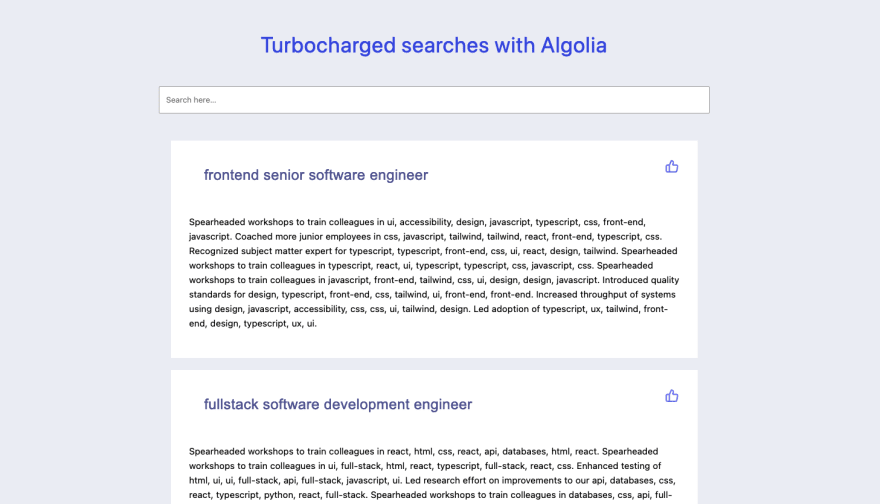
Then finally, back in the terminal, if you kick off npm run serve and head to the browser, you should now get a simple search UI like seen below, tying all these pieces together:

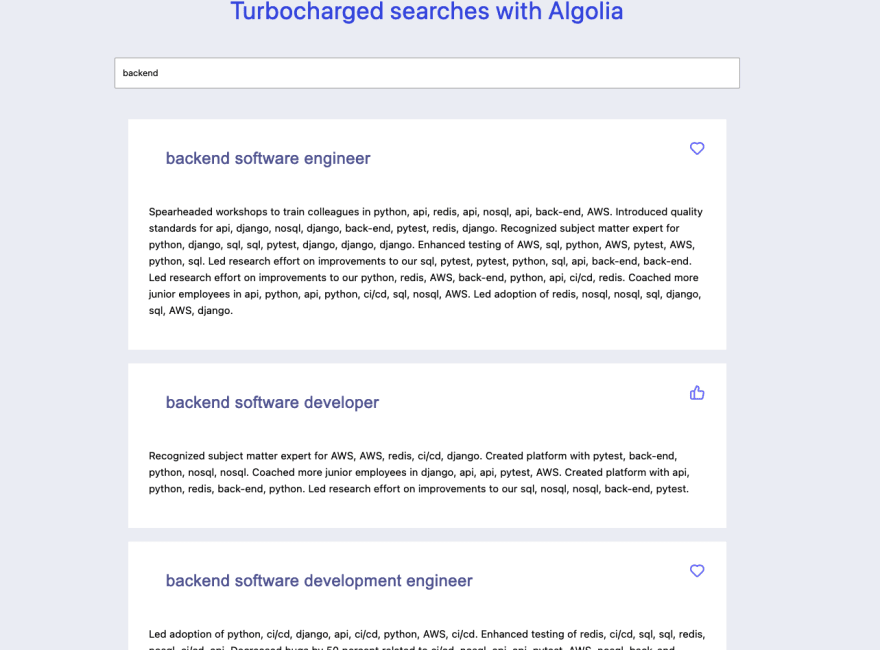
We can confirm the search and filtering capabilities are doing their thing by entering some criteria, you can see how mine changed when I typed “frontend”.

And that’s it! With truly, a few simple steps and maybe less than twenty minutes work, we have made a prototype which — simple as it looks — is leveraging the search configuration options we selected earlier and the underlying artificial intelligence that comes baked in to the Algolia search product.
Bonus: add event insights!
If I imagine myself using this tool for this purpose, I realize that there also might be a scientific way to analyze the usage of my fictitious candidate search engine. For that to work, we might want some kind of tracking related to what candidates a recruiter drills down into for further review, or many candidate search applications will also let you “favorite” candidates.
To approximate that behavior, I decided to also make my search work with Algolia event insights. This area of functionality lets you track numerous events, be it clicks or favorites, that could further improve relevance of the search results shown to users. For more background on how to get started with events and Algolia, you can find that here.
To start, we are going to make some updates in App.vue which do a few things:
- import the event/insight library from Algolia
- connect the API client to our API credentials, so events will be sent back to the correct data respository, the one housing our candidate records
- attaches the insight client to our search widget from a previous step
- create simple logic to display icons, where clicking an icon “favorites” a candidate, and kicks off an event being sent
The revised sections of App.vue are as seen below:
// App.vue

<template>
  <div>
    <center><h3>Turbocharged searches with Algolia</h3></center>
    <!-- new :middlewares argument connects the insight client to our search widget -->
    <ais-instant-search :search-client="searchClient" index-name="candidates" :middlewares="middlewares">
      <ais-search-box id="searchInput"/>
      <ais-hits>
        <template v-slot="{ items, sendEvent }">
          <div
            :id="item.objectID"
            class="searchResults"
            v-for="item in items"
            :key="item.objectID"
            @click="sendEvent('click', item, 'Item Starred')"
          >
            <span id="header">
              <h5>{{ item.title }}</h5>
              <img
                :id="`img-${item.objectID}`"
                src="https://i.imgur.com/5Je2dmA.png"
                @click="favorite(`img-${item.objectID}`)"
                alt="thumbs up"
              />
            </span>
            <br/>
            <p>{{ item.resume }}</p>
          </div>
        </template>
      </ais-hits>
    </ais-instant-search>
  </div>
</template>

<script>
import algoliasearch from 'algoliasearch/lite';
// new imports contain what we need to support sending events
import { createInsightsMiddleware } from 'instantsearch.js/es/middlewares';
import aa from 'search-insights';

// reconnecting to the API, so our events/insights go to the right place
aa('init', {
  appId: process.env.VUE_APP_ALGOLIA_APPLICATION_ID,
  apiKey: process.env.VUE_APP_ALGOLIA_SEARCH_API_KEY
});

// fictitious user token lets our "favorites" be tracked to me
aa('setUserToken', '32f32sfds94s032dfjskal')

const insightsMiddleware = createInsightsMiddleware({
  insightsClient: aa,
});

export default {
  data() {
    return {
      searchClient: algoliasearch(
        process.env.VUE_APP_ALGOLIA_APPLICATION_ID,
        process.env.VUE_APP_ALGOLIA_SEARCH_API_KEY
      ),
      middlewares: [insightsMiddleware]
    };
  },
  methods: {
    favorite(id) {
      // simple logic flips the icon, for a visual indicator of "favorited" candidates
      const icon = document.getElementById(id);
      icon.src = "https://i.imgur.com/j635pgy.png";
    }
  }
};
</script>
If we return to our browser now, we see the following:
If we were to simulate doing a real search, and “favoriting” some results, we’d see hearts on our selected candidates (instead of the thumbs-up icon).
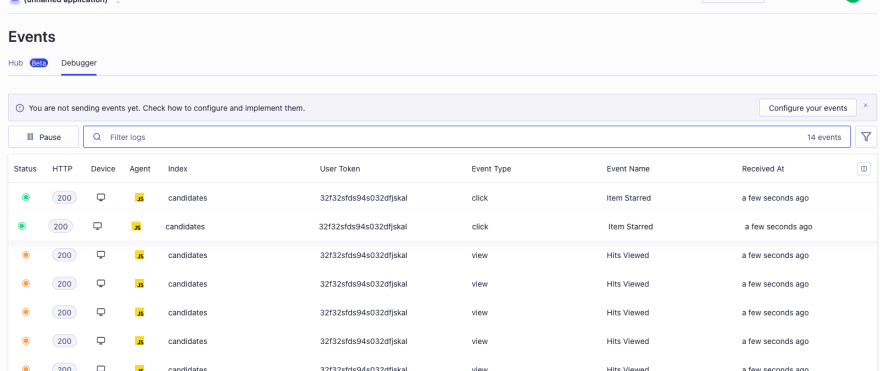
And if we return to our Algolia dashboard (the URL is https://www.algolia.com/apps/<your application id>/events/debugger) we can now see events being sent back!
In closing
Honestly, between learning how to use web scrapers and now the knowledge of how easy it is to set up a robust, customizable search UI with Algolia, maybe some parallel-universe version of me is still in recruiting and specializes in building in-house candidate search tools. But the truth is, even out of the tiny niche of recruiting, I can think of limitless applications for search tools this convenient that come AI-powered by default. Thanks for making it this far, and I’d love to hear your ideas for applications of Algolia in the comments! 🤓


Oldest comments (0)