The new Windows 11 has been released recently, and many of those who were eager to install it or upgrade from Windows 10 faced the error saying that this PC doesn’t meet the minimum requirements for Windows 11. Read this article to find out how to fix this issue and how to install the new operating system without the TPM and Secure Boot.
The first build of Windows 11 is already available to members of the Windows Insider program (Windows insider Preview). However, most computers fail to meet the minimal requirements for this operating system as they lack the TPM (Trusted Platform Module) component.
This module is used for data encryption, user authentication, hardware antivirus protection, and so on. Most likely, Windows 11 uses the TPM features to encrypt the computer’s hard disk and protect your data reliably against unauthorized access. If you’re thinking about installing Windows 11 on your computer, keep that in mind. When you try installing Windows 11 to a computer without TPM 2.0, you’ll see this error message saying “This PC can’t run Windows 11.” But never mind this error: I’m going to show you a workaround that disables the TPM and Secure Boot check.
YouTube:
How to get round the TPM 2.0 and Secure Boot requirement in the installer registry
Let’s start with the simplest things. For the first method, you will only need an ISO image of Windows 11. We’re going to disable the TPM and Secure Boot check in the registry before actually starting the installation from the preinstallation environment.
Modern versions of Windows usually boot a minimal version of the operating system known as Windows Preinstallation Environment. It loads a set of drivers required for a particular computer and then launches the main installer.
At this stage of installation, you can edit the registry so that the installer will never check the computer for TPM and Secure Boot. Here is how you can do it:
Make sure you have an empty drive to install the operating system.
Boot your computer from a Windows 11 bootable pen drive. You should have no difficulties in finding an ISO image of this operating system on the Internet. If necessary, you can watch a video on how to create a bootable pen drive with Windows 10 – the steps are absolutely the same, and the only difference in your case would be the ISO image name.
YouTube:
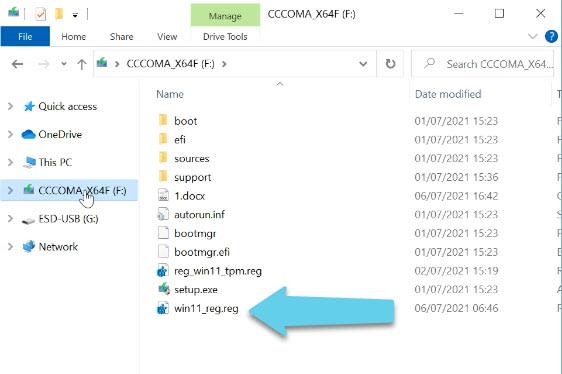
When the pen drive is ready, you have to add a REG file which is supposed to disable the TPM check.
Right-click on your desktop and create a new text document. Choose a random name for the document, and then open it.

Type this code:
Windows Registry Editor Version 5.00
[HKEY_LOCAL_MACHINE\SYSTEM\Setup\LabConfig]
"BypassTPMCheck"=dword:00000001
"BypassSecureBootCheck"=dword:00000001
This REG file is used to add to the registry the keys which help you pass the TPM 2.0 and Secure Boot check. After that, you’ll be able to continue with installing your Windows as if nothing happened.
Save the document and then change its extension from .txt to .reg.

If file extensions are not shown, open the File Explorer, click on the View tab and check the box next to File Name Extensions, and then all extensions will become visible.
The .reg file you have just created should be copied to your bootable pen drive containing Windows 11 - and you can copy it right to the root folder.
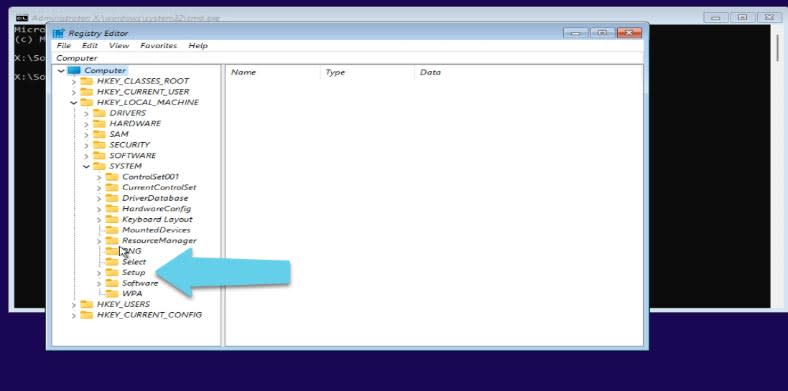
After booting from the installation USB drive, at the stage of choosing the language, time format and input method, press the key shortcut Shift+F10 to start the Command Prompt. One more thing you will need is to start the Notepad application: do it with the simple command - notepad.

The program window will open immediately. Then click “File” - “Open”.

Select “All Files” in the file type menu, and then give the path to the reg. file which is now on your USB drive, right-click on it and select “Merge.”

In the warning window, click Yes and then OK. After that, close the Notepad window, the Command Prompt window, and go on with the installation.
How to add registry settings manually
Also, this can be done manually, and without creating a separate .reg file.
In the Command Prompt, type regedit to open the registry instead of the Notepad.

Then follow this path:
HKEY_LOCAL_MACHINES\SYSTEM\Setup\
Right-click on the Setup folder - New Key, and give it the name - LabConfig.

Open this key, and in the right side of the window, right-click - select New - DWORD value - and name it as BypassTPMCheck. Open it and set the value data to “1,” then click OK.
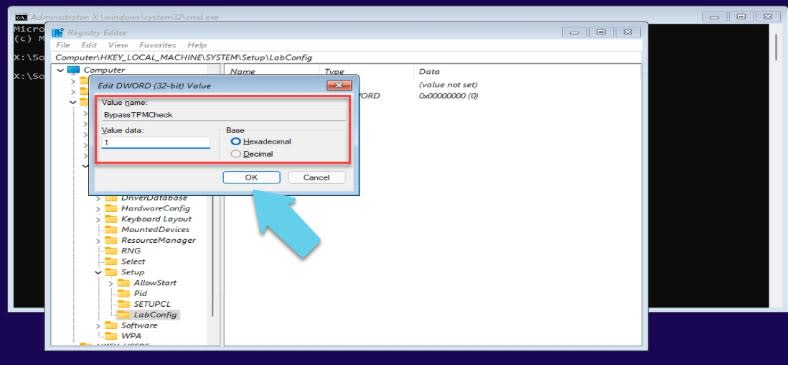
Create another value with the name BypassSecureBootCheck, change its value data to “1,” and click OK. Now close the registry and continue the installation.

How to install Windows 11
Click Next, and then “Install Now.” After that, a standard Windows installation process begins, and it looks absolutely the same as if you were installing Windows 10. This is when you’re asked to enter a product key and activate your Windows; if you have no key to use, click “I don’t have a product key.”

Select the operating system version and click Next again. Accept the License Agreement.

In the next window, select the installation type. Choose the disk where to install Windows and click Next; the installation process starts. When it’s over, reboot the computer.

After that, settings will be applied and the installation finalized. Select your region, country, and preferred keyboard layout. If necessary, you can add more layouts later.

Now wait a bit while the operating system is checking for updates.

At this stage, select the configuration to be applied to your device: it’s either for personal use or for work and school.

If you already have a Microsoft account, sign in; if you don’t, it’s a good chance to finally create one. Otherwise, select Sign-in options below, click on Offline account, skip for now, then type the username and the password, and then click Next.

Then the operating system will finish with the settings and boot. This is the last step of the Windows 11 installation process.

How to upgrade Windows 10 to Windows 11 without TPM
If you’re trying to upgrade to Windows 11 from the copy of Windows 10 that you are already using, and you get an incompatibility warning, there is one file to be replaced in that ISO image. To have things done, you need a Windows 10 image first.
Open the bootable drive with Windows 11 that you have previously created, and open the sources folder.


Top comments (1)
The following steps are necessary to remove requirements error "This PC can't run Windows 11" when attempting to install Windows 11
you can bypass the CPU / TPM Check by adding DWORD to registry in the below mentioned path.
Computer\HKEY_LOCAL_MACHINE\SYSTEM\Setup\MoSetup
Add DWORD with the value name as AllowUpgradesWithUnsupportedTPMOrCPU and Value data as 1.
Download the Windows 11 iso from official website and mount in Virtual Drive using PowerISO or similar application.
Then RUN the windows 11 setup from the virtual Drive and follow the process. you are good to go with windows 11
*Make sure the secure Boot is enabled in BIOS.