Part 1: Getting started with the command line
The command line can seem like a daunting tool for anyone who’s looked over the shoulder of their favorite software developer to see them hammering away commands full of underscores, dashes, and oddly specific decimal numbers. It’s a powerful tool that can be used to transverse, manipulate, and configure various aspects of a computer, but it has a lot of practical uses as well. The command line is the lightsaber of your computer: an elegant tool from the past that, used correctly, can slice through knotty problems in a trice.
When you’re starting out as a developer, it’s common to just copy and paste a few lines as needed into the terminal to install Node (or Python or Ruby) or run a local server for your site, and if this is what you’ve done so far, this guide is for you!
As you get a bit more advanced, you’ll find most developers use the terminal for lots of things. One of the ways it comes up as you get a bit more experience is when making updates to a git repository. There are graphical tools to push to a git repository that don’t require the command line, but if you want to fit in with the smart ladies on your dev team, it’s a great tool to know how to use.
Beyond basic git, the way I use the command line every day is the Heroku CLI. I get great insight into how my dynos are performing, what errors they’ve hit, and I can make updates -- all from a clear interface. My next post will be specifically about using the command line to work with Heroku.
Some housekeeping: defining ‘the terminal’
This tutorial will refer to this ‘thing’ as the terminal:

What is this thing? Technically in my case it’s the macOS terminal running a shell called Bash. It’s Bash that gives me access to the other commands I need - in particular, commands that are provided as part of the operating system, and other commands that I might have installed. Bash is a command-line interface or just referred to as ‘the command line.’
So technically when you finish the next part of this tutorial and you’re using the Heroku Command Line Interface (CLI), you’ll be using a CLI (Bash) to use a CLI (Heroku).
Thankfully the purpose of language is to be understood, so I’ll refer to the general command line that lets us run whatever we want ‘the terminal’ and when we get to Heroku-specific commands I’ll call that ‘The Heroku CLI’
Getting to the command line on Mac and Windows
Getting to the command line should just take 2-3 clicks on both macOS and Windows.
In macOS, the command line program is called “Terminal”. Open Launchpad and type “terminal” into the search bar at the top. Similarly, you can use Spotlight to find the Terminal by clicking the magnifying glass icon at the upper right hand side of the screen, and perform the same search. If you prefer to navigate the file system, you can find the Terminal in the “Other” folder.
On the Windows side, you can get to the command line by opening the aptly-named “Command Prompt” program. Like macOS, Windows has a system-wide search that you can use to quickly open it. Similarly, you can find Command Prompt in the “Apps” menu. This article primarily focuses on using the command line on macOS, but most of the commands are universal and work on both operating systems.
a bit of history
Until quite recently, most of the commands like those you’ll see in the rest of this tutorial (which are Unix commands),didn’t work or didn’t work the same way in Windows. However recent updates to Windows 10 have made things much more similar. If you have an older Windows install you can still probably get these features by grabbing Windows Powershell, a free offering from Microsoft.
Navigating directories
Here are a few of the basic commands that can be used to navigate through directories with ease.
ls
ls is short for list. Like the name implies, this will list all of the files and folders within the directory that you have open. If you run this in the home directory, you’ll probably see things like “applications”, “desktop”, “downloads”, and so on.

The contents of my home directory
cd [directory name]
cd stands for change directory. You can use this to move between the directories outlined above. For example, cd desktop will take you to your desktop. You can run the cd command followed by any of the folder names that pop up when you run ls.
cd ..
If you navigate into a directory and want to go back, use cd .. to move back up. In this case, running cd .. from the desktop will take you back to the home directory. And if you want to go back to the home directory from wherever you are cd will take you there.
Wait, where are we right now? pwd
pwd stands for ‘print working directory’ by which we mean print it out in our terminal. This will show the path where you’re currently working.

The title bar on my macOS terminal shows the directory I’m in currently, but pwd can be a useful command nonetheless, since it prints the whole path.
Looking into a file with less
Once we’ve found a file by browsing around with the commands above, we’re often going to just open it with whatever application we’d normally use. In fact typing open [file name] will open the file with whatever the default application for that type is. But to stick with the command line a bit, and to make sure we can handle some more advanced situations, let’s use less.
I like to start these explanations by explaining why the command has its name. Sadly less is named that because it’s a significantly improved version of the command more, so like so many concepts in the terminal, it’s a term with less a ‘meaning’ and more an ‘origin story’ 😄.
If we run less [file name], our terminal changes. We no longer see a list of our previous commands, instead the whole screen is filled with the contents of the file whose name we entered. Also we can’t type commands like cd any more.
This is something we haven’t encountered before: a command that changes the terminal to show the terminal’s version of a ‘full-screen’ interface. While in less there are two keys you need to remember: (If you are an experienced Linux user reading this who wants to tell me of a bunch more keys: why on earth have you read so much of this very basic tutorial???)
Arrow keys: Let you scroll up and down in the file (space will hop you forward a whole page)
q : to quit less and get back to the command line
Also, the / key is super useful, letting you find text in the document.
Getting help
man [some command]
We very often find answers as programmers by googling, and on sites like Stack Overflow the fix for your problem is often given as a single long command, e.g. ‘Oh just run bundle exec jekyll serve -lo and it will work perfectly.’ But what do those individual commands do?
The good news is that each command should have a file that describes what it does, and we get there by typing man [command].
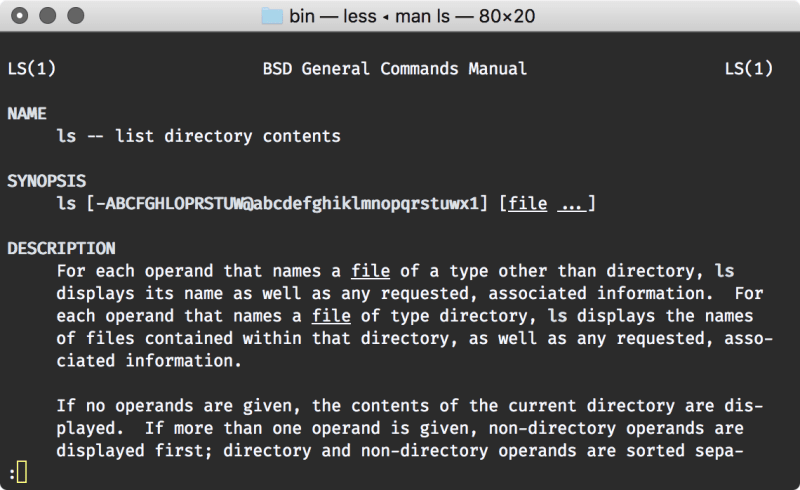
The man page for ls
Just like when we ran less above, the interface for man is full-screen, and uses the same keyboard commands as less (arrows to scroll, space to go forward a page, and q to quit).
Okay, but a reality check: man pages are often intended for adding detail for those who know well how a command works and not the beginner. It’s a good idea to skip ahead to the EXAMPLES section of the man page. I often google a command to see some posts about how it works written for someone who’s never used it before.
Getting help with a command that’s hard to google
It’s a bit silly, but commands like curl can be hard to google, unless you want hairstyling tips. In that case, googling ‘man curl’ will get you what you need. I feel the results are far more helpful for a beginner than running man curl from the command line.
Keep in mind that the answers you get via google may not be for your exact version of the command _nor _even for the same operating system. Once you’ve googled enough to know basically what the command does or is supposed to do, if you need to get very specific with the functionality, it’s probably time to go back to the man page.
More useful tips, tricks, and commands
Using the “up” arrow key to access previous commands
You can use the up arrow key to scroll through your previous commands with ease. This can be helpful in a variety of cases. If you get deep into a file system and want to get out, you can type in cd .. and use the up key to access that command multiple times until you’re back to your desired directory.
Using “tab” to autocomplete file names
Surely you don’t want to type cd extremely-long-folder-name-here every time you navigate to your Extremely Long Folder Name Here directory, right? Luckily, you can skip the heavy lifting by typing in the beginning of the directory name and using tab to fill in the rest. In this case, you could type cd extre and hit the tab key to fill in the rest. This obviously requires some maneuvering if you’ve got multiple folders with similar names, but it’s a valuable tool nonetheless.
Using open . to view the contents of a directory in a finder window
Imagine you’re deep into a series of folders and come across one that needs some help. Some files need to be renamed, you need to add a blank document, and so on. This can all be done in the terminal, but it can be a huge pain if you’re not a master at using the command line yet. Some tasks are easier in Finder, which can pop open the directory you’re in if you simply run open .
Putting it all together
The command line is a versatile, powerful tool and it is a hugely important utility in the realm of software development. Even if you’re not interested in being a developer, it can be helpful to know the basics of the terminal so that you can navigate your computer and accomplish straightforward tasks with ease. Having some proficiency with the command line can also help you take advantage of some key Heroku features, which will be touched on later. With some practice, you’ll be a command line expert in no time!


Top comments (0)