Deal with it, security is difficult and it can be the most complex piece in our applications. Because of this, many of us tend to leave it for last, if we ever implement it.
- JWT
- Cookies
- IdP
- Authentication
- Authorization
- Password reset
- Email confirmation
- Etc...
It can be too much to do it by ourselves.
So, why don't leave it to someone who knows about that complex world and can bring us a complete authentication and authorization platform?
That would make our lives less difficult.
Enters Auth0
As per Auth0 site:
Auth0 provides a universal authentication & authorization platform for web, mobile, and legacy applications.
Auth0 will take care of all the complex duties and you only need to take care of the integration.
Better of, a library already exists that facilitates its integration with Blazor.
Blazor.Auth0
Disclaimer: Author here.
Blazor.Auth0 Is a library for using the Authorization Code Grant with Proof Key for Code Exchange (PKCE) with Auth0's Universal Login in Blazor SPAs.
The idea behind this is to have an easy way of using Auth0's services with Blazor (especially the client-side) without relying on javascript libraries.
Blazor Requirements
Blazor is evolving rapidly, especially on the client-side, so you will need to fulfill some requirements before starting to work, the best place to find the latest steps for preparation will always be the official Blazor website
Note: Visual Studio 2019 16.4 Preview 2 or later is a must for working with Client-Side applications (at the time of writing this).

Creating the Blazor Client-Side App
If you are in the command line, you should use the .Net Core CLI:
$ dotnet new blazorwasm -o your_awesome_app_name
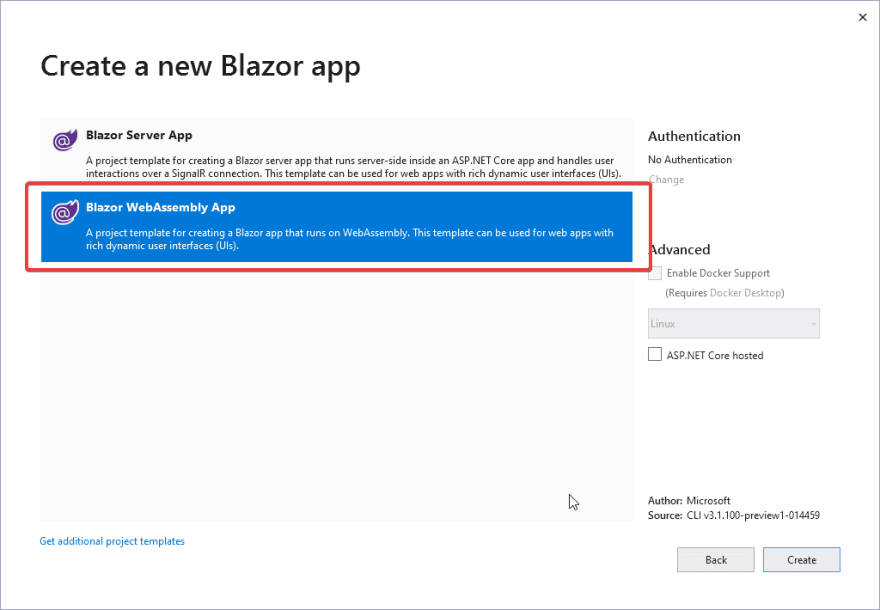
If you are using VS 2019, please select Create a new project, look for Blazor App, give a cool name to your project and click on create.
Be sure to select the correct project template, in this case, we'll be working on a Client-Side application, so you need to select Blazor Webassembly App
Configuring the Blazor Client-Side App
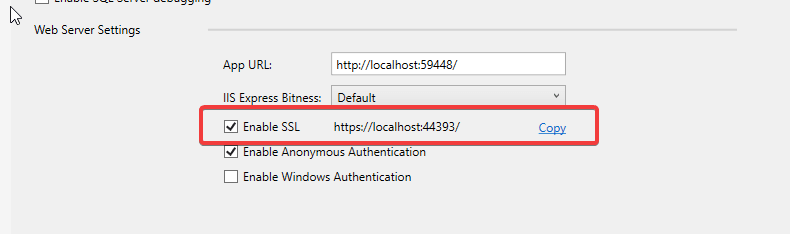
First, you'll want to enable the SSL support, it can be activated by checking the Enable SSL checkbox in the application's properties page.
Please take note of the generated SSL URL as you'll need it when configuring Auth0.
Now install the Blazor.Auth0 library via the NuGet Package console by running the following command:
$ Install-Package Blazor-Auth0-ClientSide -Version 2.0.0-Preview2
Another option is opening the Nuget Package Manager, look for Blazor-Auth0-ClientSide and click in install.

Once Blazor.Auth0 is installed, you need to register the AuthenticationService via Dependency Injection, to do it, edit the Startup.cs file as follows:
    using Blazor.Auth0;
    using Microsoft.AspNetCore.Components.Builder;
    using Microsoft.Extensions.DependencyInjection;

    namespace Examples.ClientSide
    {
        public class Startup
        {

            public void ConfigureServices(IServiceCollection services)
            {
                services.AddBlazorAuth0(options =>
                {
                    options.Domain = "[Auth0_Domain]";
                    options.ClientId = "[Auth0_Client_Id]";
                    options.RequireAuthenticatedUser = false;
                });
                services.AddAuthorizationCore();
            }

            public void Configure(IComponentsApplicationBuilder app)
            {
                app.AddComponent<App>("app");
            }
        }
    }
services.AddBlazorAuth0 is a helper method that will register the required ClientOptions settings, AuthenticationService, and AuthenticationStateProvider.
An optional but recommended step is to add the following import statements in _Imports.razor
    @using Microsoft.AspNetCore.Authorization
    @using Microsoft.AspNetCore.Components.Authorization

    @using Blazor.Auth0
    @using Blazor.Auth0.Models
    @using Blazor.Auth0.Models.Enumerations
This will expose these namespaces globally in our Blazor App
Replace the content of App.razor with the following:
    <Router AppAssembly="@typeof(Program).Assembly">
        <Found Context="routeData">
            <AuthorizeRouteView RouteData="@routeData" DefaultLayout="@typeof(MainLayout)">
                <Authorizing>
                    <p>>Determining session state, please wait...</p>
                </Authorizing>
                <NotAuthorized>
                    <h1>Sorry</h1>
                    <p>You're not authorized to reach this page. You may need to log in as a different user.</p>
                </NotAuthorized>
            </AuthorizeRouteView>
        </Found>
        <NotFound>
            <p>Sorry, there's nothing at this address.</p>
        </NotFound>
    </Router>
That way you'll display the appropriate content depending on the current authentication state.
More important is, the AuthorizeRouteView component will Set up the
Task <AuthenticationState> cascading parameter.
Replace the content of MainLayout.razor with the following:
    @inherits LayoutComponentBase
    @inject Blazor.Auth0.IAuthenticationService authService

    <div class="sidebar">
        <NavMenu />
    </div>

    <div class="main">
        <div class="top-row px-4">
            <AuthorizeView>
                <Authorized>
                    <NavLink class="nav-link" href="" @onclick="authService.LogOut">
                        <span class="oi oi-account-logout" aria-hidden="true"></span> Logout
                    </NavLink>

                </Authorized>
                <NotAuthorized>
                    <NavLink class="nav-link" href="" @onclick="authService.Authorize">
                        <span class="oi oi-account-login" aria-hidden="true"></span>  Login
                    </NavLink>
                </NotAuthorized>
            </AuthorizeView>
            <a href="http://blazor.net" target="_blank" class="ml-md-auto">About</a>
        </div>

        <div class="content px-4">
            @Body
        </div>
    </div>
This will display a Login/Logout button in the top-bar for the users to start or finish their sessions.
The last view you'll need to edit is the Index.razor, replace its content with the following:
    @page "/"

    <h1>
        Hello,
        <AuthorizeView>
            <Authorized>@context.User.Identity.Name</Authorized>
            <NotAuthorized>World</NotAuthorized>
        </AuthorizeView>
        !
    </h1>

    Welcome to your new app.

    <SurveyPrompt Title="How is Blazor working for you?" />
The <AuthorizeView> component will detect the authentication state of the user and will display Hello, World in case there's no active user or Hello, [Name of the user] when a user is authenticated.
Configuring Auth0
If you don't have an Auth0 account already, please create one by navigating to Auth0's home page, hitting the Sign-Up button and following thru the account creation wizard, at the end of the process you'll end up in the dashboard.
Once there, select Applications then Default App to load the application settings page.
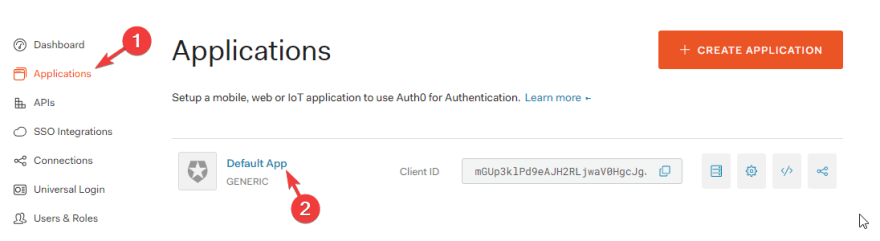
Then, look for the Domain and Client ID fields, and take note of them as you'll need them in the final step.

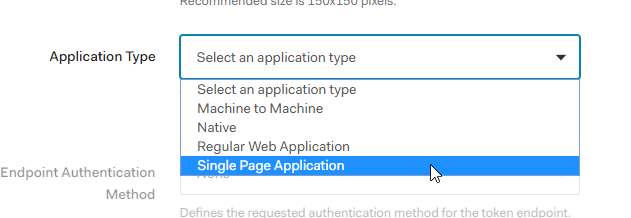
Next look for the Application Type field, expand it to see the different client application types supported by Auth0. Select Single Page Application
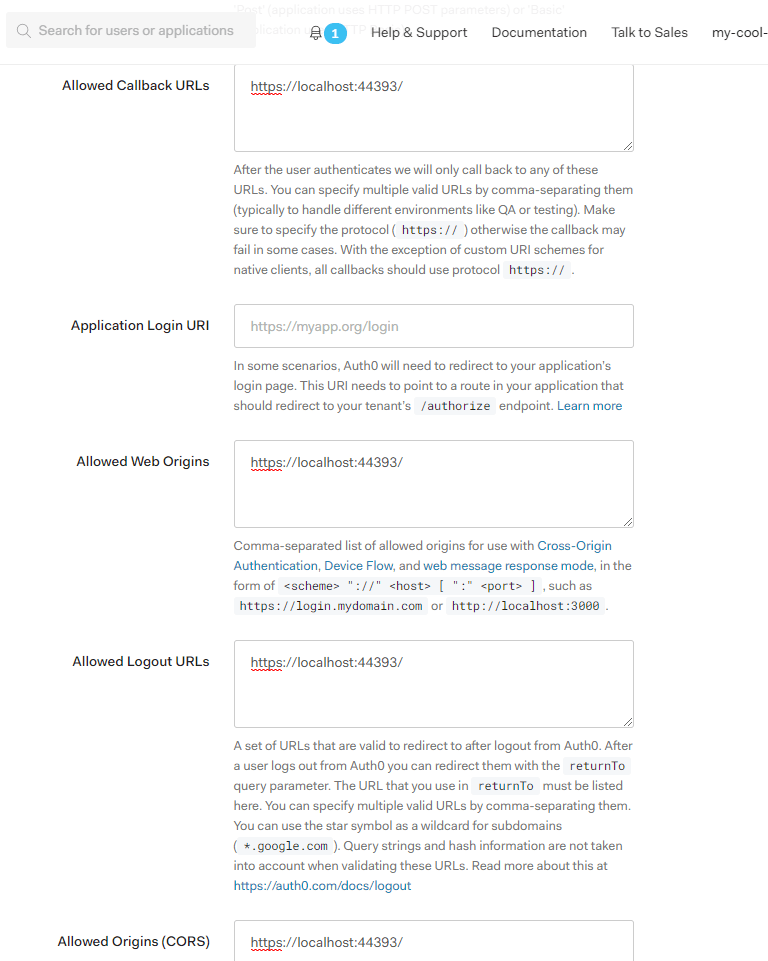
To finish with the Auth0 configuration you need to indicate the Blazor App SSL URL as one of the valid paths for Auth0 to allow the users to authenticate.
To do it, look for the following fields and add the application SSL URL to them.
Allowed Callback URLs:
To which URLs the user can be redirected to after login inAllowed Web Origins:
Which URLs are allowed to perform Silent LoginAllowed Logout URLs:
To which URLs the user can be redirected to after logging offAllowed Origins (CORS):
Which URLs are allowed to perform POST request to the Auth0 API
The SSL URL is the one obtained after activating the SSL checkbox in the Blazor application options page.
The final result should look similar to this:
With that we finished configuring our Auth0 account, now we need to go back to our code to give the last touch.
Back to Blazor
Go back to the Blazor application one last time and replace the [Auth0_Domain] and [Auth0_Client_Id] values in Startup.cs with the values that you've just got from Auth0's Application Settings page.
    options.Domain = "[Auth0_Domain]";
    options.ClientId = "[Auth0_Client_Id]";
Press F5 and enjoy!

Now you've completed the integration of a fully-fledged IDaaS platform into your Brand-new Blazor App, but this is just the beginning, you can take you Application Security to the next level, by implementing:
- RBAC (Role-Based Access Control)
- Claims Base Authorization
- SSO
- Social Connections
- Lots more!
I hope you've found this publication interesting, useful or learned something new from it.
Two more publications are in the works for covering Server Side and ASP.Net Core Hosted Scenarios, also, a more in-depth sight to the Blazor.Auth0 library internals and capabilities.
All comments are welcome, thanks for reading!


Top comments (7)
Henry, I'm running into an issue with this example. All goes well when I log in to the application, but when I click "Logout," the app is crashing with the following messages in the console (Chrome and Edge, both latest builds as of today) (see attached image) thepracticaldev.s3.amazonaws.com/i...
Would you let me know what version of the library are you using, please?
Update: I found the issue, It'll be corrected EOD today, sorry for the inconveniences.
Update 2: Fixed github.com/henalbrod/Blazor.Auth0/...
PD: This post will be updated in the following days too.
Same here :(
Having the same issue :(
Thanks for this awesome post.
This works on my localhost as you have described above. However, when I uploaded my Blazor wasm project on Azure, authentication part didn't work properly.
My problem is even though I am able to go to Auth0 Universal login page, after login it successfully redirects to my Azure app. But, my azure app still thinks its not logged in.
The only difference I found is, after successful callback, azure app is not calling /userinfo and /token apis compared to localhost. Please help me
A very nice work, good job and thank, However I have one question here, how could we surpass that universal login page of Auth0 directly to the social network provider of our choice using you package?
Would love to go with Auth0, but their Developer cost is huge compared to Auzure B2C.
For example for 50,000 MAU, Azure is FREE.
Auth0, for 50,000 users will cost you $12,118/yr.