When I first started learning Express, I was overwhelmed by all the new terms that I had to learn. I found myself having to learn about Node.js and Express, MongoDB and Mongoose, view engines, and middleware functions. Also, I realized that I needed to develop a sense of knowing which dependencies to use best for building my apps.
However, instead of succumbing to “Oh, my! What I’ve gotten myself into!” feeling I decided to take a deep breath and try to tackle one thing at a time, and started with Mongoose.
Hello Mongoose
I think the simplest definition to Mongoose is, it is a module/library that helps us connect to MongoDB, which is a NoSQL database system, to create and access data using more readable, easy to manage schemas and queries.
Five main steps we take to start working with Mongoose:
- Define/design your models.
- Connect to MongoDB.
- Create Schemas.
- Make models of these schemas.
- Use these models to create (or then update or delete) the documents (records) you want to store in the database.
Step 1: Define your Models
When we build an app we need to define what kind of models we should have based on the app we are building. Then we need to specify the properties that we need for each of these models.
Here, we will define two models for a tiny, little blog app, User and Post.
For User, the properties are username and email.
For Post, the properties are title, content, author, and created_at.
Step 2: Connect to MongoDB
I am using MongoDB Atlas for this step.
After signing up, choose Create a Cluster.

Click the Create Cluster button (the one fixed at the bottom).
Wait a few minutes for the cluster to be ready and then click CONNECT.

Click the Allow Access from Anywhere button.

Click the Add IP Address button.

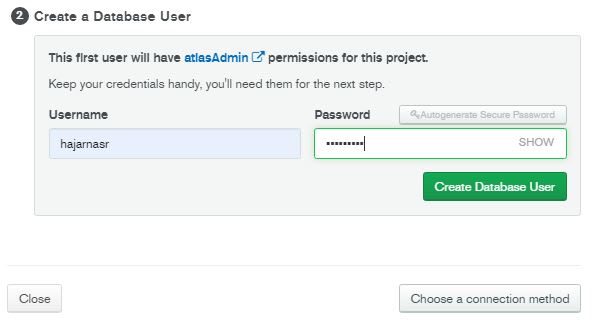
Add a username and password to your database and click Create Database User and then the Choose a connection method button at the bottom. We will need the username and password to connect to the database later.
Click Connect your application

Then Copy and save the link somewhere.

Note: Replace <username> and <password> with your database username and password. And since we did not name the database, replace <dbname> with the default namecluster0.
// here's how my link looks
/*"mongodb+srv://hajarnasr:mydbpassword@cluster0.cszse.mongodb.net/cluster0?retryWrites=true&w=majority" */
Now let us write some code.
cd to your project, yarn init and then yarn add express mongoose nodemon.
Create app.js at the root of your project.
// app.js
const express = require("express");
const mongoose = require('mongoose');

// initiate an express app
const app = express();

// The link to the database. Note that this link should be in a .env file to make it more secure.
const MongoUri = "mongodb+srv://hajarnasr:mydbpassword@cluster0.cszse.mongodb.net/cluster0?retryWrites=true&w=majority";

// connect to the database
mongoose.connect(MongoUri, {
                           useNewUrlParser: true,
                           useUnifiedTopology: true
                        },
                        (err)=>{
                            err?
                              console.log(err)
                            :
                            // let me know when the database is connected
                            console.log("Connected successfully!")
                       });

// add a root route to the app and send "Hello Mongoose"
app.get("/", (req, res)=>{
    res.send("Hello Mongoose")
});

// set up the server
app.listen(3000, ()=> {
    console.log("Server up: http://localhost:3000");
});
In the cmd run nodemon app.
Now, if you go to http://localhost:3000/, you should see "Hello Mongoose" on your screen and "Connected successfully!" in the console.
Our database is now connected, and we are ready to move to the next step. We are ready to create a few Schemas.
Refrences
freeCodeCamp
the mongoosejs docs.
MDN
code.tutsplus


Oldest comments (0)