
In today's world, most shopping is done online rather than in person, making e-commerce websites increasingly important. The speed of the website is important because some can have thousands of huge images that slow down the website's performance; this is why Cloudinary is used to store and compress all images on the site. Xata is a severless database that can be used to store all of the images' data.
Prerequisites for this project
Knowledge of Javascript, React and CSS
Node.js installed
A Cloudinary account. Create one here if you don’t have an account
You can find the repo for this project in Github. Fork it to get started. A live demo of this project can be found on Vercel
Setting up our project's images in Cloudinary
After our Cloudinary account is successfully created, we navigate to the media library where we create the folders to store our images, we then upload the various images to be used in our project. Cloudinary offers a wide range of tools and effects applicable to our images to reduce their size and make our site lighter.

Setting up the project
First, we run the following line of code in the terminal to create a new react app:
npx create-react-app ecommerce-website
To store all of our app's components, we create a components folder:
Next, we run the following to install the dependencies for the project:
// install React Router
npm i react-router-dom@5.3.3
// install uuid
$ npm install uuidv4
// install cloudinary
npm install cloudinary-react
In the Home component, React and the usestate hook are imported, it is then exported in order for it to be rendered in the app.js file.
Following that, we import and utilize React Router to show the app's components based on the url of the page. Then, we use useState hooks to save both the items in the cart and current category.
import React,{useState} from "react";
import {BrowserRouter as Router,Route} from "react-router-dom"


function Home (){
    const [cartItems,setCartItems]=useState([])
    const [categ,setCateg]=useState()


  return ()

}

export default Home
After that, we'll utilize useState to build an array of objects that will serve as our products. Each product is assigned an id that is obtained using uuid. We import it into the app with import {v4 as uuid} from 'uuid'
    const [products,setProducts]=useState([
        {
            title:'Blender',
            price:'15',
            categ:'electronics',
            id:uuid()
        },
        {
            title:'Apple airpods',
            price:'200',
            categ:'electronics',
            id:uuid()
        },
        {
            title:'T-shirt',
            price:'20',
            categ:'clothing',
            id:uuid()
        },
        {
            title:'Shorts',
            price:'10',
            categ:'clothing',
            id:uuid()
        },
        {
            title:'Book-1',
            price:'10',
            categ:'books',
            id:uuid()
        },
        {
            title:'Book-2',
            price:'10',
            categ:'books',
            id:uuid()
        },
        {
            title:'Barbell',
            price:'5',
            categ:'fitness',
            id:uuid()
        },
        {
            title:'Dumbbell',
            price:'10',
            categ:'fitness',
            id:uuid()
        },
        {
            title:'Phone-1',
            price:'300',
            categ:'phones',
            id:uuid()
        },
        {
            title:'Phone-2',
            price:'500',
            categ:'phones',
            id:uuid()
        },
        {
            title:'Toy truck',
            price:'17',
            categ:'toys',
            id:uuid()
        },
        {
            title:'Fidget spinner',
            price:'20',
            categ:'toys',
            id:uuid()
        }


    ])
Building the functions of the app
The next step is to build functions to carry out the app's various tasks. To do that, we add the following in the home component:
    const addToCart=(id)=>{
        setCartItems((prevState)=>[...prevState,
            products.find((item)=>item.id===id)
        ]);
    }


    const removeFromCart =(id)=>{
        setTimeout(()=>{setCartItems(cartItems.filter((item)=> item.id !== id))},0)
    }
In the code above, we:
Defined the
addToCartfunction, which accepts anidargument and adds to the cart any product whoseidproperty matches theidargument.Defined
RemoveFromCartfunction which accepts anidargument and deletes any product whoseidproperty matches theidargument from the cart.
Constructing our components
After that, we build the individual components, which are imported into the Home component later. They are:
Category
Productlist
Productpage
Cart
Cartbutton
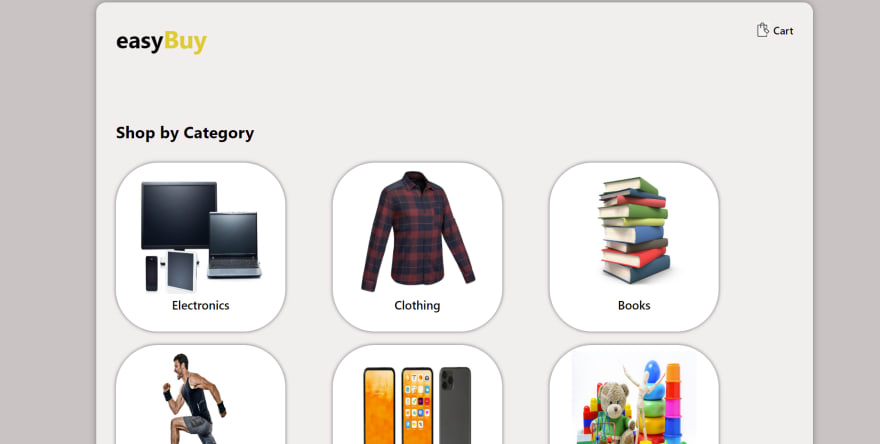
The first component is the Category component, which contains the categories array, and stores the many groups that will be used in this project. For each category, we use the Javascript map technique to generate a div with an image and a name. It is passed a changecateg props, which delivers the clicked category to the home component, allowing the correct list of products to be presented.
import React,{useState, useEffect} from "react";
import {AdvancedImage} from '@cloudinary/react';
import {Cloudinary} from "@cloudinary/url-gen";
import {Link} from "react-router-dom"


function Category({changeCateg}){
   // define categories of products in the app
    const categories=['electronics','clothing','books','fitness','phones','toys']

   // access cloudinary account
  const cld = new Cloudinary({
    cloud: {
      cloudName: 'dhdmchgsh'
    }
  });
    return(
        <div className="categories">
            <h1>Shop by Category</h1>

            {categories.map((category)=>{

               // fetch image from cloudinary based on category

                var myImage=cld.image(`categories/${category}`);

                    return (
                    <div className="category">
                        <Link to='/products' onClick={()=>changeCateg(category)} className='category-link'>
                          <AdvancedImage cldImg={myImage} className="image"/>
                          <p>{category}</p>
                        </Link>
                      </div>

                    )})}
        </div>
    )
}

export default Category
The cld variable helps us to access our cloudinary account, the Advancedimage component contains the myImage prop which passes a string to cld to retrieve the image for each category.
The React Router Link is imported and then used to change the url of the app to /products, this triggers the Router to display the Productlist component.
import React from "react";
import {AdvancedImage} from '@cloudinary/react';
import {Cloudinary} from "@cloudinary/url-gen";
import {Link} from "react-router-dom"


function Productlist ({list,category}){
    const cld = new Cloudinary({
        cloud: {
          cloudName: 'dhdmchgsh'
        }
      });

      const filteredProducts=list.filter((product)=>product.categ==category)
    return(
      <div>
      {filteredProducts.map((item)=>{
      var myImage=cld.image(`products/${item.title}`);
        return(
          <div className="product">
            <Link to={`/products/${item.title}`}  className='product-link'>
              <AdvancedImage cldImg={myImage} className="image"/>
              <p>{item.title}</p>
              <span>${item.price}</span>
            </Link>
          </div>
        )
      })}
      </div>

    )
}

export default Productlist
Productlist is a component that renders all the products available for a selected category. It is passed both list and category props.
list inserts the array of products into the Productlist component while category is the category selected. filteredProducts checks the list array and returns products whose categ property matches the selected category.
When a product is clicked, we use React Router useParams to change the url of the page to match the product.
import React from "react";
import {AdvancedImage} from '@cloudinary/react';
import {Cloudinary} from "@cloudinary/url-gen";
import {useParams} from "react-router-dom";


function Productpage({addToCart,list}){
    const cld = new Cloudinary({
        cloud: {
          cloudName: 'dhdmchgsh'
        }
      });
      const {title}=useParams()

    return(
      <div>
            {list.filter((item)=>item.title === title).map((item)=>{
              var myImage=cld.image(`products/${item.title}`)
              return(
              <div className="product-page">
                <AdvancedImage cldImg={myImage} className="big-image"/>
                <div>
                  <h5>{item.title}</h5>
                  <p>${item.price}</p>
                  <button className="firstbtn" onClick={()=>{addToCart(item.id)}}>ADD TO CART</button>
                  <button>BUY NOW</button>
                </div>
              </div>
              )})}
      </div>
    )
}

export default Productpage
Following that is the Productpage component, which shows product information. It is supplied the 'list' props, which represents the array of products, and addToCart is a function that is called when the first button is clicked.
We import useParams then it is assigned title, this changes the url of the app based on the title property of the product that is clicked. Click here to learn more about useParams.
import React from "react";
import {AdvancedImage} from '@cloudinary/react';
import {Cloudinary} from "@cloudinary/url-gen";

function Cart({cartItems,removeItem}){
    const cld = new Cloudinary({
        cloud: {
          cloudName: 'dhdmchgsh'
        }
      });
    return(
        <div >
            {cartItems.map((item)=>{
                var myImage=cld.image(`products/${item.title}`)
                return (
                <div className="cart">
                    <AdvancedImage cldImg={myImage} className="cart-image"/>
                    <div>
                        <h6>{item.title}</h6>
                        <p>${item.price}</p>
                        <button onClick={()=>{removeItem(item.id)}}>DELETE</button>
                    </div>
                </div>
                )})}
        </div>
    )
}

export default Cart
Now that we've defined the Productpage component, the next step is to create the Cart component which will display all products currently stored in the cartItems variable. It is passed a removeItem prop which deletes a product using it's id property.
import React from 'react'
import {Link} from 'react-router-dom'
import cart from '../images/cart.jpg'

function Cartbutton(){
    return(
        <div className='cart-button'>
            <Link to='/cart' className='cart-button-link'>
                    <img src={cart}/>
                    <span>Cart</span>
            </Link>
        </div>
    )
}


export default Cartbutton
We have sucessfully defined our Cart component but we still need a way to access it, this is why we create Cartbutton which renders a React Router Link component that changes the app's url to /cart which displays the cart.
Importing our components into Home.js
The various components to be used in this app have all been defined but need to be imported into the Home component in order to be displayed.
import Productlist from "./Productlist";
import Cart from "./Cart";
import Category from "./Category";
import Productpage from "./Productpage";
import Cartbutton from "./Cartbutton";
After that, we replace the return statement in the Home component with the following:
    return(
        <div className="home">
            <div className="header">
                <div className="logo">easy<span>Buy</span></div>
            </div>
            <Router>
                <Route path='/'><Cartbutton/></Route>
                <Route exact path='/'><Category changeCateg={categ=>setCateg(categ)}/></Route>
                <Route exact path='/products'><Productlist  list={products} category={categ} /></Route>
                <Route exact path='/products/:title'><Productpage list={products} addToCart={addToCart}/></Route>
                <Route exact path='/cart'><Cart cartItems={cartItems} removeItem={removeFromCart}/></Route>
            </Router>
        </div>
    )
The Route containing Cartbutton is given a path of '/' so it is displayed on every page of the app. exact ensures that the corresponding component renders only when the page url is matched by the path.
Next, we style our app in app.css.
Conclusion
This article demonstrates how to create a simple e-commerce website utilizing Cloudinary and React hooks to store images and values respectively. Xata can also be used to store the products in a secure database.


Top comments (1)
Thanks for the advice, I need a website to develop my brand and increase sales. Also for this I found SparkSales This is an online platform for selling goods and services that helps businesses and individuals increase their sales and achieve success in business, what is needed in my case