
Jamstack, fully known as javascript, APIs, and markup, is one of the architectures revolutionizing the way we approach building faster, scalable, and secure websites. It provides many benefits, like better performance and excellent developer experience, making it easy to serve static content dynamically.
Managing media and databases in Jamstack architecture can become cumbersome, so there is a need for products like Xata, which provides a serverless database for Jamstack products, and Cloudinary, which makes it easy to manage media easily in the application.
In this tutorial, we’ll create an online library that allows us to upload, manage and get books from others using Next.js, Chakra UI, Xata, and Cloudinary.
What Is Xata?
Xata is our go-to serverless data platform that allows us to optimize our development workflow by managing, scaling, preventing downtime, caching, and maintaining our database. At the same time, we focus on developing the client side. It provides a powerful search engine, relational database, analytics engine, and more. It works with various javascript stacks like Nextjs, Svelte js, Node js, etc.
What Is Cloudinary?
Cloudinary is a media management platform that makes it easy to manage images, files, and videos for websites and mobile apps. It covers everything from uploading, storing, optimizing, delivery, and media transformation, and it provides SDK support in various languages.
Prerequisites
To follow this tutorial, we will need to have the following:
- Understanding of JavaScript, Typsecript and Es6 features
- Basic knowledge of React and Next.js
- Basic knowledge of Chakra UI
- Nodejs and npm installed on our PC
- A Cloudinary account, signup is free
- A Xata account signup is free
The project currently runs on code sandbox, and you can easily fork to get started.
It is deployed live on Netlify on this link.
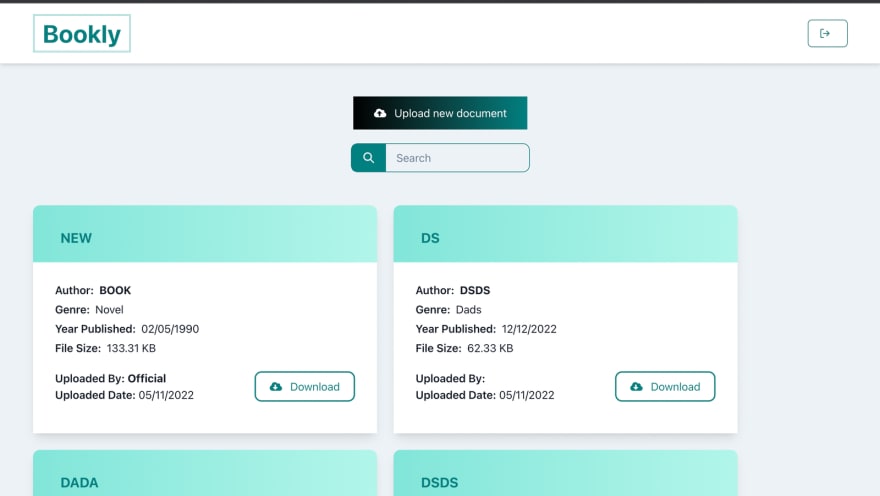
This a picture of what we will be building
Now let’s dive into building our application.
Project Setup
We will run npm init to initialize a new project in any directory of our choice.
Let’s go to the project directory and run the following commands to install dependencies.
cd <project_name>

# Install dependencies
npm install react react-dom next

# Install devDependencies
npm install typescript @types/node @types/react @chakra-ui/react axios bcrypt nprogress yup -D
We will create a new directory called pages and add an index.tsx file. In the index.tsx, let’s add a layout like this.
const Index = ({ }) => {
  return (
    <h1>Hello world</h1>
  )
};
We then start the development server on http://localhost:3000/ by running the command below:
npx next dev
Running this command will give us a blank page with “hello world” written.
Now, let’s set up the database of our application.
Setting up Xata and Database Schema
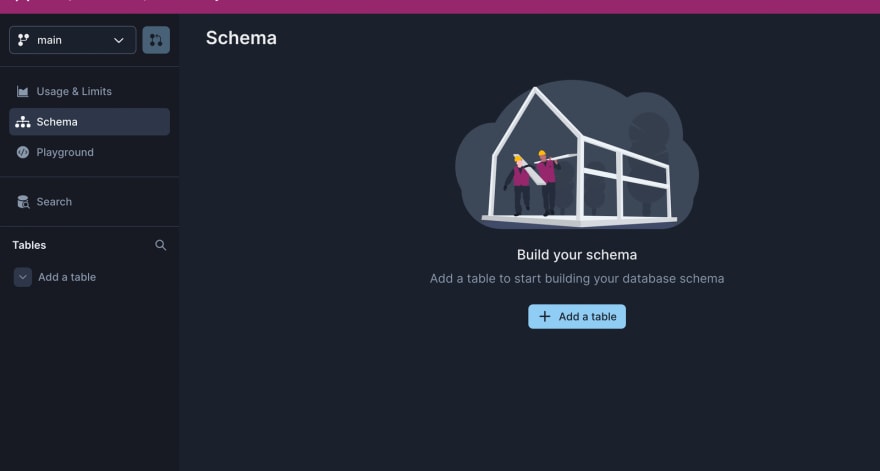
To get started with Xata, we will create a new database on the Xata workspace by giving it a name and selecting the region we want our database to be.


Next, let’s start building our database schema by adding new tables.
Our Schema Diagram looks like this:
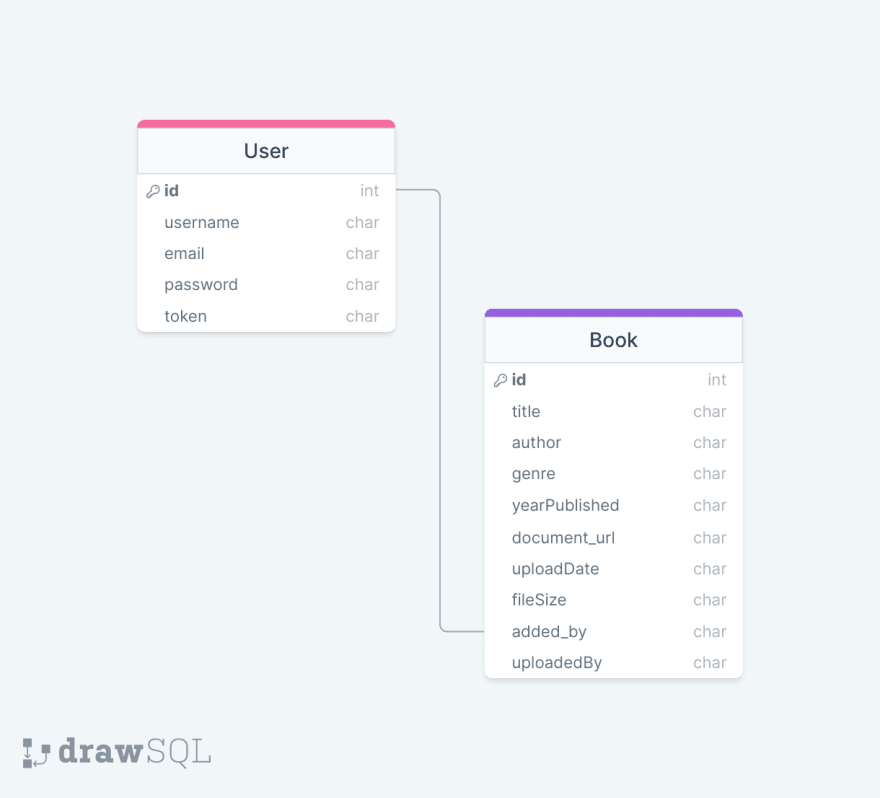
We then create two tables called User and Book on Xata workspace and add the following fields in our schema above.
Xata lets us relate two tables with the type Link, so we use that when adding the field added_by and link it to the User table.
Now, let’s initialize our database in our project.
To start working with Xata on our Command line interface (CLI), we will install it globally by running the command.
# Install the Xata CLI globally
npm i -g @xata.io/cli
Then let’s run the following command to initialize the created database.
xata init --db https://Ubaydah-s-workspace-qb9vvt.us-east-1.xata.sh/db/bookly
Note: We can access our DB base URL from our workspace's configuration section. It follows the format
https://Ubaydah-s-workspace-qb9vvt.{region}.xata.sh/db/{database}.
Xata prompts us and generates a new file for our Xata configuration.
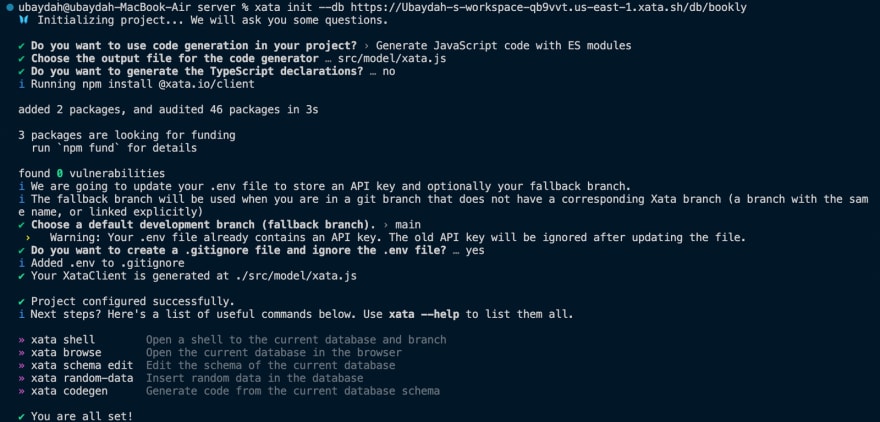
During the process, it prompts our browser to open so we can create an API key for our project, which will be added to our .env file and needed too when deploying.

Codes are generated in our
xata.tsfile, which contains the Schemas in codes and instances of XataClient, which we will use to interact with the Xata database.
We are all set. Let’s dive into building our APIs.
Building The APIs
In our pages directory, let’s create a new folder named api and two folders in the api folder named book and user.
Login And Register Functionality
Let’s create two new files in our user folder, register.ts, and login.ts.
In the register.ts file, let’s add the following code.
import { NextApiHandler } from "next";
import { getXataClient } from "../../../utils/xata";
import bcrypt from "bcrypt";
import { promisify } from "util";

const hash = promisify(bcrypt.hash);
const handler: NextApiHandler = async (req, res) => {
  const { email, username, password } = req.body;
  const xata = getXataClient();
  //validate
  const emailExists = await xata.db.User.filter({ email }).getFirst();
  const usernameExists = await xata.db.User.filter({ username }).getFirst();
  if (usernameExists) {
    return res.status(400).json({ success: false, message: "Username already exists! " });
  } else if (emailExists) {
    return res.status(400).json({ success: false, message: "User with the email already exists!" });
  }
  // user doesn't exist
  await xata.db.User.create({
    username: username,
    email: email,
    password: await hash(password, 10),
  });
  return res.status(201).json({
    message: "user created",
  });
};
export default handler;
Explanation: In the code above, we created a NextApiHandler that handles creating new users in our database. We first checked if the email or username exists in the database and throw an error based on that. Then, if the user doesn't exist in the database, we hashed their passwords using the bcrypt package and created a new instance of them in the database.
Let’s add our Login API.
In the login.ts file, let’s add the following code.
import { NextApiHandler } from "next";
import { getXataClient } from "../../../utils/xata";
import jwt from "jsonwebtoken";
import bcrypt from "bcrypt";
import { promisify } from "util";
import cookie from "cookie";
const { JWT_SECRET_KEY } = process.env;
const compare = promisify(bcrypt.compare);
const handler: NextApiHandler = async (req, res) => {
  const { email, password } = req.body;
  // instantiate a xata client
  const xata = getXataClient();
  const user = await xata.db.User.filter({ email }).getFirst();
  // validate
  if (!(user && (await compare(password, user.password)))) {
    return res.status(400).json({ success: false, message: "Username or password is incorrect!" });
  }
  // create a jwt token that is valid for 7 days
  const token = jwt.sign({ sub: user.id }, JWT_SECRET_KEY, { expiresIn: "7d" });
  user.update({ token: token });
  // set the jwt token as a cookie
  res.setHeader(
    "Set-Cookie",
    cookie.serialize("token", token, {
      maxAge: 24 * 60 * 60, // 1 day
      sameSite: "strict",
      path: "/",
    })
  );
  return res.status(200).json({
    id: user.id,
    username: user.username,
    email: user.email,
    token: token,
  });
};
export default handler;
Explanation: In the code above, we filtered out the user from the database, checked if the user exists and if the password entered correlated with the hashed password. If the user exists, we created a new Jwt token for the user, valid for seven days, and updated their details with the token. We then set the Jwt token as a cookie in the header, where it will expire in a day on the browser.
Adding The Database CRUD Functionality
Now, let’s write the API to create, delete, update and get books from our database.
In the api/book directory, let’s create four new files named create.ts, update.ts, get.ts, and delete.ts.
In the create.ts file, let’s add the following code:
import { NextApiHandler } from "next";
import { getXataClient } from "../../../utils/xata";
const handler: NextApiHandler = async (req, res) => {
  // instantiate a xata client
  const xata = getXataClient();
  const book = await xata.db.Book.create(req.body);
  res.status(201).json({
    data: book,
  });
};
export default handler;
In the code above, we created a new entry of our book gotten from the request body in our database.
In the update.ts file, let’s add the following code:
import { NextApiHandler } from "next";
import { getXataClient } from "../../../utils/xata";
const handler: NextApiHandler = async (req, res) => {
  const xata = getXataClient();
  const book = await xata.db.Book.update(req.body);
  res.status(201).json({
    data: book,
  });
};
export default handler;
In the code above, we updated an entry of our book with the request body in our database.
In the delete.ts file, let’s add the following code:
import { NextApiHandler } from "next";
import { getXataClient } from "../../../utils/xata";
const handler: NextApiHandler = async (req, res) => {
  const { id } = req.body;
  const xata = getXataClient();
  await xata.db.Book.delete(id);
  res.end();
};
export default handler;
Here, we deleted an entry in the database by passing the book id gotten from the request body.
In the get.ts file, let’s add the following code:
import { NextApiHandler } from "next";
import { getXataClient } from "../../../utils/xata";
const handler: NextApiHandler = async (req, res) => {
  const xata = getXataClient();
  const books = await xata.db.Book.getMany();
  res.status(200).json({
    data: books,
  });
};
export default handler;
Here, we queried the xata database to get all entries from the database.
We can learn more about different ways of querying data in the Xata docs.
Search Functionality
In the api/book directory, let’s create a new file named search.ts and the following code:
import { NextApiHandler } from "next";
import { getXataClient } from "../../../utils/xata";
const handler: NextApiHandler = async (req, res) => {
  const xata = getXataClient();
  const books = await xata.db.Book.search(req.body.value, {
    fuzziness: 1,
    prefix: "phrase",
  });
  res.status(200).json({
    data: books,
  });
};
export default handler;
In this code, we performed a full-text search on the Book table to get entries that matched the value passed. Xata tolerates typos when searching, and this behavior is enabled with the fuzziness parameter added in the code above. The set number 1 indicates one typo tolerance, and fuzziness can be disabled by setting it to 0.
Let’s learn more in xata search docs.
After building the essential APIs, we set up the Cloudinary account to store our documents.
Setting up a Cloudinary account
We will create an account on Cloudinary and be redirected to a dashboard. Let’s copy our cloud name and store it in our .env file.
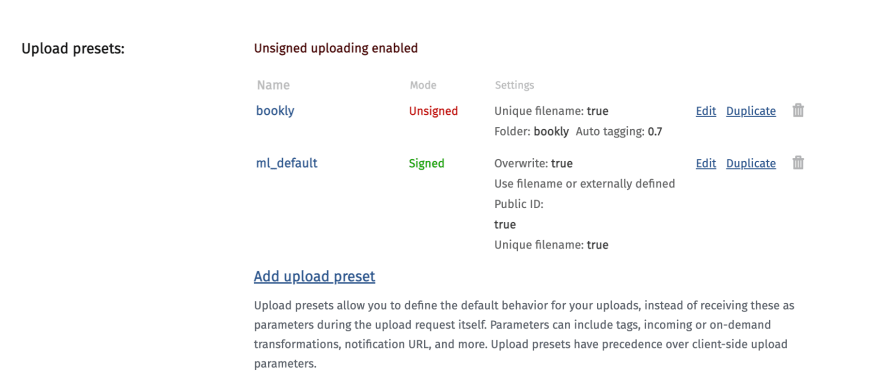
Let’s hover over the settings section and go to the upload panel to create an upload preset using the unsigned key for uploading our documents.

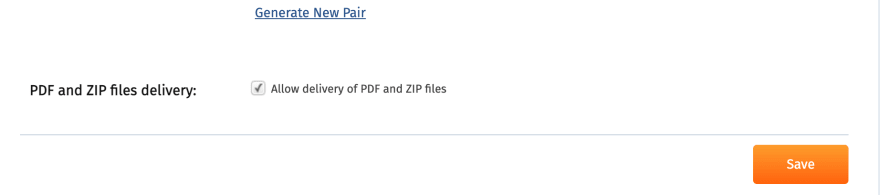
After, let’s go over the security section to enable PDF delivery with the account.
We are now set to use the account to upload PDFs.
Building Frontend and Consuming APIs
In the root directory, let’s create a new folder named src, we will be creating our react components and hooks here. Create new folders named components, config, and hooks. The config folder will have a config.ts file in which our Cloudinary cloud name will be stored.
const config = {
  cloudinary_name: process.env.NEXT_PUBLIC_CLOUD_NAME,
};
export default config;
In the hooks folder, let’s create a new file called useUploadImage.tsx and add the following codes:
import { useState } from "react";
const useUploadImage = () => {
  const [preview, setPreview] = useState<string>("");
  const [file, setFile] = useState(null);
  const onChange = (e: any, multiple?: any) => {
    //check if files are multiple and collect them in an array
    if (multiple) {
      const selectedFIles: any = [];
      const targetFiles = e.target.files;
      const targetFilesObject = [...targetFiles];
      targetFilesObject.map((file) => {
        return selectedFIles.push({ file: file, url: URL.createObjectURL(file) });
      });
      setPreview(selectedFIles);
    } else {
      const file = e.target.files[0];
      const reader: any = new FileReader();
      setFile(e.target.files[0]);
      reader.onloadend = () => setPreview(reader.result);
      reader.readAsDataURL(file);
    }
  };
  const image = {
    preview,
    file,
  };
  return { onChange, image };
};
export default useUploadImage;
The code above handles collecting all the files sent on the client side so we can easily send them to Cloudinary.
In the components folder, we will create a new component named BookForm.tsx , where we will handle creating and updating books and sending them to the Next.js server.
In the code above, we created some form validation using yup. We then created some initial values for our book. The useEffect gets the current user logged in and stores it on our local storage. The function that handles sending the book to the server has two parameters: the data sent out and isEdit. The isEdit helps us differentiate whether we are adding a new book or updating it. A new FormData is then created where the file and upload_preset in sent to the Cloudinary API using Axios. Our secure URL is gotten from Cloudinary response, which is sent along with other data to the API to create a new book.
View the full codes on the GitHub repository to check other implementations like the login and register form.
The code also runs on code sandbox, and it’s deployed on Netlify.
Conclusion
In this tutorial, we learned about serverless databases and how to create one using Xata. We also learned about Cloudinary and how to upload files in Cloudinary using upload presets.
Next Steps
Check out the full GitHub repository to see other implementations and components built.
We can also add extra features such as displaying the user profile, bookmarking a book to a list, and other ideas to improve the app.


Top comments (4)
Indepth! ✨
Sabi woman👍
This is amazing man, keep it up!!!
Mind-blowing and comprehensive 🤩🤩💫