
Trackers are mechanisms, applications, or systems used by investors to track the financial performance of a particular stock. They give investors the required leverage to make a profitable financial decision as an individual or a company.
In this post, we will learn how to create a stock price tracker in Flutter using the Marketstack open API to search for our favourite stock details and save the details on Appwrite’s database.
Prerequisites
To fully grasp the concepts presented in this tutorial, we require the following:
- Basic understanding of Dart and Flutter
- Flutter SDK installed
- Xcode with a developer account (for Mac users)
- Either IOS Simulator, Android Studio, or Chrome web browser to run our application
- Docker installation
- An Appwrite instance; check out this article on how to set up an instance locally or one-click install on DigitalOcean or Gitpod
- Marketstack account. Sign up is completely free
Getting Started
In this post, we will focus on implementations only. The project UI has already been set up.
To get started, we need to clone the project by navigating to the desired directory and running the command below:
git clone https://github.com/Mr-Malomz/stock_tracker && cd stock_tracker
The complete source code is also available on the dev branch of the same repository.
Running the Project
First, we need to install the project dependencies by running the command below:
flutter pub get
Then run the project using the command below:
flutter run
The command above will run the application on the selected device.

Creating a New Appwrite Project
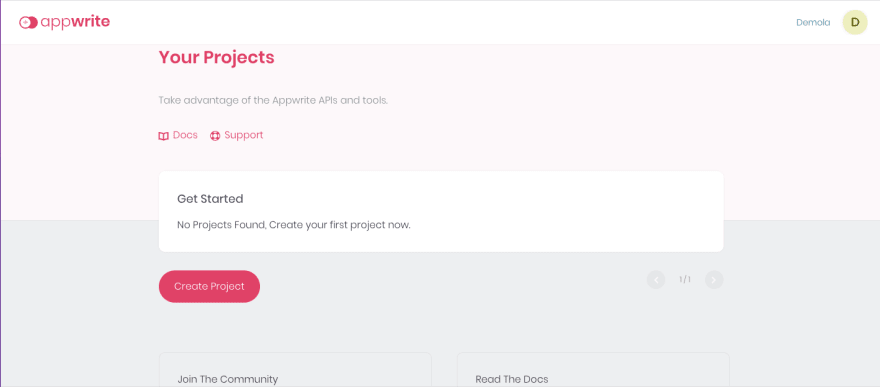
To create a new project, start the Appwrite instance and navigate to the specified hostname and port http://localhost:80. Next, we need to log into our account or create an account if we don’t have one.

On the console, click the Create Project button, input stock_tracker as the name, and click Create.

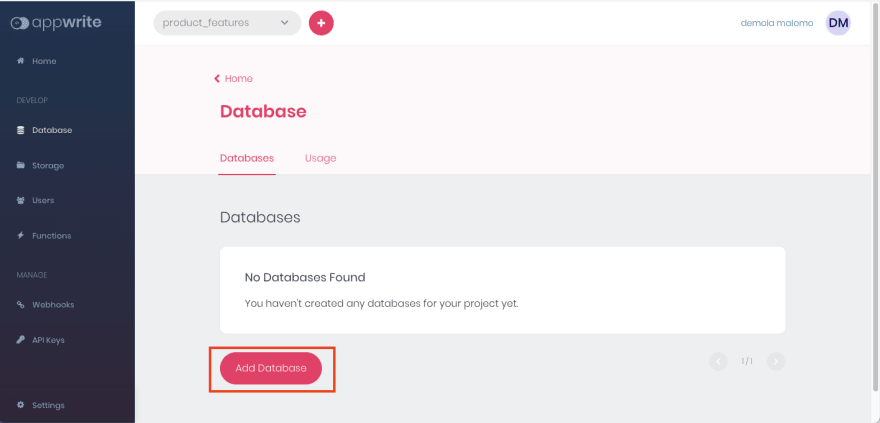
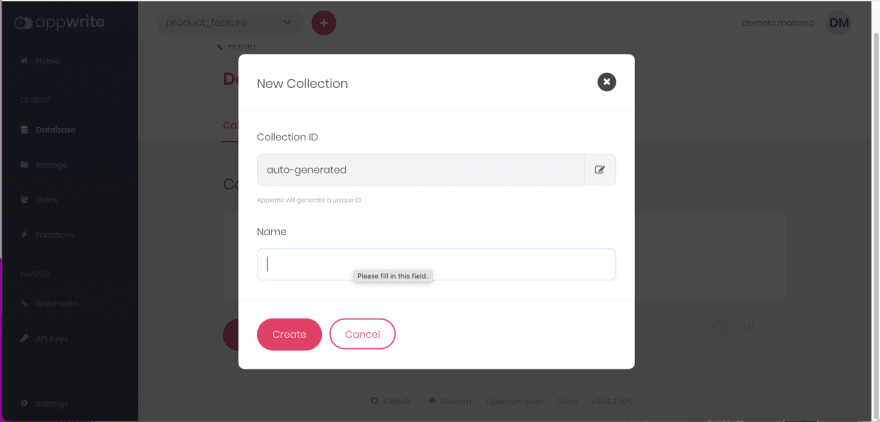
Next, we need to create a database to save our favourite stocks. Navigate to the Database tab, click Add Database, input stocks as the database name, and click Create.

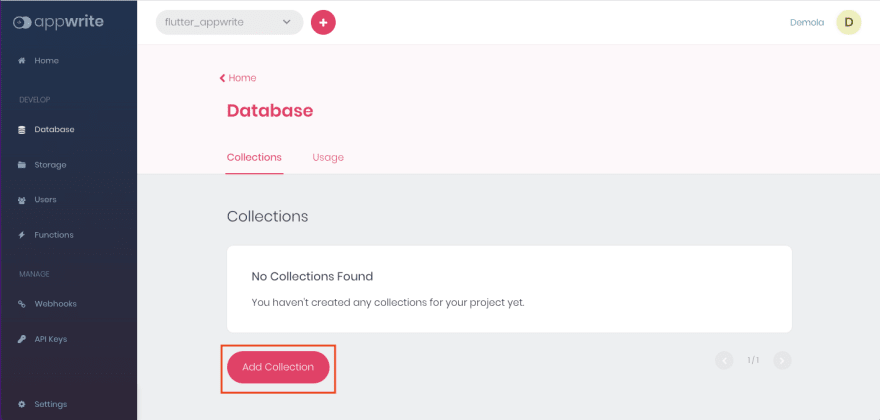
With that done, we need to create a collection for grouping our stocks. Click Add Collection, input stock_list as the collection name, and click on Create.
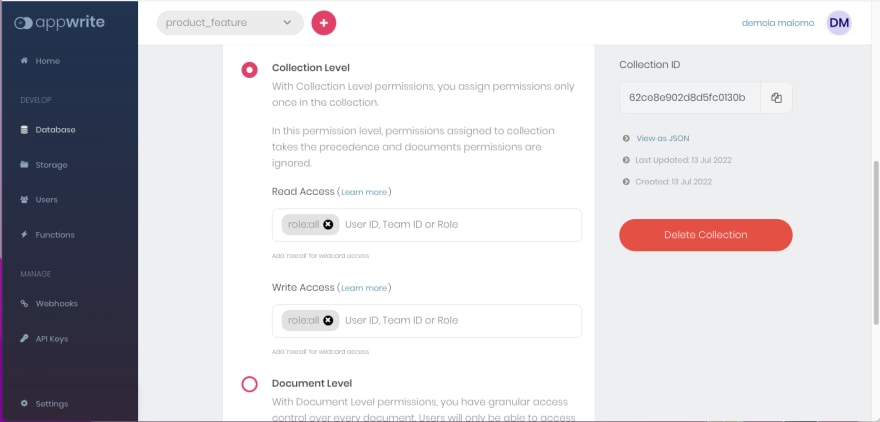
Appwrite has an advanced yet flexible way to manage access to users, teams, or roles to specific resources. We will modify the permission role:all to enable access from any application. Then click on Update to save changes.
Add Attributes
Attributes are fields that our database will possess. Navigate to the Attributes tab, click on Add Attributes, add a New String Attribute and size of 225 for name, symbol, open, and exchange fields with the required option marked, and click on Create.
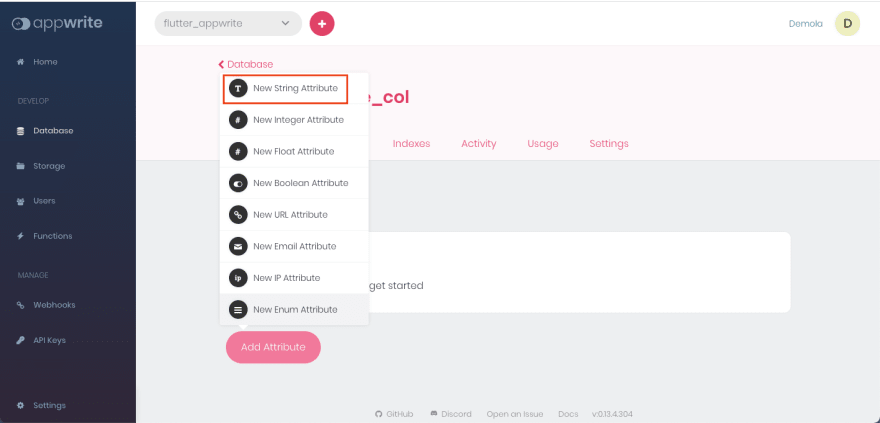

Note: The *name*, *symbol*, *open*, and *exchange* fields represent the name of the stock, ticker or symbol of the stock, the opening price, and the stock marketplace, respectively.
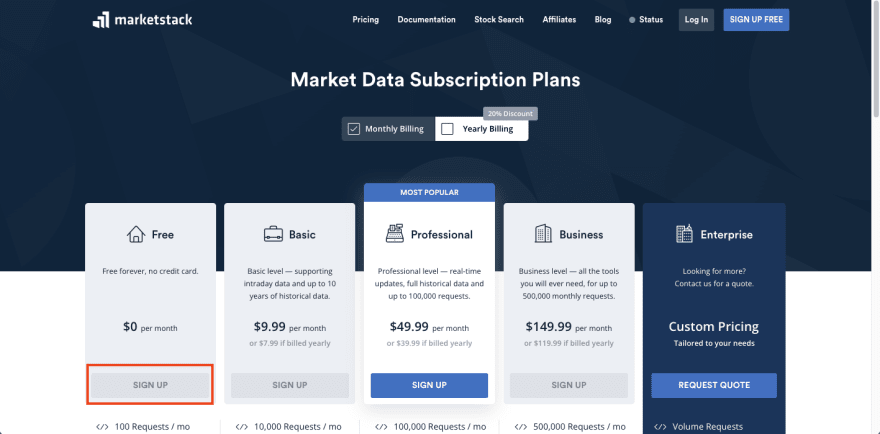
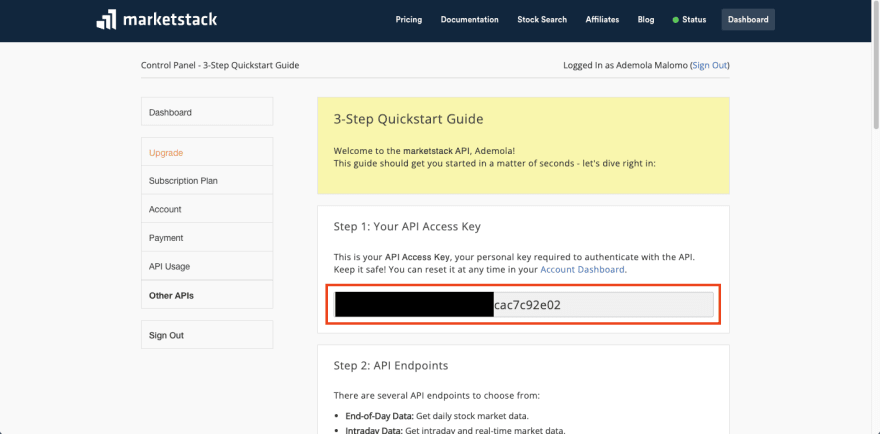
Setting up Marketstack
With that done, we need to create an account on Marketstack and get an Access Key to use the open stock API.
Next, we need to navigate to the lib directory and create a utils.dart file and add the snippet below:
    class AppConstant {
      //marketstack
      final String accessKey = "REPLACE WITH ACCESS KEY";
    }
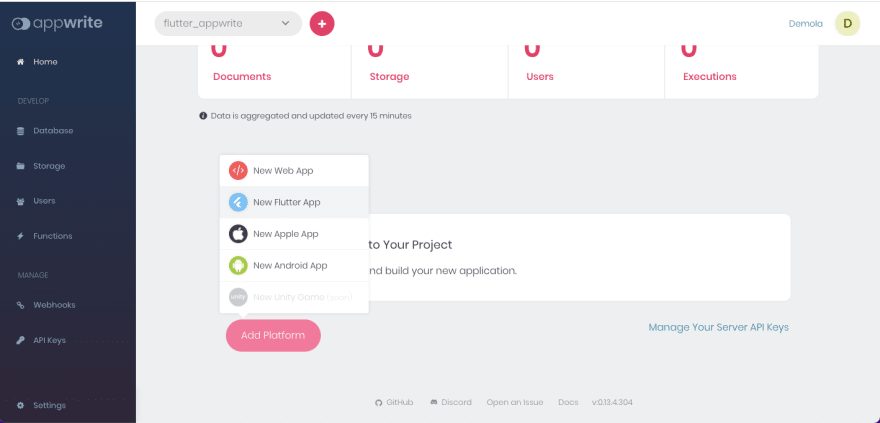
Connecting Appwrite to Flutter
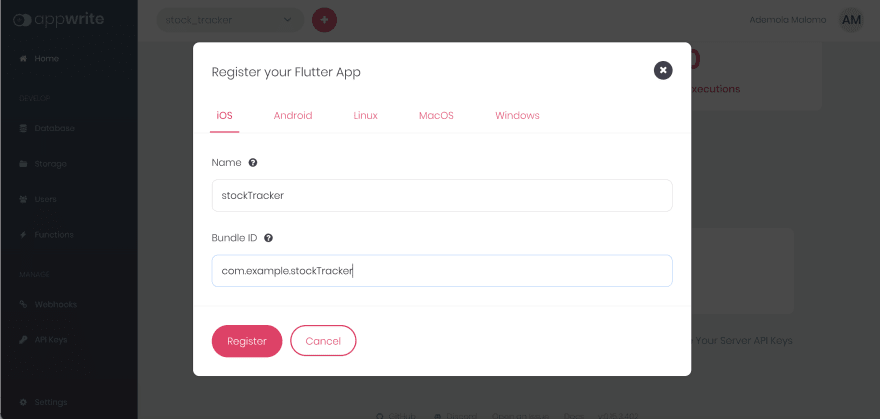
To add support for our Flutter app, navigate to the Home menu, click on the Add Platform button, and select New Flutter App.

Depending on the device we are running our Flutter application, we can modify it as shown below.
iOS
To obtain our Bundle ID, we can navigate using the path below:
ios > Runner.xcodeproj > project.pbxproj
Open the project.pbxproj file and search for PRODUCT_BUNDLE_IDENTIFIER.
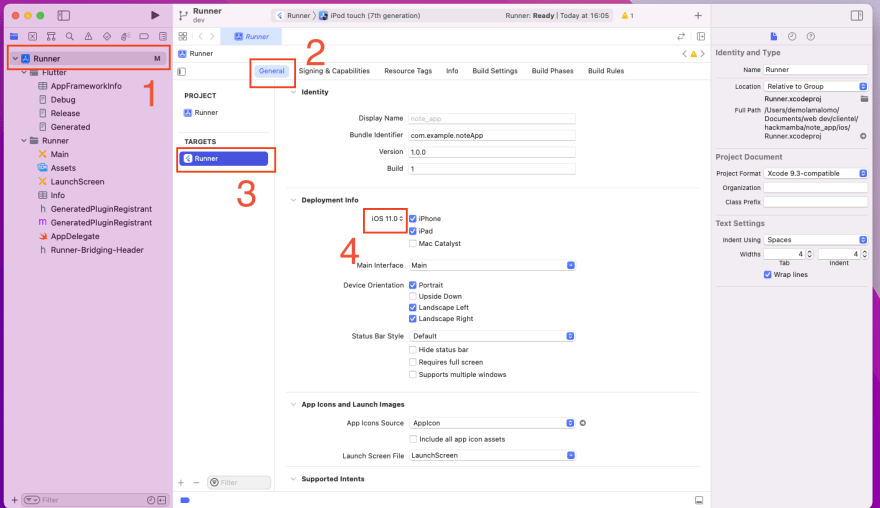
Next, open the project directory on Xcode, open the Runner.xcworkspace folder in the app's iOS folder, select the Runner project in the Xcode project navigator, select the Runner target in the main menu sidebar, and then select iOS 11 in the deployment info’s target.
Android
To get our package name, we can navigate using the path below:
android > app > src > debug > AndroidManifest.xml
Open the AndroidManifest.xml file and copy the package value.

Next, we need to modify the AndroidManifext.xml as shown below:
<manifest xmlns:android="http://schemas.android.com/apk/res/android"
    package="com.example.stock_tracker">
    <uses-permission android:name="android.permission.INTERNET"/>
    <application ...>
    <activity android:name="com.linusu.flutter_web_auth.CallbackActivity" android:exported="true">
      <intent-filter android:label="flutter_web_auth">
        <action android:name="android.intent.action.VIEW" />
        <category android:name="android.intent.category.DEFAULT" />
        <category android:name="android.intent.category.BROWSABLE" />
        <data android:scheme="appwrite-callback-[PROJECT_ID]" />
      </intent-filter>
    </activity>
  </application>
</manifest>
Then, we need to update the utils.dart file as shown below:
class AppConstant {
  //marketstack
  final String accessKey = "REPLACE WITH ACCESS KEY";

  //appwrite
  final String databaseId = "REPLACE WITH DATABASE ID";
  final String projectId = "REPLACE WITH PROJECT ID";
  final String endpoint = "REPLACE WITH ENDPOINT";
  final String collectionId = "REPLACE WITH COLLECTION ID";
}
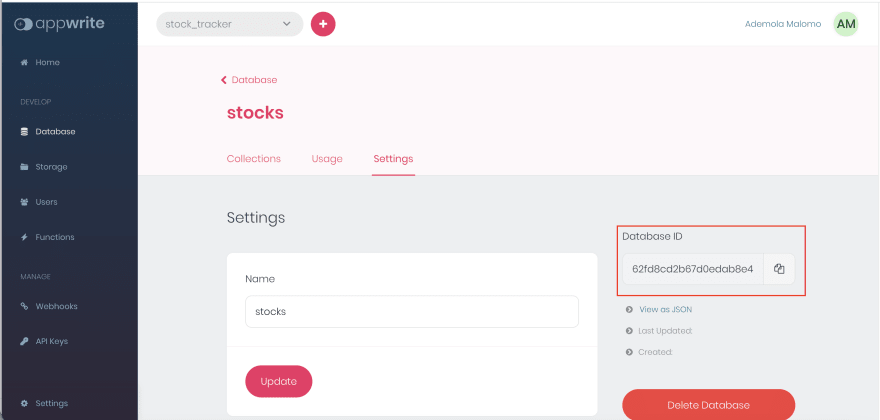
Navigate to the Database menu, click on the Stocks database, click on the Settings tab, and copy the Database ID.
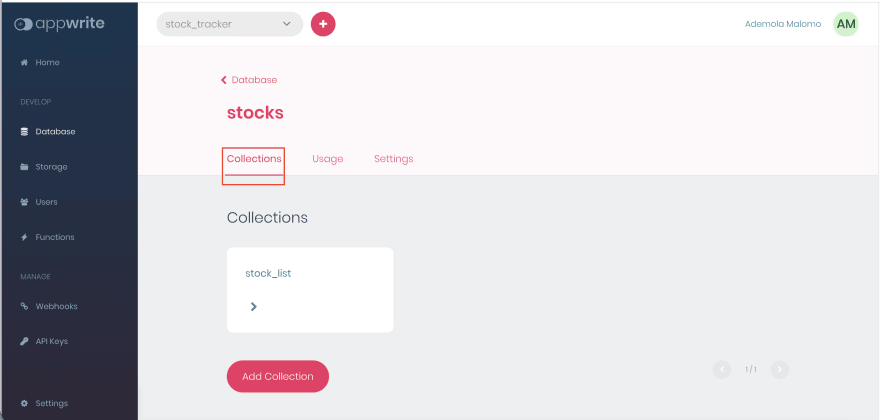
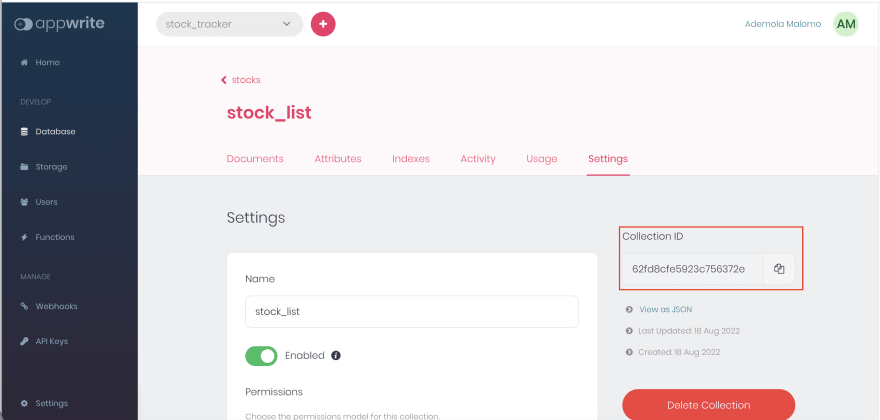
Switch to the Collections tab, click on the stock_list collection, click on the Settings tab, and copy the Collection ID.
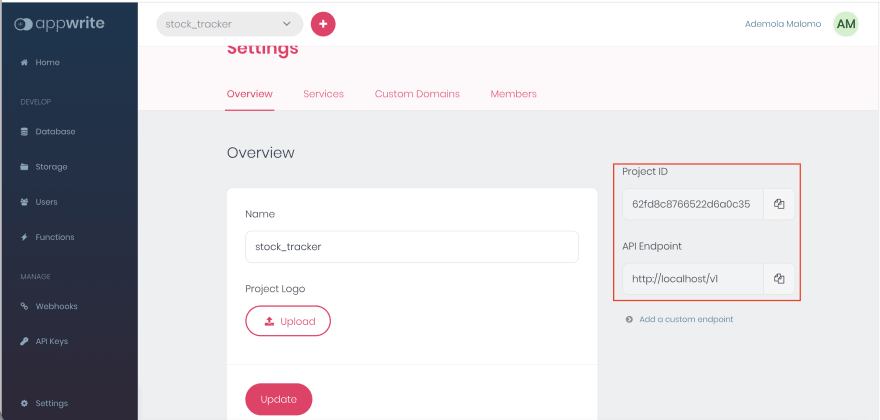
Navigate to the Settings menu to copy the Project ID and API Endpoint.
For the endpoint property, we need to modify it to work with our system's local network address. We can adjust accordingly:
iOS
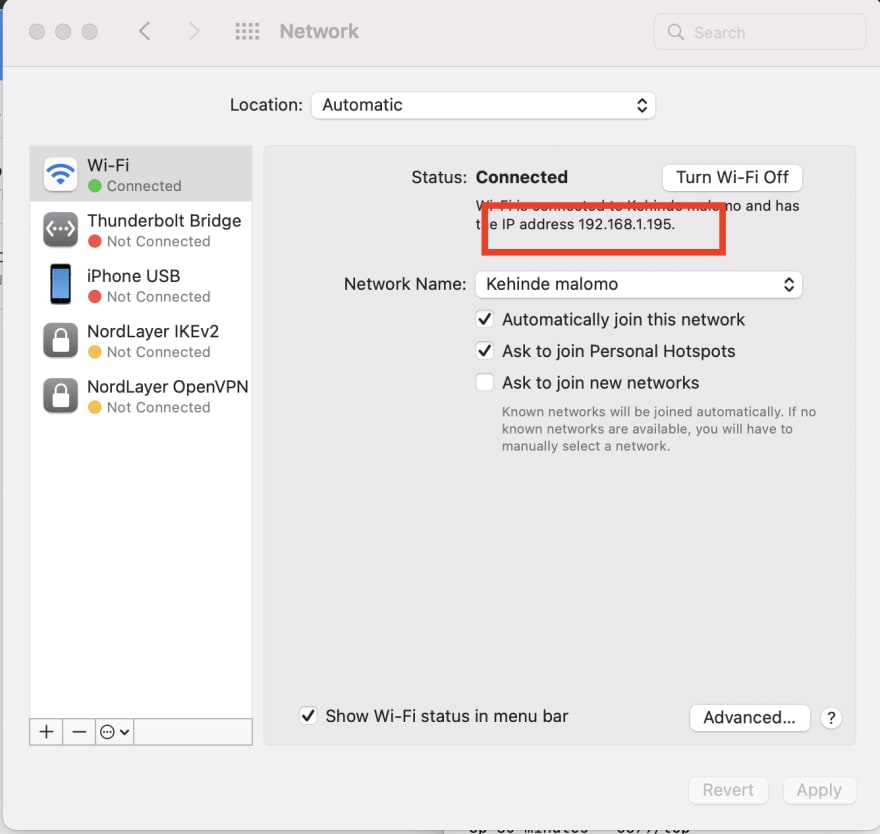
Navigate to the Network section, copy the IP address, and modify it as shown below:
class AppConstant {
  //marketstack
  final String accessKey = "REPLACE WITH ACCESS KEY";

  //appwrite
  final String databaseId = "REPLACE WITH DATABASE ID";
  final String projectId = "REPLACE WITH PROJECT ID";
  final String endpoint = "http://192.168.1.195/v1";
  final String collectionId = "REPLACE WITH COLLECTION ID";
}
Android
We can connect our Android emulator to the system’s IP using the 10.0.2.2 IP address.
class AppConstant {
  //marketstack
  final String accessKey = "REPLACE WITH ACCESS KEY";

  //appwrite
  final String databaseId = "REPLACE WITH DATABASE ID";
  final String projectId = "REPLACE WITH PROJECT ID";
  final String endpoint = "http://10.0.2.2/v1";
  final String collectionId = "REPLACE WITH COLLECTION ID";
}
Building the Stock Price Tracker
To get started, we need to create models to convert the response sent from Marketstack and Appwrite to a Dart object. The models will also cater to JSON serialization. To do this, add the snippet below in the same utils.dart file:
class AppConstant {
  //code goes here
}

class TickerResponse {
  String name;
  String symbol;

  TickerResponse({required this.name, required this.symbol});

  factory TickerResponse.fromJson(Map<dynamic, dynamic> json) {
    return TickerResponse(
      name: json['name'],
      symbol: json['symbol'],
    );
  }
}

class PriceResponse {
  String open;
  String exchange;

  PriceResponse({required this.open, required this.exchange});

  factory PriceResponse.fromJson(Map<dynamic, dynamic> json) {
    return PriceResponse(
      open: json['open'],
      exchange: json['exchange'],
    );
  }
}

class Stock {
  String? $id;
  String name;
  String symbol;
  String open;
  String exchange;

  Stock({
    this.$id,
    required this.name,
    required this.symbol,
    required this.open,
    required this.exchange,
  });

  factory Stock.fromJson(Map<dynamic, dynamic> json) {
    return Stock(
      $id: json['\$id'],
      name: json['name'],
      symbol: json['symbol'],
      open: json['open'],
      exchange: json['exchange'],
    );
  }

  Map<dynamic, dynamic> toJson() {
    return {'name': name, 'symbol': symbol, 'open': open, 'exchange': exchange};
  }
}
The snippet above does the following:
- Creates a
TickerResponse,PriceResponse, andStockclasses with required properties - Adds a constructor with unrequired and required parameters
- Creates a
fromJsonandtoJsonmethod for JSON serialization
Next, we need to create a service file to separate the application core logic from the UI. To do this, create a stock_service.dart file inside the lib directory and first update it by doing the following:
import 'dart:convert';
import 'package:http/http.dart' as http;
import 'package:stock_tracker/utils.dart';
import 'package:appwrite/appwrite.dart';

class StockService {
  final _accessKey = AppConstant().accessKey;
  Client client = Client();
  Databases? db;

  StockService() {
    _init();
  }

  //initialize the application
  _init() async {
    client
        .setEndpoint(AppConstant().endpoint)
        .setProject(AppConstant().projectId);
    db = Databases(client, databaseId: AppConstant().databaseId);
    //get current session
    Account account = Account(client);
    try {
      await account.get();
    } on AppwriteException catch (e) {
      if (e.code == 401) {
        account
            .createAnonymousSession()
            .then((value) => value)
            .catchError((e) => e);
      }
    }
  }
}
The snippet above does the following:
- Imports the required dependencies
- Creates a
StockServiceclass with_accessKey,client, anddbproperties to connect to Marketstack, Appwrite instance, and the database - Creates an
_initmethod that configures the Appwrite using the property and also conditionally creates an anonymous user to access the Appwrite database
Finally, we can use the configuration above to create the required methods by updating as shown below:
//imports goes here

class StockService {
  final _accessKey = AppConstant().accessKey;
  Client client = Client();
  Databases? db;

  StockService() {
    _init();
  }

  //initialize the application
  _init() async {
    //init code goes here
  }

  Future<TickerResponse> _getTicker(String ticker) async {
    String tickerKey = ticker.toUpperCase();
    var response = await http.get(Uri.parse(
        'http://api.marketstack.com/v1/tickers/$tickerKey?access_key=$_accessKey&limit=1'));
    var data = jsonDecode(response.body);
    if (response.statusCode == 200) {
      return TickerResponse(name: data['name'], symbol: data['symbol']);
    } else {
      throw Exception('Error getting ticker');
    }
  }

  Future<PriceResponse> _getPrice(String ticker) async {
    String tickerKey = ticker.toUpperCase();
    var response = await http.get(Uri.parse(
        'http://api.marketstack.com/v1/eod?access_key=$_accessKey&symbols=$tickerKey&limit=1'));
    var data = jsonDecode(response.body);
    if (response.statusCode == 200) {
      return PriceResponse(
          open: data['data'][0]['open'].toString(),
          exchange: data['data'][0]['exchange']);
    } else {
      throw Exception('Error getting price');
    }
  }

  Future saveStock(String ticker) async {
    try {
      var tickerDetails = await _getTicker(ticker);
      var priceDetails = await _getPrice(ticker);
      Stock newStock = Stock(
        name: tickerDetails.name,
        symbol: tickerDetails.symbol,
        open: priceDetails.open,
        exchange: priceDetails.exchange,
      );
      var data = await db?.createDocument(
        collectionId: AppConstant().collectionId,
        documentId: 'unique()',
        data: newStock.toJson(),
      );
      return data;
    } catch (e) {
      throw Exception('Error creating stock');
    }
  }

  Future<List<Stock>> getFavStocks() async {
    try {
      var data =
          await db?.listDocuments(collectionId: AppConstant().collectionId);
      var stockList =
          data?.documents.map((stock) => Stock.fromJson(stock.data)).toList();
      return stockList!;
    } catch (e) {
      throw Exception('Error getting list of products');
    }
  }
}
The snippet above does the following:
- Creates a
_getTickerand_getPricehelper methods that use the Marketstack API and Access Key to get stock details and price - Creates a
saveStockmethod that uses the helper methods to get required data and uses the configured databasecreateDocumentfunction to create a stock by passing in the required arguments - Creates a
getFavStocksmethod that uses the configured database’slistDocumentsfunction to get a list of stocks and converts the returned JSON to a list using theStock.fromJsonmethod
Note: The underscore _ prefixing variables and functions in Dart marks them as a private entity of a class, while the unique() flag passed to the createDocument function tells Appwrite to auto-generate a unique ID.
Consuming the Service
With that done, we can start using the service to perform the required operation.
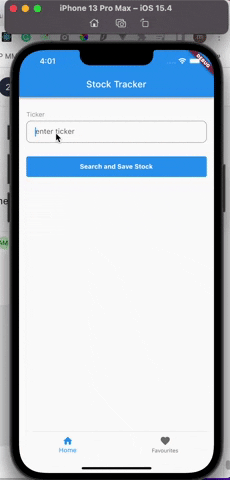
Search for Stock and Add to Favourites
To search for stock and add to favourite, we need to navigate to the screens folder, open the home.dart, and modify as shown below:
import 'package:flutter/material.dart';
import 'package:flutter/services.dart';
import 'package:stock_tracker/stock_service.dart'; //add

class Home extends StatefulWidget {
  @override
  State<Home> createState() => _HomeState();
}

class _HomeState extends State<Home> {
  final _formKey = GlobalKey<FormState>();
  final TextEditingController _ticker = TextEditingController();
  bool _isLoading = false;

  _getTickerAndSave() {
    setState(() {
      _isLoading = true;
    });
    StockService().saveStock(_ticker.text).then((value) {
      setState(() {
        _isLoading = false;
      });
      ScaffoldMessenger.of(context).showSnackBar(
        const SnackBar(content: Text('Stock saved successfully!')),
      );
    }).catchError((_) {
      setState(() {
        _isLoading = false;
      });
      ScaffoldMessenger.of(context).showSnackBar(
        const SnackBar(content: Text('Error saving stock!')),
      );
    });
  }

  @override
  Widget build(BuildContext context) {
    return Scaffold(
      body: Padding(
        padding: const EdgeInsets.symmetric(horizontal: 16.0, vertical: 30.0),
        child: Form(
          key: _formKey,
          child: Column(
            children: [
              Column(
                crossAxisAlignment: CrossAxisAlignment.start,
                children: [
                  //title
                  Column(
                    crossAxisAlignment: CrossAxisAlignment.start,
                    children: [
                      const Text(
                        'Ticker',
                        style: TextStyle(
                          color: Colors.grey,
                          fontSize: 14.0,
                        ),
                      ),
                      const SizedBox(height: 5.0),
                      TextFormField(
                        validator: (value) {
                          if (value == null || value.isEmpty) {
                            return 'Please input ticker';
                          }
                          return null;
                        },
                        inputFormatters: [LengthLimitingTextInputFormatter(25)],
                        controller: _ticker,
                        decoration: InputDecoration(
                          contentPadding: const EdgeInsets.symmetric(
                              vertical: 10, horizontal: 20),
                          hintText: "enter ticker",
                          focusedBorder: OutlineInputBorder(
                            borderRadius: BorderRadius.circular(10),
                            borderSide: const BorderSide(color: Colors.grey),
                          ),
                          enabledBorder: OutlineInputBorder(
                            borderRadius: BorderRadius.circular(10),
                            borderSide: const BorderSide(color: Colors.grey),
                          ),
                          errorBorder: OutlineInputBorder(
                            borderRadius: BorderRadius.circular(10),
                            borderSide: const BorderSide(color: Colors.red),
                          ),
                        ),
                      ),
                    ],
                  ),
                ],
              ),
              const SizedBox(height: 30.0),
              SizedBox(
                height: 45,
                width: double.infinity,
                child: TextButton(
                  onPressed: _isLoading
                      ? null
                      : () {
                          if (_formKey.currentState!.validate()) {
                            _getTickerAndSave();
                          }
                        },
                  style: ButtonStyle(
                    backgroundColor:
                        MaterialStateProperty.all<Color>(Colors.blue),
                  ),
                  child: const Text(
                    'Search and Save Stock',
                    style: TextStyle(
                      color: Colors.white,
                      fontWeight: FontWeight.bold,
                      fontSize: 14.0,
                    ),
                  ),
                ),
              ),
            ],
          ),
        ),
      ),
    );
  }
}
The snippet above does the following:
- Imports the required dependency
-
Line 12 - 13: Creates a
_tickerand_isLoadingvariable to control input and loading state -
Line 15 - 34: Creates a
_getTickerAndSavemethod that uses theStockService().saveStockservice to search and save stock, set states, and uses thesnackbarto show the action performed -
Line 68: Adds the
_tickeras a controller to manage input -
Line 96 - 102: Calls the
_getTickerAndSavemethod when the search and save button is pressed
Get the List of Favourite Stocks
To get the list of stocks added as a favourite, we need to open the favourite.dart file in the same screens folder and modify as shown below:
import 'package:flutter/material.dart';
import 'package:stock_tracker/stock_service.dart'; //add
import 'package:stock_tracker/utils.dart'; //add

class Favourites extends StatefulWidget {
  const Favourites({Key? key}) : super(key: key);

  @override
  State<Favourites> createState() => _FavouritesState();
}

class _FavouritesState extends State<Favourites> {
  List<Stock>? stocks;
  bool _isLoading = false;
  bool _isError = false;

  @override
  void initState() {
    _getFavStockList();
    super.initState();
  }
  _getFavStockList() {
    setState(() {
      _isLoading = true;
    });
    StockService().getFavStocks().then((value) {
      setState(() {
        stocks = value;
        _isLoading = false;
      });
    }).catchError((e) {
      setState(() {
        _isLoading = false;
        _isError = true;
      });
    });
  }

  Widget build(BuildContext context) {
    return _isLoading
        ? const Center(
            child: CircularProgressIndicator(
            color: Colors.blue,
          ))
        : _isError
            ? const Center(
                child: Text(
                  'Error loading stocks',
                  style: TextStyle(
                    color: Colors.red,
                    fontWeight: FontWeight.bold,
                  ),
                ),
              )
            : stocks!.isEmpty
                ? const Center(
                    child: Text(
                      'No stock added to favourites yet',
                      style: TextStyle(
                        color: Colors.grey,
                        fontWeight: FontWeight.bold,
                      ),
                    ),
                  )
                : ListView.builder(
                    itemCount: stocks?.length,
                    itemBuilder: (context, index) {
                      return Container(
                        decoration: const BoxDecoration(
                          border: Border(
                            bottom: BorderSide(width: .5, color: Colors.grey),
                          ),
                        ),
                        padding: EdgeInsets.fromLTRB(10, 20, 10, 20),
                        child: Row(
                          mainAxisAlignment: MainAxisAlignment.spaceEvenly,
                          children: [
                            Expanded(
                              flex: 7,
                              child: Column(
                                crossAxisAlignment: CrossAxisAlignment.start,
                                children: [
                                  Text(
                                    stocks![index].symbol,
                                    style: TextStyle(
                                        color: Colors.black,
                                        fontWeight: FontWeight.w800),
                                  ),
                                  SizedBox(height: 10.0),
                                  Text(stocks![index].name)
                                ],
                              ),
                            ),
                            Column(
                              crossAxisAlignment: CrossAxisAlignment.end,
                              children: [
                                Text(
                                  '\$ ' + stocks![index].open,
                                  style: TextStyle(
                                      color: Colors.blue,
                                      fontWeight: FontWeight.w800),
                                ),
                                SizedBox(height: 10.0),
                                Text(stocks![index].exchange)
                              ],
                            ),
                          ],
                        ),
                      );
                    },
                  );
  }
}
The snippet above does the following:
- Imports the required dependencies
-
Line 13 - 15: Creates the
stocks,_isLoading, and_isErrorproperties to manage the application state -
Line 18 - 37: Creates a
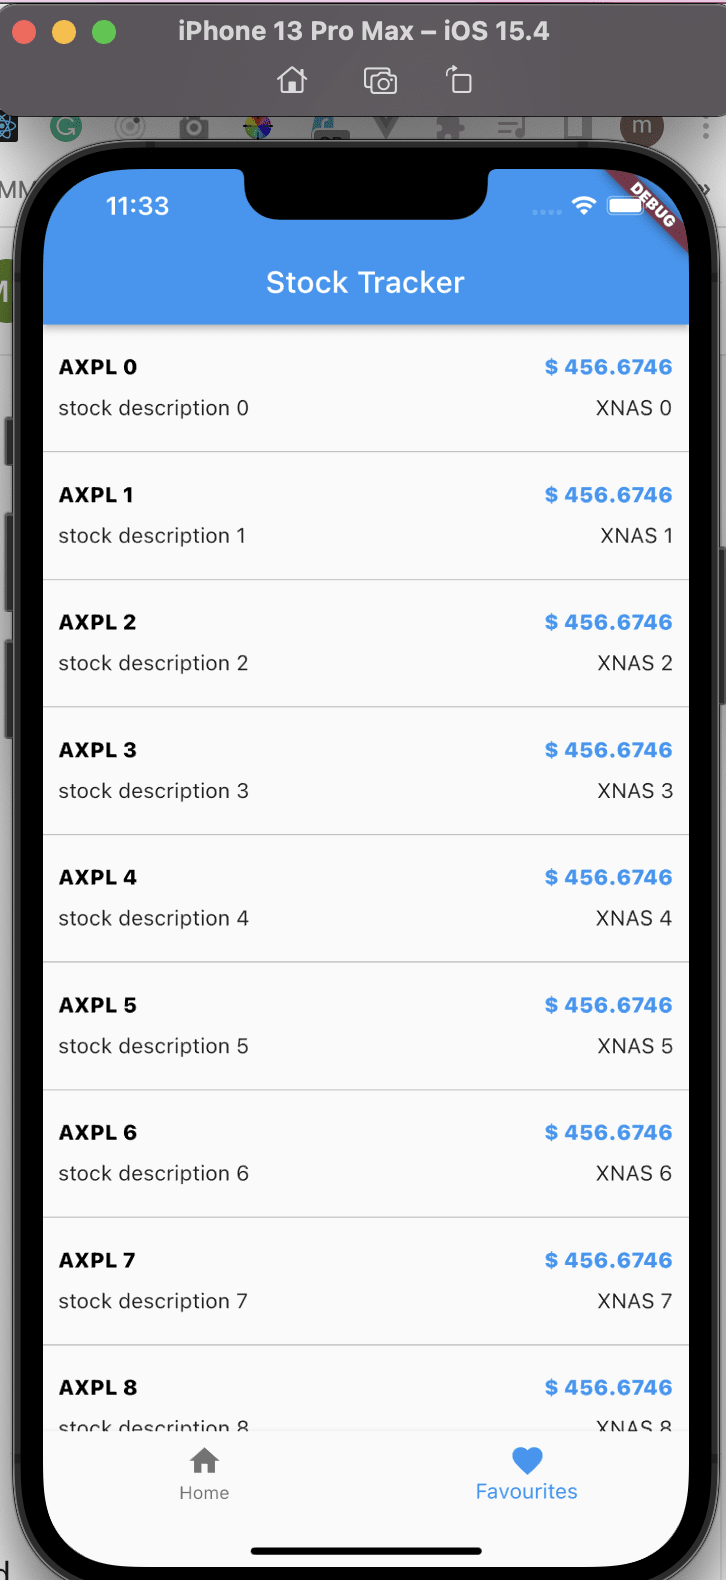
_getFavStockListmethod to get the list of stocks added as favourite using theStockService().getFavStocksservice, sets states accordingly, and uses theinitStatemethod to call the_getFavStockListmethod when the object is inserted into the tree - Modifies the UI widgets to show the stocks added as favourite coming from Appwrite
With that done, we restart the application using the code editor or run the command below:
flutter run

https://media.giphy.com/media/3iUrYHkpDGSlEUNUFv/giphy.gif
We can also validate the entries by navigating to the Database section of Appwrite’s management console.

Conclusion
This post discussed how to create a stock price tracker in Flutter and Appwrite. The Appwrite platform ships with services that speed up development processes. Try it out today and focus on what matters while Appwrite takes care of the tricky part.
These resources might be helpful:


Latest comments (0)