
When working with data sets, an essential first step is finding a view that lets you see all the relevant information you need from it at a glance, whether it's by listing out items, grouping them into columns in a table, or, as I'll demonstrate in this article a board that allows you to move items seamlessly based on their status.
Now to integrate Xata with React to create a board with the following features:
- Persisted data
- Create, Read, Update and Delete Assets
- Set the availability of the assets, i.e., if the player is injured or suspended
- Click and drop functionality to manage the player's status in relation your team
We'll use the following tools:
- Xata
- React
- Vite
- Cloudinary
Xata is a database service that provides built-in analytics, a search engine, and an easy-to-use spreadsheet-like user interface, among other great features.
React is a JavaScript library for building user interfaces with a great ecosystem of tools built around it.
Vite is a build tool that aims to provide faster and leaner development experience for current web projects.
Cloudinary provides cloud-based image and video management services, including storage and delivery, which we will take advantage of now to add the fantasy logo to our App.
And for those wondering, FPL (Fantasy Premier League) is a fantasy football game with over 10 million players worldwide.
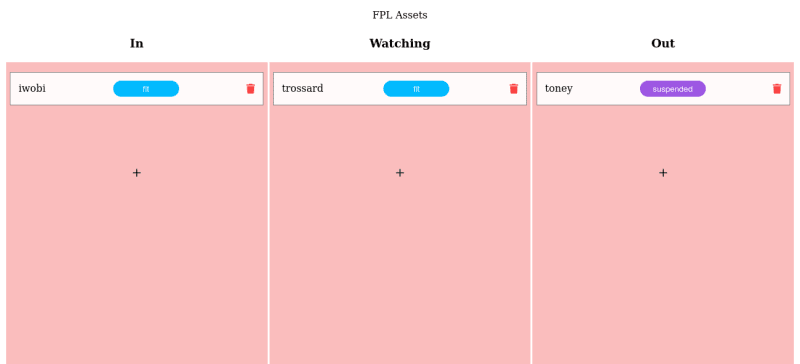
Here's a look at the complete application:
Creating the Xata Database
To get started with Xata, create an account here and follow the steps provided in the docs.
Logged into your workspace, you should see the following screen.

Create your database and create your table with the following schema:
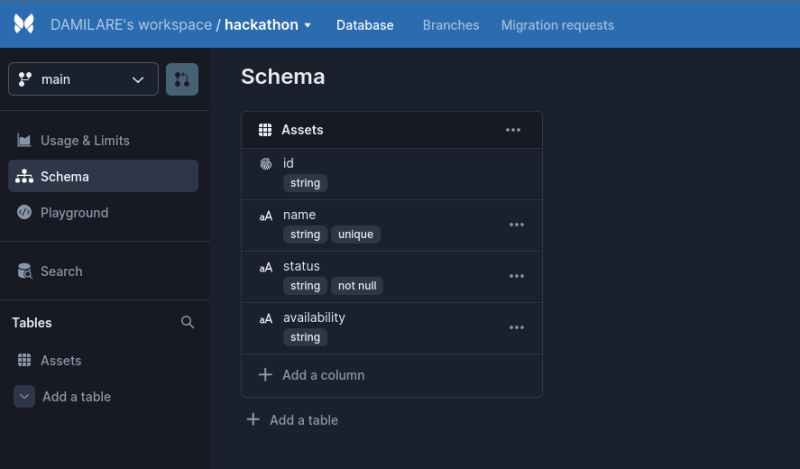
The assets table is the only one used in building this App, and I will go through the details and constraints I set on the database. There are four columns to store the associated values of each record, and all the column types are strings.
The id field contains an auto-generated value by default. The name field is set to be unique, so no two assets can have the same value for this field since it is used in filtering values later when developing the UI. The status field is required, so an error is thrown if an attempt is made to create a record without setting a status.
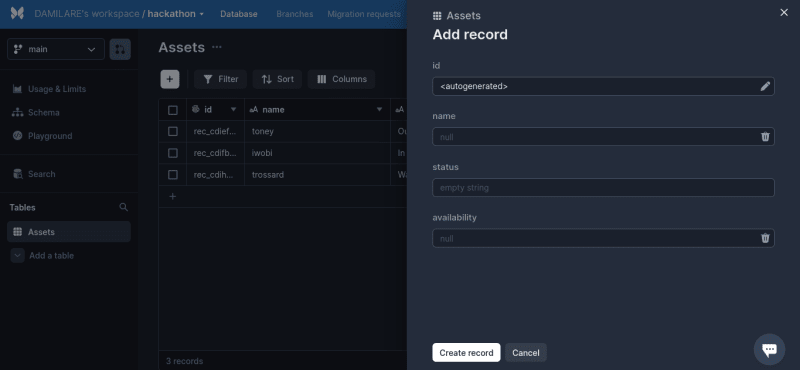
The image above shows the form required to create a new record instead of an ORM or raw SQL 🤫 .
Now that all the database requirements have been handled, we'll move on to building the front-end interface and connecting it to Xata using the SDK.
Building the React front end
No surprise that I've chosen React [the most popular UI library] for the front end. On the other hand, I've gone with vite as my build tool. It's more widely used in the Vue community, but it provides templates from other front-end frameworks and works amazingly well. Let's see it in action:
#scaffold the project you can replace `fpl` with a preferred project name
yarn create vite fpl --template react
#change directories to the newly created project
cd fpl
#run yarn to install packages
yarn
And that's it. You're free to swap it out with any other scaffolding framework of your choice
To add Xata to the application, start by installing the CLI globally
npm i -g @xata.io/cli
Follow the instructions here to create an API key and initialize your project.
After initialization, move the files in the src directory generated by xata init to your react apps src folder.
Now import the xata client generator into your App.jsx, call it, and export it so other components can access it.
import { useEffect, useState } from "react";
import { getXataClient } from "./xata";
import "./App.css";
export const xata = getXataClient();
Once that's done, we're ready to build the front end of our application. Although now is a good time to mention that Xata is better suited for frameworks with server-side capabilities, e.g., Next, Nuxt, and Svelte Kit.
There's the risk of exposing your API key when you work with Xata from a browser, so you'll see this message in your console if you try to run it within the browser:
Uncaught Error: You are trying to use Xata from the browser, which is potentially a non-secure environment. If you understand the security concerns, such as leaking your credentials, pass `enableBrowser: true` to the client options to remove this error.
This is easily fixed by modifying the defaultOptions object in xata.js:
    // Generated by Xata Codegen 0.18.0. Please do not edit.
    import { buildClient } from "@xata.io/client";
    /** @typedef { import('./types').SchemaTables } SchemaTables */
    /** @type { SchemaTables } */
    const tables = [
      {
        name: "Assets",
        columns: [
          { name: "name", type: "string", unique: true },
          { name: "status", type: "string", notNull: true, defaultValue: "in" },
          { name: "availability", type: "string" },
        ],
      },
    ];
    /** @type { import('@xata.io/client').ClientConstructor<{}> } */
    const DatabaseClient = buildClient();
    const defaultOptions = {
      databaseURL:
        "https://DAMILARE-s-workspace-uaav04.us-east-1.xata.sh/db/hackathon",
    };
    /** @typedef { import('./types').DatabaseSchema } DatabaseSchema */
    /** @extends DatabaseClient<DatabaseSchema> */
    export class XataClient extends DatabaseClient {
      constructor(options) {
        super({ ...defaultOptions, ...options }, tables);
      }
    }
    let instance = undefined;
    /** @type { () => XataClient } */
    export const getXataClient = () => {
      if (instance) return instance;
      instance = new XataClient();
      return instance;
    };
In the defaultOptions object set the enableBrowser option to true:
    const defaultOptions = {
      databaseURL:
        "https://DAMILARE-s-workspace-uaav04.us-east-1.xata.sh/db/hackathon",
      enableBrowser: true,
    };
Let's now add the CSS, open the App.css file and add the following rulesets:
    #root {
      max-width: 1280px;
      margin: 0 auto;
      padding: 2rem;
      text-align: center;
    }

    .header {
      display: flex;
      gap: 1em;
      justify-content: center;
      align-items: center;
    }
    .index {
      display: grid;
      height: 100vh;
      grid-template-rows: auto 1fr auto;
      row-gap: .4em;
    }
    .board {
      display: grid;
      grid-template-columns: repeat(3, 1fr);
      column-gap: .2em;
    }
    .assets {
      display: grid;
      grid-template-rows: repeat(11, 1fr);
      background-color: rgb(250, 189, 189);
    }
    .asset-card {
      background-color: rgba(255, 255, 255, 0.925);
      border: solid 1px grey;
      padding: .8em;
      margin-inline: .4em;
      display: flex;
      justify-content: space-between;
      align-items: center;
    }
    .avail-selector {
      appearance: none;
      background-color: #02bafe;
      color: white;
      border-radius: 3.2em;
      height: 2em;
      margin-left: 0;
      width: 8em;
      text-align: center;
      border: none;
    }
    .suspended {
      background-color: rgb(156, 86, 226);
    }
    .injured {
      background-color: rgb(158, 158, 8);
    }
    .fa-trash {
      color: rgb(250, 66, 66);
    }
    .hide {
      display: none;
    }
    .add-asset-form {
      display: flex;
      flex-direction: column;
      gap: 2px;
    }
And include the following link in index.html to use the font awesome icons in this project:
    <link
          rel="stylesheet"
          href="https://cdnjs.cloudflare.com/ajax/libs/font-awesome/6.2.0/css/all.min.css"
          integrity="sha512-xh6O/CkQoPOWDdYTDqeRdPCVd1SpvCA9XXcUnZS2FmJNp1coAFzvtCN9BmamE+4aHK8yyUHUSCcJHgXloTyT2A=="
          crossorigin="anonymous"
          referrerpolicy="no-referrer"
        />
Now we're ready to React! 😁
Components
This section will show the components used in building the application and their functions.
Create a components directory with the following members and insert the following code:
- AssetList.jsx
- AddAssetForm.jsx
- AssetDetail.jsx
AssetDetail.jsx
import React, { useState } from "react";
import { xata } from "../App";

function AssetDetail({ asset, deleteAsset, onClick }) {
  const optionsAvailable = ["fit", "injured", "suspended"];
  const [availability, setAvailability] = useState(asset.availability);
  const { id } = asset;
  const handleChange = (e) => {
    let availability = e.target.value;
    xata.db.Assets.update({ availability, id });
    setAvailability(availability);
  };
  return (
    <p className="asset-card" key={asset.id} onClick={() => onClick(asset)}>
      <span>{asset.name}</span>{" "}
      <select
        name="availability"
        onChange={handleChange}
        className={`avail-selector ${availability}`}
      >
        <option value={asset.availability}>{asset.availability}</option>
        {optionsAvailable.map(
          (option) =>
            option != asset.availability && (
              <option value={option} key={option}>
                {option}
              </option>
            )
        )}
      </select>
      <i
        className="fa-solid fa-trash"
        onClick={(e) => {
          deleteAsset(asset.name, asset.id);
          e.stopPropagation();
        }}
      />
    </p>
  );
}
export default AssetDetail;
This component displays a card with the details about a single asset, i.e., name and availability. You can select between 3 different options, and the styling changes depending on the preferred option.
It also contains a delete functionality in an onClick event with a stopPropagation set, so it doesn't interfere with the click-and-drop functionality. Calls are made to the database to delete and update an asset's availability.
AddAssetForm.jsx
    import React from "react";
    import { useState } from "react";
    import { xata } from "../App";
    function AddAssetForm({ status, show, onFormClick, updateAssets }) {
      const [name, setName] = useState("");
      //   const [status, setStatus] = useState(status);
      const [availability, setAvail] = useState("");
      const handleChange = (e) => setName(e.target.value);
      const handleSubmit = (e) => {
        e.preventDefault();
        updateAssets({ name, availability, status });
        xata.db.Assets.create({ name, availability, status });
        setName("");
        setAvail("");
        onFormClick();
      };
      return (
        <div>
          <form
            action="post"
            onSubmit={handleSubmit}
            className={!show ? "hide" : "add-asset-form"}
          >
            Add Asset
            <input type="text" value={name} onChange={handleChange} />
            <input
              type="text"
              name="availability"
              value={availability}
              onChange={(e) => setAvail(e.target.value)}
            />
            <input type="submit" value="add player" />
          </form>
        </div>
      );
    }
    export default AddAssetForm;
This component contains the form to add new assets to the list. I have an onFormClick prop that toggles its visibility when submitted. Upon submission, the database is called, the new asset is created, and the local state is updated to display the changes.
AssetList.jsx
    import { useState } from "react";
    import { xata } from "../App";
    import AddAssetForm from "./AddAssetForm";
    import AssetDetail from "./AssetDetail";
    export default function AssetList({
      assets,
      status,
      updateAsset,
      allAssets,
      selectAssetCardOnClick,
      moveCard,
    }) {
      const [showForm, setShowForm] = useState(false);
      const updateAssetsDisplayed = (newAsset) => {
        updateAsset(allAssets.concat(newAsset));
      };
      const handleClick = () => {
        setShowForm(!showForm);
      };
      const deleteAsset = (assetName, assetID) => {
        xata.db.Assets.delete(assetID);
        updateAsset(allAssets.filter((asset) => asset.name !== assetName));
      };
      return (
        <div className="assets" onClick={() => moveCard(status)}>
          {assets.map((asset) => (
            <AssetDetail
              asset={asset}
              allAssets={allAssets}
              deleteAsset={deleteAsset}
              onClick={selectAssetCardOnClick}
              key={asset.id}
            />
          ))}
          {assets.length < 11 ? (
            <>
              <AddAssetForm
                status={status}
                show={showForm}
                onFormClick={handleClick}
                updateAssets={updateAssetsDisplayed}
              />
              <i className="fa-regular fa-plus" onClick={handleClick} />
            </>
          ) : (
            ""
          )}
        </div>
      );
    }
This component lists all the assets of a particular status that have been created. It's set only to allow the user to toggle the form to create new assets while the number of assets contained in it is less than 11.
Finally, bring it all together in the App.jsx file:
    import { useEffect, useState } from "react";
    import { getXataClient } from "./xata";
    import "./App.css";
    import AssetList from "./components/AssetList";
    export const xata = getXataClient();
    function App() {
      const [assets, setAssets] = useState([]);
      const [selectedCard, setSelectedCard] = useState(null);
      useEffect(() => {
        (async () => {
          const data = await xata.db.Assets.getAll();
          setAssets(data);
        })();
      }, []);
      const handleCardSelect = (currentCardName) => {
        setSelectedCard(currentCardName);
      };
      const moveCard = (newStatus) => {
        try {
          const { id } = selectedCard;
          if (selectedCard) {
            xata.db.Assets.update({ id, status: newStatus }),
              setAssets((prevState) => [
                ...prevState.filter((asset) => asset.name !== selectedCard.name),
                { ...selectedCard, status: newStatus },
              ]);
            setSelectedCard(null);
          }
        } catch (e) {}
      };
      const assetsIn = assets.filter(
        (asset) => asset.status.toLowerCase() === "in"
      );
      const assetsOut = assets.filter(
        (asset) => asset.status.toLowerCase() === "out"
      );
      const assetsWatch = assets.filter(
        (asset) => asset.status.toLowerCase() === "watch"
      );
      return (
        <div className="index">
          <header className="header">FPL Assets</header>
          <div className="board">
            <span>
              <h3>In</h3>
              <AssetList
                assets={assetsIn}
                allAssets={assets}
                status="In"
                updateAsset={setAssets}
                selectAssetCardOnClick={handleCardSelect}
                moveCard={moveCard}
              />
            </span>
            <span>
              <h3>Watching</h3>
              <AssetList
                assets={assetsWatch}
                allAssets={assets}
                status="Watch"
                selectAssetCardOnClick={handleCardSelect}
                updateAsset={setAssets}
                moveCard={moveCard}
              />
            </span>
            <span>
              <h3>Out</h3>
              <AssetList
                assets={assetsOut}
                allAssets={assets}
                status="Out"
                updateAsset={setAssets}
                selectAssetCardOnClick={handleCardSelect}
                moveCard={moveCard}
              />
            </span>
          </div>
          <footer>and some bottom stuff</footer>
        </div>
      );
    }
    export default App;
In the App root, we fetch the initial data from the database with useEffect, filter the cards by their current status and provide them to the AssetList components as appropriate.
Finally, this contains the moveCard function that handles the click-and-drop functionality to move assets between different lists.
Image storage with Cloudinary
Cloudinary provides cloud-based image and video management services, including storage and delivery, which we will take advantage of now to add the fantasy logo to our App.
Start by creating an account, registering, logging in, accessing your media library, and uploading the logo, which you can find here.

To get it to work with React, you have to install Cloudinary's React library:
yarn add @cloudinary/url-gen @cloudinary/react
Now add the following code to App.jsx
import { Cloudinary } from "@cloudinary/url-gen";
import { AdvancedImage } from "@cloudinary/react";
import { fill } from "@cloudinary/url-gen/actions/resize";
function App() {
  ...
  const cld = new Cloudinary({
    cloud: {
      cloudName: <CLOUD_NAME>,
    },
  });
  const Image = cld
    .image("FPL-2223-EDITORIAL-STATEMENT_2_kd8sgw.png")
    .resize(fill().width(200).height(50));
...
Replace with your cloud_name, which was automatically assigned when you created your account. The dynamic URLs for accessing Cloudinary are based on your cloud_name.
After that, include the newly created image in the app header, and it is done.
    return(
    ...
      <header className="header">
            <span>
              <AdvancedImage cldImg={Image} />
            </span>
            <span>
              <h2>Assets</h2>
            </span>
          </header>
     ...)
This only scratches the surface of what can be done with Cloudinary. From the fast content delivery network to automatic face detection-based transformations while providing easy-to-use APIs for every widely used programming language. It is a convenient service for projects of all sizes requiring any form of image or video handling.
Conclusion
You can find all the code; my application instance is here. For example, you can extend the ideas presented in this article by replicating them in a server-side framework like in the official Xata tutorial.


Latest comments (2)
Nice one!
thanks.