Expectation
In this post I am going to explain how I automated certain garage door operation using raspberry pi. If you find it useful then you can follow this guide and build your own too.
- Open/Close garage door from your phone
- Know the status (open or close) of the garage door.
- Auto close garage door in 5 mins.
- Override auto close in 5 mins.
- Know the time it was last closed/opened.
Note: This is my first take at this and I am still learning.
Parts needed
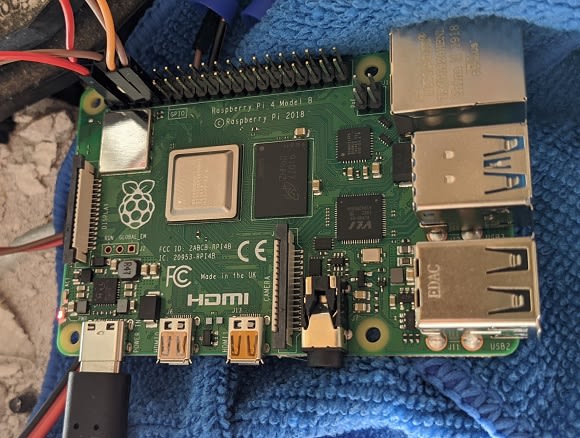
- Raspberry Pi -
~$35- You can use any kind 3 or 4. I used 4 because I got it for
$5price difference. - Buy link - Microcenter
- You can use any kind 3 or 4. I used 4 because I got it for
- Breadboard jumper wires - Amazon
- Relay module - Amazon
- 20 Gauge 2 pin wire - Amazon
- You can buy a lower gauge wire also.
- Magnetic switch - Amazon
Setup
Raspberry Pi
I am not going to go into detail on how to setup Raspberry Pi as most of the setup instructions are available out in the wild.
Here is what I used:
- Youtube video - https://www.youtube.com/watch?v=BpJCAafw2qE
- Docs - https://crosstalksolutions.com/getting-started-with-raspberry-pi-4/
Thanks to @crosstalksol for the awesome setup guide.
Note: Please read up on raspberry pi GPIO pins as it will help you when you work on this project.
gpio module on raspberry pi
Inside raspberry pi, open a terminal and write gpio -v. We need atleast 2.52 version.
If an update is needed, then follow this: http://wiringpi.com/wiringpi-updated-to-2-52-for-the-raspberry-pi-4b/
IP address
First, note down the current IP address of the Pi. Second. make sure you make the ip of the Pi static because we don't want to keep changing it after restarts. This is not a necessary step, but it helps while you work on this.
In my setup i have google fiber, so I logged into the router setup page and in the client list select raspberry pi. Activated the reserved flag on pi client so that it keeps the same ip address. Feel free to google on how to do this on your router.
Computer
- I installed Putty on my windows machine to
sshinto raspberry pi from my windows laptop. - Feel free to use any other
sshclient which works best for you.
Let us get to work
Hardware setup
Let's setup all the different parts to get door working first. At this point don't worry about all these connection as we will go in detail when we start programming them.
We will use BCM conventions for GPIO pin numbers. When using pin numbers those will denote physical pin numbers. Run gpio readall inside bash session on your raspberry pi to get more details.
Find the manual button wire connection into your garage door
I have a Chamberlain garage door opener, I was able to trace the button (from the wall) wires going into one terminal in your garage door opener. It looks like a thin looking wire as compared to regular electric wires in your house. Do not confuse the wires coming from the safety sensors hooked up to your garage door sides. In my case red was positive and white was negative.

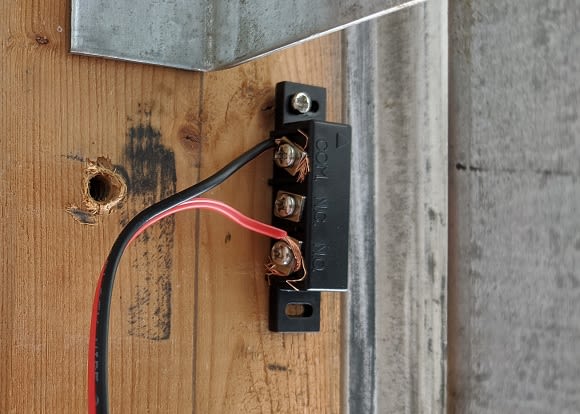
Connect wires from your garage opener sockets to relay module
- Make sure you connect the negative (black in pic) to center terminal of the relay module and hot (red in pic) wire to left terminal on the relay module.
- Concept is that when we connect these two wires, it completes the circuit which in turn trigger the garage open/close operation.

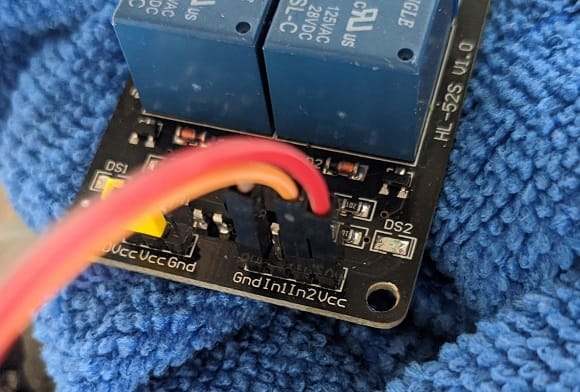
Connect relay to raspberry pi
- Connect GND to pin 6 (other orange looking wire)
- Connect VCC to pin 2 ie 5v supply (red wire in pic)
- Connect IN2 to GPIO 4 (orange wire in pic)
IN2 pin is what will be used to trigger the changes. Other 2 wires is to provide power (5v) to the relay.
Connect magnetic switch to raspberry pi
- Connect COM to ground on pin 6
- Black wire from the switch to orange looking wire
- Connect NO to GPIO 2 (red wire in pic)
- This is pin is an pull-up type which means it outputs 3.3v
- I am still trying to better understand this area.
- I think you can use other pins as pull-up by configuration but i did not try it.
Mechanical switch connections
Connection to the raspberry pi
Mechanical switch to the garage door
- Hook up the mechanical switch on the side of the garage door panel as show in the picture above.
- Hook up the other piece on the movable garage door so that when its closed it comes very close to the other side.
- Basically, it detects close when they are close to each other and open when they are not close to each other.
Software
Complete code: Github
Using onoff npm package
- This package only works on Linux so make sure you code on the raspberry pi
- You can use vscode via ssh to code inside raspberry pi (Google is your friend here)
- Lets setup
GPIO 4tooutsince we are going to use that pin to trigger the open close. - Configure
GPIO 2toinas we are going to read high (1) and low (0) based on the magnetic switch changes.- Configure this pin to call out function in both direction (high and low)
- This library allows to read in one direction also.
const buttonTrigger = new Gpio(4, "out", undefined, {
    reconfigureDirection: false
});
const doorSensor = new Gpio(2, "in", "both", {
    reconfigureDirection: false,
    debounceTimeout: 1000
});
Open close action
- When we want to close/open the garage door we are going to output a low on
GPIO 4then wait for 1 second and then output high. - The reason we flip flop is that we want to just output a pulse and then get back to its original state.
- Think of this as a button click, press and release action kind of a deal.
- When you do this at this point it sends the signal to the relay where its output state is disconnected.
- When the trigger happens, it completes the relay switch circuit on the other side.
- That complete circuit allows the current to flow from inside the garage opener and that's why its start to work.
- Sorry I am not an electrician so that's the best I can explain.
export const openCloseGarage = async () => {
    buttonTrigger.write(Gpio.LOW);
    await sleep();
    buttonTrigger.write(Gpio.HIGH);
};
Bonus stuff
If you use the garage module, I have setup then it should get you all started. Follow these steps inside your raspberry pi:
git clone https://github.com/gyandeeps/garage.git-
npm install(This is going to take a long time) sudo sh prod.sh
Phone
- On your phone you should be able to hit
http://<ip address to pi>:3000 - Then open close the garage.
Closing thoughts
- This is my first project and i am still trying to figure a lot of things out.
- Please provide feedback or anything which can be improved.
- Any ideas on what else can be done.
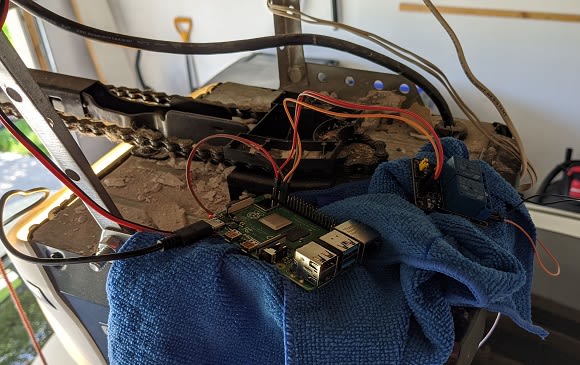
Overall picture (needs to find a good place for this but they work for now)


Oldest comments (1)
Thank you so much for sharing this detailed guide on automating garage door operations using Raspberry Pi! Your step-by-step instructions and insights into hardware setup and software configuration are incredibly helpful. I really appreciate it. I'll definitely share this information on my garage door opener repair website to help others interested in DIY projects like this one. Keep up the fantastic work, and looking forward to any updates or further projects you undertake!