Thirdweb recently upgraded its framework by adding support for all EVM-compatible blockchains (EVM-Ethereum Virtual Machine: this deals with the ability to write and deploy smart contracts that work seamlessly with the Ethereum Virtual Machine and hence can be recognized by nodes running on the Ethereum blockchain.)
With this development, thirdweb now boast of a dashboard that works with any existing smart contract, regardless of how it was deployed. While this works most of the time, other times further actions are needed for contracts to be fully imported, such as verifying the contract and ensuring that its metadata is recognized
This improvement has also increased thirdweb’s blockchain base to around 700+ making it an all-in-one solution for most deployment need.
Understanding thirdweb
Prior to thirdweb inception, writing, compiling and deploying smart contracts would require extensive knowledge on the path of choice be it solidity with hardhat or truffle framework, this required writing scripts, testing and ensuring everything works as planned. These actions can be time-consuming and prone to errors. Thirdweb removed all this hurdles by providing users and developers with set of prepared contracts for their needs. Be it NFT, token, authentication e.t.c. Within minutes, such contracts can be deployed to any chain of choice, greatly reducing the time for a developer to produce. Now with increased support for all EVM compatible chains, thirdweb aims to become the default choice for all your deployment needs.
Importing custom “MultiSend” contract
By importing your contracts to the thirdweb dashboard, you gain the advantage of integrating directly to the thirdweb suite of tools like their SDK, custom explorer and other functionality for testing and visualizing your contract.
Navigate to the thirdweb dashboard, click on search and input your custom contract address, click on the recognized contract to begin the import.

The contract is finally imported, giving you a view to custom actions.

On the left side, you can see custom tabs namely build, explorer and events. These allow you to perform actions such as integrating your contract to the thirdweb SDK for easy front end development, accessing your contracts methods for testing and viewing all events available in your contract.
Under the ‘source’ tab, it further gives you an option to verify your contract and shows you the source code and ABI. Truly a convenient way to manage custom contract.

Deploying contracts via thirdweb
A convenient way to deploy smart contracts is with the thirdweb command line interface (CLI), accessible from a terminal.
To begin, navigate to a folder of choice and input:
npx thirdweb create
This will install the thirdweb package for you.

Select “contract”
And fill in other prompts with your choice
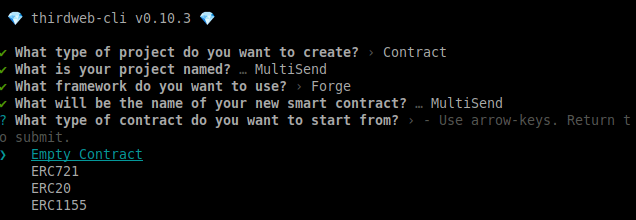
For this project, I chose forge as my framework
After the setup is completed with the folder generated, copy your contract source code into the ‘src’ folder, replacing the generated ‘contract.sol’ file.
The main function in the "MultiSend" Contract can be seen below
function sendAll (address[] calldata recievers, uint amt) external payable{
        senderBalance[msg.sender] += msg.value;
        uint arrLength = recievers.length;
        uint totalToSend = amt * arrLength;
        uint tempAmt = amt;
        uint bal = checkSendersBalanceOfContract();
        require(bal >= totalToSend, "Insufficient balance");

        for (uint i = 0; i < arrLength; i++) {
            if(recievers[i] != address(0)) {
                address _to = payable(recievers[i]);
                senderBalance[msg.sender] -= tempAmt;
                (bool sent, ) = _to.call{value: amt}("");

                require(sent, "Failed to send Ether");
                emit SendAll(recievers[i], amt);

            }else{
                revert SendFailed(recievers[0], amt);
            }
        }
        whitelistToWithdraw[msg.sender] = true;

    }
Which ensures that senders balance is sufficient to distribute the given value between the recipients. This is important as the purpose of a multisend contract is to send value to multiple recipients, thereby saving on gas cost.
Back in the terminal, run yarn build to compile your project and yarn deploy to upload your contract to IPFS(Interplanetary File System; a decentralized storage medium)

After this, the thirdweb deployment utility gets opened, from where you can connect your wallet and choose a network for deployment.

For this project, I chose to use the polygon Mumbai, which is a Layer-two network, for testing purposes. Click on "deploy now" and follow through with the prompts from Metamask to finalize the contract deployment.
Below is the deployed multisend contract on the thirdweb dashboard
https://thirdweb.com/mumbai/0xd04B1Ebea6CfFdF2b9bc8aE5C71cCf04e7D662b8
Conclusion
With technological advancement and the demand for rapid project delivery, it has become very important to find a solution that provide security and speed to contracts deployment. Thirdweb provides an easy and intuitive way to quickly deploy smart contracts and standards for your quick use. This can prove handy in situations like hackathons, bounties and time sensitive projects where a feature needs to be quickly added without fear of compromising on quality and security. Indeed, thirdweb has made smart contract accessibility and deployment problem a thing of the past, and with it “Any contract, any EVM” upgrade, it has become the Swiss army knife for deployment and contract management.


Top comments (0)