
Table Of Contents
- Howdy Reader
- Demo
- What is an emulator
- Shallow Dive into the Gameboy
- Enter Google Sheets
- The First Road Block
- Creating the Sidebar
- Integrating the Gameboy
- Final Thoughts
- About the Author
Howdy Reader 👋🏽
You must be thinking "only an idiot would try to run a Gameboy emulator in Google Sheets"? And you'd be right! My favorite programming projects have always been emulators. I was on Google Sheets one day and thought this is boring, and you know what's not boring? Gameboys! It shouldn't be too hard, after all, I've already written one in Java.
We are gonna go over what an emulator is, the basics of the Gameboy, and then the steps to running it in Google Sheets. Let's dive in.
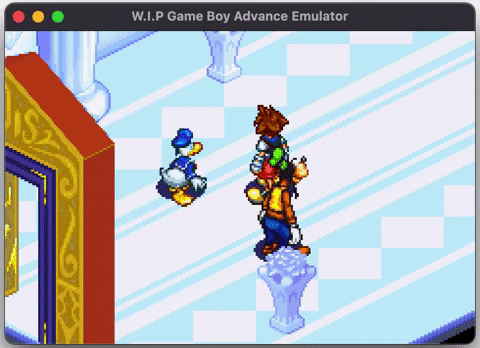
Demo 🎮
Click here for the sheet. Be sure to make a copy or else your sheet won't render. You can do this by clicking "File" then "Make a copy". After copying, you will have to wait a couple seconds for the script to activate which will reveal a new tab in the toolbar named "Gameboy Emulator". Click on the "Gameboy Emulator" tab then click "Show dialog". The script should automatically switch to the "GameboyScreen" sheet, if not switch to it manually.

You may be greeted with an error about not being safe or needing permission. Click yes / proceed on both. And if you are not sure, here is the source.
You can view the code by clicking "Extensions" in the toolbar and click "Apps Script".

What is an emulator 🕹️
An emulator can be summed up as hardware or software that allows a computer system (aka your laptop) to run software meant for another computer system (aka Gameboy ROMs).
A general rule of thumb is the computer system that's emulating another computer system needs to be at-least 3-4x more powerful than the original because of the extra layer's introduced through emulation.
That's how you're able to download Gameboy / PSX ROMs and run them on phones/computers or any device that can download the appropriate emulator.
Shallow Dive into the Gameboy 🥽

The Gameboy is a relatively simple system running a modified 8-bit Z80 Cpu and 64 KB of addressable memory. It also has multiple accompanying sub-components:
- LCD
- Timers
- APU
- Serial Port
- Gamepad Buttons
When a computer system starts up it runs on a finite loop called the fetch-decode-execute loop.
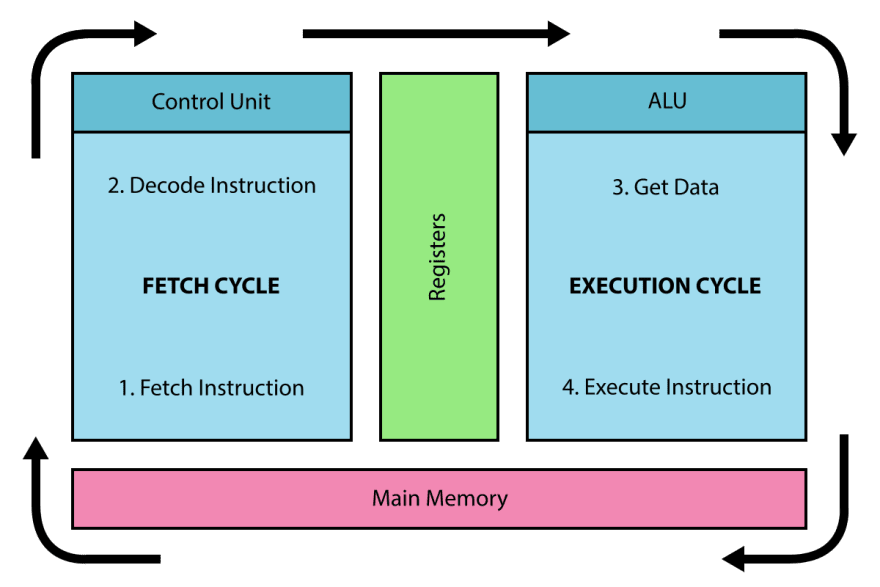
The CPU
The CPU functions as the brain on a computer and orchestrates the fetch, decode, and execute cycle. It contains 8, 8-bit registers A, B, C, D, E, F, H, and L and can combine them to make 4, 16-bit registers AF, BC, DE, and HL along with the other 16-bit registers SP and PC. Let's see how the cycle looks inside the CPU.
const runCycle = () => {
  // Fetch
  const opcode = memory.read8(pc++);
  // Decode
  const instruction = decode(opcode);
  // Execute
  const elapsedCycles = instruction();

  return elapsedCycles;
}
Keeping Components in Sync
After executing an instruction, a certain amount of CPU cycles have elapsed and we have to keep the entire system in sync. We do this by extracting each component into a class and expose a update function that progresses the component based on how many cycles have passed.
let currCycles = 0;

const runFrame = () => {
  while (currCycles < CYCLES_PER_FRAME) {
    const elapsedCycles = cpu.runCycle();
    lcd.update(elapsedCycles);
    apu.update(elapsedCycles);
    timers.update(elapsedCycles);
  }
}
Enter Google Sheets 📊
That's all I'm going to say for the Gameboy. If you want to know more, read here. Knowing how to start, the next step was writing the code for Google Sheets. Google Sheets runs code using Apps Script which is Google's custom server-side JavaScript runtime made for their web apps.
Diving into the docs nothing seem too different from regular JavaScript so I started writing! The plan was simple. Write the emulator using Apps Script, then display the frames on the sheet.
Simple enough, so I started writing the code and performed simple operations.
// Get sheet meta
const sheet = SpreadsheetApp.getActiveSheet();
const maxCols = sheet.getMaxColumns();
const maxRows = sheet.getMaxRows();

// Resize grid to gameboy dims
resizeSheetToGameboyDims(sheet, maxRows, maxCols);

// Set the size of rows and cols to a gameboy pixel
setSheetRowAndColsToSizeOfPixel(sheet, maxRows, maxCols);

// Clear sheet
clearSheet(sheet);

// Start emulator
startEmulator();
The First Road Block
After a while, my code would automatically fail with no warning. That's when I noticed a major flaw in my plan.

Google only allows 30 seconds of runtime for custom scripts! That means my emulator couldn't run long enough to be useful or debuggable! All was lost until I realized you can create sidebars with JavaScript and HTML.
The plan shifted from running the emulator on the server to creating a client-side sidebar that will contain the context of our emulator and send a draw command to the server to draw the current frame on the sheet.
Creating the Sidebar
An interesting feature of Apps Scripts HTML is that it cannot import JavaScript files, everything must be a .html file. The workaround is to wrap all client-side JavaScript within an HTML file in a <script> tag.
HTML files can be linked using an import function inside <?!= ?> scriptlets which allows you to execute code within HTML. Inside, we run the client-side Apps Script function to load HTML from another file.
<!-- Outputs the Gameboy file inside the current html file -->
<?!= HtmlService.createHtmlOutputFromFile('gameboy.html')
    .getContent(); ?>
Integrating the Gameboy
After some writing, I realized I'm not that good at writing JavaScript so I opted to modify an existing Gameboy core.
Since the emulation logic is already there, all that needs to be done is modify the core's drawing function to send the frame data to the server and draw it to the sheet.
I started by defining logic to draw a 2d array of image data to the sheet.
const drawGrid = (colors) => {
  try {
    const ss = SpreadsheetApp.getActiveSpreadsheet();
    const sheet = ss.getSheets()[1];
    const range = sheet.getRange("1:144");
    range.setBackgrounds(colors);
    SpreadsheetApp.flush();
  } catch (e) {
    Logger.log(e);
  }
}
Now the emulator on the client calls the draw function using the google.script.run.[SERVER_FUNCTION_NAME] function.
google.script.run.drawGrid(frame);
After connecting the functions we got a Gameboy emulator that draws to Google sheets!

Limitations 🚫
It's Super Slow
Turns out the Apps Script API is not that fast. The server commands are slow and drawing is slower. Maybe one of you could experiment and find a speedup solution.
No way to queue commands
Draw commands sent to the server are drawn out of order so you keep seeing frames that were executed in the past. To mitigate, the client queues draw commands and sends the next one only when the previous command finishes.
Final Thoughts 💭
This was an interesting yet disappointing journey. I wish that the Google Sheets API had higher script limits. I did enjoy revisiting the Gameboy and learning about Apps Script even though it's limited.
Even though I didn't get the exact effect I wanted, I got it to draw so I guess that counts as something. Next time, I'll drop a banger project for sure!
About the Author 👨🏾💻
I'm Gregory Gaines, a simple software engineer @Google who's trying to write good articles. If you want more content, follow me on Twitter at @GregoryAGaines.
Now go create something great! If you have any questions, hit me up on Twitter (@GregoryAGaines); we can talk about it.
Thanks for reading!


Top comments (0)