Microsoft recently released their .NET 6 Preview environment for developers working in Visual Studio 2022 Preview (.NET 6 won’t natively work in Visual Studio 2019). With the release of .NET 6, we’ve released our own .NET 6 controls that will make your experience working in the latest version of WinForms that much easier. We’ll be learning how to create an annual financial report using our WinForms PrintDocument control this time.

One of the main advantages to using the PrintDocument control over one of our reporting controls, such as FlexReport, is that with PrintDocument, you have complete control over the entire rendering of the document, including what, where, and how items are placed. Every line inside the PrintDocument control is fully customizable.
Compared to our other reporting controls, there is slightly more developer overhead working with PrintDocument, but the customization potential provided by PrintDocument is unrivaled. We could create any report, image, pdf, text, etc., that we want, but we’ve gone with an annual financial report for this practical example. To find the in-depth documentation we used for this sample; please visit the following link: https://www.grapecity.com/componentone/docs/win/online-printdocument/overview.html
To start, we will want to open Visual Studio 2022 Preview, create a new .NET 6 WinForms application, and go to the NuGet Package Manager in the Visual Studio Tools menu to add the package C1.Win.Printing (6.0.20213.530) or higher.
Next, we’ll want to navigate to the Form1.cs designer page and open the Visual Studio toolbox to add the C1PrintDocument control and the C1PrintPreviewControl to the form. Once both the C1PrintDocument and the C1PrintPreviewControl are on the form, we’ll want to click on the smart tag on the upper right-hand corner of the C1PrintPreviewControl to dock it to the parent container.

We begin by creating a blank PrintDocument object:
C1PrintDocument doc = new C1PrintDocument();
Next, we’ll need data. You would like to connect to the PrintDocument control if you have an underlying database. You can do so via the DataBinding property in RenderObject, the type C1DataBinding that allows you to specify the data source for data shown by the rendered object. The document can then contain the database schema, represented by C1DataSchema, and includes the database connection info such as SQL queries, etc. The C1DataBinding objects within the document can reference the properties of that schema. Alternatively, the C1DataBinding object can reference existing data sources, such as DataTable and so on, which were created on the form or elsewhere in the program that created the PrintDocument. For simplicity, in our example, we will be creating a RenderTable inside our application that will supply the data for our PrintDocument.
We will create two RenderTables objects, one for the “Title” of the report and company information, and the second RenderTable will hold our actual data.
// Create two RenderTable objects:
RenderTable rt = new RenderTable();
RenderTable rt1 = new RenderTable();
// Here we are utilizing our second RenderTable to create extra headers above our grid, and we have lines turned off by default so nothing shows.
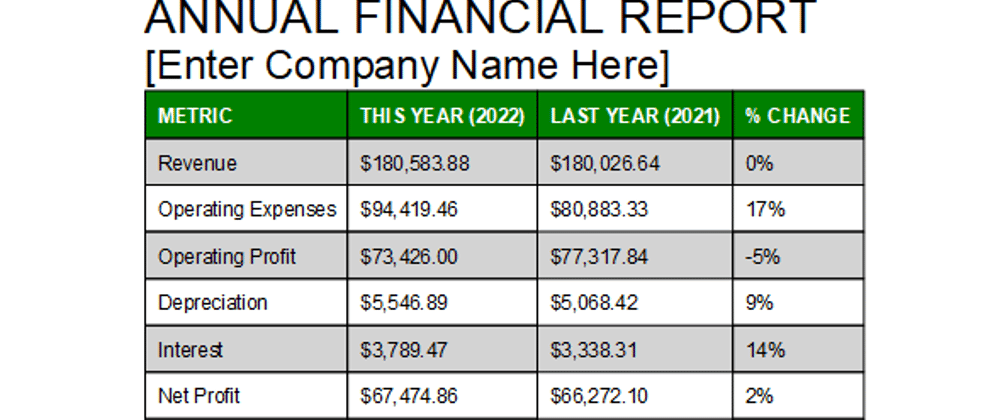
rt1.Cells[0, 0].Text = "ANNUAL FINANCIAL REPORT";
rt1.Cells[1, 0].Text = "Enter Company Name Here";
rt1.Rows[0].Style.FontSize = 24;
rt1.Rows[1].Style.FontSize = 20;
For the data-containing RenderTable, I used the first row to set column headers:
    // add initial header data

    rt.Cells[0, 0].Text = "METRIC";

    rt.Cells[0, 1].Text = "THIS YEAR (2022)";

    rt.Cells[0, 2].Text = "LAST YEAR (2021)";

    rt.Cells[0, 3].Text = "% CHANGE";
We then manually set the data for each row as follows:
   // Row 1

    rt.Cells[1, 0].Text = "Revenue";

    rt.Cells[1, 1].Text = "$180,583.88";

    rt.Cells[1, 2].Text = "$180,026.64";

    rt.Cells[1, 3].Text = "0%";
Style
After all our data is supplied, it’s time to set the style properties of the RenderTables. The first thing we’ll want to do is turn on gridlines for our second RenderTable and add some padding to clearly distinguish the separate rows of data.
    rt.Style.GridLines.All = LineDef.Default;

    rt.CellStyle.Padding.All = "2mm";
We can also set the columns and rows to auto-size based on the data inside them rather than the default, which is based on the parent page’s width.
    // 1) By default, table width is set to parent (page) width,
    // for auto-sizing we must change it to auto (i.e. based on content):
    rt.Width = Unit.Auto;
    // 2) Set ColumnSizingMode to Auto (default means Fixed for columns):
    rt.ColumnSizingMode = TableSizingModeEnum.Auto;
    // that's it, now the table's columns will be auto-sized.
We can also use the different collections included in the RenderTable class for easy access to entire Row styles or even the RowGroups collection if we want to group a range of rows for easy manipulation. In the image below, we are using the RowGroups.Header property to specifically label the first row as the header and the page header.
    // Add the first row as a header and make the text color white and bolded
    rt.RowGroups[0, 1].Header = C1.C1Preview.TableHeaderEnum.Page;
    rt.Rows[0].Style.TextColor = Color.White;
    rt.Rows[0].Style.FontBold = true;
    rt.RowGroups[0, 1].PageHeader = true;
    // Change the header background color
    rt.RowGroups[0, 1].Style.BackColor = Color.Green;
Next, we can add different background colors for every other row by using the following logic along with the Rows.Count property:
    for(int i = 1; i < rt.Rows.Count; i++)

                {

                    if (i % 2 == 0)

                    {

                        rt.Rows[i].Style.BackColor = Color.White;

                    }

                    else

                        rt.Rows[i].Style.BackColor = Color.LightGray;

                }
Finally, we can add the RenderTables to the PrintDocument object and then load the PrintDocument object into the PrintPreview control with just a few lines of code:
    // Add the tables to the document

    doc.Body.Children.Add(rt1);

    doc.Body.Children.Add(rt);

    // Show the document

    this.c1PrintPreviewControl1.Document = doc;
Once you run the application, you can print the file or export it via the “save” icon directly from the PrintPreview control into a variety of different file formats, such as PDF, .xlsx, .xls, .rtf, and more. A complete list is shown in the image below:

Download the sample here.


Top comments (0)