In this article, I will give a step-by step guide on how to create a CI/CD Pipeline for a React Web App hosted as a static website in a S3 Bucket.
Below is an architecture diagram illustrating the AWS services that were used to build this solution.

Now that you have reviewed the architecture, let's get straight into it.
Create React App
If you want to follow along with your own react application please feel free to do so. If not, head over to GitHub and clone the repo.
Creating buildspec file
Once you have the repo cloned, take a minute to review the buildspec.yml file, this file is used to provide AWS CodeBuild instructions on how to build our application. It has 4 stages, install, pre_build, build and post_build and lastly it output our artifacts files.
Note: The buildspec file is created at the root level inside your directory.
version: 0.2

phases:
  install:
    runtime-versions:
      nodejs: 16

  pre_build:
    commands:
      # install dependencies
      - echo installing dependencies...
      - yarn install

  build:
    commands:
      # run build script
      - echo Build started on `date`
      - echo Building React Application...
      - yarn build

  post_build:
    commands:
      - echo Build completed on `date`

artifacts:
  # include all files required to run application
  # we include only the static build files
  files:
    - "**/*"
   # reference directory where build file is located
  base-directory: "build"
Creating CloudFormation Template
Next, we'll look at our CloudFormation template that creates our resources for the pipeline.
First, we define our parameters. These will later be used as references in our code.
AWSTemplateFormatVersion: 2010-09-09
Description: This template is used to create a CI/CD Pipeline that deploys a React Web app to S3 for static website hosting.

# Parameters to be used through out the template
Parameters:
  Stage:
    Type: String
    Default: dev
  AppName:
    Type: String
    Default: <APP NAME>
  GithubUserName:
    Type: String
    Default: <GITHUB USERNAME>
  GithubRepo:
    Type: String
    Default: <GITHUB REPO>
  GithubBranch:
    Type: String
    Default: <GITHUB BRANCH>
  GithubOAuthToken:
    Type: String
    Default: <GITHUB ACCESS TOKEN>
Next, we create IAM policies to give our resources adequate permissions.
# Create role for CodeBuild
  CodeBuildRole:
    Type: AWS::IAM::Role
    Properties:
      AssumeRolePolicyDocument:
        Version: "2012-10-17"
        Statement:
          -
            Effect: Allow
            Principal:
              Service:
                - "codebuild.amazonaws.com"
            Action:
              - "sts:AssumeRole"
      Path: /service-role/
      Policies:
        - PolicyName: root
          PolicyDocument:
            Version: "2012-10-17"
            Statement:
              -
                Effect: Allow
                Action:
                  - "s3:GetObject"
                  - "s3:GetObjectVersion"
                  - "s3:GetBucketVersioning"
                  - "s3:PutObject"
                  - "s3:PutObjectAcl"
                  - "s3:PutObjectVersionAcl"
                Resource:
                  - !GetAtt PipelineBucket.Arn
                  - !Join ['', [!GetAtt PipelineBucket.Arn, "/*"]]
              -
                Effect: Allow
                Action:
                  - "s3:GetObject"
                  - "s3:GetObjectVersion"
                  - "s3:GetBucketVersioning"
                  - "s3:PutObject"
                  - "s3:PutObjectAcl"
                  - "s3:PutObjectVersionAcl"
                Resource:
                  - !GetAtt DeployBucket.Arn
                  - !Join ['', [!GetAtt DeployBucket.Arn, "/*"]]
              -
                Effect: Allow
                Action:
                  - "logs:CreateLogGroup"
                  - "logs:CreateLogStream"
                  - "logs:PutLogEvents"
                  - "cloudfront:CreateInvalidation"
                Resource:
                  - "*"
      Tags:
        - Key: Name
          Value: !Join ['-', [!Ref AppName, !Ref 'AWS::AccountId', 'BuildRole', !Ref Stage]]


  # Create role for CodePipeline
  CodePipeLineRole:
    Type: AWS::IAM::Role
    Properties:
      AssumeRolePolicyDocument:
        Version: "2012-10-17"
        Statement:
          -
            Effect: Allow
            Principal:
              Service:
                - "codepipeline.amazonaws.com"
            Action:
              - "sts:AssumeRole"
      Policies:
        - PolicyName: root
          PolicyDocument:
            Version: "2012-10-17"
            Statement:
              -
                Effect: Allow
                Action:
                  - "s3:GetObject"
                  - "s3:GetObjectVersion"
                  - "s3:GetBucketVersioning"
                  - "s3:GetObjectAcl"
                  - "s3:PutObject"
                  - "s3:PutObjectAcl"
                  - "s3:PutObjectVersionAcl"
                Resource:
                  - !GetAtt PipelineBucket.Arn
                  - !Join ['', [!GetAtt PipelineBucket.Arn, "/*"]]
              -
                Effect: Allow
                Action:
                  - "codebuild:BatchGetBuilds"
                  - "codebuild:StartBuild"
                Resource: "*"
              -
                Effect: Allow
                Action:
                  - "codecommit:GetRepository"
                  - "codecommit:GetBranch"
                  - "codecommit:GetCommit"
                  - "codecommit:UploadArchive"
                  - "codecommit:GetUploadArchiveStatus"
                  - "codecommit:CancelUploadArchive"
                Resource: "*"
      Tags:
        - Key: Name
          Value: !Join ['-', [!Ref AppName, !Ref 'AWS::AccountId', 'PipelineRole', !Ref Stage]]
After the policies we will create our build project for codebuild to use.
  # Create Code Build Project
  CodeBuild:
    Type: 'AWS::CodeBuild::Project'
    Properties:
      Name: !Sub ${AWS::StackName}-CodeBuild
      ServiceRole: !GetAtt CodeBuildRole.Arn
      Artifacts:
        Type: CODEPIPELINE
        Name: MyProject
      Source:
        Type: CODEPIPELINE
      Environment:
        ComputeType: BUILD_GENERAL1_SMALL
        Type: LINUX_CONTAINER
        Image: aws/codebuild/amazonlinux2-x86_64-standard:3.0
      Source:
        Type: CODEPIPELINE
        # This file (buildspec.yml In Source code) contains commands to Create and Push a docker image to the ECR_REPOSITORY_URI
        BuildSpec: buildspec.yml

      Tags:
        - Key: Name
          Value: !Join ['-', [!Ref AppName, !Ref 'AWS::AccountId', 'BuildProj', !Ref Stage]]
We then create our pipeline which has 3 stages source, build and deploy.
Note: For the source declaration, I am using a third-party provider which is GitHub. You will need to generate an auth token from GitHub for AWS to use.
# Create CodePipeline with 3 stages (Source, Build and Deploy)
  CodePipeline:
    Type: 'AWS::CodePipeline::Pipeline'
    Properties:
      RoleArn: !GetAtt CodePipeLineRole.Arn
      Name: !Join ['-', [!Ref AppName, !Ref 'AWS::AccountId', 'CodePipeLine',!Ref Stage]]
      ArtifactStore:
        Location: !Ref PipelineBucket
        Type: S3

      # Stages declaration
      Stages:
     # Download source code from Github Repo to source-output-artifacts path in S3 Bucket
        -
          Name: Source
          Actions:
            -
              Name: SourceAction
              ActionTypeId:
                 Category: Source
                 Owner: ThirdParty
                 Provider: GitHub
                 Version: 1
              OutputArtifacts:
                -
                  Name: MyApp
              Configuration:
                 Repo: !Ref GithubRepo
                 Branch: !Ref GithubBranch
                 Owner: !Ref GithubUserName
                 OAuthToken: !Ref GithubOAuthToken

        # Build the project using the BuildProject and Output build artifacts to build-output-artifacts path in S3 Bucket
        -
          Name: Build
          Actions:
            -
              Name: BuildAction
              ActionTypeId:
                Category: Build
                Owner: AWS
                Version: 1
                Provider: CodeBuild
              InputArtifacts:
                -
                  Name: MyApp
              OutputArtifacts:
                -
                  Name: MyAppBuild
              Configuration:
                ProjectName: !Ref CodeBuild

        # Deploy the project to S3 Bucket for website hosting.
        -
          Name: Deploy
          Actions:
            -
              Name: DeployAction
              ActionTypeId:
                Category: Deploy
                Owner: AWS
                Version: 1
                Provider: S3
              InputArtifacts:
                -
                  Name: MyAppBuild
              Configuration:
                BucketName: !Ref DeployBucket
                Extract: 'true'
      # Create a name tag for the pipeline
      Tags:
        - Key: Name
          Value: !Join ['-', [!Ref AppName, !Ref 'AWS::AccountId', 'CodePipeLine',!Ref Stage]]
Now that we have our IAM Policies, Pipeline and the Build Project, it's time to define our S3 Buckets (Store Pipeline Artifacts, Website Host)
# Create S3 Buckets (Store Pipeline Artifacts, Website Host)
  PipelineBucket:
    Type: 'AWS::S3::Bucket'
    Properties:
      BucketName: !Join ['-', [!Ref AppName, !Ref 'AWS::AccountId', 'pipelineartifacts', !Ref Stage]]

  DeployBucket:
    Type: 'AWS::S3::Bucket'
    Properties:
      BucketName: !Join ['-', [!Ref AppName, !Ref 'AWS::AccountId', 'website', !Ref Stage]]
      WebsiteConfiguration:
        IndexDocument: index.html
      AccessControl: PublicReadWrite
      CorsConfiguration:
        CorsRules:
        - AllowedOrigins: ['*']
          AllowedMethods: [GET]

  # Bucket policy that hosts the website
  DeploymentBucketPolicy:
    Type: AWS::S3::BucketPolicy
    Properties:
      Bucket: !Ref DeployBucket
      PolicyDocument:
        Statement:
          -
            Action:
              - "s3:GetObject"
            Effect: "Allow"
            Resource:
              Fn::Join:
                - ""
                -
                  - "arn:aws:s3:::"
                  -
                    Ref: DeployBucket
                  - "/*"
            Principal: "*"
Upload CloudFormation Template to AWS
Great! Now that we have our CloudFormation template created,
it's now time to upload our template to AWS.
Step 1: Log in to your AWS Console and navigate to CloudFormation; you should see a screen similar to this below. Click on create stack.

Step 2: Choose upload a template file and upload our cloudformation template.

Step 3: Give the stack a proper name, and give appropriate values to the stack parameters.

Step 4: Click next until you're on the last step. Select the checkbox in the last step. This allows AWS to let our template create IAM resources.

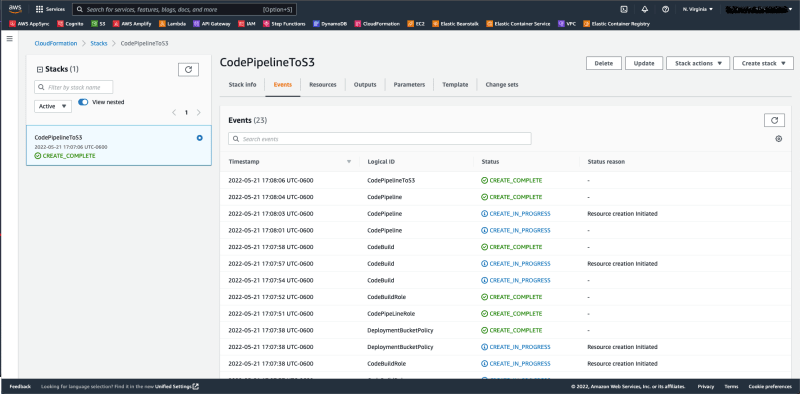
Step 5: Once you have created the stack, you can monitor the events of the stack as it is building. Whenever it is fully completed, we will get a status of 'CREATE_COMPLETE'
Step 6: Head over to CodePipline and we should see our pipeline in action.

Step 7: Navigate over to S3 to view the S3 bucket that is hosting our website. Click on the properties tab and scroll all the way to the bottom. You should see a website URL.

The URL should load our website and you should see the site below.
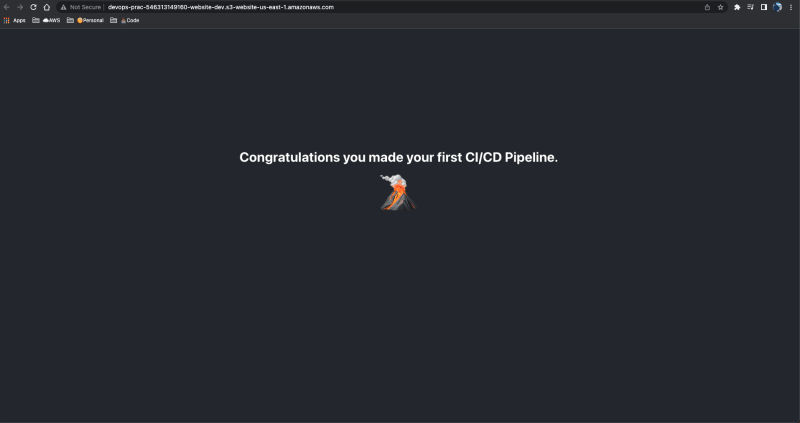
That's it, you have built a CI/CD Pipeline that automates your website deployment.
Lastly, to test that the pipeline works properly, push a commit to your git branch. This should automatically trigger the pipeline.
Happy Coding everyone. 👨🏾💻


Top comments (2)
I tried to implement this demo code and got a 404. I've tried doing it with several other tutorials and with just doing it myself. Every single one results in the same 404 error.
Code: NoSuchKey
Message: The specified key does not exist.
Key: index.html
Looking at the pipeline, I see that the build failed.
[Container] 2023/01/23 02:03:56 Selecting 'nodejs' runtime version '16' based on manual selections...
[Container] 2023/01/23 02:03:58 Phase complete: DOWNLOAD_SOURCE State: FAILED
[Container] 2023/01/23 02:03:58 Phase context status code: YAML_FILE_ERROR Message: Unknown runtime version named '16' of nodejs. This build image has the following versions: 10, 12
So, the react code needs version 16 to build, but the template only has 10, 12.
Hey @jfoxworth appreciate the heads up. This code is outdated certain packages and libraries that were supported when i wrote this article might not be the same. Sorry for any inconvenience.