Prerequisites
- Access to an Azure Account
- Access to Azure DevOps and PAT Token
Access to a GitHub Account
Create an Azure DevOps Organization. Head here & click the “Create a new organization” button.
All of the following commands should be run in Azure Cloud Shell. Access the shell here from any browser and logging into your Azure account.
You can use the PowerShell screen, but in this walkthrough I use Bash. Type “bash” in the terminal to switch to bash commands.
Overall Architecture
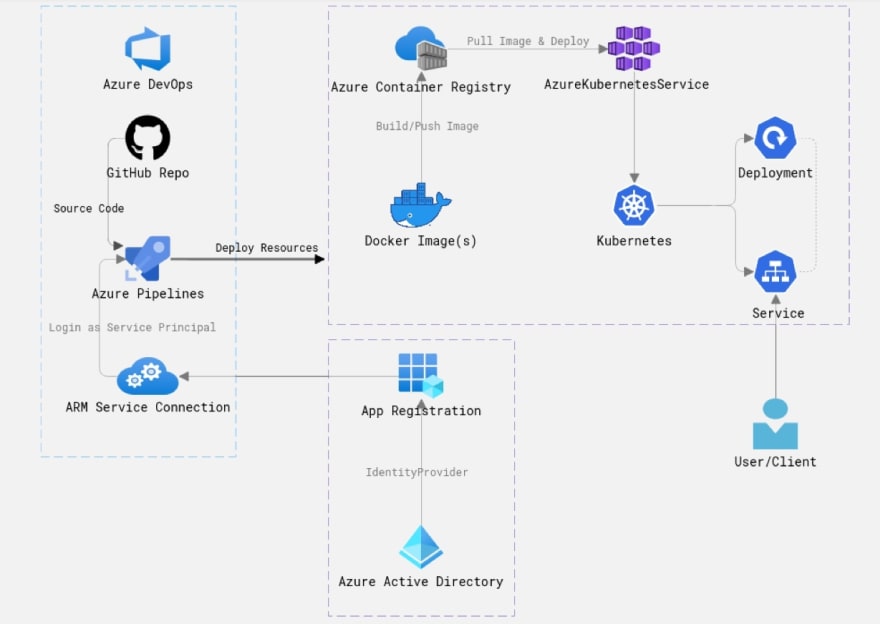
I used CloudSkew to create the above diagram. Highly recommend you check it out (It's FREE).
Azure DevOps & GitHub are great, easy to use SaaS products - GitHub and Azure Pipelines will help you to achieve your source control and CI/CD needs. The source code is in a Git repository in GitHub (your application, infrastructure, and pipeline code), and your CI/CD pipeline is an Azure YAML Pipeline.
Azure Container Registry (ACR) is an Azure-native container registry, much like Docker Hub but it’s Azure’s container registry solution, so it integrates with other Azure resources and uses Azure Active Directory for added security. The Azure Pipeline in this demo is building and pushing the Docker image to the ACR (a new version of the image is created on every successful run of the pipeline execution).
Azure Kubernetes Service (AKS) is a serverless, managed container orchestration service. AKS runs directly on Azure as a PaaS service and provides you with a Kubernetes environment to deploy and manage your containerized Docker application. This managed Kubernetes environment is what runs your Kubernetes resources in this demo.
Azure Active Directory is the built-in Azure identity management solution. In this demo, it is important for you because you need a Service Principal (an identity based on an Azure AD App Registration). This Service Principal is used to create a secure, identity-based authenticated connection (a Service Connection to the Azure Resource Manager) so you can deploy the resources with the correct permissions to the correct Azure Subscription.
Initial Setup
- Add the Azure DevOps extension to your cloud shell session:
az extension add --name azure-devops
- Add context for your shell to reference your DevOps organization:
az devops configure --defaults organization=https://dev.azure.com/insertorgnamehere/
- Set the AZURE_DEVOPS_EXT_PAT environment variable at the process level. Now run any command without having to sign in explicitly:
export AZURE_DEVOPS_EXT_PAT=insertyourpattokenhere
- Create a new Azure DevOps project:
az devops project create --name k8s-project
- Set the default project to work with:
az devops configure --defaults project=k8s-project
Deploying the Infrastructure
- Create a resource group to logically organize the Azure resources you will be creating:
az group create --location westeurope --resource-group my-aks-rg
- Create a service principal. Your AKS cluster will use this service principal to access the Azure Container Registry and pull container images.
IMPORTANT: Copy the output of the following command, you will need it later:
az ad sp create-for-rbac --skip-assignment
- Create an AKS cluster to deploy your app into (this is where you use the output from the previous command)
IMPORTANT: Sometimes you will get an error like "400 Client Error: Bad Request for url" - It is a known issue & re-running the command again usually works:
 az role assignment create fails in Cloud Shell: 400 Client Error: Bad Request for url: http://localhost:50342/oauth2/token
#9345
az role assignment create fails in Cloud Shell: 400 Client Error: Bad Request for url: http://localhost:50342/oauth2/token
#9345

Describe the bug
Running in CloudShell , command fails, works correctly on client.
Command Name
az role assignment create
Errors:
The command failed with an unexpected error. Here is the traceback:


400 Client Error: Bad Request for url: http://localhost:50342/oauth2/token
Traceback (most recent call last):
  File "/opt/az/lib/python3.6/site-packages/knack/cli.py", line 206, in invoke
    cmd_result = self.invocation.execute(args)
  File "/opt/az/lib/python3.6/site-packages/azure/cli/core/commands/__init__.py", line 560, in execute
    raise ex
  File "/opt/az/lib/python3.6/site-packages/azure/cli/core/commands/__init__.py", line 618, in _run_jobs_serially
    results.append(self._run_job(expanded_arg, cmd_copy))
  File "/opt/az/lib/python3.6/site-packages/azure/cli/core/commands/__init__.py", line 611, in _run_job
    six.reraise(*sys.exc_info())
  File "/opt/az/lib/python3.6/site-packages/six.py", line 693, in reraise
    raise value
  File "/opt/az/lib/python3.6/site-packages/azure/cli/core/commands/__init__.py", line 588, in _run_job
    result = cmd_copy(params)
  File "/opt/az/lib/python3.6/site-packages/azure/cli/core/commands/__init__.py", line 297, in __call__
    return self.handler(*args, **kwargs)
  File "/opt/az/lib/python3.6/site-packages/azure/cli/core/__init__.py", line 453, in default_command_handler
    return op(**command_args)
  File "/opt/az/lib/python3.6/site-packages/azure/cli/command_modules/role/custom.py", line 134, in create_role_assignment
    resolve_assignee=(not assignee_object_id))
  File "/opt/az/lib/python3.6/site-packages/azure/cli/command_modules/role/custom.py", line 150, in _create_role_assignment
    object_id = _resolve_object_id(cli_ctx, assignee) if resolve_assignee else assignee
  File "/opt/az/lib/python3.6/site-packages/azure/cli/command_modules/role/custom.py", line 1614, in _resolve_object_id
    filter="servicePrincipalNames/any(c:c eq '{}')".format(assignee)))
  File "/opt/az/lib/python3.6/site-packages/msrest/paging.py", line 143, in __next__
    self.advance_page()
  File "/opt/az/lib/python3.6/site-packages/msrest/paging.py", line 129, in advance_page
    self._response = self._get_next(self.next_link)
  File "/opt/az/lib/python3.6/site-packages/azure/graphrbac/operations/service_principals_operations.py", line 156, in internal_paging
    response = self._client.send(request, stream=False, **operation_config)
  File "/opt/az/lib/python3.6/site-packages/msrest/service_client.py", line 336, in send
    pipeline_response = self.config.pipeline.run(request, **kwargs)
  File "/opt/az/lib/python3.6/site-packages/msrest/pipeline/__init__.py", line 197, in run
    return first_node.send(pipeline_request, **kwargs)  # type: ignore
  File "/opt/az/lib/python3.6/site-packages/msrest/pipeline/__init__.py", line 150, in send
    response = self.next.send(request, **kwargs)
  File "/opt/az/lib/python3.6/site-packages/msrest/pipeline/requests.py", line 65, in send
    self._creds.signed_session(session)
  File "/opt/az/lib/python3.6/site-packages/azure/cli/core/adal_authentication.py", line 26, in signed_session
    scheme, token, _ = self._token_retriever()
  File "/opt/az/lib/python3.6/site-packages/azure/cli/core/_profile.py", line 532, in _retrieve_token
    return self._get_token_from_cloud_shell(resource)
  File "/opt/az/lib/python3.6/site-packages/azure/cli/core/_profile.py", line 365, in _get_token_from_cloud_shell
    auth = MSIAuthentication(resource=resource)
  File "/opt/az/lib/python3.6/site-packages/msrestazure/azure_active_directory.py", line 576, in __init__
    self.set_token()
  File "/opt/az/lib/python3.6/site-packages/msrestazure/azure_active_directory.py", line 582, in set_token
    self.scheme, _, self.token = get_msi_token(self.resource, self.port, self.msi_conf)
  File "/opt/az/lib/python3.6/site-packages/msrestazure/azure_active_directory.py", line 485, in get_msi_token
    result.raise_for_status()
  File "/opt/az/lib/python3.6/site-packages/requests/models.py", line 940, in raise_for_status
    raise HTTPError(http_error_msg, response=self)
requests.exceptions.HTTPError: 400 Client Error: Bad Request for url: http://localhost:50342/oauth2/token
To Reproduce:
Steps to reproduce the behavior. Note that argument values have been redacted, as they may contain sensitive information.
- Put any pre-requisite steps here...
az role assignment create --assignee {} --role {} --scope {}
Expected Behavior
Environment Summary
Linux-4.15.0-1041-azure-x86_64-with-debian-stretch-sid
Python 3.6.5
Shell: bash

azure-cli 2.0.64

Extensions:
resource-graph 0.1.8
interactive 0.4.1
Additional Context
Thanks for your feedback! command ran in 4.050 seconds.
az aks create -g my-aks-rg -n myakscluster -c 1 --generate-ssh-keys --service-principal "insertappidhere" --client-secret "insertpasswordhere"
- Create an Azure Container Registry (ACR). This will be the repository for our containers used in AKS:
az acr create -g my-aks-rg -n insertuniqueacrnamehere --sku Basic --admin-enabled true
- To allow AKS to pull images from ACR, we must set our Azure RBAC permissions for the service principal:
ACR_ID=$(az acr show --name ghostauacr --resource-group my-aks-rg --query "id" --output tsv)

CLIENT_ID=$(az aks show -g my-aks-rg -n myakscluster --query "servicePrincipalProfile.clientId" --output tsv)

az role assignment create --assignee $CLIENT_ID --role acrpull --scope $ACR_ID
Deploying the Application
-
Fork this GitHub repo (open this link in a new tab and click "fork"):
Now clone it to the terminal session within cloud shell:
git clone https://github.com/<your-github-username-goes-here>/k8s-application.git

cd k8s-application
- Create a pipeline in Azure DevOps:
az pipelines create --name "k8s-application-pipeline"
- Follow the prompts in your terminal to set up the pipeline:
Enter your GitHub username; press enter
Enter your GitHub password; press enter
Confirm by entering your github password again; press enter
(If Enabled) Enter your two factor authentication code
Enter a service connection name (e.g. k8sapplicationpipeline); press enter
Choose [3] to deploy to Azure Kubernetes Service; press enter
Select the k8s cluster you just created; press enter
Choose [2] for the “default” kubernetes namespace; press enter
Select the ACR you just created; press enter
Enter a value for image name (press enter to accept the default); press enter
Enter a value for the service port (press enter to accept the default); press enter
Enter a value for enable review app flow for pull requests (press enter without typing a value)
Choose [1] to continue with generated YAML; press enter
Choose [1] to commit directly to the master branch; press enter
CONGRATULATIONS!
You have created an Azure DevOps Project! Wait a few minutes for the container to build, push to ACR, then deploy to AKS.
- Access your AKS cluster by getting the kubeconfig credentials:
az aks get-credentials --resource-group my-aks-rg --name myakscluster
- View the Kubernetes resources your project has created:
kubectl get all

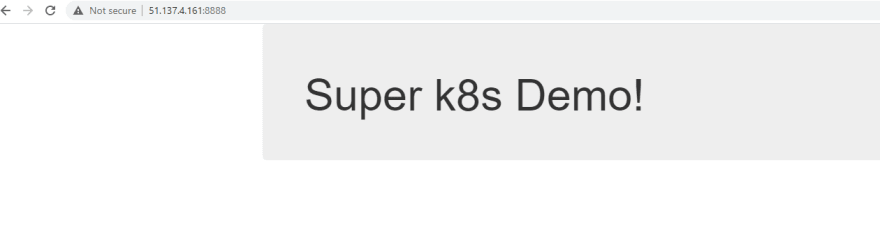
- Copy the service IP address (under “External IP”) and paste into a new browser tab with ":8888" (e.g. 51.137.4.161:8888) on to the end.
This should be your final result!
Summary
In a relatively short period of time, you have created a new project in Azure DevOps. Within that project, you have set up a CI/CD pipeline. That pipeline built your application inside of a container, pushed that container to a container repository, and deployed the container to AKS. Finally allowing you to view your web application running in AKS from the web via a Kubernetes service. You are amazing, well done!
IMPORTANT: Head back over to your forked repo and check out the file "azure-pipelines.yml". You should see the line "trigger: – master" which means every time we make a change to the master branch, a new build will kick off automatically. Magic!
Now that you have a fully working application deployed to AKS, I bet you can't wait to dive in and see how it all works under the hood. I recommend this blog post that has lots of useful snippets & tips for working with Kubernetes.
Any questions, get in touch on Twitter
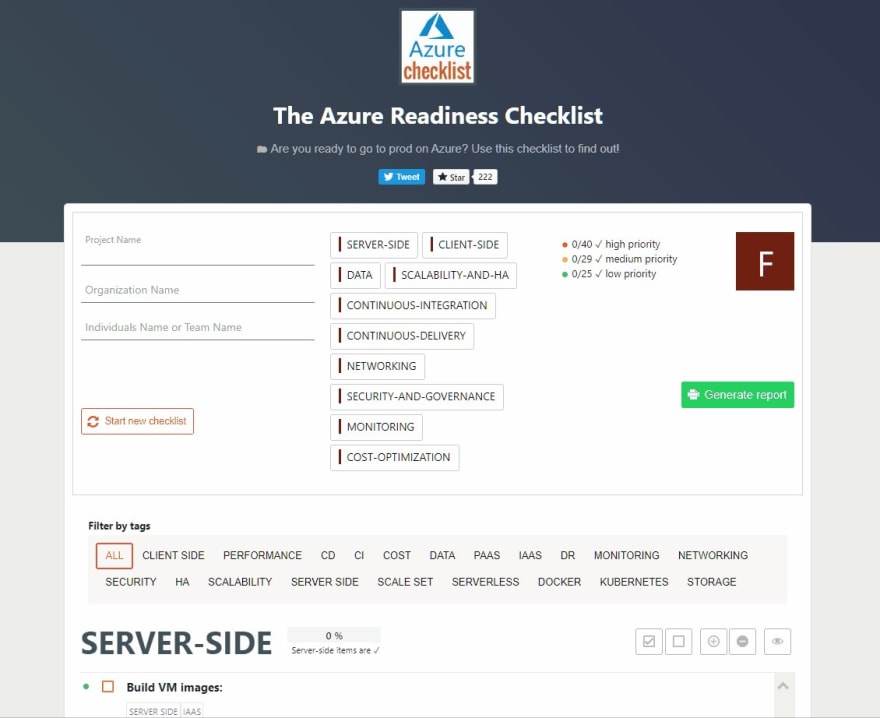
 ✨Azure Readiness Checklist✨
Are you ready to go to prod on Azure? Use this checklist to find out: azurechecklist.com
Call for #contributors! - Help make this THE go to list for #Azure
#AzureDevOps #OpenSource - PLS RT ❤️09:24 AM - 01 Nov 2019


![Andrew [MVP] profile image](https://res.cloudinary.com/practicaldev/image/fetch/s--GXR7wJds--/c_limit%2Cf_auto%2Cfl_progressive%2Cq_auto%2Cw_880/https://pbs.twimg.com/profile_images/1266114810590179328/at1PK_qL_normal.jpg)


Oldest comments (2)
Hi, Andrew
Nice article, very informative, thanks for writing. :)
While following this lab, the following error occurred.
"Could not queue the build because there were validation errors or warnings."
For detailed error details, refer to the attached captured image.
How to proceed in the azure-pipelines.yml file selection step and how to handle this error?
have a nice day~ :)
Hi, Can't see any image attached. You can send it to me on Twitter if you want?
Some comments have been hidden by the post's author - find out more