Twitter, one of the most popular websites where you can share your thoughts. A lot of people use Twitter for different purposes like marketing, sharing knowledge, etc. Being a developer, the Twitter API is one of the most important APIs. Let’s say a marketing agency wants to collect Twitter data, analyze it, and make tweets according to the stats. This task will definitely require them to use the API else they’ll have to spend so much money just to collect the data is unimaginable. To help you out we have created this tutorial. In this tutorial, we’ll be covering the Twitter API, how to connect to API, and how to tweet on Twitter using the API. So let’s get started:
Prerequisites:
- Twitter account
- Basic Knowledge of Python
Step -1: Getting Access to Twitter API
In order to get started with the Twitter API, you not only need a normal Twitter account but also require a Twitter Developer Account. Head over to https://developer.twitter.com/en and login with your credentials. Once you’re in, go to this URL: https://developer.twitter.com/en/apply-for-access and click on Apply for a developer account.

Now select the Making a bot option and then next:

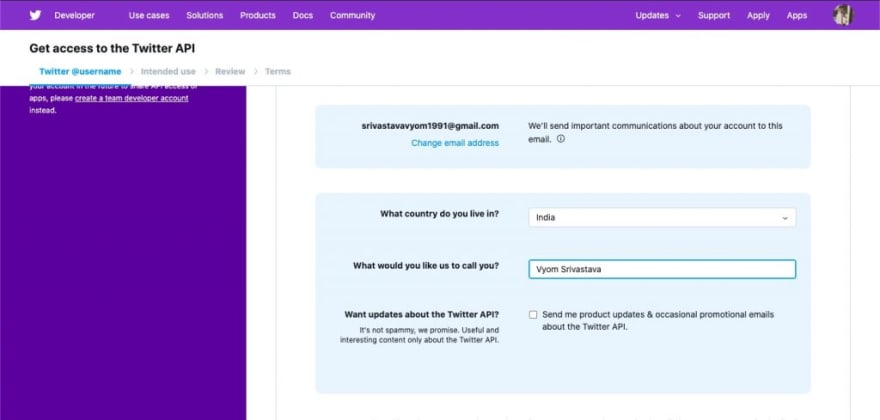
On the next page just cross-check if all the details are correct and then select your country and enter a name for your application. In my case, I have just passed my name.
Now click on the Next button. On the next page Twitter will ask you a few questions:
- “In English, please describe how you plan to use Twitter data and/or APIs. The more detailed the response, the easier it is to review and approve.“
- “Are you planning to analyze Twitter data?“ Just select “No” here
- “Will your app use Tweet, Retweet, like, follow, or Direct Message functionality?” You can mention here that yes my app will use a tweet feature here.
- “Do you plan to display Tweets or aggregate data about Twitter content outside of Twitter? You can select “No” here.
- ”Will your product, service, or analysis make Twitter content or derived information available to a government entity?”. Select “No” here also.
Once you’re done with the adobe details, click on next, and on the next page, you can see all your submitted values. Cross-check them once and click on the “Looks Good” button. On the next page, you’ll have to accept the Terms and Conditions, read it thoroughly, and accept. You’ll receive an email to verify your account, you can follow the link in the email. You’ll also receive an acknowledgment email from Twitter that they have received your application. TADA!! Your application has been submitted for approval now. It doesn’t take more than a couple of hours for the review team of Twitter to review the application.
Step -2: Twitter App Setup
Once the application has been accepted, you’ll get an email from the Twitter team. Now it’s time to create our app on. So head over to your Twitter Developer account and click on Developer Portal. You’ll see the below page:

Now click on “Create Project” and fill out the form details like project name, description, app name. Once done, you can now see your API KEY, API SECRET, and Bearer Token. Save them in a safe place, we’ll be needing these credentials for API connection. Once you’re done with that, open the settings of your app and enable “Read and Write” under the permissions of your app.

Step -3: Implementing and Generating Authentication URL
Once you’re done with all the above steps, it’s time to write some code! So open the terminal, create a new folder for this project and open it:
mkdir twitter-test
cd twitter-test
Now we have to install some dependencies Once you’re in the folder, paste the below command to install the package:
python3 -m pip install twython
python3 -m pip install requests
Now create three files:
- authenticate.py
- generateToken.py
- post.py
After that, open authenticate.py and paste the below code:
from twython import Twython
import requests
APP_KEY = "YOUR API KEY FROM TWITTER"
APP_SECRET = "YOUR API SECRET FROM TWITTER"
twitter = Twython(APP_KEY, APP_SECRET)
auth = twitter.get_authentication_tokens()
OAUTH_TOKEN = auth['oauth_token']
OAUTH_TOKEN_SECRET = auth['oauth_token_secret']
oauth_verifier_url = auth['auth_url']
oauth_verifier = requests.get(oauth_verifier_url)
print("Verifier URL is:" + oauth_verifier_url)
print("OAUTH_TOKEN is:" + OAUTH_TOKEN)
print("OAUTH TOKEN SECRET is:" + OAUTH_TOKEN_SECRET)
Code Explanation:
We’re using twython here which makes it easier for us to make Twitter API calls and provides multiple functions for different API calls. We’re also using requests here which are used to make GET requests so that we can get oauth_verifier. This code is basically used to get the authentication URL so that you can authorize the app to make tweets on your behalf.
Now on your terminal run the above piece of code by using the below code:
python3 authenticate.py
On execution you’ll get something like this:
Verifier URL is: https://api.twitter.com/oauth/authenticate?oauth_token=XXXXX
OAUTH_TOKEN is: XXXXX
OAUTH TOKEN SECRET is: XXXXX
Now open the above URL in a browser as you’ll see something like this:

Once you authorize the app, you’ll get an auth code, store that as well.
Step -4: Implementing Token Generator
Once you’re done implementing the authentication, it’s time to implement the token generator. So open generateToken.py in a code editor and paste the below code:
from twython import Twython
import requests
APP_KEY = "YOUR APP KEY FROM TWITTER"
APP_SECRET = "YOUR APP SECRET FROM TWITTER"
twitter = Twython(APP_KEY, APP_SECRET)
twitter = Twython(APP_KEY, APP_SECRET,
OAUTH TOKEN FROM ABOVE SCRIPT, OAUTH TOKEN SECRET FROM ABOVE SCRIPT)
final_step = twitter.get_authorized_tokens(YOUR AUTH CODE HERE)
OAUTH_TOKEN = final_step['oauth_token']
OAUTH_TOKEN_SECRET = final_step['oauth_token_secret']
print(‘Token: ’+OAUTH_TOKEN)
print(‘Secret:’ + OAUTH_TOKEN_SECRET)
Code Explanation:
Here we’re again generating OAUTH_TOKEN and OAUTH_TOKEN_SECRET but this time these credentials are actually attached to your own profile so that the combination of APP_KEY, APP_SECRET can identify your profile’s credentials.
Let’s execute this script also by using the command python3 generateToken.py and you’ll get something like this:
Token: XXXXX
Secret: XXXXX
Store these credentials as they’re the final credentials. Now it’s the time to tweet something.
Step -5: Tweet Code
Now open post.py and paste the below code:
from twython import Twython
import requests
APP_KEY = "YOUR APP API KEY"
APP_SECRET = "YOUR APP SECRET"
OAUTH_TOKEN = "TOKEN FROM ABOVE SCRIPT"
OAUTH_TOKEN_SECRET = "SECRET FROM ABOVE SCRIPT"
twitter = Twython(APP_KEY, APP_SECRET, OAUTH_TOKEN, OAUTH_TOKEN_SECRET)
twitter.update_status(status='@geekyhumans I made it!!')
Code Explanation:
Here we’re all done with the authentication and token generation part. Now we’re tweeting status on Twitter. First, we’re creating an object of Twython using our credentials and then we’re calling a function update_status that is used for tweeting on Twitter.
Final Words:
So we have learned how to connect to Twitter API and post on Twitter. You can do a lot more with this API. I have created a bot that picks up posts from different websites and posts the URL with the title on Twitter every hour. Remember sky’s the limit and there’s a lot more to explore at an advanced level. I have created a Twitter bot which uses beautifulsoup to fetch newly published posts from the sitemap of this website and some others also and then fetched the
tag with meta description and tweets on Twitter every hour.
The post How to use Twitter API in Python appeared first on Geeky Humans.


Top comments (0)