In this tutorial...
We are going to build a custom subscriber form in React and connect it to a Mailchimp audience (list). ⚛️ 📤 🙉
Mailchimp is a marketing platform that collects contact information into lists (recently renamed to "audiences"). You can then send email campaigns to these lists.
In building this for a freelance project, I found it to be more complex than I had anticipated. So this post is an A-Z guide on how to do it and hopefully saves you some headaches!
To view the form live, click the "get updates" button in the navbar.
genhybridsystems.com
Some notes on this tutorial structure
To help simplify the steps, I will be presenting blocks of related code together, while hiding others. This way you can focus on just what is relevant for that step.
Also, the original site I built had this form in a modal. I tried to strip out any code specific to that modal for this tutorial.
However, if you want to review all the code at once + the modal specific code. I will include a complete gist at the end. 👍
Steps to success
1. Build a base sign-up form in Mailchimp
2. Get the u and id form values
3. Install react-mailchimp-subscribe
4. Create a component to hold the Mailchimp form
5. Create a <CustomForm /> component
6. Set up handleSubmit function
7. Format status messages
8. Show confirmation screen with conditionals
9. Clear all fields on a successful form submission
10. Add form SCSS styles
Step 1 — Build a base sign-up form in Mailchimp
Before jumping into any React code, we need to first create a form in Mailchimp. This will power our custom form later on, from behind the scenes.

a1 — Go to the Audience section, select Signup forms from the sub-menu, and finally select the Form builder.

b1 — With a new form generated, scroll down the page to the Built It section.
c1 — For this tutorial, we just want to keep the "First Name", "Last Name" and "Email" fields. Go ahead and delete any other fields so it looks like the example above.
Step 2 — Get the u and id form values

a2 — Above the form, copy the Signup form URL and open it in a new tab.
b2 — Then right-click on the "Sign Up Form" page and select View page source.
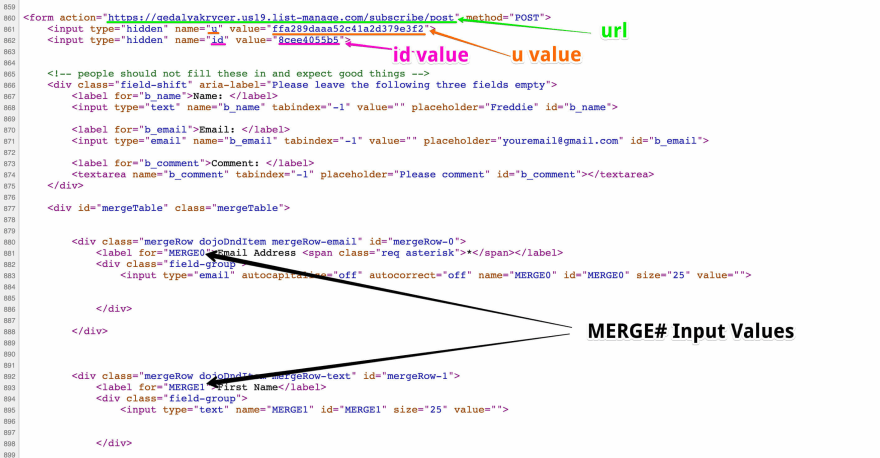
c2 — Scroll way down the page, past all the CSS code in the <head>, until you get to the <form> section. (For me it was at line 860.)
There are 4 parts to copy and save for later reference...
The URL inside of the
action="".The
valuein the input field withname="u".The
valuein the input field withname="id".In the input field sections for Email, First Name, Last Name – take note of the
for=""in each of them. For me they are namedMERGE0,MERGE1, andMERGE2respectively. We will reference these later in our form to map our own fields with these Mailchimp fields.
Step 3 — Install react-mailchimp-subscribe
As it turns out it isn't super straightforward to query the Mailchimp API on a static site.
After trying a bunch of options, I found that the npm package react-mailchimp-subscribe does a great job at handling the Mailchimp integration.
$ npm i react-mailchimp-subscribe
We will just need to feed it the url / u / id values from the last step and make some components. Easy peasy!!
Step 4 — Create a component to hold the Mailchimp form
import React from 'react';
import './mcFormStyles.scss';
import MailchimpSubscribe from "react-mailchimp-subscribe";

const MailchimpFormContainer = props => {
    return (
        <div className="mc__form-container">
            <MailchimpSubscribe />
        </div>
    );
};

export default MailchimpFormContainer;
a4 — Import React, your styles, and react-mailchimp-subscribe into your new component. I also placed the <MailchimpSubscribe /> component inside a div to help with positioning. (We will add styling later.)
import React from 'react';
import './mcFormStyles.scss';
import MailchimpSubscribe from "react-mailchimp-subscribe";

const MailchimpFormContainer = props => {

    const postUrl = `https://genhybridsystems.us1.list-manage.com/subscribe/post?u=${process.env.REACT_APP_MAILCHIMP_U}&id=${process.env.REACT_APP_MAILCHIMP_ID}`;

    return (
        <div className="mc__form-container">
            <MailchimpSubscribe
                url={postUrl}
            />
        </div>
    );
};

export default MailchimpFormContainer;
b4 — Next create a variable called postUrl. (Actual name is up to you). Inside it, store the URL we copied from the form's action="" in step 2.
c4 — Then add the u and id keys from step 3 at the end of the URL. I suggest storing the actual values in a dotenv file and just referencing them in the url. (Remember to prepend the dotenv variables with "REACT_APP_".)
d4 — Finally pass the postUrl as a url prop on the <MailchimpSubscribe /> component.
import React from 'react';
import './mcFormStyles.scss';
import MailchimpSubscribe from "react-mailchimp-subscribe";

const MailchimpFormContainer = props => {

    const postUrl = `https://genhybridsystems.us1.list-manage.com/subscribe/post?u=${process.env.REACT_APP_MAILCHIMP_U}&id=${process.env.REACT_APP_MAILCHIMP_ID}`;

    return (
        <div className="mc__form-container">
            <MailchimpSubscribe
                url={postUrl}
                render={({ subscribe, status, message }) => (
                    <CustomForm
                        status={status}
                        message={message}
                        onValidated={formData => subscribe(formData)}
                    />
                )}
            />
        </div>
    );
};

export default MailchimpFormContainer;
e4 — After the url props add a render with a call back function. This callback function should return a <CustomForm /> component. (We will build this in Step 5.)
f4 — Within the render callback function, destructure the 3 values indicated below and pass them as props (also below) to the <CustomForm /> component.
Step 5 — Create a <CustomForm /> component
This <CustomForm /> component can by all means be in its own file. To make it easier to see how the two related, I kept it in the same file as the MailchimpFormContainer. (Code example is below the instructions.)
import React, {useState} from 'react';
import './mcFormStyles.scss';
import MailchimpSubscribe from "react-mailchimp-subscribe";
import InputField from "../../ui/InputField/InputField";

const CustomForm = ({ status, message, onValidated }) => {

    const [email, setEmail] = useState('');
    const [firstName, setFirstName] = useState('');
    const [lastName, setLastName] = useState('');

    return ();
};

//MailchimpFormContainer Parent Component Below
a5 — Add useState to the React import.
I am also importing a custom InputField component to help control styling and basic validation. Check out my previous article to see how to build this.

b5 — At the start of the function, destructure the three props that are passed in from the parent component during step 4.
c5 — Set up useState variables for each of our input fields. These will hold the values that the user types in.
import React, {useState} from 'react';
import './mcFormStyles.scss';
import MailchimpSubscribe from "react-mailchimp-subscribe";
import InputField from "../../ui/InputField/InputField";

const CustomForm = ({ status, message, onValidated }) => {

    const [email, setEmail] = useState('');
    const [firstName, setFirstName] = useState('');
    const [lastName, setLastName] = useState('');

    return (
      <form className="mc__form">
        <h3 className="mc__title">Join our email list for future updates.</h3>
        <div className="mc__field-container">
          <InputField
            label="First Name"
            onChangeHandler={setFirstName}
            type="text"
            value={firstName}
            placeholder="Jane"
            isRequired
          />

          <InputField
            label="Last Name"
            onChangeHandler={setLastName}
            type="text"
            value={lastName}
            placeholder="Doe"
            isRequired
          />

          <InputField
            label="Email"
            onChangeHandler={setEmail}
            type="email"
            value={email}
            placeholder="your@email.com"
            isRequired
          />

        </div>

        <InputField
          label="subscribe"
          type="submit"
          formValues={[email, firstName, lastName]}
        />
      </form>
    );
};

//MailchimpFormContainer Parent Component Below
d5 — Add a form element and within it another div to contain and position the input fields. (Styles to come later.)
e5 — Add input fields for "Email", "First Name" and "Last Name". Pass in the corresponding state for each value and onChange handler. (Remember that the above example is using my custom input fields, so it looks a little different than regular JSX.)
f5 — Outside of the div add a submit input field.
Step 6 — Set up handleSubmit function
Now that we got our input fields set up, it is time to send that data to Mailchimp. This is where the react-mailchimp-subscribe package really does all the heavy lifting. Most of the below code is actually provided by them. I'll do my best to describe (assume) what it all does.
// imports...

const CustomForm = ({ status, message, onValidated }) => {

  const [email, setEmail] = useState('');
  const [firstName, setFirstName] = useState('');
  const [lastName, setLastName] = useState('');

  const handleSubmit = (e) => {
        e.preventDefault();
        email &&
        firstName &&
        lastName &&
        email.indexOf("@") > -1 &&
        onValidated({
            EMAIL: email,
            MERGE1: firstName,
            MERGE2: lastName,
        });
    }

    return (
      <form
        className="mc__form"
        onSubmit={(e) => handleSubmit(e)}
      >
        // form field code...
      </form>
    );
};

//MailchimpFormContainer Parent Component Below
6a — Inside of the <Form> element adds an onSubmit function and passes in the event (e).
6b — Inside of that function (called handleSubmit) we have a few things going on...
Breakdown
e.preventDefault();will stop the page from refreshing when the form submits and thereby preserving our state.email && firstName && lastName &&checks if our state values are "truthy". In other words, if a user misses a field, that state will be empty and therebyfalse. If so the form won't submit.email.indexOf("@") > -1checks if a@has been included in the user input. If not the form won't submit.onValidated()This one is very important! Remember in step 2 I instructed you to store the input field values from Mailchimp? (MERGE0, MERGE1, and MERGE2) We will use these names (except for MERGE0 which "EMAIL") and assign our state to them
Step 7 — Format status messages
Mailchimp's API sends back some really awesome status responses, in 3 categories.
- Sending
- Success
- Error
The error status comes with really helpfully specific messages. For example, including a link back to Mailchimp to update your email, if the one you entered already exists.
// imports...

const CustomForm = ({ status, message, onValidated }) => {

  // states...

  const handleSubmit = (e) => {
       // •••
    }

    return (
      <form className="mc__form" onSubmit={(e) => handleSubmit(e)}>
        <h3 className="mc__title">Join our email list for future updates.</h3>

        {status === "sending" && (
          <div className="mc__alert mc__alert--sending">
            sending...
          </div>
        )}
        {status === "error" && (
          <div
            className="mc__alert mc__alert--error"
            dangerouslySetInnerHTML={{ __html: message }}
          />
        )}
        {status === "success" && (
          <div
            className="mc__alert mc__alert--success"
            dangerouslySetInnerHTML={{ __html: message }}
          />
        )}

        <div className="mc__field-container">
        // form field code...
        </div>
      </form>
    );
};

//MailchimpFormContainer Parent Component Below
7a — Right below the <h3> add some conditional JSX for if the status prop equal sending. Instead of a ternary operator, I am using the && operator to show the content if the value before is true. I also opted for some simple text that blinks with CSS animations. But you can totally render a cool spinner here instead.
7b — Next is the conditional JSX for when the status prop equals error. The content is pulled from the API and is set up based on react-mailchimp-subscribe's example. The classes for this section (covered later) will also include styles for any links that might be provided.
7c — Lastly add the conditional JSX for when the status prop equals success. The content is also pulled from the API and is set up based on react-mailchimp-subscribe's example.
Step 8 — Show confirmation screen with conditionals
Besides showing helpful messages we can use the success status response to show a confirmation in our modal. (We partly set this up in the step before.)
// imports...

const CustomForm = ({ status, message, onValidated }) => {

  // states...

  const handleSubmit = (e) => {
       // •••
    }

    return (
      <form className="mc__form" onSubmit={(e) => handleSubmit(e)}>

        <h3 className="mc__title">
          {status === "success"
            ? "Success!"
            : "Join our email list for future updates."
          }
        </h3>

        // error and sending status messages...

        {status === "success" && (
          <div
            className="mc__alert mc__alert--success"
            dangerouslySetInnerHTML={{ __html: message }}
          />
        )}

        {status !== "success" ? (
          <div className="mc__field-container">
            // form field code...
          </div>
        ) : null}

        {
          status === 'success' ? <button
            onClick={() => setModalOpen(false)}
            className="g__justify-self-center">Close</button> : <InputField
                 label="subscribe"
                 type="submit"
                 formValues={[email, firstName, lastName]}
               />
        }
      </form>
    );
};

//MailchimpFormContainer Parent Component Below
8a — Starting with the <h3> we can use the status prop to show "Success!" if the form is submitted correctly.
8b — Next we can use the status prop to hide the input fields <div> on a success response. (It will be replaced by the success status message that we set up in step 7.)
8c — Lastly, we will use the status prop to change the submit button to a regular button that closes the modal. (This is very specific to my setup and uses a custom button component. If you don't have a modal you can totally just hide the submit button instead.)
Step 9 — Clear all fields on a successful form submission
Nice! We are almost there. The last thing (re: functionality) is to clear the state when we submit the form. That way the old values are not preserved when we successfully submit the form.
// imports...

const CustomForm = ({ status, message, onValidated }) => {

  // states...

  useEffect(() => {
    if(status === "success") clearFields();
  }, [status])

  const clearFields = () => {
    setFirstName('');
    setLastName('');
    setEmail('');
  }

  const handleSubmit = (e) => {
       // •••
    }

    return (
      <form className="mc__form" onSubmit={(e) => handleSubmit(e)}>
        // Form content...
      </form>
    );
};

//MailchimpFormContainer Parent Component Below
9a — Add useEffect to the React import.
9b — Create a function called clearFields that sets all the input field states to "".
9c — Call that function in a useEffect. It should only run if the status === "success".
9d — Lastly, set the useEffect dependency to look at status. That way every time it updates, the useEffect will run.
Step 10 — Add form SCSS styles
Ok final step! Let's style this sucker up.
It is worth noting the I am using SCSS and importing some custom variables. I'll include some comments to help explain what these are and what to do on your end.
Also, this is all based on the website's brand. By all means, change these styles to match your branding!
@use "../../../sassStyles/_variables" as v;
@use "../../../sassStyles/_mixins" as m;

 /* Styles the h3 */
.mc__title {
  max-width: 235px;
  text-align: center;

  /* Replace with your brand's main text color */
  color: v.$secondary1;
  margin: 25px auto 35px;


  /* Media query for breakpoints over 676px */
  @include m.smMinBreakPoint {
    margin: 0 auto 30px;
  }
}

/* Positions the form in the middle of the modal and ensures the content doesn't jump as status messages get added/removed */
.mc__form-container {
  width: 100%;
  margin: 0 auto;
  transition: height .2s ease;
}

/* Positions Text and form fields nicely in the middle with some spacing. */
.mc__form {
  display: grid;
  grid-template-rows: min-content min-content;
  grid-row-gap: 40px;
  justify-content: stretch;
  align-items: center;
  transition: height .2s ease;
}

/* Seperates the input fields vertically */
.mc__field-container {
  display: grid;
  grid-row-gap: 30px;
}

/* Provides styles for status messages */
.mc__alert {
  text-align: center;

  /* Imports my site's Google Font from another file */
  @include m.poppinsFontStack;

  /* If "sending" this will animate the text.*/
  /* Keyframes for this will be included below.*/
  &--sending {
    color: v.$highlight2;
    -webkit-animation: fade-loop 0.8s ease-in-out infinite alternate-reverse both;
    animation: fade-loop 0.8s ease-in-out infinite alternate-reverse both;
  }

  /* "success" status styles with text color */
  &--success {
    color: v.$secondary2;
    margin-top: -60px;
  }

  /* "error" status styles*/
  &--error {
    color: v.$warning;
    font-weight: bold;

    /* This addresses any links the error message includes */
    a {

      /* Select a high contrast color from your brand. */
      color: v.$highlight1;
      transition: .3s ease-in-out;
      font-weight: normal;
      display: block;
      margin-top: 5px;
      opacity: .7;

      &:hover {
        text-decoration: none;
        opacity: 1;
      }
    }
  }
}


/* ----------------------------------------------
 * Generated by Animista on 2021-4-1 16:18:48
 * Licensed under FreeBSD License.
 * See http://animista.net/license for more info.
 * w: http://animista.net, t: @cssanimista
 * ---------------------------------------------- */

/**
 * ----------------------------------------
 * animation fade-loop
 * ----------------------------------------
 */
@-webkit-keyframes fade-loop {
  0% {
    opacity: 0;
  }
  100% {
    opacity: 1;
  }
}
@keyframes fade-loop {
  0% {
    opacity: 0;
  }
  100% {
    opacity: 1;
  }
}
Complete JSX Code
Thumbnail designed with Figma


Oldest comments (11)
Useful and great article, but i think that you can call
apidirectly instead of using external packages.You can use
e.target.reset()to reset inputs.Oh nice! Thank you for the feedback.
Thanks friend Gedalya for tutorial, i will configure in my personal project.
Hi!
I got this error:
./components/Mailchimp/CustomForm.js:4:0
Module not found: Can't resolve '../../ui/InputField/InputField'
2 | import './mcFormStyles.scss';
3 | import MailchimpSubscribe from 'react-mailchimp-subscribe';
Sorry, i just find tour repository with your project. Thank you!
github.com/GedalyaKrycer/genhybrid...
Thank you so much. This helps a lot.
I did this on my personal project, and everything works just fine.
Thank you so much @gedalyakrycer . I promised myself that your article was the last place I would stop in getting MailchimpSubscribe to work on my site
Cause I have been trying(from scratch each time) and it was not working and the crazy thing is; I couldn't figure out what I was missing.
But I followed this tutorial and did everything almost verbatim and it worked...Thanks
How do you call the env file? on my console it's stating "undefined" on the URL
I can't susbscribe to it. It shows 'Timeout' everytime after 'Sending'
Worked like a charm! Thank you for putting this together! Confirming this still works in 2023!
AMAZING! It is still working in October 2023. I was hopeless trying to connect it via APIKey, but this was SO MUCH easier I cannot even begin to describe it. Thank you for putting this in such an easy way with a step-by-step guide.