Read Part 1 Setting up Kubernetes and Kubernetes Dashboard using Docker Desktop. In this article, we will be deploying a WebApi and MySql Database to Kubernetes. To understand the process, here is a visual representation of the different components we will be creating.

To deploy an application to Kubernetes we need to create a Deployment which is a blueprint of the application itself; we expose our deployment to other components by linking it to a service that acts as a gateway to the pods which is our application.
What is a Deployment?
A deployment object has the required information of how pods will be created and how will they run and communicate with each other, it contains information on how an application will be set up and configured. For this tutorial, we will be creating two Kubernetes Deployments one for the MySql Database and the other for the API.
A Kubernetes Deployment can be created by configuring a YAML file.

This YAML file configuration is sent to the Kube API server which then feeds the configuration to the brain of Kubernetes the etcd. The Controller Manager and the Scheduler request for these configuration data through the APIServer in order to bring the application to its desired state as defined in the deployment configuration.
The pods as defined in the configuration file are then installed and run on the worker nodes.
CREATING THE DATABASE DEPLOYMENT
- Download the starting source code from here.
- Create a YAML file called mySqlDeployment.yaml in the root of the application.
- Paste this code snippet.
Lets Go through the YAML file
- apiVersion: Specifies which version of the Kubernetes API you're using to create this object.
- kind: What kind of object you want to create. In this case a Deployment.
- metadata: Data that describes and gives information about other data, It helps uniquely identify the object, including a name string, UID, and an optional namespace.
- spec: What state you desire for the object. This contains the attributes of the deployment. The attributes of the spec are specific to its kind. So a Deployment will have a different spec from a Service.
- template: The template describes the pods that will be created. The template has its own configuration and specification and it applies to the pods that are going to be created within the deployment.
- ImagePullPolicy: Never- This Means Kubernetes should not attempt to pull the image from docker hub but rather use the local image.
- The spec within the template is like the specifications of the pod. Its container name, the image it is based on, its environment variables, and the port it should open.
- port: This is the port number that the pod will be listening on.
- replicas: This is the number of pods that should be created from this deployment. Replicas allow us to easily scale our pods and ultimately our application.
- *Labels and Selectors *: These are connecting elements in our case, we are labeling the deployment (mysql-deployment), and whenever we need to attach the deployment to another object like a service we can easily attach it with the label name. We label the pod template as (mysql8) and we attach it to the deployment by using a selector and specifying the matchLabels tag - (mysql8). This way deployments know which pods belong to it.
- resources: This is to specify the compute resources for this container.
env: This is to specify the environment variables that we will be used to authenticate and connect to the MYSQL database.
1028Mi is equivalent to 1GB; 500m is equivalent to 1 CPU core.Navigate to the root of the project in the command prompt.
Apply the deployment using this command.
$ kubectl apply -f mysqlDeployment.yaml

deployment.apps/mysql-deployment created
If we check for the pods
 $ kubectl get pods

NAME                                  READY   STATUS    RESTARTS   AGE
mysql-deployment-558fc46595-h5bg8     1/1     Running   0          4m23s
One pod has been created and it has started running
VOLUMES AND VOLUME MOUNTS
Because pods can easily be destroyed we create a volume to ensure data in the MYSQL pod can be persisted even when the pod is destroyed. Think of a volume as a hard drive storage that attaches to the pod.
a persistent volume (PV) is the "physical" volume on the host machine that stores the persistent data. A persistent volume claim (PVC) is a request for the platform to create a persistent volume for you, and then PVs are attached to pods via a PVC. So in order to create a Persistent Volume, you need to create a Persistent Volume Claim.
- Create a YAML file called (my-sql-pv-claim.yaml).
- Paste the code snippet as shown below.
As with the other deployments we specify the kind, metadata, and labels we then specify the access modes. This defines the way pods can interact with the volumes.
AccessModes
ReadWriteOnce- If you need to write to the volume but you don't have the requirement that multiple pods should be able to write to it. We have just one MYSQL pod so we use this.
https://stackoverflow.com/questions/57798267/kubernetes-persistent-volume-access-modes-readwriteonce-vs-readonlymany-vs-read]
At the tail end of the (my-sql-pv-claim.yaml) file, we use a configMap to store a MYSQL initialization script to create a Users table.
A ConfigMap is an API object that lets you store configuration for other objects to use.
*To loop multiple YAML documents in a single file separate them using(---) *.
- Go to the mySqlDeployment.yaml
- Add this code Snippet
- The full mySqlDeployment.yaml file is now like this.
A Volume mount is used to mount the container at a specified path. The MySQL container mounts the PersistentVolume at (/var/lib/mysql). and the MySQL table creation initialization script is mounted at this location(/docker-entrypoint-initdb.d). As specified in the MYSQL Docker Hub Documentation.
- Apply the claim.
 $ kubectl apply -f mysql-pv-claim.yaml

persistentvolumeclaim/mysql-pv-claim created
configmap/mysql-initdb-config created
- ReApply the mySqlDeployment.
$  kubectl apply -f mysqlDeployment.yaml

deployment.apps/mysql-deployment configured
For the MySQL deployment. Don’t forget to create the claim first otherwise, you would have a mounting issue.
CREATING THE DATABASE SERVICE
Every Kubernetes Deployment needs to seat behind a service. A service can be defined as a logical set of pods. Because pods are dynamic and change frequently. It is important to provide a stable interface to a set of pods that does not change. Service provides that interface and maintains a stable IP Address. The service's IP and name can be used to communicate with external components that want to interact with the pods.
- Create a YAML file called (mySqlService.yaml).
- Paste the code snippet as shown below.
- Apply the deployment using this command.
- check whether the service is up.
$ kubectl get services

NAME              TYPE           CLUSTER-IP       EXTERNAL-IP   PORT(S)          AGE
mysql8-service    NodePort       10.109.131.242   <none>        3306:30750/TCP   5m
.We use a NodePort type of service since we have only one pod and NodePort opens a specific port on each node of the cluster and traffic on that node is forwarded directly to the service. So there is really no need for LoadBalancing the request since we only have a single pod for our DataBase.
CREATING THE API DEPLOYMENT
- Navigate to the root of the project where the (docker-compose.yml) file is and run this command to build the docker images.
docker-compose -f docker-compose.yml up
- Create a file called (deployment.yaml) in the root of the project.
- Paste this code snippet.
It is similar to the mySqlDeployment.yaml with a few changes to the image and the pod name. We set the DBHOST to be (mysql-service). Which is the name of the DataBase service, and then we specify the environment variables to connect to the MYSQL service.
CREATING THE API SERVICE
- Create another file called (service.yaml).
- Paste this code snippet.
Just like the Deployment, we specify the Kind tag as a service and then we bind the service to our deployment using a selector(testapi-deployment). We use a LoadBalancer type of service. This helps balance requests across our pods in the deployment. Let's apply them to Kubernetes.
$ kubectl apply -f deployment.yaml

deployment.apps/testapi-deployment created
$ kubectl apply -f service.yaml

service/testapi-service created
- The API and MYSQL services and deployments have been created.
$ kubectl get services

NAME              TYPE           CLUSTER-IP      EXTERNAL-IP   PORT(S)          AGE
kubernetes        ClusterIP      10.96.0.1       <none>        443/TCP          4h54m
mysql8-service    NodePort       10.106.223.74   <none>        3306:30211/TCP   10m
testapi-service   LoadBalancer   10.111.82.6     localhost     8080:31852/TCP   5s
- Our service has been started on localhost port 8080.
 $ kubectl get pods

NAME                                  READY   STATUS    RESTARTS   AGE
mysql-deployment-558fc46595-h5bg8     1/1     Running   0          11m
testapi-deployment-6b6866d579-9dh5p   1/1     Running   0          29s
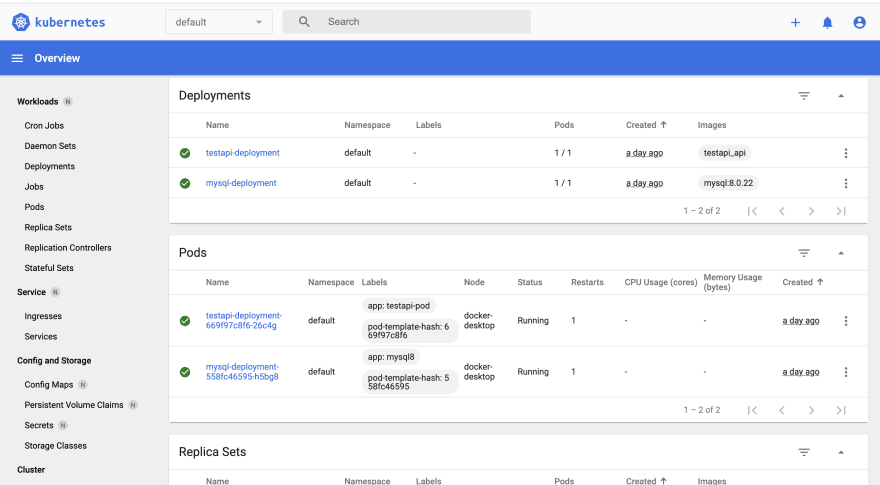
- Go to your Kubernetes dashboard to Monitor the pods and service.
Navigate to the URL of the service. In my case, it is http://localhost:8080/swagger/index.html and test the API endpoints.
Lets scale the API pod
$ kubectl scale --replicas=3 deployment/testapi-deployment

deployment.apps/testapi-deployment scaled
- Check the number of pods. Three pods have been created.
$ kubectl get pods

NAME                                  READY   STATUS    RESTARTS   AGE
mysql-deployment-558fc46595-h5bg8     1/1     Running   1          43h
testapi-deployment-669f97c8f6-26c4g   1/1     Running   1          42h
testapi-deployment-669f97c8f6-fq5tg   0/1     Pending   0          6s
testapi-deployment-669f97c8f6-mxcz2   1/1     Running   0          6s
- One of the pods is pending. Let's check for the reason. We use the describe tag to give more information about a Kubernetes object.
$ kubectl describe pods testapi-deployment-669f97c8f6-fq5tg

Events:
  Type     Reason            Age                  From               Message
  ----     ------            ----                 ----               -------
  Warning  FailedScheduling  65s (x4 over 2m25s)  default-scheduler  0/1 nodes are available: 1 Insufficient cpu.
- We see the reason below. Insufficient CPU. We can then choose to add more resources to the Kubernetes Cluster.
The LoadBalancer service will now balance the request across the 2 API pods. If any of the pods die the Controller Manager will ensure that it is recreated to bring the application to its desired state. Hence providing a highly stable, scalable, and performant system.
-
Finished source code here.
CONCLUSION
In this article we have :
Gone through the different components of the Kubernetes system.
Discussed Persistent Volumes and Persistent Volume claims in Kubernetes
Explained the meaning of some Kubernetes objects.
Deployed an ASP.NetCore WebApi with MYSQL Database to Kubernetes.
MORE RESOURCES
I just discovered this awesome channel TechWorld with Nana. Check out some of the videos here


Top comments (0)