This time I will show you how to use Firebase service to perform authentication in your React JS application.
Any kind of feedback is welcome, thanks and I hope you enjoy the article.🤗
⚠️ Note: You need to have basic knowledge in React JS and hooks and TypeScript.
Table of contents
📌 Technologies to be used.
📌 Creating the project.
📌 First steps.
📌 Creating the authentication designs.📌 Handling form states.
📌 Configuring Firebase.📌 Creating the project.
📌 Creating the app.
📌 Configuring the authentication.📌 Configuring Firebase in our React app.
📌 Creating the functions for authentication.📌 1 - Creating the function to authenticate by Google.
📌 2 - Creating the function to authenticate by credentials.
📌 3 - Creating the function to observe the changes in the user authentication status.
📌 4 - Creating the function to logout.📌 Creating a context of our application.
📌 Using our context.
📌 Conclusion.
🔥 Technologies to be used.
- ▶️ React JS (version 18)
- ▶️ Vite JS
- ▶️ TypeScript
- ▶️ Firebase (version 9.10)
- ▶️ CSS vanilla (You can find the styles in the repository at the end of this post)
🔥 Creating the project.
We will name the project: auth-firebase-react (optional, you can name it whatever you like).
npm init vite@latest
We create the project with Vite JS and select React with TypeScript.
Then we run the following command to navigate to the directory just created.
cd auth-firebase-react
Then we install the dependencies.
npm install
Then we open the project in a code editor (in my case VS code).
code .
🔥 First steps.
First we go to the src/App.tsx file and delete everything, we are going to create a new component that shows a simple title.
const App = () => {
  return (
    <main>
      <h1><b>Auth with</b> <span>Firebase</span> <b>and</b> <span>React</span></h1>
    </main>
  )
}
export default App
It would look like this, if you use the same styles as this project. 👀

🔥 Creating the authentication designs.
In this application we will not handle routes, we only focus on authentication. So the login and register designs can be put in separate views if you like, in my case they will only be components.
I do it this way to explain it in the simplest way.
🔥 Designing the login.
Create the folder src/components and inside create the file Login.tsx.
The login will consist of 2 inputs:
- Email.
- Password.
The inputs, must have to contain the name attribute identifying each input.
It will also have 2 buttons:
- Normal login.
- Login with Google.
Each button must have its type property, this is so that the Google button does not post the form, only the first button must do that.
export const Login = () => {

    return (
        <div className="container-auth">
            <h2>Login</h2>

            <form>
                <input
                    name="email"
                    type="email"
                    placeholder="E-mail"
                />
                <input
                    name="pass"
                    type="password"
                    placeholder="Password"
                />

                <div className="container-buttons">
                    <button type="submit">Log In</button>
                    <button type="button"> Google </button>
                </div>
            </form>
        </div>
    )
}
🔥 Designing the registration.
The design of the registration will be the same as the login, with the same inputs but only one button.
export const Register = () => {

    return (
        <div className="container-auth">
            <h2>Create an account</h2>

            <form>
                <input
                    name="email"
                    type="email"
                    placeholder="E-mail"
                />
                <input
                    name="pass"
                    type="password"
                    placeholder="Password"
                />
                <div className="container-buttons">
                    <button type="submit">Sign up</button>
                </div>
            </form>
        </div>
    )
}
Now we create a barrel file, (index.ts) in the src/components folder to be able to export our components and import them elsewhere in a more orderly way.
export * from './Login'
export * from './Register'
Once we have the two designs and the barrel file, we go to src/App.tsx and add them:
import { Login, Register } from "./components"

const App = () => {

  return (
    <main>
      <h1><b>Auth with</b> <span>Firebase</span> <b>and</b> <span>React</span></h1>
      <section>
        <Login />
        <Register />
      </section>
    </main>
  )
}
export default App
The result of the design would be as follows:

🔥 Handling form states.
To handle each form, we are going to implement a custom hook, we will call it useForm.tsx and it will be inside the folder src/hooks.
We create a function that receives as parameter an object that contains the initial state of the form and this will have a generic type, this so that it is a little more reusable (in case they want to add more fields to the forms) the hook although in this case it is not necessary since we have the same fields in both forms.
interface Props<T> {
    initialState: T
}

export const useForm = <T>({ initialState }: Props<T>) => {}
Then, we will use the state to store the values of the form. And with the handleChange function we will be able to handle the changes of the input and store its values.
The handleChange function sends a computed property to the setForm function and that is why we need the name attribute in the input, to identify it and get its value.
Finally we return, by means of the operator rest we spread the values of the form, then the form and finally the function handleChange.
import { useState } from 'react';

type eventInput = React.ChangeEvent<HTMLInputElement>;

interface Props<T> {
    initialState: T
}

export const useForm = <T>({ initialState }: Props<T>) => {

    const [form, setForm] = useState<T>(initialState)

    const handleChange = (e: eventInput) => {
        setForm(prev => ({
            ...prev,
            [e.target.name]: e.target.value
        }))
    }

    return { ...form, form, handleChange }
}
Now we use the hook in src/components/Login.tsx:
We call the hook useForm we send it an object that will be the initial state of the form, in this case we will have two properties that is the email and pass, that make reference to the inputs that we have in the HTML. Their default values are empty strings.
We destructure the properties of the form and the function handleChange.
const { handleChange, pass, email } = useForm({
    initialState: {
        email: '',
        pass: ''
    }
})
In the inputs we place the value attribute with its corresponding value and the onChange attribute sending the handleChange function to manage the input state.
<input
    name="email"
    type="email"
    placeholder="E-mail"
    onChange={handleChange}
    value={email}
/>
<input
    name="pass"
    type="password"
    placeholder="Password"
    onChange={handleChange}
    value={pass}
/>
Finally, we will make a function called handleSubmit that receives the form event, and this function for the moment only prevents the default form behavior.
We pass the handleSubmit function to the onSubmit attribute of the form tag.
const handleSubmit = (e: React.FormEvent<HTMLFormElement>) => {
        e.preventDefault()
}
This is how Login.tsx would look like for the moment
import { useForm } from '../hooks/useForm';

export const Login = () => {

    const { handleChange, pass, email } = useForm({
        initialState: {
            email: '',
            pass: ''
        }
    })

    const handleSubmit = (e: React.FormEvent<HTMLFormElement>) => {
        e.preventDefault()
    }

    return (
        <div className="container-auth">
            <h2>Login</h2>

            <form onSubmit={handleSubmit}>
                <input
                    name="email"
                    type="email"
                    placeholder="E-mail"
                    onChange={handleChange}
                    value={email}
                />
                <input
                    name="pass"
                    type="password"
                    placeholder="Password"
                    onChange={handleChange}
                    value={pass}
                />

                <div className="container-buttons">
                    <button type="submit">Log In</button>
                    <button type="button"> Google </button>
                </div>
            </form>
        </div>
    )
}
Just as we did the Login.tsx it is exactly the same in the Register.tsx file.
import { useForm } from "../hooks/useForm"

export const Register = () => {

    const { handleChange, pass, email } = useForm({
        initialState: {
            email: '',
            pass: ''
        }
    })

    const handleSubmit = (e: React.FormEvent<HTMLFormElement>) => {
        e.preventDefault()
    }

    return (
        <div className="container-auth">
            <h2>Create an account</h2>

            <form onSubmit={handleSubmit}>
                <input
                    name="email"
                    type="email"
                    placeholder="E-mail"
                    onChange={handleChange}
                    value={email}
                />
                <input
                    name="pass"
                    type="password"
                    placeholder="Password"
                    onChange={handleChange}
                    value={pass}
                />
                <div className="container-buttons">
                    <button type="submit">Sign up</button>
                </div>
            </form>
        </div>
    )
}
⚠️ Note: You can even create a single reusable component, as the forms are almost exactly the same only differing by the buttons and the handleSubmit action as this function will do something different depending on the form.
We already have the design and functionality of the forms, we continue with the creation of our app in Firebase.
🔥 Configuring Firebase.
Now we have to configure the application in firebase to be able to use its authentication service.
🔥 Creating the project.
1 - Let's go to the firebase console, we log in with a Gmail account.
2 - If this is the first time you are using Firebase, you will see a message and a create project button which you should press.
3 - Place the new name to the project. In my case I named it auth-firebase-react.
And at the end there is a continue button that you must press.

4 - Wait for your project to finish creating and then click continue.

Once you continue, you will be sent to a new panel.
🔥 Creating the app.
1 - In the new panel, you have to identify these buttons. Press the web button to create an app (the third button with white background).

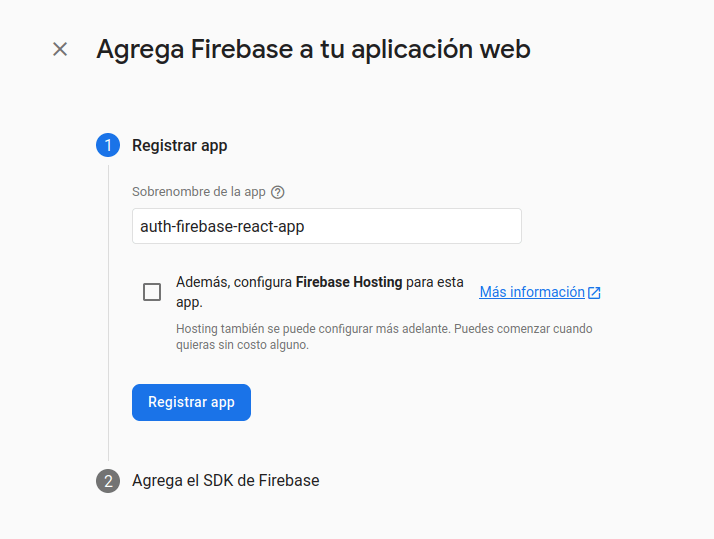
2 - Name your app and click on Register App.
3 - Once the app is registered, we will be given our credentials, which we have to save because we are going to use them later.

🔥 Configuring the authentication.
1 - Now, we have to go back to the panel, in the menu on the right side there is an option that says compilation and inside there is the option authentication and you have to click on it, so it will take you to another screen.
And you have to click on the Start button.

2 - Then you will be shown several providers, from which we are going to select the email/password and Google (you can choose the ones you want, although you will probably have to do more configuration).
When you choose email/password just click on Enable and at the end there is a save button that you must press once you finish making any modification in the provider.
When you choose Google you will do the same as the previous one, and you will also have to select your email.

3 - Once the providers are enabled, it should appear in the Sign-in method tab as follows.

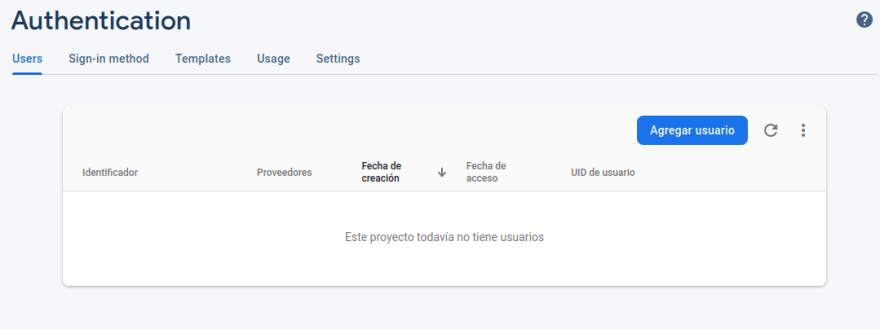
4 - In the Users tab you can see all the users that are registered in your application.
🔥 Configuring Firebase in our React app.
Back to our React app, let's install Firebase.
npm install firebase
create a new folder src/firebase and inside a file called config.ts and paste all the configuration you gave us in the previous section
In my case, I put the values of each property in an environment variable, only creating in the root of the project a .env file.
Each variable must begin with the word VITE_ for them to work.
VITE_APIKEY=1231231465
# more vars
And to call an environment variable we have to use the import.meta.env['Nombre de la variable']
Note: you should also notice that I changed the name of the app variable to FirebaseApp.
import { initializeApp } from "firebase/app";

const firebaseConfig = {
    apiKey: import.meta.env.VITE_APIKEY,
    authDomain: import.meta.env.VITE_AUTHDOMAIN,
    projectId: import.meta.env.VITE_PROJECTID,
    storageBucket: import.meta.env.VITE_STORAGEBUCKET,
    messagingSenderId: import.meta.env.VITE_MESSAGINGSENDERID,
    appId: import.meta.env.VITE_APPID,
};

// Initialize Firebase
export const FirebaseApp = initializeApp(firebaseConfig)
Now to use the Firebase authentication service, we use the getAuth method and we have to get it from 'firebase/auth', then we send it the initialization of our app, that is the FirebaseApp constant.
import { getAuth } from 'firebase/auth'

export const FirebaseApp = initializeApp(firebaseConfig)
export const FirebaseAuth = getAuth(FirebaseApp)
The configuration would look like this 👀:
import { initializeApp } from "firebase/app";

const firebaseConfig = {
    apiKey: import.meta.env.VITE_APIKEY,
    authDomain: import.meta.env.VITE_AUTHDOMAIN,
    projectId: import.meta.env.VITE_PROJECTID,
    storageBucket: import.meta.env.VITE_STORAGEBUCKET,
    messagingSenderId: import.meta.env.VITE_MESSAGINGSENDERID,
    appId: import.meta.env.VITE_APPID,
};

export const FirebaseApp = initializeApp(firebaseConfig)
export const FirebaseAuth = getAuth(FirebaseApp)
🔥 Creating the functions for authentication.
Now let's create a new file inside src/firebase named services.ts
Note: all the firebase functions that we are going to use come from firebase/auth
🔥 1 - Creating the function to authenticate by Google.
First we must create a new instance of the provider we have chosen, in this case Google.
Then we create an asynchronous method, and inside a try/catch because either the user makes a mistake or something goes wrong.
Through the signInWithPopup method, we have to send it our instance of FirebaseAuth, which we had already created in the previous section, and the provider instance.
If everything goes correctly, from the user property of the result variable, it will give you several information as you can see in the destructuring, but we are only going to use the uid that's why we return it.
And in the catch, in fact in all the catch of this file, we are only going to send an alert with the message that Firebase provides us.
import { GoogleAuthProvider, signInWithPopup } from 'firebase/auth'
import { FirebaseAuth } from './config'

const googleProvider = new GoogleAuthProvider()

export const singInWithGoogle = async () => {
    try {
        const result = await signInWithPopup(FirebaseAuth, googleProvider)

        const { displayName, email, photoURL, uid } = result.user

        return uid

    } catch (e) {
        alert((e as Error).message)
    }
}
🔥 2 - Creating the function to authenticate by credentials.
The function for login and register using credentials are the same, they only differ in the method.
Both receive an object containing the email and password and if all goes well, return the uid (these functions also return the same as the google authenticate, such as displayName, photoURL, etc.).
Both the createUserWithEmailAndPassword and signInWithEmailAndPassword functions receive the FirebaseAuth instance, and an email and password.
- createUserWithEmailAndPassword, creates the user in Firebase.
- signInWithEmailAndPassword, verifies if the user exists in Firebase.
import { createUserWithEmailAndPassword, signInWithEmailAndPassword } from 'firebase/auth'
import { FirebaseAuth } from './config'

interface PropsRegister { email: string, password: string }

export const signInWithCredentials = async ({ email, password }: PropsRegister) => {

    try {
        const resp = await createUserWithEmailAndPassword(FirebaseAuth, email, password);
        return resp.user.uid

    } catch (e) {
        alert((e as Error).message)
    }

}

export const loginWithCredentials = async ({ email, password }: PropsRegister) => {

    try {
        const resp = await signInWithEmailAndPassword(FirebaseAuth, email, password);
        return resp.user.uid

    } catch (e) {
        alert((e as Error).message)
    }
}
🔥 3 - Creating the function to observe the changes in the user authentication status.
Why do we want to observe the user's authentication status?
Well, let's suppose we log in correctly, everything goes fine, we are inside the application already authenticated 🤩. But upss! we refresh the browser and we lose the session, and we have to log in again 😥.
So how do we solve this problem, well by observing the authentication status of the user.
For this we need a couple of things.
First create a function, which is going to receive as parameter a callback, that is a function, this function will help us to establish the authenticated or unauthenticated user.
You can notice in the code that we will use a setter of useState and that we will also use the Context API, the typing will fail because we have not created the context yet, so for the moment you can set the type to any.
But what is important now is that we receive the function setSession.
// type StateDispatch = React.Dispatch<React.SetStateAction<Pick<AuthStateContext, "status" | "userId">>>
type StateDispatch = any

export const onAuthStateHasChanged = (setSession: StateDispatch) => {}
Now we will use the function onAuthStateChanged, which receives as first parameter the FirebaseAuth.
import { onAuthStateChanged } from 'firebase/auth'
import { FirebaseAuth } from './config'

// type StateDispatch = React.Dispatch<React.SetStateAction<Pick<AuthStateContext, "status" | "userId">>>
type StateDispatch = any

export const onAuthStateHasChanged = (setSession: StateDispatch) => {
    onAuthStateChanged(FirebaseAuth)
}
The second parameter is a callback, which returns the user if his active session exists, otherwise it returns undefined.
import { onAuthStateChanged } from 'firebase/auth'
import { FirebaseAuth } from './config'

// type StateDispatch = React.Dispatch<React.SetStateAction<Pick<AuthStateContext, "status" | "userId">>>
type StateDispatch = any

export const onAuthStateHasChanged = (setSession: StateDispatch) => {
    onAuthStateChanged(FirebaseAuth, user => {

    })
}
We evaluate the user:
If it does not exist, we use the setSession to set the status to no-authenticated and the user id to null. (don't forget to set the return to avoid executing the following line)
If it exists, we use the setSession to set the status to authenticated and the user id.
import { onAuthStateChanged } from 'firebase/auth'
import { FirebaseAuth } from './config'

// type StateDispatch = React.Dispatch<React.SetStateAction<Pick<AuthStateContext, "status" | "userId">>>
type StateDispatch = any

export const onAuthStateHasChanged = (setSession: StateDispatch) => {
    onAuthStateChanged(FirebaseAuth, user => {

        if (!user) return setSession({ status: 'no-authenticated', userId: null })

        setSession({ status: 'authenticated', userId: user!.uid })
    })
}
You probably don't understand why we send status or userId, well that's the data we will need in our global status, when we are going to create the context of our app.
🔥 4 - Creating the function to logout.
Now what happens, thanks to the fact that we are observing the user's authentication status, we can't change the user for a long time, even if you reload or close the browser.
Well for that, we must log out, and it's very simple:
import { FirebaseAuth } from './config'

export const logoutFirebase = async () => await FirebaseAuth.signOut()
🔥 Creating a context of our application.
To create a context we will first create a folder in src/context and inside a file named authContext.tsx.
Inside we are going to define our interface of the properties we are going to share in our context.
export interface AuthStateContext {
    userId: string | null
    status: 'checking' | 'authenticated' | 'no-authenticated'
    handleLoginWithGoogle: () => Promise<void>
    handleLoginWithCredentials: (password: string, email: string) => Promise<void>
    handleRegisterWithCredentials: (password: string, email: string) => Promise<void>
    handleLogOut: () => Promise<void>
}
Then we are going to create the initial status of our context.
By default the status will be checking because at the beginning we don't know if the user is authenticated or not, we will know it once certain functions are executed. And also the userId will be null by default until we check the authentication status of the user.
const initialState: Pick<AuthStateContext, 'status' | 'userId'> = {
    status: 'checking',
    userId: null
}
We create the context.
export const AuthContext = createContext({} as AuthStateContext)
We create the supplier that will be a functional component that will receive the children
interface IElement { children: JSX.Element | JSX.Element[] }

export const AuthProvider = ({ children }: IElement) => {}
Inside the AuthProvider we will use a state and initialize it with the object we set previously.
export const AuthProvider = ({ children }: IElement) => {

    const [session, setSession] = useState(initialState)
}
Now we are going to use the function we created before to observe the user's authentication status.
We will do it in an effect that should only be executed the first time the application starts. And the callback that we will send it will be the setSession.
const [session, setSession] = useState(initialState)

useEffect(() => {
    onAuthStateHasChanged(setSession)
}, [])
Then we will make the function that executes the logout. We call the logoutFirebase function and set the session with the userId to null and the status to no-authenticated.
import { logoutFirebase } from '../firebase/providers'

const handleLogOut = async () => {
    logoutFirebase()
    setSession({ userId: null, status: 'no-authenticated' })
}
Next, we will make a function that we will reuse in other functions, since we want to avoid repeating so much code.
This function receives the userId that can be a string or undefined, we evaluate if the userId is a string:
If the userId is a string, it means that the user is authenticated and we set the session with the userId and the status to authenticated. (don't forget to set the return to avoid executing the next line).
If the userId is undefined, we call the handleLogOut function, because the user does not have a valid authentication, and we need to close all sessions.
const validateAuth = (userId: string | undefined) => {
    if (userId) return setSession({ userId, status: 'authenticated' })
    handleLogOut()
}
Another function that we are also going to reuse is the following one, it is to set the status to checking while performing some validation.
const checking = () => setSession(prev => ({ ...prev, status: 'checking' }))
The following functions, as well as this one will be similar, first do the checking, then execute the specific function for this task which returns the userId or undefined and call the validateAuth sending what returns this function
1 - Google login function.
import { singInWithGoogle } from '../firebase/providers'

const handleLoginWithGoogle = async () => {
    checking()
    const userId = await singInWithGoogle()
    validateAuth(userId)
}
2 - Function to log in with credentials.
const handleLoginWithCredentials = async (password: string, email: string) => {
    checking()
    const userId = await loginWithCredentials({ email, password })
    validateAuth(userId)
}
3 - Function to create an account with credentials.
const handleRegisterWithCredentials = async (password: string, email: string) => {
    checking()
    const userId = await signInWithCredentials({ email, password })
    validateAuth(userId)
}
Finally, as it is a functional component, we must return a component as follows, placing the children.
return (
    <AuthContext.Provider>
        {children}
    </AuthContext.Provider>
)
The AuthContext.Provider tag receives a value, which is the following properties
return (
    <AuthContext.Provider
        value={{
            ...session,
            handleLoginWithGoogle,
            handleLoginWithCredentials,
            handleRegisterWithCredentials,
            handleLogOut
        }}
    >
        {children}
    </AuthContext.Provider>
)
And we end up with our context. It would look like this 👀
import { createContext, useEffect, useState } from 'react'
import { loginWithCredentials, logoutFirebase, onAuthStateHasChanged, signInWithCredentials, singInWithGoogle } from '../firebase/providers'

export interface AuthStateContext {
    userId: string | null
    status: 'checking' | 'authenticated' | 'no-authenticated'
    handleLoginWithGoogle: () => Promise<void>
    handleLoginWithCredentials: (password: string, email: string) => Promise<void>
    handleRegisterWithCredentials: (password: string, email: string) => Promise<void>
    handleLogOut: () => Promise<void>
}

const initialState: Pick<AuthStateContext, 'status' | 'userId'> = {
    userId: null,
    status: 'checking'
}

export const AuthContext = createContext({} as AuthStateContext)

interface IElement { children: JSX.Element | JSX.Element[] }

export const AuthProvider = ({ children }: IElement) => {

    const [session, setSession] = useState(initialState)

    useEffect(() => {
        onAuthStateHasChanged(setSession)
    }, [])

    const handleLogOut = async () => {
        logoutFirebase()
        setSession({ userId: null, status: 'no-authenticated' })
    }

    const validateAuth = (userId: string | undefined) => {
        if (userId) return setSession({ userId, status: 'authenticated' })
        handleLogOut()
    }

    const checking = () => setSession(prev => ({ ...prev, status: 'checking' }))

    const handleLoginWithGoogle = async () => {
        checking()
        const userId = await singInWithGoogle()
        validateAuth(userId)
    }

    const handleLoginWithCredentials = async (password: string, email: string) => {
        checking()
        const userId = await loginWithCredentials({ email, password })
        validateAuth(userId)
    }

    const handleRegisterWithCredentials = async (password: string, email: string) => {
        checking()
        const userId = await signInWithCredentials({ email, password })
        validateAuth(userId)
    }

    return (
        <AuthContext.Provider
            value={{
                ...session,
                handleLoginWithGoogle,
                handleLoginWithCredentials,
                handleRegisterWithCredentials,
                handleLogOut
            }}
        >
            {children}
        </AuthContext.Provider>
    )
}
Now we need to wrap our app with the provider. To do this we go to the highest point of our app which is the src/main.tsx file and add the AuthProvider
import React from 'react'
import ReactDOM from 'react-dom/client'
import App from './App'
import { AuthProvider } from './context/authContext'
import './index.css'

ReactDOM.createRoot(document.getElementById('root') as HTMLElement).render(
  <React.StrictMode>
    <AuthProvider>
      <App />
    </AuthProvider>
  </React.StrictMode>
)
🔥 Using our context.
Now we go to the src/components/Register.tsx file and use our context as follows:
We import the useContext hook and send the AuthContext and get the handleRegisterWithCredentials function.
We execute this function inside handleSubmit and send the email and password.
import { useContext } from 'react';
import { AuthContext } from "../context/authContext";

export const Register = () => {

    const { handleRegisterWithCredentials } = useContext(AuthContext)

    const { handleChange, pass, email } = useForm({
        initialState: {
            email: 'test@test2.com',
            pass: '123456'
        }
    })

    const handleSubmit = (e: React.FormEvent<HTMLFormElement>) => {
        e.preventDefault()
        handleRegisterWithCredentials(pass, email)
    }

// ...
We do the same in src/components/Login.tsx.
import { useContext } from 'react';
import { AuthContext } from '../context/authContext';

export const Login = () => {

    const { handleLoginWithCredentials } = useContext(AuthContext)

    const { handleChange, pass, email } = useForm({
        initialState: {
            email: 'test@test1.com',
            pass: '123456'
        }
    })

    const handleSubmit = (e: React.FormEvent<HTMLFormElement>) => {
        e.preventDefault()
        handleLoginWithCredentials(pass, email)
    }

// ...
But we also need the handleLoginWithGoogle function.
const { handleLoginWithGoogle, handleLoginWithCredentials } = useContext(AuthContext)
This function will execute the onClick attribute of the Google button tag.
<button type="button" onClick={handleLoginWithGoogle}> Google </button>
Finally in our src/App.tsx file
We are going to use the context by extracting the status and the userID.
We evaluate the status and if it is checking, we show a loading.
  const { status, userId } = useContext(AuthContext)

  if (status === 'checking') return <p className="loading"><span>Checking credentials, wait a moment...</span></p>

Now at the end of the file we will create two components.
The first one is the HomePage (to simulate that it is a different page).
This component will only be visible when the user is authenticated.
And it will show the userID and a button that executes the close session.
export const HomePage = () => {
  const { userId, handleLogOut } = useContext(AuthContext)

  return (
    <section>
      <h5>Your ID is: <span>{userId}</span></h5>
      <button className="btn-logout" onClick={handleLogOut}>Log out</button>
    </section>
  )
}

The second component is the AuthPage, (simulates a different page).
This component will only be visible when the user is NOT authenticated.
Only the Login and Register components that we had in our App component are shown.
export const AuthPage = () => {
  return (
    <section>
      <Login />
      <Register />
    </section>
  )
}
Now in the App component, we are going to make a validation. Where if the status is authenticated and the userId exists, we show the HomePage, otherwise we show the AuthPage.
return (
    <main>
        <h1><b>Auth with</b> <span>Firebase</span> <b>and</b> <span>React</span></h1>
        {
            (status === 'authenticated' && userId)
                ? <HomePage />
                : <AuthPage />
        }
    </main>
)
The App.tsx file would look like this 👀:
import { useContext } from "react"
import { Login, Register } from "./components"
import { AuthContext } from './context/authContext';

const App = () => {

  const { status, userId } = useContext(AuthContext)

  if (status === 'checking') return <p className="loading"><span>Checking credentials, wait a moment...</span></p>

  return (
    <main>
      <h1><b>Auth with</b> <span>Firebase</span> <b>and</b> <span>React</span></h1>
      {
        (status === 'authenticated' && userId)
          ? <HomePage />
          : <AuthPage />
      }
    </main>
  )
}
export default App

export const HomePage = () => {
  const { userId, handleLogOut } = useContext(AuthContext)

  return (
    <section>
      <h5>Your ID is: <span>{userId}</span></h5>
      <button className="btn-logout" onClick={handleLogOut}>Log out</button>
    </section>
  )
}

export const AuthPage = () => {
  return (
    <section>
      <Login />
      <Register />
    </section>
  )
}
🔥 Conclusion.
No doubt using a service like Firebase helps us a lot in saving time compared to building our own services like authentication.
I hope you liked this post and that it has helped you to understand more about how to perform user authentication in your application with React. 🤗
If you know any other different or better way to perform this functionality feel free to comment 🙌.
I invite you to check my portfolio in case you are interested in contacting me for a project!. Franklin Martinez Lucas
🔵 Don't forget to follow me also on twitter: @Frankomtz361

 Franklin Martinez@frankomtz361
 Hi there! 👋
My name is Franklin Martinez.
I'm a Front-End developer and I specialize in JavaScript and React JS technologies. ⚛️
I also like to publish ✍ some articles.
This is my portfolio, take a look. 👀 franklin-dev.netlify.app03:42 AM - 29 Sep 2022


🔥 Source code.
 Franklin361
/
auth-firebase-react
Franklin361
/
auth-firebase-react
Application to show how to do authentication with Firebase and React JS 🔑
React app authentication using Firebase. 🔑
This time, we are going to implement authentication using React JS and Firebase!

Features ⚙️
- Log in.
- Log in with Google.
- Sign in
- Log out.
Technologies 🧪
-
▶️ React JS (v 18) -
▶️ Vite JS -
▶️ TypeScript -
▶️ Firebase (v 9.10) -
▶️ CSS vanilla
Installation 🧰
- Clone the repository (you need to have Git installed).
git clone https://github.com/Franklin361/auth-firebase-react
- Install dependencies of the project.
npm install
- Run the project.
npm run dev
Article links ⛓️
Here's the link to the tutorial in case you'd like to take a look at it! eyes 👀
-
🇲🇽 🔗 -
🇺🇲 🔗


Top comments (1)
hi @franklin030601, thanks for the article, i really appreciate your work, i face a problem with onAuthStateChanged, when the app is loading it returns false but after some millseconds it returns the userId