
Pub/Sub is a pattern where the publisher is not programmed to send a message (payload) to a specific receiver. These messages are sent by publishers to specific channels, and receivers can subscribe to one or more channels to consume those same messages.
Imagine that you have a monolithic backend, however you want to add a new feature to that backend, such as sending emails. Instead of this backend being responsible for sending the emails, you can make it a publisher that sends the emails to a channel to be consumed by another backend (receiver) that will be responsible for sending the emails (like newsletters).
The implementation of this process is quite simple, and that's why in today's example I decided to create a simple Api so that it will receive the body of our request and will send it to a specific channel to be consumed by a receiver and console.log() of it.
The framework I decided to use today was tinyhttp, with an API similar to Express, I don't have a specific reason to use this framework and the example code is easily replicated to other frameworks.
The tinnyhttp framework doesn't come with a body parser already integrated so I'll install milliparsec, in addition to being lighter than the famous body-parser, it's asynchronous and faster.
The Redis client I'm going to use today is ioredis, because its API is intuitive, very robust and with good performance.
Let's code
As you may have already understood, we are going to have two backends. One of the backends we will call a pub, which will be our Api. The other backend will be the sub, which will be our receiver.
Let's start by installing the pub dependencies:
npm i @tinyhttp/app milliparsec ioredis
Now let's create a simple API:
// @/pub/index.js

import { App } from "@tinyhttp/app";
import { json } from "milliparsec";

const app = new App();

app.use(json());

app.get("/", (req, res) => {
  return res.json({ msg: "I hope this runs 😅" });
});

app.listen(3000);
Now we can import ioredis into our project and let's create our client.
// @/pub/index.js

import { App } from "@tinyhttp/app";
import { json } from "milliparsec";
import Redis from "ioredis";

const app = new App();
const redis = new Redis();

app.use(json());

app.get("/", (req, res) => {
  return res.json({ msg: "I hope this runs 😅" });
});

app.listen(3000);
Now on our endpoint we will create a publisher, for that we will use the redis.pubish() method. This method takes two arguments, the first is the name of the channel to which we want to send the message and the second is that same message.
And another thing I want to add is that in this case our message payload is going to be a json object, however the messages must be of type string. So we have to convert our json into a string.
In addition to this we will change the http verb of our endpoint from GET to POST.
// @/pub/index.js

import { App } from "@tinyhttp/app";
import { json } from "milliparsec";
import Redis from "ioredis";

const app = new App();
const redis = new Redis();

app.use(json());

app.post("/", (req, res) => {
  redis.publish("send-user-data", JSON.stringify({ ...req.body }));
  return res.sendStatus(200);
});

app.listen(3000);
With this we have our pub finished and now we can start working on our sub.
First let's install the following dependencies:
npm i ioredis
First let's create a function that will keep our backend running.
// @/sub/index.js

const main = () => {
  console.log("I hope it runs 😅")
};

main();
Now we can import ioredis into our project and let's create our client.
// @/sub/index.js

import Redis from "ioredis";

const redis = new Redis();

const main = () => {
  console.log("I hope it runs 😅")
};

main();
As we are now working on our sub, we are working on our receiver. This way we have to create a subscriber using the redis.subscrive() method. In this example we will only have two arguments, the first will be the channel we want to subscribe to and the second is a callback.
The callback contains two arguments, the first is the error and the second is the count. The count serves to know how many channels our subscriber is subscribed to, in this example it is just one.
// @/sub/index.js

import Redis from "ioredis";

const redis = new Redis();

const main = () => {
  redis.subscribe("send-user-data", (err, count) => {
    // ...
  });

  // ...
};

main();
If an error occurs you will want to log that error, but if this error does not occur, you will want to log the number of channels our subscriber is subscribed to.
// @/sub/index.js

import Redis from "ioredis";

const redis = new Redis();

const main = () => {
  redis.subscribe("send-user-data", (err, count) => {
    if (err) console.error(err.message);
    console.log(`Subscribed to ${count} channels.`);
  });

  // ...
};

main();
Now we just need to create a listener to be aware of messages that will enter the channel queue. For that we will use the redis.on() method which will receive two arguments, the first will be the event name, which in this case is the message, the second argument is a callback.
The callback takes two arguments, the first is the channel the message comes from and the second is the message itself.
// @/sub/index.js

import Redis from "ioredis";

const redis = new Redis();

const main = () => {
  redis.subscribe("send-user-data", (err, count) => {
    if (err) console.error(err.message);
    console.log(`Subscribed to ${count} channels.`);
  });

  redis.on("message", (channel, message) => {
    // ...
  });
};

main();
After that we will want to log the channel the message comes from and finally we will want to log the message that was received. But we have to be aware that the message we receive is a string, so we can get the json object we have to perform a conversion. Like this:
// @/sub/index.js

import Redis from "ioredis";

const redis = new Redis();

const main = () => {
  redis.subscribe("send-user-data", (err, count) => {
    if (err) console.error(err.message);
    console.log(`Subscribed to ${count} channels.`);
  });

  redis.on("message", (channel, message) => {
    console.log(`Received message from ${channel} channel.`);
    console.log(JSON.parse(message));
  });
};

main();
Now when testing our Api with a tool similar to Postman, you can send a json object in the request body with the properties you want.
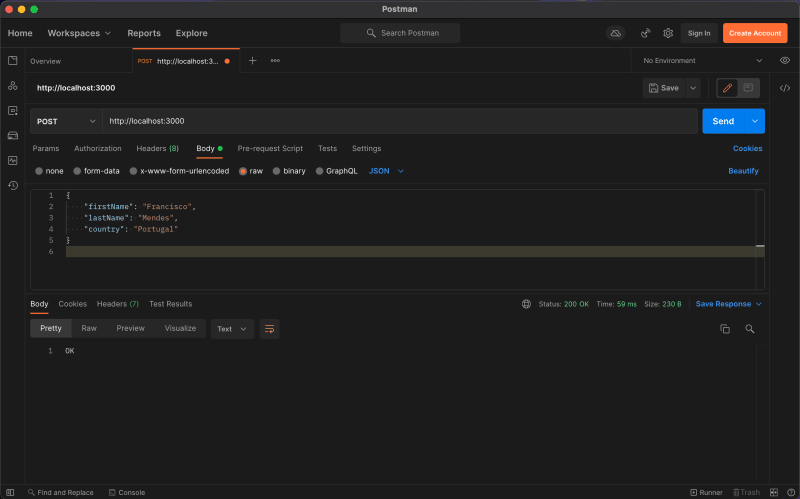
Then you should have something similar to this on your terminal:
Conclusion
As always, I hope you found it interesting. If you noticed any errors in this article, please mention them in the comments. 🧑🏻💻
Hope you have a great day! 💪 🤩


Top comments (6)
You made it easy
Excelente todo, te agradezco tu aporte, me sirvio mucho para implementarlo en los microservicios que vengo trabajando, lo haces ver todo tan sencillo.
This is really awesome! Thank you for sharing Francisco 😊
Thanks 💪
So much simplified and easy to understand text with good code examples. I loved it and I learned how Redis is used for pub/sub messaging.
Thank you Francisco...
Thanks so much for the feedback! 😊 I am immensely happy to know! 🤗