
Maybe you have been developing Apis to be consumed by a website, mobile or desktop application. And one of the points that you need to learn in a quick and simple way is how to implement authentication and authorization in your Api.
Obviously, there are several strategies, from the most popular, such as cookies, sessions and JWT. However, in recent years there has been a huge popularity in the use of third party services like OAuth. However, I am always reticent about whether or not I will give the sensitive data of my users to another company.
I would also add that implementing OAuth can be challenging, at least on the server side. However, in this article I will talk about JWT and I will give a simple example of its implementation.
What are JWTs?
A JSON Web Token, or JWT, is a method used to securely transfer information between two parties. And they are basically an implementation of an authentication and authorization mechanism that is already quite common.
Example of a JWT:
eyJhbGciOiJIUzI1NiIsInR5cCI6IkpXVCJ9.eyJpZCI6Nywicm9sZSI6ImNhcHRhaW4iLCJpYXQiOjE2MjE5NTc4MzF9.Rt2gvcnAVXXKYIbVsmee3qKeGkAWuytLzjZEc6jwUu8
A JWT is split into three parts. The first part of a JWT describes the type of the token together with the hashing algorithm used, usually called Header.
{
  "alg": "HS256",
  "typ": "JWT"
}
The second part is the fundamental part of the token, this is because it is where the information that was added by us and that is relevant to us is found, usually called Payload.
{
  "id": 7,
  "role": "captain",
  "iat": 1621964911,
  "exp": 1621968511
}
The third and final part of the JWT is a signature generated based on the Header, the Payload and our Secret Key.
HMACSHA256(
  base64UrlEncode(header) + "." +
  base64UrlEncode(payload),
  YOUR_256_BIT_SECRET_KEY
) secret base64 encoded
Now that we have a brief idea, let's code.
Let's code
As always, we will start by installing the following facilities:
npm i express jsonwebtoken
Now that we have the dependencies installed, let's create a simple api:
const express = require("express");

const app = express();

app.get("/", (req, res) => {
  return res.json({ message: "Hello World 🇵🇹 👋" });
});

const start = (port) => {
  try {
    app.listen(port, () => {
      console.log(`Api up and running at: http://localhost:${port}`);
    });
  } catch (error) {
    console.error(error);
    process.exit();
  }
};
start(3333);
First we will import the dependency jsonwebtoken giving the name of jwt. And then we will create the endpoint "/login" with the http verb GET (because in this case I will not send data in the body, but if you do, you must use POST). Like this:
app.get("/login", (req, res) => {
  // Logic goes here
});
Now let's sign our jwt. Passing in the first argument the data we want to keep in the payload, we will assign our secret key in the second argument and the third argument will be the expiration of our token (which in this case will only last an hour). Finally, we will return the token in the response.
app.get("/login", (req, res) => {
  const token = jwt.sign({ id: 7, role: "captain" }, "YOUR_256_BIT_SECRET_KEY", { expiresIn: '1h' });
  return res.json({ token });
});
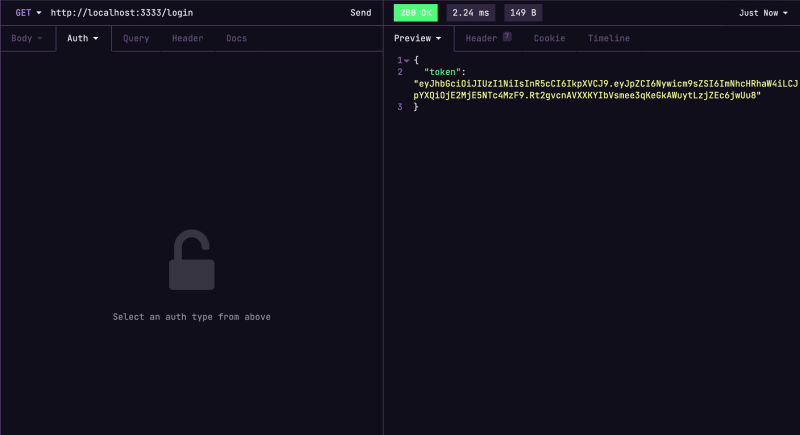
Now if we are going to test the api on our preferred client we should have a similar response like this:
Now we are able to create a JWT, so we already have the authentication finalized. But the authorization is missing. So we are going to create a middleware called authorization to check if the request has a JWT or not. If not, access to the controller will be denied, protecting it.
So we are going to create our middleware:
const authorization = (req, res, next) => {
  // Logic goes here
};
First we have to check if we have the Authorization header, if we don't, we will immediately forbid the access to the controller.
const authorization = (req, res, next) => {
  const { authorization } = req.headers;
  if (!authorization) {
    return res.sendStatus(403);
  }
  // More logic goes here
};
If we have the Authorization header, it will look like the following:
Bearer eyJhbGciOiJIUzI1NiIsInR5cCI6IkpXVCJ9.eyJpZCI6Nywicm9sZSI6ImNhcHRhaW4iLCJpYXQiOjE2MjE5NjAwMTZ9.oWhqt6Nlnfol9uv5rk29_7TTtptQXtT9Kpd97MW4f_g
However we just want the token and not the Bearer, so we have to split the string in the empty space that separates them and just take the token, like this:
const authorization = (req, res, next) => {
  const { authorization } = req.headers;
  if (!authorization) {
    return res.sendStatus(403);
  }
  const token = authorization.split(" ")[1];
  // Even more logic goes here
};
Now we already have the token, we just need to verify it. For this we will use the verify method and in the first argument we will pass the token we obtained previously and in the second argument we will have to pass our secret key.
This way we will have access to the token's payload, but if an error occurs we will prohibit access to the controller, this is because the token may not have been generated by us and someone may be trying to consume our Api with a fake token.
const authorization = (req, res, next) => {
  const { authorization } = req.headers;
  if (!authorization) {
    return res.sendStatus(403);
  }
  const token = authorization.split(" ")[1];
  try {
    const data = jwt.verify(token, "YOUR_256_BIT_SECRET_KEY");
    // Almost done
  } catch {
    return res.sendStatus(403);
  }
};
Now it is time to declare new properties in the request object to make it easier for us to access the token's payload values.
To do this we will create the req.userId and assign the value of the id that is in the token payload.
const authorization = (req, res, next) => {
  const { authorization } = req.headers;
  if (!authorization) {
    return res.sendStatus(403);
  }
  const token = authorization.split(" ")[1];
  try {
    const data = jwt.verify(token, "YOUR_256_BIT_SECRET_KEY");
    req.userId = data.id;
    // Just a bit more
  } catch {
    return res.sendStatus(403);
  }
};
And we will also create the req.userRole and assign the value of the role present in the token payload. And then just give access to the controller.
const authorization = (req, res, next) => {
  const { authorization } = req.headers;
  if (!authorization) {
    return res.sendStatus(403);
  }
  const token = authorization.split(" ")[1];
  try {
    const data = jwt.verify(token, "YOUR_256_BIT_SECRET_KEY");
    req.userId = data.id;
    req.userRole = data.role;
    return next();
  } catch {
    return res.sendStatus(403);
  }
};
With the middleware finished just create a new route in our Api and add it as well as we can make use of the new properties that we declared in the request. Like this:
app.get("/protected", authorization, (req, res) => {
  return res.json({ user: { id: req.userId, role: req.userRole } });
});
The final code should be as follows:
const express = require("express");
const jwt = require("jsonwebtoken");

const app = express();

const authorization = (req, res, next) => {
  const { authorization } = req.headers;
  if (!authorization) {
    return res.sendStatus(403);
  }
  const token = authorization.split(" ")[1];
  try {
    const data = jwt.verify(token, "YOUR_256_BIT_SECRET_KEY");
    req.userId = data.id;
    req.userRole = data.role;
    return next();
  } catch {
    return res.sendStatus(403);
  }
};

app.get("/", (req, res) => {
  return res.json({ message: "Hello World 🇵🇹 👋" });
});

app.get("/login", (req, res) => {
  const token = jwt.sign({ id: 7, role: "captain" }, "YOUR_256_BIT_SECRET_KEY", { expiresIn: '1h' });
  return res.json({ token });
});

app.get("/protected", authorization, (req, res) => {
  return res.json({ user: { id: req.userId, role: req.userRole } });
});

const start = (port) => {
  try {
    app.listen(port, () => {
      console.log(`Api up and running at: http://localhost:${port}`);
    });
  } catch (error) {
    console.error(error);
    process.exit();
  }
};
start(3333);
Now if we test our Api again on our favorite client but this time testing our protected route without sending the token, we will have a response similar to this:

However, if we send the token we will get a response similar to this:

What about you?
What authentication strategy/method do you use?


Top comments (3)
You explained the topic very well.
Thank you so much.
I've been searching for a readable blog post on this for a while now and this was it. Thank you
I am happy to know 💪 Thanks 🙏