
Introduction
In the previous article we used the PocketBase SDK together with React Context to create a global store with the PocketBase client instance, as well as some functions related to user authentication, including session update.
In today's article we will build on what was done in the previous article and we will add other features such as creating a collection in the database, adding API rules, as well as adding, deleting and consuming data from that same collection.
Prerequisites
Before going further, you need:
- React
- PocketBase
In addition, you are expected to have basic knowledge of these technologies.
Getting Started
Starting by installing the missing libraries:
yarn add swr
It's just what will be installed in today's article.
Database Collection
The first step will be to create a new collection in the database called todos, which will contain the following fields:
-
title- title of the todo -
user- relationship between thetodoscollection and theuserscollection
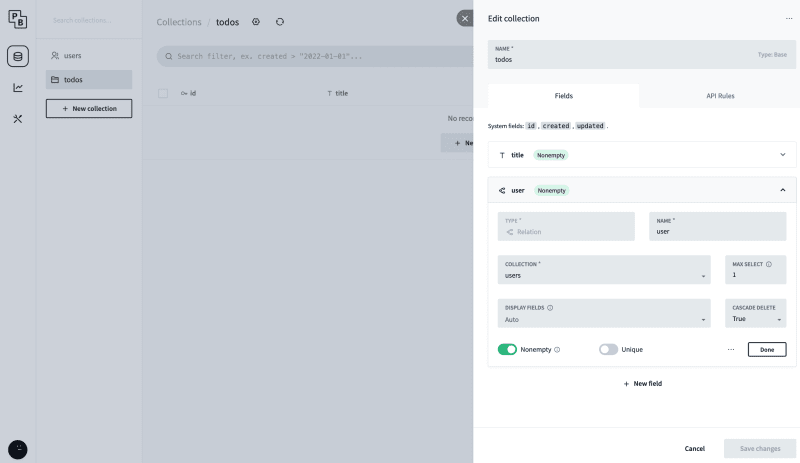
We must bear in mind the following:
- users other than
admincan perform operations on the collection - operations cannot be carried out if the user is not logged in
- taking into account the context of the article, the user can only obtain his data/todos
Taking into account the previous points, we can now define the following rules:
-
@request.auth.id = user.id- whenever we want to get data -
@request.auth.id != ""- whenever it's required to have a session

With this defined we can move on to the next step.
Frontend Implementation
Now that we have the collection in the database defined, we can start by trying to insert a new todo in the collection. To do so, we're going to create a simple form in which we're going to have an input to insert the title of the whole and a button to make the submission.
To make the http request to PocketBase we will use the useSWRMutation() hook so that after the request is successful we can access the cache and perform an optimistic update of the UI.
// @/src/components/AddTodo.jsx
import React, { useCallback, useRef } from "react";
import useSWRMutation from "swr/mutation";
import { useSWRConfig } from "swr";

import { usePocket } from "../contexts/PocketContext";

export const AddNote = () => {
  const todoRef = useRef();
  const { pb, user } = usePocket();
  const { cache, mutate } = useSWRConfig();

  const { trigger } = useSWRMutation(
    "/addTodo",
    async (_, { arg }) => await pb.collection("todos").create(arg),
    {
      onSuccess: async (todo) => {
        const cachedTodos = cache.get("/getTodos")?.data ?? [];
        await mutate("/getTodos", [...cachedTodos, todo], {
          rollbackOnError: true,
          revalidate: false,
        });
      },
    }
  );

  const onSubmitHandler = useCallback(async (evt) => {
    evt?.preventDefault();
    await trigger({ title: todoRef.current.value, user: user.id });
    todoRef.current.value = "";
  }, []);

  return (
    <div>
      <h2>New Todo Form</h2>
      <form onSubmit={onSubmitHandler}>
        <input placeholder="Todo..." type="text" ref={todoRef} />
        <button type="submit">Add Todo</button>
      </form>
    </div>
  );
};
As you can see in the code snippet above, after submitting the whole, providing the title and userId of the user, we reset the form.
Now that we can insert a new todo into the collection, we need to do two more things, get the user todo and remove a todo from the list.
To get the user's todos, we'll need to use the useSWR() hook which will fetch the list of all the user's todos.
And to remove a specific whole, we will use the useSWRMutation() hook again, but this time instead of updating the UI in an optimistic way, we will revalidate the query described in the previous paragraph.
// @/src/components/List.jsx
import React from "react";
import useSWR from "swr";
import useSWRMutation from "swr/mutation";

import { AddNote } from "../components/AddTodo";
import { usePocket } from "../contexts/PocketContext";

export const List = () => {
  const { pb } = usePocket();

  const { data, isLoading, mutate } = useSWR(
    "/getTodos",
    async () => await pb.collection("todos").getFullList()
  );

  const { trigger } = useSWRMutation(
    "/deleteTodo",
    async (_, { arg }) => await pb.collection("todos").delete(arg),
    {
      onSuccess: async () => await mutate(),
    }
  );

  return (
    <section>
      <hr />
      <AddNote />
      <hr />

      <h2>List of Todos</h2>
      {isLoading && <p>Loading...</p>}

      <ul>
        {data?.map((todo) => (
          <li key={todo.id} onClick={async () => await trigger(todo.id)}>
            {todo.title}
          </li>
        ))}
      </ul>
    </section>
  );
};
As you may have noticed in the previous code snippet, in addition to doing everything mentioned above, we also imported the <AddTodo /> component.
Last but not least, we can go to the <Protected /> page component to make a few adjustments and import the <List /> component as follows:
// @/pages/Protected.jsx
import React from "react";

import { List } from "../components/List";
import { usePocket } from "../contexts/PocketContext";

export const Protected = () => {
  const { logout } = usePocket();

  return (
    <section>
      <button onClick={logout}>Logout</button>
      <br />
      <List />
    </section>
  );
};
And with that, I conclude today's article.
Conclusion
I hope you found this article helpful, whether you're using the information in an existing project or just giving it a try for fun.
Please let me know if you notice any mistakes in the article by leaving a comment. And, if you'd like to see the source code for this article, you can find it on the github repository linked below.


Latest comments (0)