In this article, I will give a walk-through tutorial on how to manage Search Engine Optimization (SEO) in a headless WordPress architecture.
Prerequisites
- A fundamental understanding of Next.js and the Node ecosystem
- Foundational SEO best practices knowledge
- A WordPress install
- A basic understanding of the WPGraphQL API
Yoast SEO
Before getting into the Yoast SEO plugin, let's quickly go over what SEO is and its importance. SEO is the practice of orienting your website to rank higher on a search engine results page (SERP) so that you receive more traffic. The aim is typically to rank on the first page of Google results for search terms that mean the most to your target audience.
Yoast SEO is a WordPress plugin that improves your website’s rankings on search engines by helping you optimize your site’s content and keywords. A lot of what Yoast SEO does is automated such as analyzing a page's content and providing suggestions on how to improve it. The plugin gives you a score, tells you what problems there are and how to improve your content for SEO. But there are things that still need your input such as key phrases and meta descriptions.
In this next section, let's go over installing it and extending it with WPGraphQL.
Installing Yoast SEO and WPGraphQL extensions
To start, we need to set up and configure Yoast and WPGraphQL including its Yoast extension to expose the SEO fields in the GraphQL schema with Yoast.
Login to your WP Admin. From Plugins > Add new menu, search for Yoast SEO, install it, and activate the plugin:

Next, search for WPGraphQL and Yoast for WPGraphQL, install and activate both:
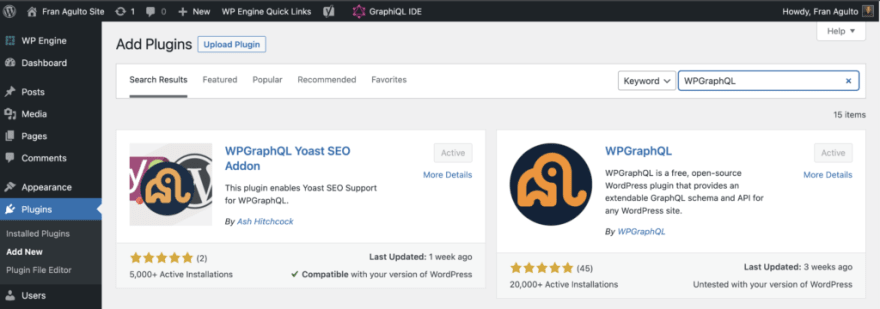
Stoked! These are all the plugins we need on the WordPress install to manage SEO in a headless setup! Let's make sure everything is working as it should be.
Head over to Posts and click on an individual post to edit it. When you are in the edit interface of the individual post, you should see an option to select Yoast SEO at the bottom of the page:

Click on that Yoast SEO option and it will reveal tools such as adding a meta description, canonical URL, breadcrumbs title, etc. There are lots of features to increase and boost your SEO. For this quick tutorial, we will focus on exposing the meta and full head of the HTML in the post in order for web crawlers to better find and index the page.

WPGraphQL and the SEO field
The WPGraphQL for Yoast extension makes it really easy and seamless to expose and query for the SEO data in the WordPress WPGraphQL schema. A SEO field is exposed in the GraphiQL IDE and you can ask specifically for what SEO data you want back.
On the side menu in your WP admin, go to the GraphiQL option on the left or the icon at the top of the navbar. In this case, I am querying for a single post by its slug as the variable and asking for the meta description, title, and the full head of the HTML page in the SEO field.
This is what my query looks like in a code block:
query PostBySlug($slug: String!) {
        generalSettings {
          title
        }
        postBy(slug: $slug) {
          id
          content
          title
          slug
          seo {
            metaDesc
            title
            fullHead
          }
        }
      }
This is what the query looks like in the GraphiQL IDE in WP Admin after you press play to run it:

You can see that it exposes the SEO data via GraphQL schema!! We get back some SEO data goodness! The next step is to get this data and consume it on our frontend UI with Next.js.
Next.js Head and Metadata
We have our WordPress install transformed into a WPGraphQL server with the SEO extension to expose that metadata. The next step is to use Next.js as our frontend app to consume that data and turn it into HTML and improve the way the search engine indexes our site.
In this tutorial, I am going to use my Next.js demo starter. Once you clone down the starter, navigate to the root of the project into the pages/[slug].js file. Go down to the getStaticProps function that contains our GraphQL query. Copy and paste this block over the existing code. It should look like this:
export async function getStaticProps({ params }) {
  const GET_POST = gql`
    query PostBySlug($id: ID!) {
      post(id: $id, idType: SLUG) {
        title
        content
        date
        seo {
          metaDesc
          fullHead
          title
        }
        author {
          node {
            firstName
            lastName
          }
        }
      }
    }
  `;
This file and query are grabbing an individual post with its related data. The SEO meta description, full head, and title are also being requested! Stoked!!
Now that our SEO data is being requested and coming through, let's show it on our site by adding it to our variable in Next.js and destructure it so we can add it to our JSX.
At the top of the [slug].js file, copy this code block and paste it over the existing code. It should look like this:
import { client } from "../lib/apollo";
import { gql } from "@apollo/client";

import Head from "next/head";

export default function SlugPage({ post }) {
  const { seo } = post;

  return (
    <div>
      <Head>
        <title>{seo.title}</title>
        <meta name="description" content={seo.metaDesc} />
        <link rel="icon" href="/favicon.ico" />
      </Head>
When we run this locally in terminal to pull up the site on the browser with npm run dev and open up the dev tools to inspect the elements in the Head tag, you should see all the SEO data that you requested:

We are now optimized for SEO using next/head which is a built-in component in Next.js that allows us to append elements at the head of each page.
Full Head and HTML Parser
Managing the entire Head of your page is made easier with the full head field within the WPGraphQL schema. The issue here is the next/head component does not support React dangerouslySetInnerHTML convention.
In order to alleviate this issue we can use the html-react-parser package. Go to terminal and install it like so in your project directory:
![]()
Once installed, go back to the [slug].js file and copy this code block from top to bottom and your full file should look like this:
import { client } from "../lib/apollo";
import { gql } from "@apollo/client";
import parse from "html-react-parser";
import Head from "next/head";
export default function SlugPage({ post }) {
const fullHead = parse(post.seo.fullHead);
return (
<div>
<Head>{fullHead}</Head>
<main>
<div className="siteHeader">
<h1 className="title">{post.title}</h1>
<p>
✍️
{`${post.author.node.firstName} ${post.author.node.lastName}`} | 🗓️
{new Date(post.date).toLocaleDateString()}
</p>
</div>
<article dangerouslySetInnerHTML={{ __html: post.content }}></article>
</main>
</div>
);
}
export async function getStaticProps({ params }) {
const GET_POST = gql`
query PostBySlug($id: ID!) {
post(id: $id, idType: SLUG) {
title
content
date
seo {
metaDesc
fullHead
title
}
author {
node {
firstName
lastName
}
}
}
}
`;
// the params argument for this function corresponds to the dynamic URL segments
// we included in our page-based route. So, in this case, the `params` object will have
// a property named `uri` that contains that route segment when a user hits the page
const response = await client.query({
query: GET_POST,
variables: {
id: params.slug,
},
});
const post = response?.data?.post;
return {
props: {
post,
},
};
}
export async function getStaticPaths() {
const paths = [];
return {
paths,
fallback: "blocking",
};
}
At the top of the file, we import the parse from html-react-parser. Then, we set a const up to call the full head and transform it into react. Once that is done, we simply add the jsx within the head tag grabbing the full head data in one object.
Going back to terminal and running it locally, we can see that it is working!!! The entire full head is showing with all the metadata and canonical URLs!

Deploy On Atlas
This works locally on our machine. Let's get it deployed and live on the internet and check to see if we get the same results.
I will use Atlas, WP Engine's Headless WordPress hosting platform, specifically built to optimize for headless. I already have an account all set up with my GitHub repo accessible on Atlas. All I need to do is push this change and trigger that build and deployment.
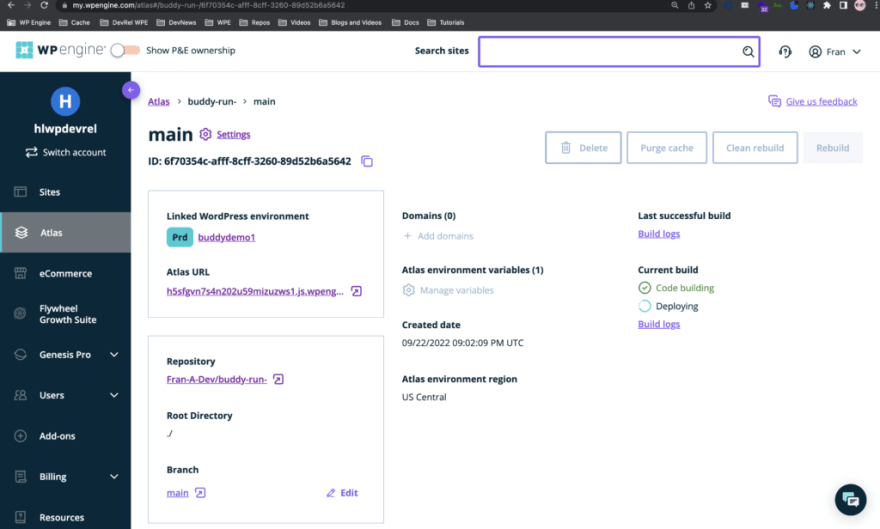
Once my app is deployed on Atlas, the unique URL is updated. Hit this URL, go to any of the post links on the home page and open the dev tools on its detail page. Once there, inspect the Head elements. You will see what we saw locally but now it is live on the internet!

Conclusion
SEO is an important part of your site's discoverability when it comes to Google and other search engines indexing your site and ranking them high. It makes your website more visible, and that means more traffic.
With the tools like WPGraphQL, Yoast SEO, Next.js and Atlas to host, this is made much more easier and seamless for the developer.
This tutorial covered just the basics of what Yoast SEO can do with WPGraphQL. There are a lot more features and options you can do and I would love to hear about them in our Discord channel!
If you have not used the Atlas platform and are interested, please check this link out to get a free sandbox dev account!


Top comments (0)