Hi all! I recently bought M1 mac and wanted to start building some apps on React Native - and it turned out it had some twists to it. So to save someone some hours of debugging and googling, here is a summary on how to get iOS to run.
Important I am on React native 0.64+ version! Also this assumes that you have nodejs already installed, and that you installed projects node dependencies (npm/yarn install).
1. XCode
Initially I downloaded an older version of XCode to make this work, however currently everything for me works on 12.5 as well. You should still launch in Rosetta even if you have 12.5 XCode!)
- (optional) Download XCode 12.4 (download https://developer.apple.com/download/more/, name it XCode-12.4.app (don't replace the existing XCode!)
- on the XCode app (whichever you choose), right-click,
Get info,Open using Rosetta)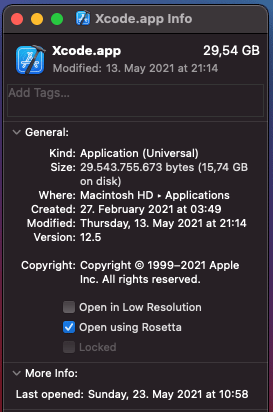
2. Podfile
Podfile is a dependency list for iOS project, and on it Flipper can cause some issues. You can fix that by specifying a specific (older) version that M1 macs. By default, more stable versions are used which fail on M1.
So to fix this, navigate to your <project_name>/ios/Podfile and instead of use_flipper!() replace it with this:
use_flipper!({ 'Flipper-Folly' => '2.5.3', 'Flipper' => '0.87.0', 'Flipper-RSocket' => '1.3.1' })
3. Installing pods
Very important is that nothing used is actually on M1 achitecture - this is because a lot of support is still lacking. So to correct this, always install your pods in intel based architecture. (https://github.com/CocoaPods/CocoaPods/issues/10518)
To do this, navigate to your ios folder and run this command:
arch -x86_64 pod install
If you already installed pods, delete Pods folder and delete Podfile.lock, and run command above.
4. Open project in XCode
Common mistake I see is that people open the actual project in XCode, not the workspace. The reason that is a fail is because then Pods are not included into bundling, and build fails. So, make sure that you open the workspace.
To do this, in XCode find file <project_name>/ios/<project_name>.xcworkspace
5. Exclude arm64 architecture
Open your workspace, select the project and open "Build" tab. in there you will find Excluded Architectures section, and add arm64 to both debug and release.

6. (optional) Clean the build
In case you ran the build already, before taking the above steps, make sure to clean it with this command (removed interpreted data in XCode such as architecture):
rm -rf ~/Library/Developer/Xcode/DerivedData/
and CMD+SHIFT+K shortcut in XCode (cleans the build files)
7. Run the build
Run the build and all should be good! Build should open the terminal for Metro and then continue to run simulator and the app itself.
While running the build from XCode a lot of libs will throw warnings but thats expected. In case you get stuck on an error that says something like "...require higher target...", then in XCode, find the pod and increase the iOS target to 10+ version.
Also its worth noting that for me, terminal launch of IOS didn't always work while XCode does. If you run XCode and build succeeds, then terminal should work later as well.
Good luck out there!
origin post that helped me a lot: https://dev.to/mngyuan/updating-react-native-projects-for-m1-mac-development-1mk4


Top comments (3)
Hey Filip, thanks a lot for this post, it helped me a lot to setup my M1 for a React Native project. 🚀
Thanks for this! I did try running the simulator via the cli after it was up in xcode, but still had no luck on that front
Update: I was able to get the simulator running via the cli by running Terminal through Rosetta. It also let me run
pod installwithout thearch -x86_64portion of the command