Whenever you start using new technologies in your development flow, you might feel at least a bit intimidated. Especially when there’s a myriad of npm packages out there in the wild. Mixing and matching things can sometimes take a lot of time and effort, and is usually frustrating. This is where the following Vue.js tutorial for beginner developers comes into play.
What is Vue.js? Why should you care? 🤔
Vue.js or Vue for short is a JavaScript framework for building user interfaces. Compared to other frameworks, like Angular or React, Vue is more approachable and has not as steep of a learning curve.
Vue is also modular, and will allow you to split your code into reusable components. Each of them having their own HTML markup, CSS and JavaScript code.
What is the scope of this Vue.js tutorial? 🔍
The purpose of this short Vue.js tutorial is to provide you with some scaffolding on which you can build and experiment with Vue. We’re going to take a look at a basic setup of a Vue app inside the WordPress dashboard.
(Note; We will not be teaching you Vue per se in this guide, but you can go ahead and learn more about the framework from the official guide after you set up the project here – on which you can continue to experiment after we are done.)
What we’re going to do is use a predefined template for WordPress plugins using Vue. You can find it in the following GitHub repository if you want to take a deeper look: https://github.com/abaicus/vue-wp-bootstrap.
Vue.js tutorial: Prerequisites 🚀
There are a few things that you should already have set up on your computer to continue following this guide:
Firstly, you are going to need a LAMP stack – you can use XAMPP on Windows or Mac, or Local by Flywheel on Mac, and then set yourself up a fresh local WordPress install.
Make sure you have the NodeJS package manager (npm) installed on your machine. You will also need to install two more packages via the terminal – the Vue CLI and the Vue template initializing tool. Like so:
$ npm install -g @vue/cli
$ npm install -g @vue/cli-init
After you have installed these two dependencies, you need to change the active directory to your local WordPress instance’s wp-content/plugins directory and then run the following command there:
$ vue init abaicus/vue-wp-bootstrap my-vue-dashboard-plugin
Next up, you will be prompted to answer some questions regarding the setup of your project.
For the Build prompt, just go ahead and choose the first option for now “Runtime + Compiler: recommended for most users”.
You can enable ESLint linter if you want. It will detect any linting errors in your project, but you don’t necessarily have to worry about this right now.
Commit Lint and Pre-Commit Hooks are meant to check your commit messages and the code before sending a commit to GitHub – to keep everything tidy and nicely formatted.
You will end up with a terminal looking more or less like this after you are done:
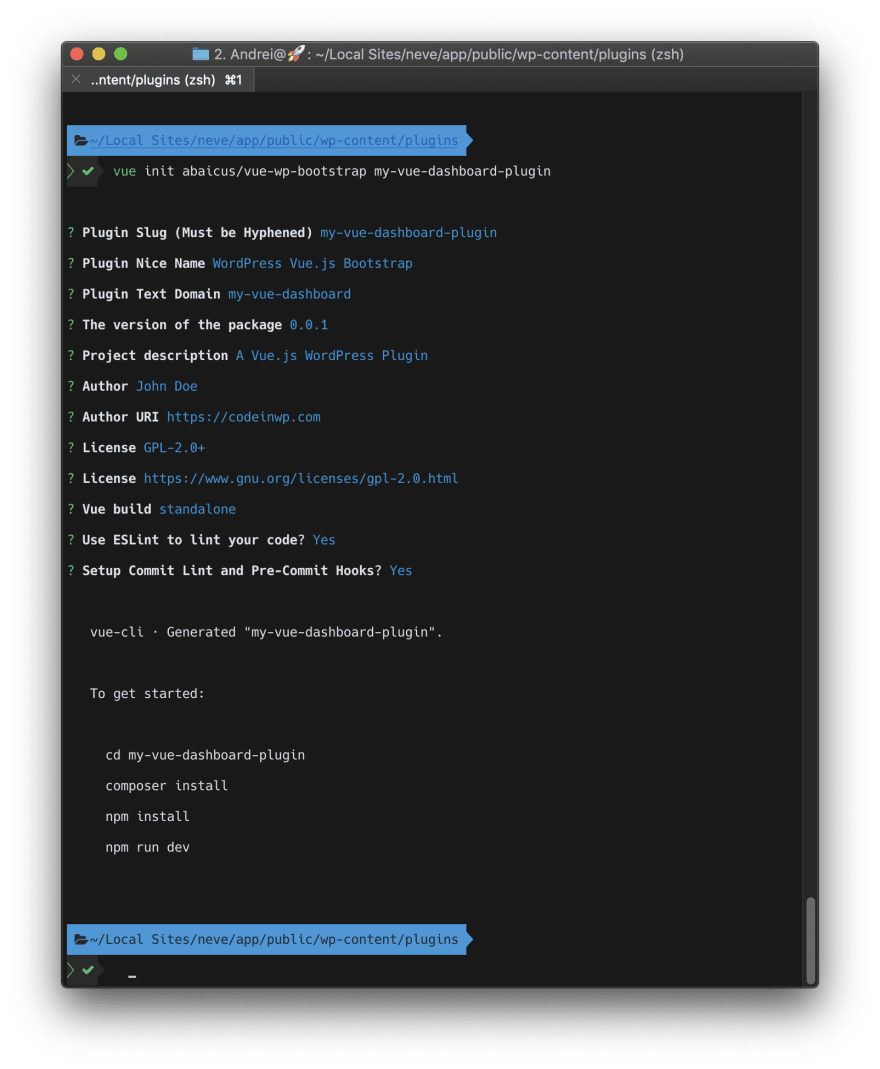
You can go ahead and follow the instructions on the screen. Change the directory to the newly generated plugin directory and run the commands shown in the terminal prompt. This will get your application up and running, waiting for changes inside your code and it will transpile the Vue code to JavaScript.
What does it do? 💻
Not much. This is just a basic application that displays some data from the backend. Not much Vue under the hood. You can go ahead to the Plugins Dashboard page and activate it. It’s going to add a new page in your Admin Menu. Upon navigating to it, you’re going to find a dashboard page with two strings:

The plugin scaffolding structure 👨🏼💻
Let’s take a look at the file structure for the newly generated plugin. We’re going to ignore most of the config files in this Vue.js tutorial so that we can focus on the structure of the application:

First, we’ve got the plugin.php file, which is the entry point for the actual plugin. Here, we have the main Plugin class. This is where the main components of the application are included and ran.
Next up, there’s the package.json file where all the dependencies and a bunch of other project info is defined. The part in which you may be interested lives under the “scripts” field. There, you have all the commands that you can run with the npm run prefix. The important ones, for now, should be npm run dev (which builds the application for development) and npm run build (which you should run once you are ready to deploy your app for production). The other commands are adjacent to these two or do other stuff that you shouldn’t need to worry about at this moment.
Inside the includes directory, there are three files:
The rest.php class doesn’t do anything at the moment, but you already have a structure to add your RestAPI routes
The assets.php class handles style and script enqueueing. Here, the JavaScript file is localized to pass starting data from PHP to our Vue app. At the moment, there are just two texts sent, but you can include anything you want.
-
The admin.php file is the one that is taking care of adding a new page in the dashboard and rendering the actual plugin page. You’re going to notice the app itself is rendered just as two empty
tags inside the plugin_page() function. That’s because the JavaScript will handle the actual rendering of the application after it loads.Inside the assets directory, you’re going to find four more directories:
- The src directory – the source files for our Vue app, which we’re going to talk about later.
- The scss directory – the SCSS style files from which we generate the CSS stylesheet.
- The js directory – the transpiled code which is generated from our files in the src directory.
- The css directory – the compiled style from the SCSS files.
The src directory and Vue template files
Inside this directory, there are two files: main.js and App.vue. The main.js file is the entry point for the application. It attaches the Vue app component to the DOM element with the corresponding id.
/* jshint esversion: 6 */
import Vue from 'vue'
import App from './App.vue'

window.addEventListener('load', function () {
  new Vue({ // eslint-disable-line no-new
    el: '#mvdp-app',
    components: { App },
    render: (h) => h(App)
  })
})
The actual application markup is inside the App.vue template:
/* jshint esversion: 6 */
<template>
  <div>
    <h1>{{this.strings.title}}</h1>
    <p>{{this.strings.description}}</p>
  </div>
</template>

<script>
  /* global MVDP */
  export default {
    data () {
      return {
        strings: MVDP.strings
      }
    },
    name: 'App.vue'
  }
</script>

<style scoped>

</style>
You can see inside the snippet above that we’re using the strings we localized in the Assets class. One of the great features of Vue is that the code of the component is neatly organized into template, script, and style making it easy to understand the structure.
That’s it, you now have a solid starting point for whatever you want to develop further with Vue.js! I hope this Vue.js tutorial has been helpful.
The article was originally published on CodeinWP.com


Top comments (0)