This article will describe in detail the common challenges of microservices in the Kubernetes world, and how we can solve those challenges.

Let's start listing some of the challenges:
Every single microservice needs to know the service address. Usually, it is injected within the microservice business logic as Config dependency.

Once the request is received in the Kubernetes Cluster, the communication is insecure as microservices talk to each other over HTTP. Every single microservice inside the cluster can talk to any other service freely. So, when it comes to security, there is no way to prevent attacks on the cluster.

Each microservice has a retry logic to make the whole application more robust. If one microservice is unreachable or you lose a connection, you naturally want to retry connecting. So, developers usually add retry logic to every service, and the same process is continued when the new microservices are added.
We want to be able to monitor how the service performs, what responses return, how many requests the microservice receives, the network latency, and tracing.
The development team may add monitoring logic to Prometheus using the client library, and collect tracing data using the tracing library, for example, Zipkin. As you might have noticed, the team of developers of each microservice needs to add all this logic to every service, which is quite time-consuming.
The developers are not integrating any business needs. Instead, they add logic for communication, security, and retry logic for each microservice. These will add complexity to the service instead of keeping it simple and straightforward.Managing Canary deployment and backward compatibility of software, including websites and backend APIs in microservices, gets challenging without proper Service Mesh patterns.
In software engineering, canary deployment is the practice of making staged releases. We roll out software updates for a small part of the live users first, so they test it and provide feedback. Once the changes are accepted, the update will be rolled out for the rest of the users.

When it comes to Canary deployment, we split users into two groups. A small percentage of these groups will go to Canary, while the rest will stay in the stable version. Later we will decide whether to roll everyone to the Canary or roll back changes to the previous version. Alternatively, we can check the headers of requests to support Canary deployment for a specific set of users.
Some of the challenges I have faced are listed above. As a result, it would make sense to extract all non-business logic out of the microservice into the separate sidecar application that handles all of the above-mentioned issues. Also, the sidecar would act as a proxy. We can solve all these challenges with the “service mesh with Sidecar” pattern.
What is Service Mesh?
The main goals of a service mesh are to allow insight into previously invisible service communications layers and to gain full control of all microservices communication logic, like dynamic service discovery, load balancing, timeouts, fallbacks, retries, circuit breaking, distributed tracing, and security policy enforcement between services. The insights are provided by traffic audit and tracing features.
Kubernetes already has a very basic “service mesh” out-of-the-box; it’s the “service” resource. It provides service discovery by targeting the needed pods and a round-robin balancing of requests. A “service” works by managing iptables on each host in the cluster, allowing only a round-robin load balancing approach, with no retries and back off logic and no other features that we might expect a modern service mesh to handle. However, implementing one of the fully featured service mesh systems in your cluster, for example, Istio, Linkerd, or Conduit, will provide you with the following possibilities:
- Allow services to talk plain HTTP and not bother about HTTPS on the application layer. The service mesh proxies will manage HTTPS encapsulation on the sender side and TLS termination on the receiver side, allowing the application components to use plain HTTP or gRPC and any other protocol without encryption in transit. Proxies will take care of the encryption.
- Security policies enforcement: the proxy knows which services are allowed to access some other services and endpoints and will deny unauthorized traffic.
- Circuit breaking: automatic back off in case of accessing an overloaded service or endpoint that would already have high latency. This is available to avoid hitting it with more and more requests which may cause that endpoint to fail under an excessive load.
- Latency-aware load balancing: instead of using a round-robin style of balancing (which ignores the latency of each target), use smarter balancing according to the response times of each backend target. This is an incredibly crucial feature of a modern service mesh.
- Queue depth load balancing: route new requests based on the least busy target by the current request processing amount. The service mesh knows where it has sent all previous requests and which ones are still being processed or were already completed. It will send new incoming requests based on that logic to a target with the lowest queue for processing.
- Per request routing: route particular requests marked by selected HTTP header to specific targets behind the load balancer, allowing easy canary deployment testing and other creative use cases. One of the most powerful features a service mesh provides.
- Metrics and tracing: reporting requests volume per target, latency metrics, success, and error rates.
We would be doing technical practice with the service mesh known as Istio. We will execute Canary Deployment with the Istio to cover the above-mentioned issues.
Istio
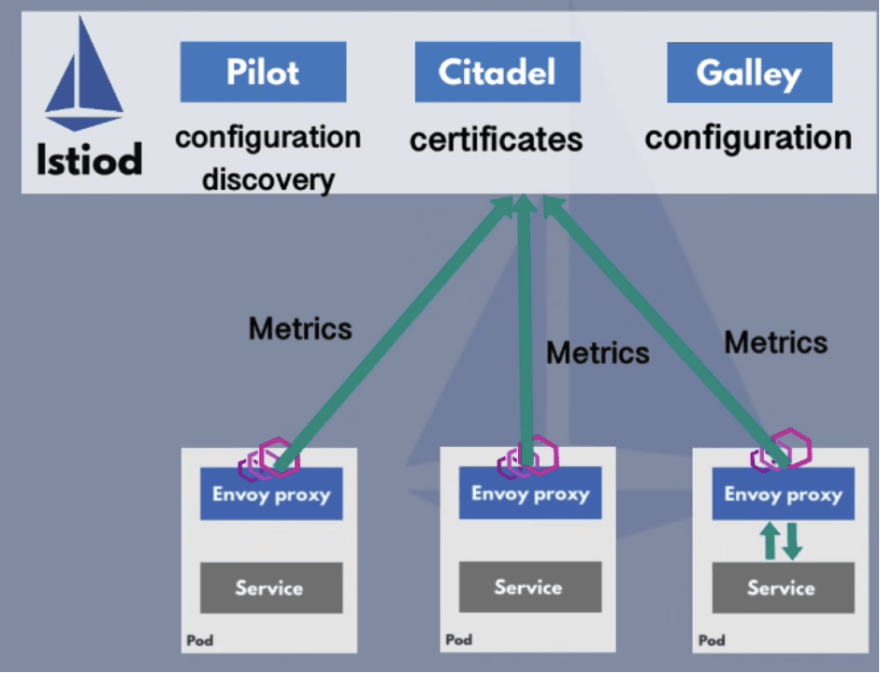
Service mesh is just a pattern, while Istio is one of its implementations. Istio architecture consists of a “Control Plane” component, also known as “Istiod”, which manages and injects proxy on each separate pod. Istio uses Envoy Proxy as the Proxy layer. The Envoy Proxy is an independent open source project which many other mesh providers use as a proxy sidecar.
You can learn more about Istio from its official documentation (https://istio.io/)

How to configure Istio in Kubernetes?
There is no need to adjust deployment and services in Kubernetes YAML files, as the Istio configuration is separate from the application configuration. Istio is configured with Kubernetes YAML files. It uses Kubernetes Customer Resource Definitions (CRD) by extending the Kubernetes API.
CRD is a custom Kubernetes component/object. For example, third-party technologies, like Istio, Prometheus, and many more, can be used like any other native Kubernetes objects.
Using a few Istio CRDs, we can configure different traffic routing between microservices, including which services can communicate with each other, traffic splitting, retry logic, and canary deployments.
Service Discovery
Istiod has a central registry for all the microservices. Instead of statically configuring endpoints for each microservice, when a new microservice gets deployed, it will be automatically registered in the service registry with no need for configuration from our side.
Envoy Proxy can query endpoints and send the traffic to the relevant services using this registry.
Certificate Management
Istiod also acts as a Certificate Authority. It generates certificates for all the cluster microservices, allowing secure TLS communication between microservices proxies.
Metrics and Tracing
Istiod receives metrics and tracing data from Envoy Proxies. It is gathered by monitoring servers, such as Prometheus, and tracing servers to have everything needed for microservice applications.
Istio Ingress Gateway
It is an entry point into the Kubernetes cluster, almost an alternative to Nginx Ingress Controller.
Istio gateway runs as Pod into the cluster and acts as load balancing by accepting incoming traffic. The gateway then will direct traffic to one of the microservices inside the cluster using VirtualService components.
VirtualService
The “VirtualService” links the gateway and destination pods of any request. Any “host” (DNS name or Kubernetes DNS name when services address each other inside the cluster) can be defined only in one VirtualService.
Istio traffic flow
A user will initiate a request to the web server microservice into the Kubernetes Cluster → then request hits to Istio Gateway because it is the entry point of the cluster → Gateway will evaluate the Virtual Service rules about how to route the traffic and send it to the WebServer microservice → Request reaches to the Envoy Proxy of web server microservice, it will evaluate the request and forward it to the actual web server container within the same container by using localhost.
For instance, webserver initiates another request to the Payment microservice so that the request will move out from Webserver container to the Envoy Proxy. Then, by applying the VIrtualService rules, the Destination rules configuration will communicate with the Envoy Proxy of Payment microservice using mTLS (mutual TLS).

Canary Deployment with Istio
Before we start the technical practice, make sure that the necessary tools which are listed below are installed on your computer:
Kubectl (https://kubernetes.io/docs/tasks/tools/)
The Kubernetes command-line tool allows you to run commands against Kubernetes clusters. You can use kubectl to deploy applications, inspect and manage cluster resources, and view logs.Minikube (https://minikube.sigs.k8s.io/docs/start/)
It is the most widely used local Kubernetes installer. It offers an easy-to-use guide on installing and running single Kubernetes environments across multiple operating systems. It deploys Kubernetes as a container, VM, or bare-metal and implements a Docker API endpoint that helps it push container images faster. It has advanced features like load balancing, filesystem mounts, and FeatureGates, making it the best for running Kubernetes locally. Run Minikube locally by executing the command -minikube startto create Kubernetes resources locally.
Istio Addons: additional elements that we can install with Istio. It will include all data visualisation about metrics, tracing, basically what your microservices are doing and how they perform. Below you can find a brief description of what each tool does, but we don't dive into details as it is out of the scope of this article.
We will install some of those add-ons into our local cluster. You can follow the official guide for installing these add-ons (https://istio.io/latest/docs/ops/integrations/). Please install the following add-ons: Kiali, Grafana, Jaeger, and Promethteus.
Prometheus is used for monitoring anything in the cluster. It can be the server itself, memory, cpu usage, as well as Kubernetes components, such as pods, services, and other components.
Grafana is a data visualization tool for metrics data.
Jaeger is a service for tracing microservice requests.
Kiali offers amazing data visualization features and configuring your microservice setup and communication.
We want to work in an isolated namespace for this example, so, please create a Kubernetes namespace, and save the following to namespace.ymal file.
apiVersion: v1
kind: Service
metadata:
  name: website
  namespace: website-istio-ns
spec:
  ports:
  - port: 80
    targetPort: 80
    protocol: TCP
    name: http
  selector:
    app: website
Then, run kubectl create -f service.yaml to submit these resource definitions to the cluster.
Create, Istio Gateway and virtual service for the basic functionality of the service mesh ingress endpoint, so that we can access our application through the Istio Ingress load balancer that was created when you deployed Istio to the cluster.
Save the following definition to the gateway.yaml file:
apiVersion: networking.istio.io/v1alpha3
kind: Gateway
metadata:
  name: website-gateway
  namespace: website-istio-ns
spec:
  selector:
    istio: ingressgateway
  servers:
  - port:
      number: 80
      name: http
      protocol: HTTP
    hosts:
    - "*"
Then, run kubectl create -f gateway.yaml to submit these resource definitions to the cluster.
Save the following definition to the virtual-service.yaml file:
apiVersion: networking.istio.io/v1alpha3
kind: VirtualService
metadata:
  name: website-virtual-service
  namespace: website-istio-ns
spec:
  hosts:
  - "*"
  gateways:
  - website-gateway
  http:
  - match:
      - headers:
          qa:
            exact: canary-test
    route:
      - destination:
          host: website
          subset: version-2

  - route:
    - destination:
        host: website
        subset: version-1
The host field in the “VirtualService” destination is a name of the Kubernetes “service” object for use. Destination can be divided into subsets, if we want to distinguish between our pods by label and address them in different scenarios separately (with URI path based or HTTP header based routing). In this case, we need to add a subset field like this:
http:
  - route:
    - destination:
        host: website
        subset: something-that-is-defined-in-DestinationRule
“Subsets” for routing are defined with “DestinationRule.” In addition to the label-based separation of target pods of service, we can apply a custom load-balancing policy, if, for example, we have a subset “version-1” and “version-2” defined below and saved in “destination-rule.yaml” file:
apiVersion: networking.istio.io/v1alpha3
kind: DestinationRule
metadata:
  name: website
  namespace: website-istio-ns
spec:
  host: website
  subsets:
  - name: version-1
    labels:
      version: website-version-1
  - name: version-2
    labels:
      version: website-version-2
Now deploy with kubectl create -f destination-rule.yaml. By doing that, we created a “subset” of the “website” destination, named “version-1” and “version-2”. That subset is any pod with “version: website-version-1” or “version: website-version-1” label and any other labels that are defined in the “website” service definition (which is “app: website”).
This will route to any pod with the “version” label that equals “website-version-1” or “website-version-2” when a “VirtualService” uses the destination service name. We defined it in the “spec.host” field (it is the Kubernetes “service” object name, the one we used in “spec.http.route.destination.host” field of “VirtualService”).
The next step is to prepare the service mesh for deploying the new website version. Let’s assume that this is a production cluster with real traffic flowing in, and “website-version-1” is active, and we have four pods that receive traffic. By creating a separate deployment, with version-2 of the website pod and the same label “app: website”, we will cause traffic to split and will impact existing users, which we want to avoid!
Let’s create a deployment pod with 2 different version of the website:
Save the below and name it as version-1-deployment.yaml
apiVersion: apps/v1
kind: Deployment
metadata:
  name: web-v1
  namespace: website-istio-ns
spec:
  replicas: 4
  selector:
    matchLabels:
      app: website
      version: website-version-1
  template:
    metadata:
      labels:
        app: website
        version: website-version-1
    spec:
      containers:
      - name: website-version-1
        image: hashicorp/http-echo:alpine
        args:
          - -listen=:80
          - --text="echo-v1"
        ports:
          - name: http
            protocol: TCP
            containerPort: 80
        imagePullPolicy: IfNotPresent
Deploy by executing command kubectl create -f version-1-deployment.yaml
For the "version-2" of website we need to have a separate deployment. Please create a file named as version-2-deployment.yaml with the following content:
apiVersion: apps/v1
kind: Deployment
metadata:
  name: web-v2
  namespace: website-istio-ns
spec:
  replicas: 1
  selector:
    matchLabels:
      app: website
      version: website-version-2
  template:
    metadata:
      labels:
        app: website
        version: website-version-2
    spec:
      containers:
      - name: website-version-2
        image: hashicorp/http-echo:alpine
        args:
          - -listen=:80
          - --text="echo-v2"
        ports:
          - name: http
            protocol: TCP
            containerPort: 80
        imagePullPolicy: IfNotPresent
Deploy by executing command kubectl create -f version-2-deployment.yaml
At this point we have four “version-1” pods and a “version-2” canary pod.
In order to access “istio ingress gateway” locally, we must tunnel it locally with the help of Minikube by executing the following command: minikube tunnel.
Finally, we can test the results by visiting the following browser address: “localhost:80”. As you can see on the screenshot, the “version-1” of our website responded as “echo-v1”. By default all visitors will land on the “version-1”.

The QA team, internal users, and a small percentage of real users can see the updated version of the website, known as the Canary version. Any HTTP request must include the “qa” header containing the “canary-test” value for viewing the Canary version.
Istio’s virtual service will check headers and values that match them, rerouting traffic to the “version-2” of the website.
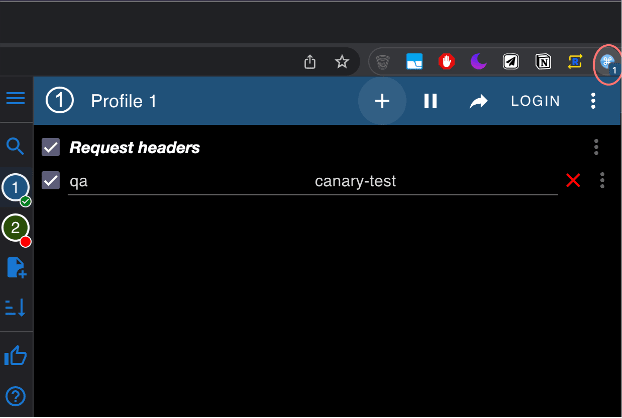
To include the header we can use Postman, Insomnia API tools. The easiest way to exercise this would be by installing the ModHeader extension for Google Chrome (https://chrome.google.com/webstore/detail/modheader/idgpnmonknjnojddfkpgkljpfnnfcklj?hl=en).
The below screenshot will demonstrate how the ModHeader extension would work in the browser.
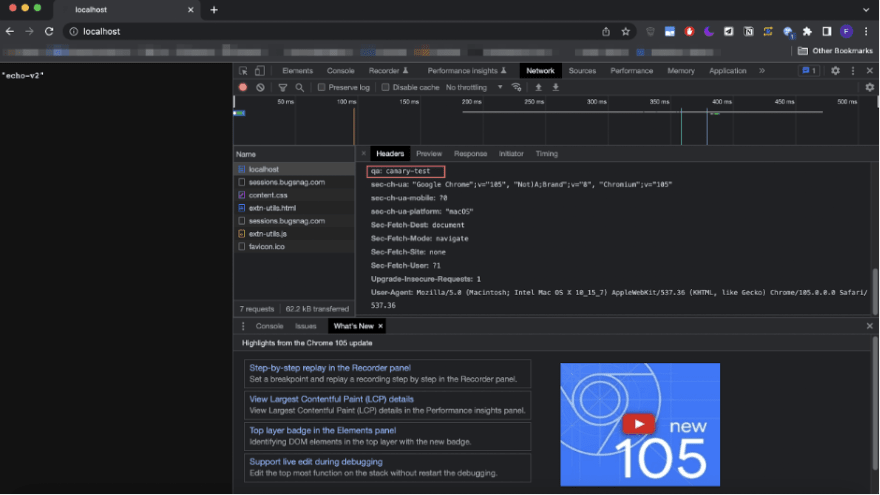
Once you include the necessary headers, you can visit “localhost:80”. As you can see, after including the headers the Istio virtual service rerouted our request to the “version-2” of our website.

The proof of the headers being sent out to the server:
For the purpose of this article, I used a simplified version of the website. It will just echo text based on the different versions of the website. You can find the full working deployment codes from following GitHub link (https://github.com/fir1/istio-ingress).
This setup can be used as a guide for Canary Deployment in different projects of yours. Good luck!


Top comments (1)
Very in-depth explanation of Istio and usage of it, thank you