
Hello to everyone,
In this article, I'm going to talk about the step-by-step implementation of a simple assistant application with Kotlin using the Dialogflow platform.
What is Dialogflow?
Google 2016 year-end (formerly Api.ai) company is a platform used to develop chatbots for multiple devices with AI side voice and speech interfaces.
Let's get to know the components to better understand Dialogflow.

Agent
It helps you process configured data to return the appropriate response to users' entries.
The Agent consists of 3 different components.
Training Phrases : Defines sample expressions that users say. Dialogflow uses these expressions and expands with similar expressions to create a matching model.
Action and Parameters : (We'll explain this item in the intent item.)
Responses
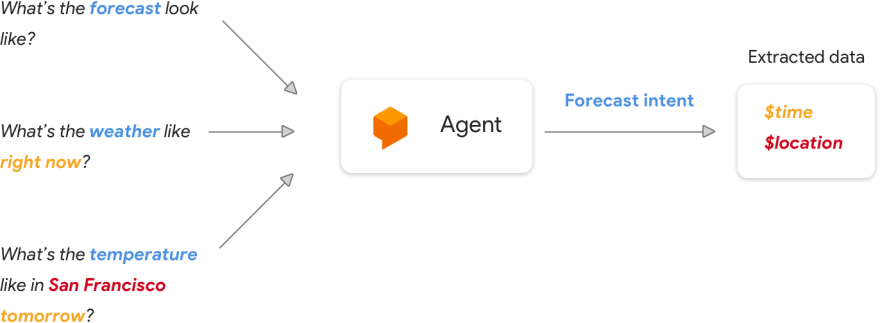
Intent
Intent represents the match that corresponds to what the user says. You can create different intentions according to our purposes.
To better explain; this is where we create different types of questions in this component and create answers to these questions.
Fulfillment
Fulfillment is the place where the necessary actions are taken to return the answer to the question we ask from any of our web services.

If we have some idea of the components, let's start the project step by step.
Development Stages
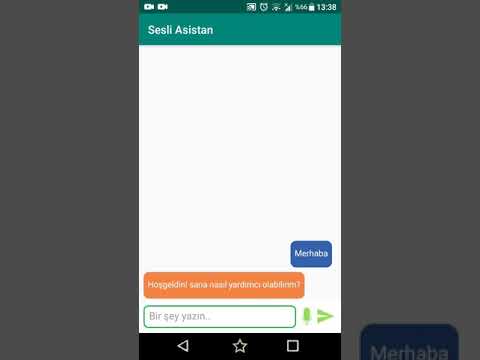
Scenario of the project we will develop:
User: Hello / Hey / Hi
Assistant: Welcome! how can I help you?
User: Who are you? / Can you explain yourself?
Assistant: Step assistant. I'm a week. Within Turkey you tell me the name of any city, it will also help you to learn about the weather :)
User: How is the weather in Bursa? How is Bursa? / Bursa - (to be mentioned in other provinces instead of Bursa.)
Assistant: In Bursa, the weather is 8 degrees partly cloudy.
Creating our new agent
First, we go to link to create our agent.

Create Intent
After creating an agent, we determine our scenario and determine what answers our assistant will answer.
We're creating Intent -> Create Intent and creating our new intention.
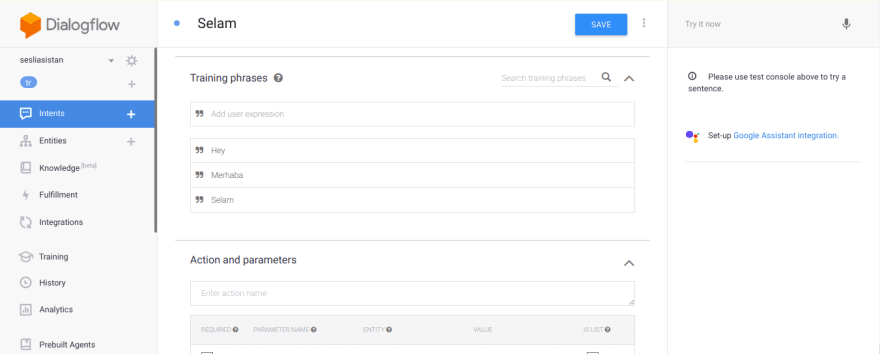

Then we identify and record the questions and answers. As you can see, I entered the questions that we would get the same answers and identified one answer.
Web service response to the answer to our question
This stage is optional. You can also create and use intentions without using a web service.
Select Fullfilment; We can ensure that the answers are received from the inline editor or from our webservice.
I've also used webhook and I've taken advantage of the current weather api for http://i.apixu.com. You can reach the codes from.

Then, with the intent we just created, we determine which questions will return data from the web service.
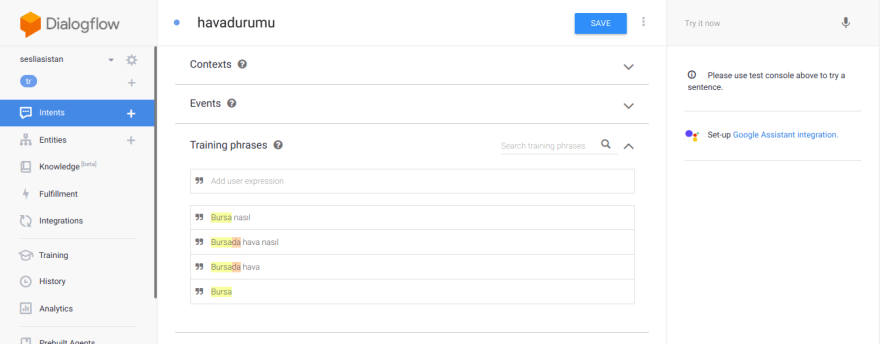
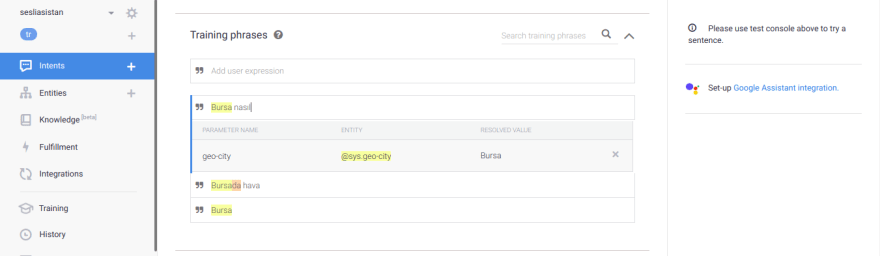
The important part here is; Bursa (variable) to make the selected part and make it a key. I've assigned geo-city. According to this key, I also do the necessary service. For more information about Webhook, please visit
Integration of Kotlin and Dialogflow platform
We follow app -> build.gradle and add dialogflow and java client v2 libraries.
    // DialogFlow SDK depencies <br>
    implementation 'ai.api:sdk:2.0.7@aar' <br>
    implementation 'ai.api:libai:1.6.12' <br>
    // Java v2 <br>
    implementation 'com.google.cloud:google-cloud-dialogflow:0.67.0-alpha' <br>
    implementation 'io.grpc:grpc-okhttp:1.15.1' <br>
Java Client v2 is the java client for dialogflow. (You can also use the v1 version, but v1 will be available on October 23, 2019.)
For us to use the Java Client library, we would like to create a json from the Google IAM console. To create this json,
First of all, we are entering the project that we created in IAM console.
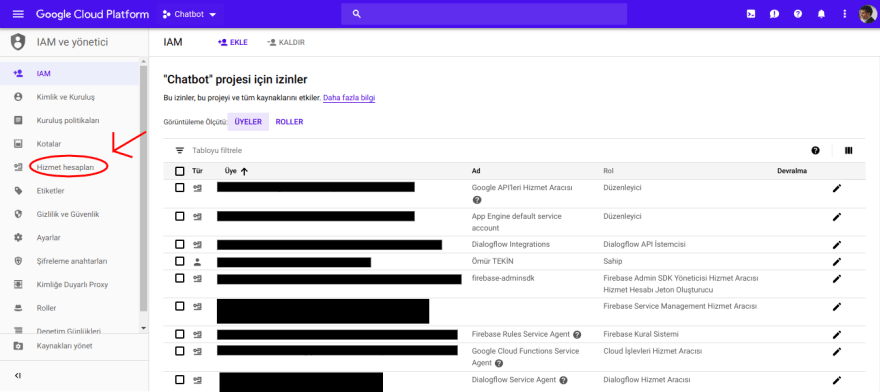

After clicking the edit first, we call it creating a new key.
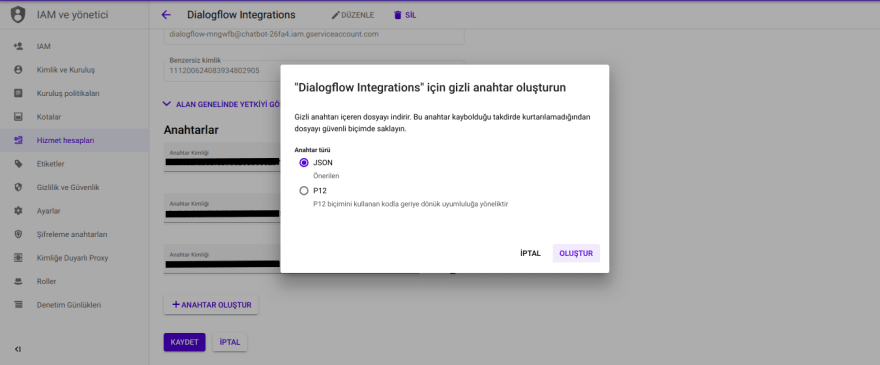
Json. It will automatically come down to our computer after creation. This file in our application to create a raw directory and put the .json file into raw.
      private fun initAsisstant() {
            try {
                val stream = resources.openRawResource(R.raw.asistan)
                val credentials = GoogleCredentials.fromStream(stream)
                val projectId = (credentials as ServiceAccountCredentials).projectId

                val settingsBuilder = SessionsSettings.newBuilder()
                val sessionsSettings =
                    settingsBuilder.setCredentialsProvider(FixedCredentialsProvider.create(credentials)).build()
                client = SessionsClient.create(sessionsSettings)
                session = SessionName.of(projectId, uuid)
            } catch (e: Exception) {
                e.printStackTrace()
            }

        }
By reading our json file created in our activity, we define our client.
We then create a class that will allow our message to communicate with Dialogflow.
class RequestTask : AsyncTask<Void, Void, DetectIntentResponse> {

    var activity: Activity? = null
    private var session: SessionName? = null
    private var sessionsClient: SessionsClient? = null
    private var queryInput: QueryInput? = null


    constructor(activity: Activity,session:SessionName,sessionsClient: SessionsClient,queryInput: QueryInput){
        this.activity=activity
        this.session=session
        this.queryInput=queryInput
        this.sessionsClient=sessionsClient
    }

    override fun doInBackground(vararg params: Void?): DetectIntentResponse? {
        try {
            val detectIntentRequest = DetectIntentRequest.newBuilder()
                .setSession(session.toString())
                .setQueryInput(queryInput)
                .build()
            return sessionsClient?.detectIntent(detectIntentRequest)
        } catch (e: Exception) {
            e.printStackTrace()
        }


        return null
    }

    override fun onPostExecute(result: DetectIntentResponse?) {
        (activity as MainActivity).onResult(result)
    }

}
The return message is in the Activity function on the On Result function.
Integrating TextToSpeech and SpeechToText
   private fun sendMicrophoneMessage(view:View){
           val intent: Intent = Intent(RecognizerIntent.ACTION_RECOGNIZE_SPEECH)
           intent.putExtra(
               RecognizerIntent.EXTRA_LANGUAGE_MODEL,
               RecognizerIntent.LANGUAGE_MODEL_FREE_FORM
           )
           intent.putExtra(RecognizerIntent.EXTRA_LANGUAGE, Locale.getDefault())
           intent.putExtra(
               RecognizerIntent.EXTRA_PROMPT,
               getString(R.string.speech_prompt)
           )
           try {
               startActivityForResult(intent, SPEECH_INPUT)
           } catch (a: ActivityNotFoundException) {
               Toast.makeText(
                   applicationContext,
                   getString(R.string.speech_not_supported),
                   Toast.LENGTH_SHORT
               ).show()
           }

       }
Speech to Text function.
    private fun sendMicrophoneMessage(view:View){
           val intent: Intent = Intent(RecognizerIntent.ACTION_RECOGNIZE_SPEECH)
           intent.putExtra(
               RecognizerIntent.EXTRA_LANGUAGE_MODEL,
               RecognizerIntent.LANGUAGE_MODEL_FREE_FORM
           )
           intent.putExtra(RecognizerIntent.EXTRA_LANGUAGE, Locale.getDefault())
           intent.putExtra(
               RecognizerIntent.EXTRA_PROMPT,
               getString(R.string.speech_prompt)
           )
           try {
               startActivityForResult(intent, SPEECH_INPUT)
           } catch (a: ActivityNotFoundException) {
               Toast.makeText(
                   applicationContext,
                   getString(R.string.speech_not_supported),
                   Toast.LENGTH_SHORT
               ).show()
           }

       }
Speech to Text function does not work long after it detects the text.
private fun initAsisstantVoice() {
asistan_voice= TextToSpeech(applicationContext,object : TextToSpeech.OnInitListener {
override fun onInit(status: Int) {
if (status!=TextToSpeech.ERROR){
asistan_voice?.language=Locale("tr")
}
}
})
}
Reading messages and adding layout
RequestTask class returned to the value of the return function of our activity onResult function. We add the response value in our onResult function to our layout.
If the user type is BOT, we have TextToSpeech done.
fun onResult(response: DetectIntentResponse?) {
try {
if (response != null) {
var botReply:String=""
if(response.queryResult.fulfillmentText==" ")
botReply= response.queryResult.fulfillmentMessagesList[0].text.textList[0].toString()
else
botReply= response.queryResult.fulfillmentText
appendText(botReply, BOT)
} else {
appendText(getString(R.string.anlasilmadi), BOT)
}
}catch (e:Exception){
appendText(getString(R.string.anlasilmadi), BOT)
}
}
    private fun appendText(message: String, type: Int) {

            val layout: FrameLayout

            when (type) {

                USER -> layout = appendUserText()

                BOT -> layout = appendBotText()

                else -> layout = appendBotText()

            }

            layout.isFocusableInTouchMode = true

            linear_chat.addView(layout)

            val tv = layout.findViewById<TextView>(R.id.chatMsg)

            tv.setText(message)

            Util.hideKeyboard(this)

            layout.requestFocus()

            edittext.requestFocus() // change focus back to edit text to continue typing

            if(type!= USER) asistan_voice?.speak(message,TextToSpeech.QUEUE_FLUSH,null)

        }
Application
Medium

Github

With Dialogflow, I tried to explain the voice assistant as much as I could. I hope I've been successful.
In the later stages of the project, I aim to make the Google Asisstant, Slack integrations more complicated. After completing these integrations to discuss with new articles.


Top comments (1)
Great example, exactly what i've been looking for.
Github link broken, could you share the new link.